


SR4-SB3+ User Manual
3
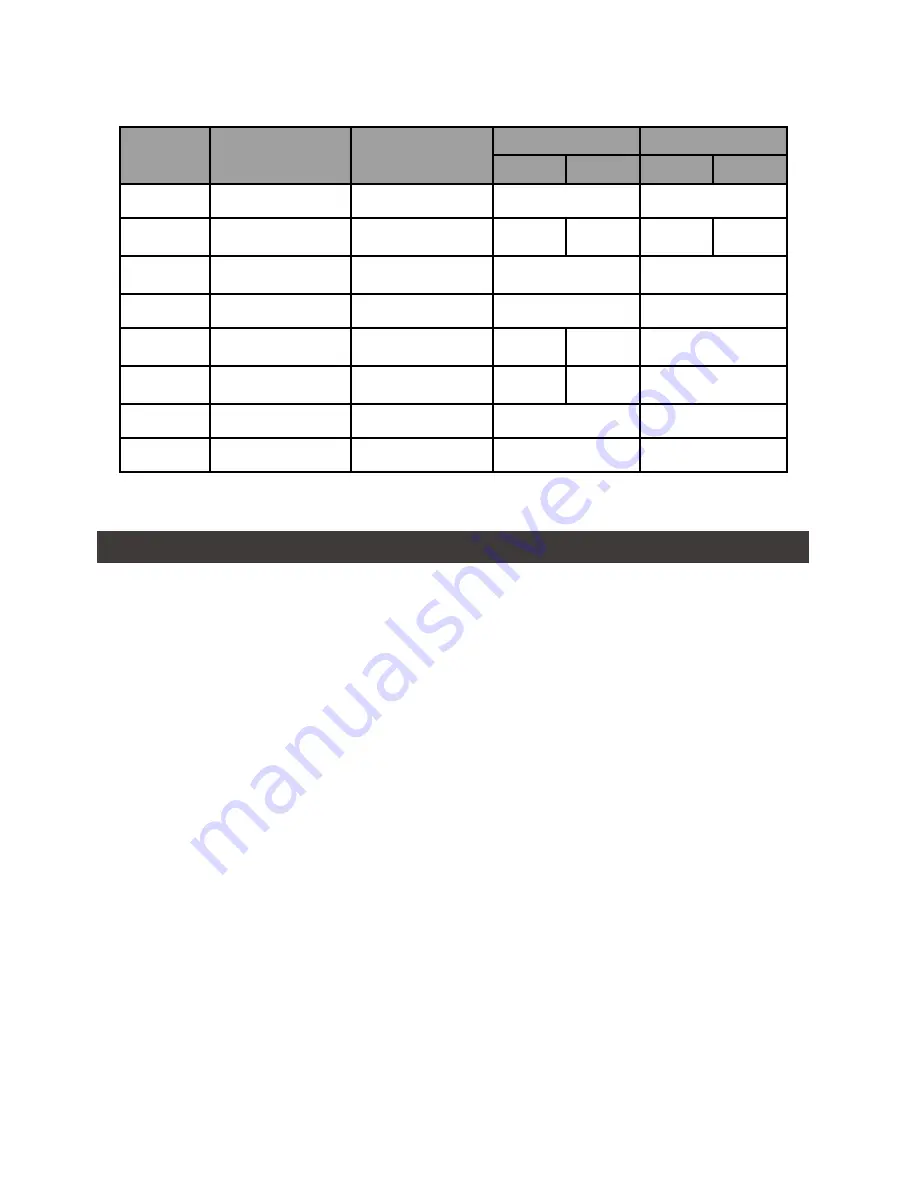
LED Indicators :
3. Hardware Requirements and Precautions
1. Only one interface connection may be used at once per computer system.
2. RAID volume formation utilizes the capacity of whichever hard drive has the smallest and then
multiply that capacity by three for RAID 5, four for RAID 0, to form a large volume, therefore,
it is recommended to only install hard drives of the same brand and specification for all drive
position prior to use. Moreover, when you need to replace with a new hard drive, please be sure
to purchase one with the same specification, capacity and brand. If these conditions can’t be met,
select one that’s at least 20 GB greater in capacity.
3. The actual storage capacity of SR4-SB3+ recognized by the system may differ from the total
capacity stated on the hard drives once the drives have been formatted.
4.
When connected to the computer system, it’s prohibited to remove, insert or swap the hard drive
while data transfer is being performed.
5.
It’s prohibited to change the positioning of the drives once the initial installation has been
completed as the changes made to the drive positions may destroy the RAID formation.
6. If you discover that hard drive failure is taking place, go to Section 6 “Replacement of
Malfunctioning Drive and Data Rebuild Instructions” and follow the steps accordingly.
7. Whenever turning off or unplugging the SR4-SB3+ from your computer system becomes
necessary, always remember to safely remove it from your operating system first.
8. In RAID 5 mode, the system allows one single hard drive failure. If multiple drive failures occur
at once, it’s likely that all data stored in the system have been destroyed or lost. In RAID 0
mode, if one hard drive failure occurs, then all data maybe destroyed or lost. If this happens, we
recommend you to consult with a professional hard drive data recovery specialist to see if your
data may be recoverable.
9. When the fan speed switch is set to "Auto", the fan will run at full speed to accelerate the heat
dissipation if the temperature inside the machine exceeds 50 (± 10%)°C.
Constant
Power LED
Larm LED
HDD LED
Buzzer
RAID
JBOD
RAID
JBOD
No HDD
Blue light always on
— —
— —
— —
HDD Failed Blue light always on
— —
Red light
always on
— —
YES
— —
Access
Blue light always on
— —
Blue light flashing
— —
Disk Idle
Blue light always on
— —
Blue light always on
— —
Rebuilding -
Source
Blue light always on
— —
Blue light
flashing
— —
— —
Rebuilding -
Target
Blue light always on
— —
Red light
flashing
— —
— —
Fan Failed
Blue light always on
Red light always on
Blue light always on
YES
Over Temp
Blue light always on
Red light always on
Blue light always on
YES
Содержание SOHORAID SR4-SB3PLUS
Страница 1: ...SOHORAID User Manual SR4 SB3...
Страница 10: ...SR4 SB3 User Manual 8 R 1 3 2 4 A B C D LCM E F G UP H DOWN I ENTER J ESC K L M USB3 0 N eSATA O P Q R...
Страница 12: ...SR4 SB3 User Manual 10 4 1 2 3 AC Power SR4 SB3 AC Power LCD LCD PC SR4 SB3 RAID RAID 4 5 6 7 8...
Страница 15: ...SR4 SB3 User Manual 13 http www stardom com tw...


