


96
WatchLock Cube User Guide
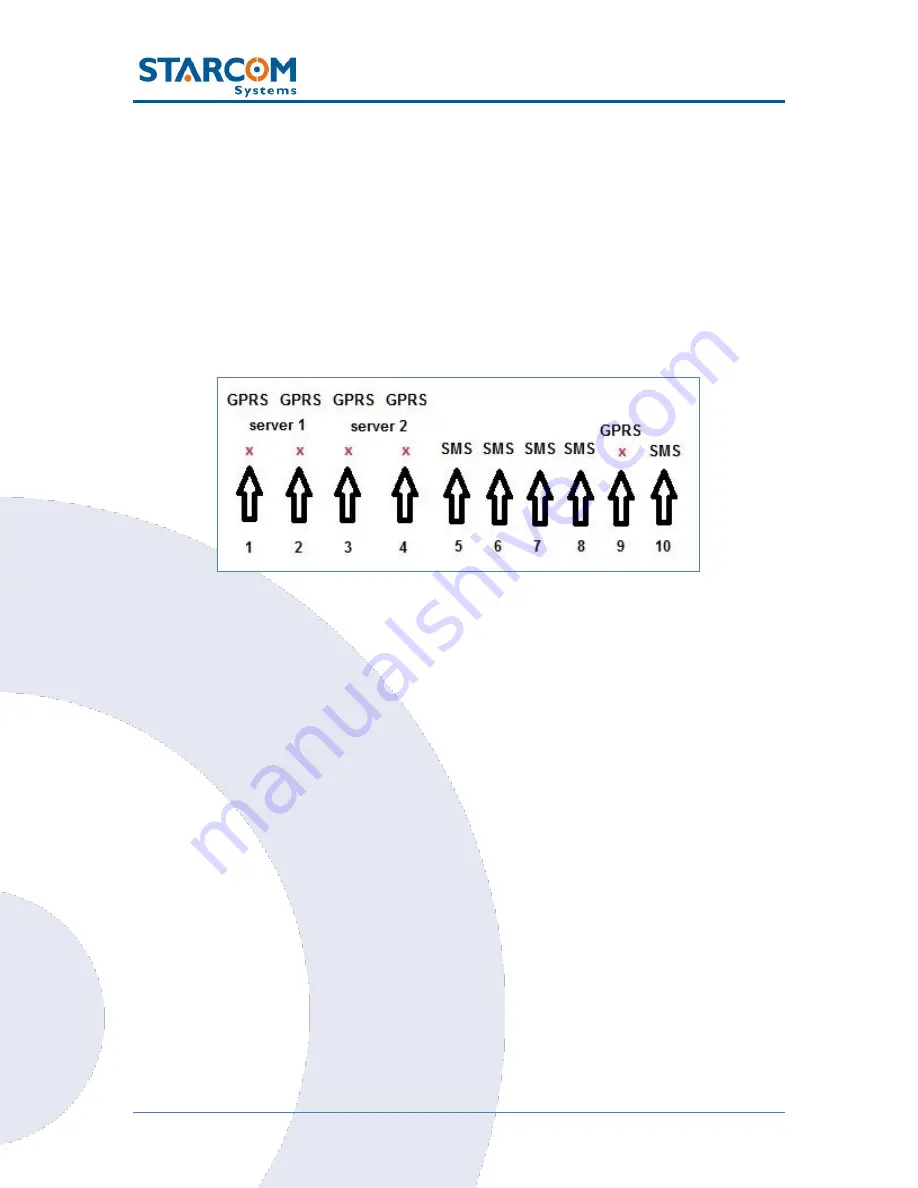
When the device
’s modem is turned on, it tries to connect to
the network and
transmit via GPRS (4 attempts: 2 on the first server and 2 on the second
server). If it fails to connect to the network, it will switch to the SMS channel
(if it is configured to transmit via SMS) after about 4 minutes, because it makes
four attempts to connect via GPRS. It will constantly try to transmit via SMS.
The next attempt to transmit via GPRS will be repeated in 5 minutes. Every 5
minutes, the device will attempt to connect to the network and transmit via
GPRS. This process is illustrated in the following figure.
The device saves all the information that could not be sent in its memory. Once
it is able to connect to the network again, it will transmit all the stored data.
The device sends encrypted data to the routing server. When the routing
receives it, it is decoded and encoded at the same time and sent to all the
recipients configured in the system.
The message size is 140 bytes (70 bytes data and 70 bytes header).
For more information, see
Routing
,
Control Center
and
SMS Notifications
guides.
Содержание WATCHLOCK CUBE
Страница 1: ...WATCHLOCK CUBE User Guide Version 1 0 ...
Страница 10: ...10 WatchLock Cube User Guide Click Run anyway The Select Destination Location window appears ...
Страница 11: ...11 WatchLock Cube User Guide Click Next The Select Components window appears ...
Страница 18: ...18 WatchLock Cube User Guide Disassembling the device Use the key to open the lock and remove the shackle ...
Страница 19: ...19 WatchLock Cube User Guide Remove the rubber cover from the device ...
Страница 20: ...20 WatchLock Cube User Guide Pull the plastic cover to remove it from the device ...
Страница 21: ...21 WatchLock Cube User Guide Use a cross head screwdriver to remove the two screws in the top cover ...
Страница 22: ...22 WatchLock Cube User Guide Remove the top cover Carefully pull and slide out the battery holder ...
Страница 23: ...23 WatchLock Cube User Guide ATTENTION Be careful when taking out the battery holder Do not tear the wires ...
Страница 30: ...30 WatchLock Cube User Guide ...
Страница 50: ...50 WatchLock Cube User Guide ...
Страница 51: ...51 WatchLock Cube User Guide Assembling the device Slide the top part onto the lower part of the device ...
Страница 53: ...53 WatchLock Cube User Guide Carefully slide the battery holder back in its place ...
Страница 56: ...56 WatchLock Cube User Guide Slide the plastic cover back onto the device ...
Страница 58: ...58 WatchLock Cube User Guide The device is now ready for installation ...
Страница 67: ...67 WatchLock Cube User Guide ...
Страница 88: ...88 WatchLock Cube User Guide ...


