background image

-7- 

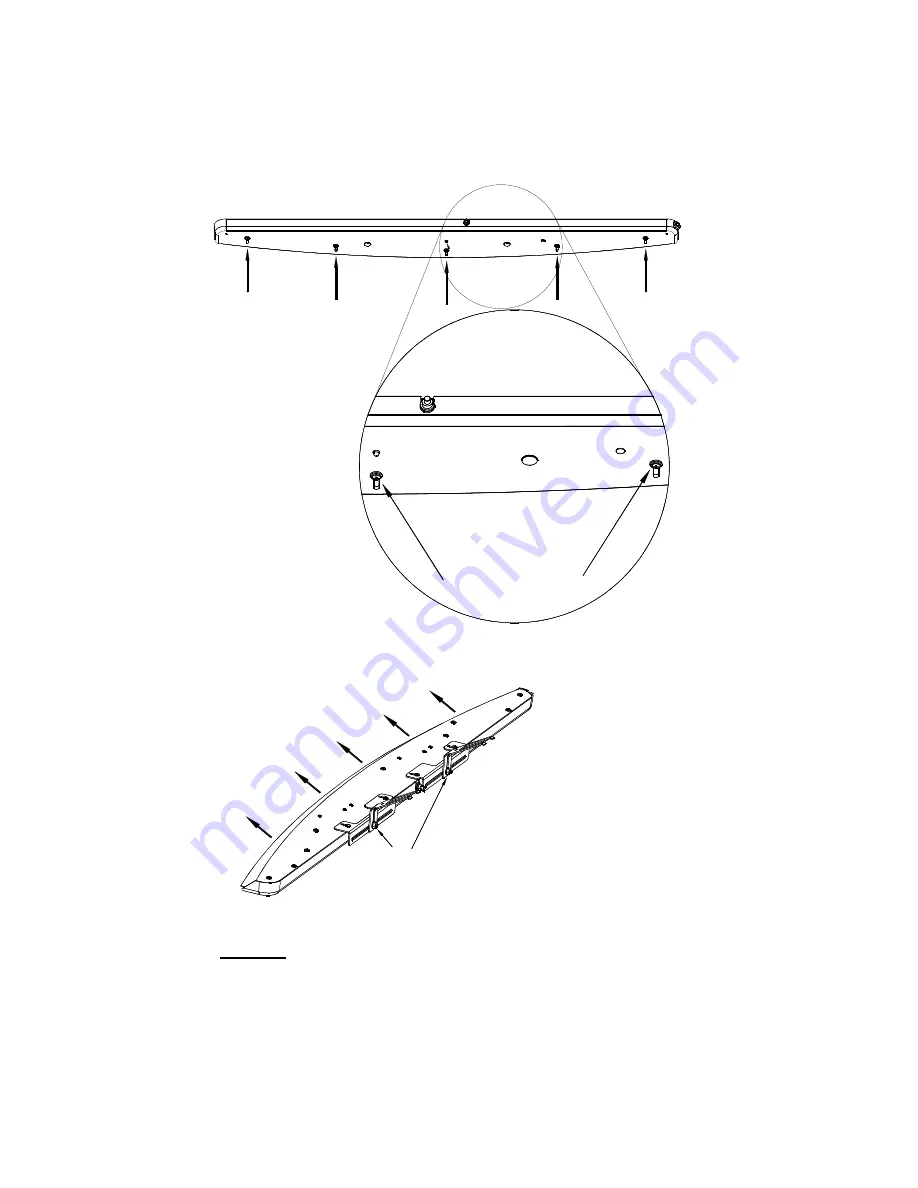
BAFFLE ADJUSTING SCREWS

(qty=5)

11. Loosen the five Baffle 

Adjusting Screws located 
on the bottom of the


Starburst Phantom

®

 
12. Slide the baffle 

forward until it 
satisfactorily blocks 
any reflected light. 

 
13  Tighten the Baffle 

Adjusting Screws to 
secure the baffle in 
place . 


CAUTION: 

Take extreme caution not to over tighten the screws!!!  Over 
tightening of the screws can strip the holes. 

14. Push the light tightly against the windshield and tighten both nuts securing the 

brackets to the light. 

Press light and baffle

tightly against window

Tighten the nuts securing 

the mounting brackets

Mounting (CONT'D) 

Содержание The Starburst ULB42-DLP

Страница 1: ...st Phantom Starburst Phantom IMPORTANT Please read all of the following instructions before installing your new warning light Undercover Interior LED Lightbar With Generation 4 LED Takedown and Direct...

Страница 2: ...1...

Страница 3: ...g and or wiring may be necessary and are the sole responsibility of the installer Star Headlight Lantern Co Inc assumes no responsibility for the integrity of the installation for this or any of its p...

Страница 4: ...n described Some applications may require you to design your own custom brackets The installer assumes all responsibility for the integrity of the installation It is the sole responsibility of the own...

Страница 5: ...DESCRIPTION 1 P30150 220LP LEFT ATTACHING BRACKET 1 P30150 220RP RIGHT ATTACHING BRACKET 2 P30150 79P FORKED L BRACKET Style 1 2 P30150 189P FORKED L BRACKET Style 2 2 P30054 27 10 32 x 1 2 CARRIAGE B...

Страница 6: ...center of the light 3 Remove two of the 8 x 1 2 self tapping Phillips pan head screws and use them to install the left attaching bracket on the light CAUTION Take extreme caution not to over tighten t...

Страница 7: ...isor clips enough that one of the forked brackets can easily slide under each of them 9 Slide one forked bracket under each visor clip and tighten the clip such that it securely holds each bracket in...

Страница 8: ...ght 13 Tighten the Baffle Adjusting Screws to secure the baffle in place CAUTION Take extreme caution not to over tighten the screws Over tightening of the screws can strip the holes 14 Push the light...

Страница 9: ...the headliner of the vehicle 3 Once you have located the roof brace pick an area to mount the brackets one on each side that is a minimum of 3 from the center of your window and a maximum of 8 4 You m...

Страница 10: ...Warning Lights Pursuit Lights Flashing DLP Takedown Lights Steady Burn DLP Orange w Red Flashing Warning Lights DLP Lights User Supplied Switches Warning Lights 10 AMP FUSE Wire Function Bare Ground B...

Страница 11: ...mmend that the red wire be routed through an ignition switched power source Orange w Red Switched 12 VDC WARNING When 12VDC is applied to the Orange w Red wire the Warning LEDs will activate displayin...

Страница 12: ...rning LEDs will flash according to the pattern you have selected See Pattern Select Burst Mode Button section on next page All LED Steady Burn Mode Green w Red The Warning LEDs will not flash but inst...

Страница 13: ...w Red wire activated If the Star Phantom is in the Steady Burn Mode the Pattern Select Burst Mode will burst your LEDs into a super bright high power mode takedowns This mode will activate for approxi...

Страница 14: ...lash Alt Flicker 29 Alt Pre Pops Alt Flicker Superfast Warn 30 Delta Omega All Double All Flicker 31 One Output Steady Other Output Singleflash 32 One Output Steady Other Output Short Long 33 Warn Med...

Страница 15: ...ot apply to any light which has been altered such that in the manufacturer s judgment the performance or reliability has been affected or if any damage has resulted from abnormal use or service There...

Страница 16: ......

Отзывы: