18
SERVICE
CLEANING AND INSPECTION
CLEANING
Clean all parts with a de-greasing solution. Blow dry with
compressed air or use lint-free cloths.
GEAR CHAMBER (MOTOR CAP)
The chamber bores and bottoms around the shaft bushings
should be polished and not rough or grooved. If the bushing
bores are yellow-bronze, replace them and investigate the
cause of wear.
The fl at surfaces around the chamber and bolt holes should
be fl at and free of nicks or burrs that could cause misalign-
ment or leaks.
BUSHINGS
The inside of the bushings should be gray with some
bronze showing through. If signifi cant yellow-bronze shows,
replace the bushings. Inspect the motor shaft and idler
shaft for corresponding wear and replace as required.
GEARS
The drive and idler gears should have straight tips without
nicks, square tooth ends and have a smooth even polish
on the teeth and end faces. Replace the gear if cracks are
present.
MAIN HOUSING ASSEMBLY
The surface near the gears should show two interconnect-
ing polished circles without a step.
SHAFTS
The shaft diameter at the bearing and seal locations must
be smooth. Grooves, roughness or a reduced diameter
indicate fl uid contamination or damaged bushings. Grit
particles may have been imbedded in the bushings, grind-
ing into the hardened shaft. If abnormal shaft wear as noted
above occurs (more than normal polishing), replace both
the shaft and associated bushings.
Also check the hydraulic system for excess contamination
in the fl uid and for fi lter condition. Operating conditions may
require changing from a 25-micron fi lter to an oversized
10-micron fi lter.
TOOL REASSEMBLY
1. Lubricate and install a new o-ring (4) and back-up ring
(39) into the main housing. Install the seal back-up washer
(44) and retaining ring (16).
2. Slide the reversing spool (68) into the main housing as-
sembly. Insert the spool with the slot toward the idler shaft
hole and the narrow side of the depression in the spool
facing up toward the top of the main housing.
3. Insert the idler shaft (47) to prevent the reversing spool
from turning.
4. Lubricate and install a new wiper seal (63), o-ring (10),
back-up ring (17) and o-ring (2) into each seal cap (64).
Install each seal cap onto the main housing assembly.
5. Install each end cap (65) and secure with snap ring (67).
6. Lubricate seal area of main shaft (50) and install it into
the main housing. Install the idler gear (45) onto the idler
shaft.
7. Lubricate and install a new o-ring (9) onto the motor cap
(46). Lubricate capscrew threads (41) with an anti-seize
compound and install the motor cap with the capscrews
and lockwashers (3). Tighten bolts to 15-17 ft lbs / 20-23
Nm in a cross pattern.
Do not force parts together.
8. Lubricate and install a new o-ring (19) in the main hous-
ing and a new seal wiper (61) in the trigger mount (78).
Secure the trigger (77) to trigger mount with roll pin (21).
Install trigger assembly to main housing with capscrews (8)
and lockwashers (32).
9. Lubricate and install a new o-ring (18) on the valve
spool (59) before installing valve spool into the main hous-
ing from the spring cap end. Do not install the vavle spool
from the trigger side of the main housing as this will result
in spool seal damage. Ensure that the tab on the valve
spool nose is aligned with the slot in the trigger. Install
spring (79) behind valve spool. Using Loctite™ 242, install
the spring cap (66) to the main housing.
CAUTION
Содержание DL07
Страница 2: ......
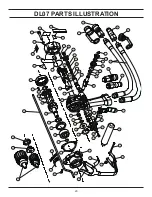
Страница 20: ...20 DL07 PARTS ILLUSTRATION ...

