background image

GX1300E

Page 8

5  GETTING STARTED

5.1  ABOUT VHF RADIO

The  radio  frequencies  used  in  the  VHF  marine  band  lie  between  156  and 

158 MHz with some shore stations available between 161 and 163 MHz. The 

marine VHF band provides communications over distances that are essen-

tially “line of sight” (VHF signals do not travel well through objects such as 

buildings, hills or trees). Actual transmission range depends much more on 

antenna type, gain and height than on the power output of the transmitter. On 

a fixed mount 25 W radio transmission expected distances can be greater 

than 25 km, for a portable 5 W radio transmission the expected distance can 

be greater than 8 km in “line of sight”.

5.2  SELECTING AN ANTENNA

Marine antennas are made to radiate signals equally in all horizontal direc-

tions, but not straight up. The objective of a marine antenna is to enhance 

the signal toward the horizon. The degree to which this is accomplished is 

called the antenna’s gain. It is measured in decibels (dB) and is one of the 

major factors in choosing  an antenna.  In terms of effective radiated  power 

(ERP), antennas are rated on the basis of how much gain they have over 

a theoretical antenna with zero gain. A 1 m, 3 dB gain antenna represents 

twice as much gain over the imaginary antenna.
Typically a 1 m 3 dB gain stainless steel whip is used on a sailboat mast. 

The longer 2.5 m 6 dB fiberglass whip is primarily used on power boats that 

require the additional gain.

3dB

6dB

9dB

Содержание ECLIPSE GX1300E

Страница 1: ...splay 31 mm x 55 mm GPS position and time shown on a full dot matrix display DSC distress individual group all ships position request position report Polling Call and DSC test call Programmable scan priority scan and Multi Watch Dual Watch or Triple Watch NMEA in and output connections to a compatible GPS chart plotter All USA International and Canadian marine channels Preset Key used to recall up...

Страница 2: ... 6 6 CHANGING THE GPS TIME 18 6 7 CHANGING THE TIME LOCATION 19 6 8 CHANGING THE TIME FORMAT 20 7 CONTROLS AND INDICATORS 21 7 1 FRONT PANEL 21 7 2 REAR PANEL 23 7 3 MICROPHONE 24 8 BASIC OPERATION 25 8 1 RECEPTION 25 8 2 TRANSMISSION 25 8 3 TRANSMIT TIME OUT TIMER TOT 25 8 4 SIMPLEX DUPLEX CHANNEL USE 26 8 5 USA INTERNATIONAL AND CANADA MODE 26 8 6 SCANNING 27 8 6 1 Selecting the Scan Type 27 8 6...

Страница 3: ...up Call 60 9 6 4 Setting up the Group Call Ringer 61 9 7 POSITION REQUEST 62 9 7 1 Transmitting a Position Request to Another Vessel 62 9 7 2 Receiving a Position Request 65 9 7 3 Setting up the Position Request Ringer 66 9 8 POSITION REPORT 67 9 8 1 Transmitting a DSC Position Report Call 67 9 8 2 Receiving a DSC Position Report Call 69 9 8 3 Setting up a Position Report Ringer 70 9 9 MANUAL INPU...

Страница 4: ... 2 7 Sub Channel 94 10 3 DSC SETUP 95 10 3 1 Individual Directory 95 10 3 2 Individual Reply 95 10 3 3 Individual Acknowledgement 95 10 3 4 Individual Ringer 95 10 3 5 Group Directory 96 10 3 6 Auto Position Polling Call Type 96 10 3 7 Auto Position Polling Interval Time 96 10 3 8 Auto Channel Switching Time 97 10 3 9 DSC Beep 97 10 4 ATIS SETUP 98 10 4 1 ATIS Code Programming 98 10 4 2 ATIS Chann...

Страница 5: ...16 S key on the radio to select Channel 16 Press and hold the 16 S key on the radio to select the sub channel Press again to revert to the last selected channel Press the H L key to toggle the transmit power between High 25W and Low 1W To transmit place your mouth about 1 5 cm away from the MIC hole of the microphone and speak in a normal voice level while pressing the PTT switch Press the MENU ke...

Страница 6: ...d marine channels which are switchable for use with either International USA or Canadian regulations It has an emergency channel 16 which can be immediately selected from any channel by pressing the red 16 S key Other features of the transceiver include scanning priority scanning high and low voltage warning and GPS repeatability 2 PACKING LIST When the package containing the transceiver is first ...

Страница 7: ...s within 5 metres of the antenna nor operated at all if any person is touching the antenna non compliance with these recommen dations and transmitting for more than 50 of the total radio use time 50 duty cycle may cause RF complaince exposure requirements to be be exceeded In all cases any possible risk depends on the transmitter being activated for long periods actual recommendation limits are sp...

Страница 8: ...distance can be greater than 8 km in line of sight 5 2 SELECTING AN ANTENNA Marine antennas are made to radiate signals equally in all horizontal direc tions but not straight up The objective of a marine antenna is to enhance the signal toward the horizon The degree to which this is accomplished is called the antenna s gain It is measured in decibels dB and is one of the major factors in choosing ...

Страница 9: ...ice For runs over 6 m but less than 15 m the larger RG 8X or RG 213 U should be used For cable runs over 15 m RG 8X should be used For installation of the connector onto the coaxial cable refer to the figure below To get your coax cable through a fitting and into your boat s interior you may have to cut off the end plug and reattach it later You can do this if you follow the directions that are su...

Страница 10: ... other distinguishing marks The total transmission should not exceed 1 minute 9 End the message by saying OVER Release the microphone button and listen 10 If there is no answer repeat the above procedure If there is still no response try another channel NOTE 5 4 CALLING ANOTHER VESSEL CHANNEL 16 OR 9 Channel 16 may be used for initial contact hailing with another vessel However its most important ...

Страница 11: ...T switch When all communication with the other vessel is completed end the last transmission by stating your Call Sign and the word out Note that it is not necessary to state your Call Sign with each transmission only at the beginning and end of the contact Remember to return to Channel 16 when not using another channel Some radios automatically monitor Channel 16 even when set to other channels o...

Страница 12: ...he compass or that the radios performance is not affected by the antenna location temporarily connect the radio in the desired location and a Examine the compass to see if the radio causes any deviation b Connect the antenna and key the radio Check to ensure the radio is operating correctly by requesting a radio check 6 2 MOUNTING THE RADIO 6 2 1 Supplied Mounting Bracket The supplied mounting bra...

Страница 13: ...eiver at least 14 cm deep There should be at least 1 3 cm between the transceiver s heat sink and any wiring cables or structures 3 Cut out the rectangular hole and insert the transceiver 4 Fasten the brackets to the sides of the transceiver with the lock washer nut combination so that the mounting screw base faces the mounting surface 5 Turn the adjusting screw to adjust the tension so that the t...

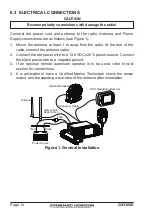
Страница 14: ... 20 power source Connect the black power wire to a negative ground 3 If an optional remote extension speaker is to be used refer to next section for connections 4 It is advisable to have a Certified Marine Technician check the power output and the standing wave ratio of the antenna after installation Figure 1 General Installation Reverse polarity connections will damage the radio GPSChart 150 GPS ...

Страница 15: ...plastic tape around the ferrite core toprevent vibration from causing the two halves to split apart Fuse Replacement To take out the fuse from the fuse holder hold both ends of the fuse holder and pull the fuse holder apart do not bend the fuse holder When you replace the fuse please confirm that the fuse is tightly fixed on the metal contact located inside the fuse Holder If the metal contact hol...

Страница 16: ...ingle NMEA signal ground wire and leave the NMEA output open In case the assignment of power supply and ground of a GPS chart plotter to be used is different from that of the radio connect the signal ground wire of the GPS chart plotter to the ground terminal GND on the rear panel of the radio The GPS must have the NMEA Output turned on and set to 4800 Baud in the SETUP menu If there is a selectio...

Страница 17: ... 23 56 890N 09 56 01 12 13 15 21 22 25 28 31 32 AS NOTE 1 Turn the transceiver on BACK SELECT 2 Press the MENU key to display the menu 3 Select GPS with the key then press the SELECT soft key The GPS STATUS screen will appear 4 Press the CLR key to return to radio operation If there is a problem with the NMEA input from a GPS the satellite icon will blink continuously until the connection is corre...

Страница 18: ...FIGURATION CONTRAST KEY BEEP LOCATION FORMT TIME OFFSET BACK ENTER TIME OFFSET 00 00 00 30 01 00 01 30 2 Select SETUP with the keys then press the SELECT soft key 3 Select CONFIGURATION with the keys then press the SELECT soft key 4 Select TIME OFFSET with the keys then press the SELECT soft key 5 Press the keys to select time offset from UTC See illustration below to find your offset time from UT...

Страница 19: ...OF MEASURE SOFT KEY BACK ENTER TIME AREA UTC LOCAL 2 Select SETUP with the keys then press the SELECT soft key 3 Select CONFIGURATION with the keys then press the SELECT soft key 4 Select TIME AREA with the keys then press the SELECT soft key 5 Press the to select UTC or LOCAL 6 Press the ENTER soft key to store the selected setting 7 Press the BACK soft key to exit the menu UTC mode BUSY MEM UTC ...

Страница 20: ...K SELECT CONFIGURATION TIME AREA TIME FORMAT UNIT OF MEASURE SOFT KEY BACK ENTER TIME FORMAT 24 HOURS 12 HOURS 2 Select SETUP with the keys then press the SELECT soft key 3 Select CONFIGURATION with the keys then press the SELECT soft key 4 Select TIME FORMAT with the keys then press the SELECT soft key 5 Press the to select 12 HOURS or 24 HOURS 6 Press the ENTER soft key to store the select ed se...

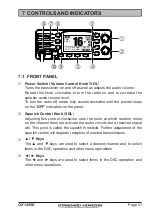
Страница 21: ...lockwise until the pointer stops on the OFF indication on the panel Squelch Control Knob SQL Adjusting this control clockwise sets the point at which random noise on the channel does not activate the audio circuits but a received signal will This point is called the squelch threshold Further adjustment of the squelch control will degrade reception of wanted transmissions Keys The and keys are used...

Страница 22: ... to HI power until the PTT is released The H L key does not function on transmit inhibited and low power only channels CLR Key Immediately recalls the previous selected working channel during the DSC operation and other menu operations 16 S Key Immediately recalls channel 16 from any channel location and automati cally selects high power Pressing and holding this key recalls sub channel Pressing t...

Страница 23: ...fety and optimum perfor mance Normally the GND connection to the heat sink is not needed However when the DC power cable connection to the radio has a long run the transmitter may become unstable and the receiving audio may be noisy In such a case connect a large diameter short cable between this termi nal on the heat sink and battery ground Install only the supplied screw or similar size M3x6 Sta...

Страница 24: ... the transmitter when the transceiver is in radio mode MIC Microphone Hole Transmits the voice message with reduction of background noise using Clear Voice Noise Reduction Technology NOTE Be sure your mouth is about 1 3 cm from the MIC hole for best performance ...

Страница 25: ...ating that the channel is being used 8 2 TRANSMISSION 1 Perform steps 1 through 6 of RECEPTION 2 Before transmitting monitor the channel to ensure it is clear 3 Press and hold the PTT push to talk switch of the microphone The TX indicator appears on the LCD 4 Speak slowly and clearly into the microphone 5 When the transmission is finished release the PTT switch 8 3 TRANSMIT TIME OUT TIMER TOT When...

Страница 26: ...TL CAN 2 Select SETUP with the keys then press the SELECT soft key 3 Press the key to select CHANNEL SETUP then press the SELECT soft key 4 Press the key to select CHANNEL GROUP then press the SELECT soft key 5 Press the key to select desired channel group USA INTL or CAN 6 Press the ENTER soft key to store the select ed setting 7 Press the BACK soft key to exit the menu All channels are factory p...

Страница 27: ...EL SETUP SCAN TYPE SCAN RESUME PRIORITY CH SUB CH BACK ENTER SCAN TYPE PRIORITY SCAN MEMORY SCAN 2 Select SETUP with the keys then press the SELECT soft key 3 Press the key to select CHANNEL SETUP then press the SELECT soft key 4 Select SCAN TYPE with the keys then press the SELECT soft key 5 Press the keys to select PRIORITY SCAN or MEMORY SCAN 6 Press the ENTER soft key to store the selected set...

Страница 28: ...peat step 5 for all the desired channels to be scanned 7 To delete a channel from the list select the channel then press the MEM soft key again The MEM disappears from the display 8 Press the BACK soft key to exit the menu NOTE 8 6 3 Memory Scanning M SCAN 1 Adjust the SQL knob until background noise disappears 2 Select MEMORY SCAN as scan type via the SETUP menu 3 Press one of the soft keys then ...

Страница 29: ...select the priority channel 6 Press the ENTER soft key to store the selected setting 7 Press the BACK soft key to exit the menu NOTE 8 6 5 Priority Scanning P SCAN 1 Adjust the SQL knob until background noise disappears 2 Select PRIORITY SCAN as scan type via the SETUP menu 3 Press one of the soft keys then press the SCAN soft key it may be necessary to press the key to locate the SCAN soft key P ...

Страница 30: ...dio stops and listens to the priority channel until communication ends and then starts dual or triple watch scan again 8 7 1 Setting up the Multi Watch Operation 1 Press the MENU key to display the menu BACK SELECT BACK SELECT SETUP DSC SETUP CHANNEL SETUP ATIS SETUP CONFIGURATION BACK SELECT CHANNEL SETUP CHANNEL GROUP MULTI WATCH SCAN MEMORY SCAN TYPE BACK ENTER MULTI WATCH DUAL TRIPLE 2 Select ...

Страница 31: ...appears on the LCD The radio will scan between the priority channel and the channel that was selected in step 2 If a transmission is received on the channel selected in step 2 the GX1300E will dual watch to the priority channel BUSY MEM A C P SET INTL 25W DW 16 88 4 To stop dual watch press one of the soft keys then press the DW soft key again When selecting TRIPLE in the SETUP menu TW will be dis...

Страница 32: ...EM A C P SET INTL 25W 88 2 Press one of the soft keys then press and hold the PRESET soft key until the channel number blinks 3 Press the ADD soft key to program the channel into the preset channel The P SET icon appears on the LCD 4 Repeat steps 1 through 3 to program the desired channels into the preset channel bank NOTE 8 8 2 Operation 1 Press one of the soft keys then press the PRESET soft key...

Страница 33: ...SY MEM A C INTL 25W 88 2 Press the key to select the preset channel to be deleted 3 Press one of the soft keys then press and hold the PRESET soft key until the channel number blinks 4 Press the DELETE soft key to delete the channel from the preset channel bank The P SET icon disappears on the LCD 5 Repeat steps 2 through 4 to delete the desired channels from the preset channel bank ...

Страница 34: ...g and Auto Position Polling This menu also provides convenient functions for DSC as below Sets the nature of Distress Call DIST ALERT MSG Browses information of received DSC calls DSC LOG Transmits a test call DSC TEST GPS You can check the signal strength of captured GPS satellites MMSI POS INFO Via this menu input your MMSI Maritime Mobile Service Identity before you use DSC SETUP This menu allo...

Страница 35: ...receive Distress Urgency Safety Routine Position Request Position Send and Group calls to or from another vessel equipped with a DSC trans ceiver 9 2 MARITIME MOBILE SERVICE IDENTITY MMSI 9 2 1 What is an MMSI An MMSI is a nine digit number used on Marine radios capable of using Digital Selective Calling DSC This number is used like a telephone number to selectively call other vessels THIS NUMBER ...

Страница 36: ...MSI number press the key until the wrong number is highlighted then press the key to correct the entry and press the SELECT soft key 7 When finished programming the MMSI number press the FINISH soft key The radio will ask you to input the MMSI number again Use steps 4 through 6 above 8 After the second number has been input press the FINISH soft key to store the MMSI 9 Press the OK soft key to ret...

Страница 37: ...nt down 3sec 2sec 1sec and then the distress alert will be transmitted The backlight of the LCD and keypad flashes while the radios display is counting down QUIT DISTRESS UNDESIGNATED DISTRESS Hold for 3 sec DISTRESS UNDESIGNATED Transmitting DISTRESS UNDESIGNATED Waiting for ACK TX IN 02 25 PAUSE INFO CANCEL 2 The GX1300E watches for an acknowledg ment call on channel 70 or a voice call on channe...

Страница 38: ...alert is repeated at approximately 4 minute intervals until a DSC acknowledgment is received NOTE Transmitting a DSC Distress Alert with Nature of Distress The GX1300E is capable of transmitting a DSC distress alert with the follow ing Nature of Distress categories Undesignated Fire Flooding Collision Grounding Capsizing Sinking Adrift Abandoning Piracy MOB 1 Press the MENU key to display the menu...

Страница 39: ...CALL INDIVIDUAL GROUP ALL SHIPS DIST ALERT MSG 2 Press the keys to select DSC then press the SELECT soft key 3 Press the keys to select DIST ALT MSG and then press the SELECT soft key To cancel press the BACK soft key 4 Press the POS TM soft key BACK POS TM DIST ALERT MSG UNDESIGNATED POS TIME UTC NATURE POS AND TIME 23 56 890N 123 56 890W POS TIME 12 56UTC BACK SELECT FINISH 5 Enter the latitude ...

Страница 40: ...s is the time when the radio will re transmit the distress call DISTRESS UNDESIGNATED Waiting for ACK TX IN 02 25 PAUSE INFO CANCEL DISTRESS UNDESIGNATED Retransmission is now pausing TX IN 02 25 RESUME INFO CANCEL 2 To suspend re transmitting the distress call press the PAUSE soft key 3 To resume counting down to transmit the distress call press the RESUME soft key Canceling a DSC Distress Alert ...

Страница 41: ...nd the acknowledgement Press the RESUME soft key to resume the acknowledgement 5 If you want the radio to stay on the channel you were on before receiv ing the distress call press the QUIT soft key 6 After accepting the distress call press the INFO soft key to show information of the vessel in distress RX DISTRESS YAESU UNDESIGNATED NOT ACKNOWLEDGED SINCE 00 05 INFO QUIT INFO DIST INFO DIST 366901...

Страница 42: ...s the same as saying Securite Securite Securite 9 4 1 Transmitting an All Ships Call 1 Press the MENU key to display the menu BACK SELECT BACK SELECT DSC CALL INDIVIDUAL GROUP ALL SHIPS DIST ALERT MSG 2 Press the keys to select DSC then press the SELECT soft key 3 Press the keys to select ALL SHIPS and then press the SELECT soft key To cancel press the BACK soft key 4 Press the keys to select the ...

Страница 43: ...nnel press the ACCEPT soft key If a key is not pressed for thirty seconds by default refer to the section 10 3 8 Auto Channel Switching Time after an all ships call is received the GX1300E will automati cally switch to the requested channel for you to monitor communications RX ALL SHIPS YAESU CATEG SAFETY CH 08 SINCE 00 05 ACCEPT QUIT PAUSE BUSY MEM A C INTL 25W 08 ALL SHIPS PAUSE QUIT RESUME 4 Pr...

Страница 44: ...ess the BACK soft key 4 Select DSC BEEP with the keys then press the SELECT soft key BACK SELECT DSC SETUP AUTO POS POLL AUTO POS TIME CH SWITCH TIMER DSC BEEP 5 Select ALL SHIPS with the keys then press the SELECT soft key BACK SELECT DSC BEEP INDIVIDUAL GROUP ALL SHIPS POS REQUEST ON ON ON OFF 6 Press the keys to select OFF then press the ENTER soft key BACK ENTER ALL SHIPS OFF ON 7 Press the 16...

Страница 45: ...GX1300E can store up to 60 individual MMSI numbers with vessel s or person s names To transmit an Individual call you must program this directory with the infor mation of the persons you wish to call similar to a cellular phones directory 1 Press the MENU key to display the menu BACK SELECT BACK SELECT SETUP DSC SETUPGROUP CHANNEL SETUP ATIS SETUP CONFIGURATION 2 Press the keys to select SETUP the...

Страница 46: ...e previous screen ADD NAME YAESU MMSI BACK SELECT FINISH BACK SELECT FINISH ADD MMSI 3 11 Select MMSI with the keys then press the SELECT soft key 12 Press the keys to scroll through numbers 0 to 9 13 Press the SELECT soft key to store the number and step to the next digit to the right 14 Repeat steps 12 and 13 until the MMSI is complete If a mistake was made entering in the MMSI number press the ...

Страница 47: ...to display the menu BACK SELECT BACK SELECT SETUP DSC SETUPGROUP CHANNEL SETUP ATIS SETUP CONFIGURATION 2 Press the keys to select SETUP then press the SELECT soft key 3 Press the keys to select DSC SETUP then press the SELECT soft key To cancel press the BACK soft key 4 Press the keys to select INDIVIDUAL REPLY then press the SELECT soft key BACK SELECT DSC SETUP INDIVIDUAL DIR INDIVIDUAL REPLY I...

Страница 48: ...ONFIGURATION 2 Press the keys to select SETUP then press the SELECT soft key 3 Press the keys to select DSC SETUP then press the SELECT soft key To cancel press the BACK soft key 4 Press the keys to select INDIVIDUAL ACK then press the SELECT soft key BACK SELECT DSC SETUP INDIVIDUAL DIR INDIVIDUAL REPLY INDIVIDUAL ACK INDIVIDUAL RING 5 Press the keys to select ABLE or UNABLE then press the ENTER ...

Страница 49: ...UAL HISTORY MEMORY NEW ID 5 Press the keys to select an individual you want to contact then press the SELECT soft key BACK SELECT MEMORY YAESU USCG MEMORY SHIPS HORIZON 6 Press the keys to select the operat ing channel you want to communicate on and press the SELECT soft key Press the MANUAL soft key to select channels other than the Intership channel BACK SELECT INTERSHIP CH CH 06 CH 08 CH 09 CH ...

Страница 50: ...key To cancel press the BACK soft key 4 Press the keys to select NEW ID then press the SELECT soft key BACK SELECT INDIVIDUAL HISTORY MEMORY NEW ID 5 Press the keys to scroll through numbers 0 to 9 BACK SELECT FINISH NEW ID MMSI 3 6 Press the SELECT soft key to store the number and step to the next digit to the right 7 Repeat steps 5 and 6 until the MMSI is complete If a mistake was made entering ...

Страница 51: ...ust be sent back to the calling station The GX1300E in the default setting will automatically respond to the calling station and switch to the requested channel for voice communications Refer to the section 9 5 2 Setting up Individual Call Reply if you want to change the setting to see who is calling before replying to the call Automatic reply 1 When an individual call is received a ringing alarm ...

Страница 52: ...DIVIDUAL YAESU CATEG ROUTINE CH 08 SINCE 00 08 ABLE QUIT UNABLE 6 Press the YES soft key to send an acknowl edgement Press the CHG CH soft key to change the channel for communication from the requested one RX INDIVIDUAL YAESU CH 08 ABLE TO COMPLY Transmit a Call YES NO CNG CH RX INDIVIDUAL YAESU CH 08 SINCE 00 05 Connected RESEND QUIT 7 After sending the acknowledgement the GX1300E switches to the...

Страница 53: ...ON 2 Press the keys to select SETUP then press the SELECT soft key 3 Press the keys to select DSC SETUP then press the SELECT soft key To cancel press the BACK soft key 4 Select INDIVIDUAL RING with the keys then press the SELECT soft key BACK SELECT DSC SETUP INDIVIDUAL DIR INDIVIDUAL REPLY INDIVIDUAL ACK INDIVIDUAL RING 5 Press the keys to select ringing time of an individual call then press the...

Страница 54: ...4 Select DSC BEEP with the keys then press the SELECT soft key BACK SELECT DSC SETUP AUTO POS POLL AUTO POS TIME CH SWITCH TIMER DSC BEEP 5 Select INDIVIDUAL with the keys then press the SELECT soft key BACK SELECT DSC BEEP INDIVIDUAL GROUP ALL SHIPS POS REQUEST ON ON ON OFF 6 Press the keys to select OFF then press the ENTER soft key BACK ENTER INDIVIDUAL OFF ON 7 Press the 16 S key or press the ...

Страница 55: ...te the country the ship registered for a MMSI The last 6 digits are specific to the ships ID Ship MMSI Example If your MMSI is 366123456 366 is MID which denote the country and 123456 is the ships ID for you Group MMSI Group MMSI numbers are not assigned by the FCC or other organiza tions licensed to assign ship MMSI numbers The first digit of a group MMSI is always set to 0 by the international r...

Страница 56: ...ELETE 6 Select NAME with the keys then press the SELECT soft key BACK SELECT ADD NAME GROUP MMSI 0 7 Press the keys to scroll through the first letter of the group name you want to reference in the directory BACK SELECT FINISH ADD NAME Y 8 Press the SELECT soft key to store the first letter in the name and step to the next letter to the right 9 Repeat steps 7 and 8 until the name is complete Press...

Страница 57: ...the entry 15 After the ninth number has been entered press the FINISH soft key to return to the previous screen ADD NAME YAESU GP GROUP MMSI 036690155 BACK SELECT FINISH 16 Press the FINISH soft key to save the entered data 17 To enter another group entry repeat steps 5 through 16 18 Press the 16 S key or press the BACK soft key to return to radio opera tion mode 9 6 2 Transmitting a Group Call Gr...

Страница 58: ...AESU GP CATEG ROUTINE CH 08 Transmit a Call YES NO 8 After the group call is transmitted the trans ceiver will switch to the channel selected in step 6 above without changing the display To change the display press the QUIT soft key GROUP YAESU GP CH 08 SINCE 00 05 Transmitted QUIT 9 Listen to the channel to make sure it is not busy then key the micro phone and call the other vessels you desire to...

Страница 59: ...ess the FINISH soft key 9 Press the keys to select the operat ing channel you want to communicate on and press the SELECT soft key Press the MANUAL soft key to select channels other than the Intership channel BACK SELECT INTERSHIP CH CH 06 CH 08 CH 09 CH 10 MANUAL To select INTERSHIP CH again press the INTSHP soft key 10 Press the YES soft key to transmit the group call signal GROUP 036690155 CATE...

Страница 60: ...8QUIT RESUME 5 If you want the radio to stay on the channel you were on before receiv ing the group call press the QUIT soft key 6 Press the keys to scroll the screen and see the MMSI or name of the calling vessel category of the call and requested operating channel RX GROUP YAESU CATEG ROUTINE CH 08 SINCE 00 08 ABLE QUIT UNABLE 7 Press the QUIT soft key to display the operat ing channel number of...

Страница 61: ...ess the BACK soft key 4 Select DSC BEEP with the keys then press the SELECT soft key BACK SELECT DSC SETUP AUTO POS POLL AUTO POS TIME CH SWITCH TIMER DSC BEEP 5 Select GROUP with the keys then press the SELECT soft key BACK SELECT DSC BEEP INDIVIDUAL GROUP ALL SHIPS POS REQUEST ON ON ON OFF 6 Press the keys to select OFF then press the ENTER soft key BACK ENTER GROUP OFF ON 7 Press the 16 S key o...

Страница 62: ...el Position Request from Individual Position Call Directory 1 Press the MENU key to display the menu BACK SELECT BACK SELECT DSC CALL GROUP ALL SHIPS DIST ALERT MSG POS REQUEST 2 Press the keys to select DSC then press the SELECT soft key 3 Press the keys to select P O S REQUEST and then press the SELECT soft key To cancel press the BACK soft key 4 Press the keys to select HISTORY or MEMORY then p...

Страница 63: ...e polled vessel is sent to a GPS chart plotter via NMEA 0183 DSC BEEP needs to be enabled to hear alarm Press any key to stop the alarm 9 Press the INFO soft key to show the position data transferred from the polled vessel on the display RX POS REPLY YAESU POS ACKNOWLEDGED SINCE 00 05 QUIT INFO 10 Press the keys to change the display to view the received data POS INFO POS 23 56 890N 123 56 890W TI...

Страница 64: ...ress the keys to scroll through numbers 0 to 9 BACK SELECT FINISH NEW ID MMSI 3 6 Press the SELECT soft key to store the number and step to the next digit to the right 7 Repeat steps 5 and 6 until the MMSI is complete If a mistake was made entering in the MMSI number press the keys repeatedly until the wrong number is highlighted then press the keys to correct the entry 8 After the ninth number ha...

Страница 65: ...POS INFO POS 23 56 890N 123 56 890W TIME 12 56 UTC RX POS REPLY BACK QUIT BACK RX POS REPLY QUIT 123 56 890W TIME 12 56 UTC DST 29 8NM BRG 270 T 14 To exit from position request display press the QUIT soft key NOTE 9 7 2 Receiving a Position Request When a position request call is received from another vessel a ringing alarm will sound and POS REQUEST will be shown in the LCD 1 When a position req...

Страница 66: ...ess the BACK soft key 4 Select DSC BEEP with the keys then press the SELECT soft key BACK SELECT DSC SETUP AUTO POS POLL AUTO POS TIME CH SWITCH TIMER DSC BEEP 5 Select POS REQUEST with the keys then press the SELECT soft key BACK SELECT DSC BEEP INDIVIDUAL GROUP ALL SHIPS POS REQUEST ON ON ON OFF 6 Press the keys to select OFF then press the ENTER soft key BACK ENTER POS REQUEST OFF ON 7 Press th...

Страница 67: ...REQUEST POS REPORT 2 Press the keys to select DSC then press the SELECT soft key 3 Press the keys to select POS REPORT and then press the SELECT soft key To cancel press the BACK soft key 4 Press the keys to select HISTORY or MEMORY then press the SELECT soft key BACK SELECT POS REPORT HISTORY MEMORY NEW ID 5 Press the keys to select an individual you want to contact then press the SELECT soft key...

Страница 68: ...5 Press the keys to scroll through numbers 0 to 9 BACK SELECT FINISH NEW ID MMSI 3 6 Press the SELECT soft key to store the number and step to the next digit to the right 7 Repeat steps 5 and 6 until the MMSI is complete If a mistake was made entering in the MMSI number press the keys repeatedly until the wrong number is highlighted then press the keys to correct the entry 8 After the ninth number...

Страница 69: ...entences DSC and DSE to a connected GPS chart plotter 2 Press any key on the radio to stop the alarm DSC BEEP needs to be enabled to hear alarm 3 Press the INFO soft key to show the position data transferred from the calling vessel RX POS REPORT YAESU POS 23 56 890N 123 56 890W SINCE 00 05 QUIT INFO 4 Press the keys to change the display to view the received data POS INFO POS 23 56 890N 123 56 890...

Страница 70: ...ancel press the BACK soft key 4 Select DSC BEEP with the keys then press the SELECT soft key BACK SELECT DSC SETUP AUTO POS POLL AUTO POS TIME CH SWITCH TIMER DSC BEEP 5 Select POS REPORT with the keys then press the SELECT soft key BACK SELECT DSC BEEP GROUP ALL SHIPS POS REQUEST POS REPORT ON ON OFF OFF 6 Press the keys to select OFF then press the ENTER soft key BACK ENTER POS REPORT OFF ON 7 P...

Страница 71: ...S INFO 3 Press the SELECT soft key To cancel press the BACK soft key 4 Press the POS TM soft key to display the position input screen 5 Press the key to select the first digit of your latitude then press the SELECT soft key to step to the next digit 6 Repeat step 5 to enter your latitude and longi tude 7 Enter UTC time in the 24 hour format with the same procedure in step 5 8 If a mistake was made...

Страница 72: ...K soft key 4 Select AUTO POS POLL with the keys then press the SELECT soft key BACK SELECT DSC SETUP AUTO POS POLL AUTO POS TIME CH SWITCH TIMER DSC BEEP 5 Press the keys to select POS REQUEST or POS REPORT then press the ENTER soft key BACK ENTER AUTO POS POLL POS REQUEST POS REPORT 6 Press the BACK soft key to return to DSC SETUP 9 10 2 Setting up the Polling Time Interval 1 Press the MENU key t...

Страница 73: ...to display the menu BACK SELECT BACK SELECT DSC CALL DIST ALERT MSG POS REQUEST POS REPORT AUTO POS POLLING 2 Press the keys to select DSC then press the SELECT soft key 3 Press the keys to select AUTO POS POLLING and then press the SELECT soft key To cancel press the BACK soft key 4 Press the keys to select SELECT ID then press the SELECT soft key BACK SELECT AUTO POS POLLING ACTIVATION START SEL...

Страница 74: ...ct AUTO POS POLLING and then press the SELECT soft key To cancel press the BACK soft key 4 Press the keys to select ACTIVATION START then press the SELECT soft key BACK SELECT AUTO POS POLLING ACTIVATION START SELECT ID 5 Press the keys to select START then press the SELECT soft key BACK SELECT ACTIVATION START START STOP 6 Press the 16 S key or press the BACK soft key to return to radio opera tio...

Страница 75: ...hen press the SELECT soft key BACK SELECT TEST CALL MEMORY NEW ID 5 Press the keys to select an individual you want to contact then press the SELECT soft key BACK SELECT MEMORY YAESU USCG MEMORY SHIPS HORIZON 6 Press the YES soft key to transmit the test signal TEST CALL YAESU CATEG SAFETY Transmit a Call YES NO 7 After the DSC test call is transmitted the GX1300E waits for a reply from the radio ...

Страница 76: ...and 6 until the MMSI is complete If a mistake was made entering in the MMSI number press the keys repeatedly until the wrong number is highlighted then press the keys to correct the entry 8 After the ninth number has been entered press the FINISH soft key 9 Press the YES soft key to transmit the test signal TEST CALL 366901555 CATEG SAFETY Transmit a Call YES NO 10 After the DSC test call is trans...

Страница 77: ... a DSC test call to the GX1300E the radio automatically reply an acknowledgement The display shows the MMSI or the name of the vessel transmitting the DSC test call RX TEST CALL YAESU DSC TEST REPLY SINCE 00 05 Transmitted QUIT Press the QUIT soft key to return to radio operation ...

Страница 78: ...ELECT POLLING CALL HISTORY MEMORY NEW ID 5 Press the keys to select an individual you want to contact then press the SELECT soft key BACK SELECT MEMORY YAESU USCG MEMORY SHIPS HORIZON 6 Press the YES soft key to transmit the polling signal POLLING CALL YAESU CATEG ROUTINE Transmit a Call YES NO 7 After the polling call is transmitted the GX1300E waits for a reply from the radio which was called an...

Страница 79: ...and 6 until the MMSI is complete If a mistake was made entering in the MMSI number press the keys repeatedly until the wrong number is highlighted then press the keys to correct the entry 8 After the ninth number has been entered press the FINISH soft key 9 Press the YES soft key to transmit the polling signal POLLING CALL 366901555 CATEG ROUTINE Transmit a Call YES NO 10 After the polling call is...

Страница 80: ...a polling call to the GX1300E the radio automatically reply an acknowledgement The display shows the MMSI or the name of the vessel transmitting the polling call RX POLLING CALL YAESU POLLING REPLY SINCE 00 05 Transmitted QUIT Press the QUIT soft key to return to radio operation ...

Страница 81: ...lay the menu BACK SELECT BACK SELECT DSC CALL AUTO POS POLLING TEST CALL POLLING CALL DSC LOG 2 Press the keys to select DSC then press the SELECT soft key 3 Press the keys to select DSC LOG and then press the SELECT soft key To cancel press the BACK soft key 4 Press the key to select TRANSMITTED LOG then press the SELECT soft key BACK SELECT DSC LOG TRANSMITTED LOG DISTRESS LOG OTHER CALL LOG LOG...

Страница 82: ...SC LOG 2 Press the keys to select DSC then press the SELECT soft key 3 Press the keys to select DSC LOG and then press the SELECT soft key To cancel press the BACK soft key 4 Press the key to select DISTRESS LOG then press the SELECT soft key BACK SELECT DSC LOG TRANSMITTED LOG DISTRESS LOG OTHER CALL LOG LOG DELETE 5 Press the key to select the station name or MMSI number you want to review Note ...

Страница 83: ...OLLING TEST CALL POLLING CALL DSC LOG 2 Press the keys to select DSC then press the SELECT soft key 3 Press the keys to select DSC LOG and then press the SELECT soft key To cancel press the BACK soft key 4 Press the key to select OTHER CALL LOG then press the SELECT soft key BACK SELECT DSC LOG TRANSMITTED LOG DISTRESS LOG OTHER CALL LOG LOG DELETE 5 Press the key to select the station name or MMS...

Страница 84: ...t DSC then press the SELECT soft key 3 Press the keys to select DSC LOG and then press the SELECT soft key To cancel press the BACK soft key 4 Press the key to select LOG DELETE then press the SELECT soft key BACK SELECT DSC LOG TRANSMITTED LOG DISTRESS LOG OTHER CALL LOG LOG DELETE 5 Press the key to select the category TRANSMITTED LOG DISTRESS LOG OTHER CALL LOG or ALL LOG to be deleted then pre...

Страница 85: ... the catego ry list OK LOG DELETE TRANSMITTED LOG Complete NOTE The procedure above will delete logged calls of the selected category all at once To delete logged calls one by one review details of a call you want to delete then press the DELETE soft key ...

Страница 86: ...N DIMMER CONTRAST KEY BEEP LOCATION FORMT 5 Press the keys to select the desired level When OFF is selected the lamp is extinguished 5 BACK ENTER DIMMER 6 Press the ENTER soft key to store the selected level 7 To exit this menu and return to radio operation press the BACK soft key 10 1 2 LCD Contrast This selection sets up the display contract to optimize the viewing angle for the varying mounting...

Страница 87: ...MENU key to display the menu BACK SELECT BACK SELECT SETUP DSC SETUP CHANNEL SETUP ATIS SETUP CONFIGURATION 2 Press the keys to select SETUP then press the SELECT soft key 3 Press the keys to select CONFIGURA TION then press the SELECT soft key 4 Select KEY BEEP with the keys then press the SELECT soft key BACK SELECT CONFIGURATION DIMMER CONTRAST KEY BEEP LOCATION FORMT 5 Press the keys to select...

Страница 88: ...ess the keys to select the desired coordinate system BACK ENTER LOCATION FORMAT dd mm mmm dd mm mm dd mm SS 6 Press the ENTER soft key to store the selected level 7 To exit this menu and return to radio operation press the BACK soft key 10 1 5 Time Offset This selection sets the time offset from UTC time GPS sends to radio Refer to section 6 6 CHANGING THE GPS TIME for details 10 1 6 Time Display ...

Страница 89: ...ION then press the SELECT soft key 4 Select UNIT OF MEASURE with the keys then press the SELECT soft key BACK SELECT CONFIGURATION TIME AREA TIME FORMAT UNIT OF MEASURE SOFT KEY 5 Press the keys to select DISTANCE then press the SELECT soft key BACK ENTER UNIT OF MEASURE DISTANCE nm 6 Press the keys to select the unit BACK ENTER DISTANCE statute mile nautical mile kilometer 7 Press the ENTER soft ...

Страница 90: ...ECT soft key BACK SELECT CONFIGURATION TIME FORMAT UMIT OF MEASURE SOFT KEY RESET 5 Press the keys to select KEY ASSIGN MENT then press the SELECT soft key BACK SELECT SOFT KEY KEY ASSIGNMENT KEY TIMMER 6 Press the keys to select the desired soft key number then press the SELECT soft key BACK ENTER KEY ASSIGNMENT 1 SCAN 2 WX CH 3 SCAN MEMORY 4 DW TW 7 Press the keys to select the desired key funct...

Страница 91: ...then press the SELECT soft key 3 Press the keys to select CONFIGURA TION then press the SELECT soft key 4 Select SOFT KEY with the keys then press the SELECT soft key BACK SELECT CONFIGURATION TIME FORMAT UMIT OF MEASURE SOFT KEY RESET 5 Press the keys to select KEY TIMER then press the SELECT soft key BACK SELECT SOFT KEY KEY ASSIGNMENT KEY TIMMER 6 Press the keys to select how long the soft key ...

Страница 92: ...tion of the dual and triple watch functions Refer to section 8 7 MULTI WATCH TO PRIORITY CHANNEL for details 10 2 3 Scan Memory To be able to scan channels the radio must be programmed This section allows channels to be stored in scan memory Refer to section 8 6 2 Scan Memory Programming for details 10 2 4 Scan Type This selection is used to select the scan mode between Memory Scan and Priority Sc...

Страница 93: ...ss the key to select CHANNEL SETUP then press the SELECT soft key 4 Press the key to select SCAN RESUME then press the SELECT soft key BACK SELECT CHANNEL SETUP SCAN TYPE SCAN RESUME PRIORITY CH SUB CH 5 Press the keys to select the desired resume time BACK ENTER SCAN RESUME 1 sec 2 sec 3 sec 4 sec 6 Press the ENTER soft key to store the selected setting 7 Press the BACK soft key to exit the menu ...

Страница 94: ... then press the SELECT soft key 3 Press the key to select CHANNEL SETUP then press the SELECT soft key 4 Press the key to select SUB CH then press the SELECT soft key BACK SELECT CHANNEL SETUP SCAN TYPE SCAN RESUME PRIORITY CH SUB CH 5 Press the keys to select the sub channel BACK ENTER SUB CH CH 09 CH 08 CH 07 CH 06 S CH 6 Press the ENTER soft key to store the selected setting 7 Press the BACK so...

Страница 95: ...o a DSC individual call requesting you to switch to a working channel for voice communications When the manual response is selected the MMSI of the calling vessel is shown allowing you to see who is calling This function is similar to caller ID on a cellular phone Refer to section 9 5 2 Setting up Individual Call Reply for setting 10 3 3 Individual Acknowledgement The radio can be setup to transmi...

Страница 96: ...pe The GX1300E has the capability to automatically track four vessels programmed into the individual directory This selection allows you to select the call type used in the auto position polling Refer to section 9 10 1 Setting up the Polling Call Type for setting 10 3 7 Auto Position Polling Interval Time The GX1300E has the capability to automatically track four vessels programmed into the indivi...

Страница 97: ...ess the BACK soft key 4 Select CH SWITCH TIMER with the keys then press the SELECT soft key BACK SELECT DSC SETUP AUTP POS POLL AUTO POS TIME CH SWITCH TIMER DSC BEEP 5 Press the keys to select the desired time then press the ENTER soft key The switching time can be set to OFF 10 sec 30 sec 1 min or 2 min BACK ENTER CH SWITCH TIMER OFF 10 sec 30 sec 1 min 6 Press the BACK soft key to exit the menu...

Страница 98: ...UP and then press the SELECT soft key To cancel press the BACK soft key 4 Press the keys to select ATIS CODE then press the SELECT soft key BACK SELECT ATIS SETUP ATIS CODE ATIS GROUP 5 Press the key to select the first number of your ATIS code then press the SELECT soft key to step to the next number ATIS CODE INPUT 1st BACK FINISH SELECT 6 Repeat step 5 to set your ATIS code ten digits 7 If a mi...

Страница 99: ... SELECT soft key To cancel press the BACK soft key 4 Press the keys to select ATIS GROUP then press the SELECT soft key BACK SELECT ATIS SETUP ATIS CODE ATIS GROUP 5 Press the keys to select the desired channel group then press the SELECT soft key BACK SELECT ATIS GROUP USA INTL CAN OFF OFF OFF 6 Press the keys to select OFF or ON then press the ENTER soft key BACK ENTER USA OFF ON 7 Press the BAC...

Страница 100: ...e contact your Dealer or our repair facility 11 1 REPLACEMENT PARTS Commonly requested parts and their part numbers are listed below Power Cord T9025406 VOL SQL Knob Black RA6045800 VOL SQL Knob White RA6045700 Mounting Bracket Black RA097840A Mounting Bracket White RA097830A Mounting Bracket Knob Black RA0978600 Mounting Bracket Knob White RA0978500 Microphone Hanger Black RA0458800 Microphone Ha...

Страница 101: ...the internal or external speaker Accessory cable Check the connections of the accessory cable Possible short circuit on the External speaker cable WHITE SHIELD Receiving station report low transmit p o w e r e v e n w i t h transceiver set to HI power Antenna Have the antenna checked or test the trans ceiver with another antenna If the problem persists contact your Dealer for servicing HI BATTERY ...

Страница 102: ...500 DUPLEX INTL 19 156 950 161 550 DUPLEX INTL 20 157 000 161 600 DUPLEX PORT OPR 21 157 050 161 650 DUPLEX INTL 22 157 100 161 700 DUPLEX INTL 23 157 150 161 750 DUPLEX INTL 24 157 200 161 800 DUPLEX TELEPHONE 25 157 250 161 850 DUPLEX TELEPHONE 26 157 300 161 900 DUPLEX TELEPHONE 27 157 350 161 950 DUPLEX TELEPHONE 28 157 400 162 000 DUPLEX TELEPHONE 60 156 025 160 625 DUPLEX TELEPHONE 61 156 07...

Страница 103: ...075 161 675 DUPLEX INTL 82 157 125 161 725 DUPLEX INTL 83 157 175 161 775 DUPLEX INTL 84 157 225 161 825 DUPLEX TELEPHONE 85 157 275 161 875 DUPLEX TELEPHONE 86 157 325 161 925 DUPLEX TELEPHONE 87 157 375 157 375 SIMPLEX PORT OPR 88 157 425 157 425 SIMPLEX PORT OPR M1 157 850 157 850 SIMPLEX M2 161 425 161 425 SIMPLEX NOTE 1 Channel M1 and M2 are assigned to only U K version 2 Channel Asignment is...

Страница 104: ...e sale of Products shall be limited solely to repair or replacement at its option of the Product or part s therein which upon examination by STANDARD HORIZON appear to be defective or not up to factory specifications STANDARD HORIZON may at its option repair or replace parts or subas semblies with new or reconditioned parts and subassemblies STANDARD HORIZON will not warrant installation maintenan...

Страница 105: ...n the sale of this Product are expressly LIMITED in duration to the time period speci fied above STANDARD HORIZON shall not be liable under any circum stances for consequential damages resulting from the use and operation of this Product or from the breach of this LIMITED WARRANTY any implied warranties or any contract with STANDARD HORIZON IN CONNECTION WITH THE SALE OF ITS PRODUCTS STANDARD HORI...

Страница 106: ...Directory Memory 30 DSC Log Memory Transmitted 30 DSC Log Memory Distress 30 DSC Log Memory Received 50 Dimensions W x H x D 155 x 60 x 150 mm Flush Mount Dimensions W x H x D 131 x 51 x 140 mm Weight 920 g 14 2 TRANSMITTER Frequency Range 156 025 to 157 425 MHz RF Output 25 W Hi 1 W Lo Conducted Spurious Emissions 80 dB Hi 66 dB Lo Audio Response within 1 3 of a 6 dB octave pre emphasis character...

Страница 107: ...5 kHz Selectivity Spurious and Image Rejection 75 dB Intermodulation and Rejection at 12 dB SINAD 70 dB Audio Output 4 5 W Audio Response within 1 3 of a 6 dB octave de emphasis characteristic at 300 to 3000 Hz Frequency Stability 0 0003 15 C to 55 C Channel Spacing 25 kHz DSC Format ITU R M 493 13 NMEA Input Output Output DSC DSE Input GLL GGA RMC GNS GSA GSV SYMBOL PLACED ON THE EQUIPMENT Direct...

Страница 108: ...GX1300E Page 108 14 4 GX1300E DIMENSIONS 109 7 4 32 3 15 80 0 1 59 40 3 1 17 6 10 6 63 4 96 126 129 5 08 168 4 155 29 7 ...

Страница 109: ...Page 109 GX1300E MEMO ...

Страница 110: ...pplier representative or service center for information about the waste collection system in your country Attention in case of use This transceiver works on frequencies which are not generally permitted For frequency allocation apply for a licence at your local spectrum management authority For actual usage contact your dealer or sales shop in order to get your transceiver adjusted to the allocate...

Страница 111: ...conforms to the essential requirements of directive as included in following standards Health 1999 5 EC Art 3 1 a EN 62311 2008 EN 50385 2002 Safety 1999 5 EC Art 3 1 a EN 60950 1 2006 A2 2013 EMC 1999 5 EC Art 3 1 b EN 301 843 02 V1 2 1 Radio Spectrum 1999 5 EC Art 3 2 EN 301 025 02 V1 5 1 EN 300 698 02 V1 2 1 Radio Spectrum 1999 5 EC Art 3 3 e EN 301 025 03 V1 5 1 EN 300 698 03 V1 2 1 ROHS2 2011...

Страница 112: ...hout the permission of YAESU MUSEN CO LTD Printed in China YAESU MUSEN CO LTD Tennozu Parkside Building 2 5 8 Higashi Shinagawa Shinagawa ku Tokyo 140 0002 Japan YAESU USA 6125 Phyllis Drive Cypress CA 90630 U S A YAESU UK Unit 12 Sun Valley Business Park Winnall Close Winchester Hampshire SO23 0LB U K ...

Отзывы: