Page 29
GX1300E
8.6.4 Priority Channel Setting
In the default setting, Channel 16 is set as the priority channel. You may
change the priority channel to another channel from Channel 16 via the
SETUP menu.
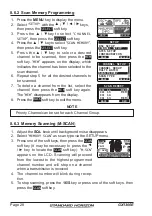
1. Press the
MENU
key to display the menu.
BACK
SELECT
BACK
SELECT
SETUP
DSC SETUP
CHANNEL SETUP
ATIS SETUP
CONFIGURATION
BACK
SELECT
CHANNEL SETUP
SCAN TYPE
SCAN RESUME
PRIORITY CH
SUB CH
BACK
ENTER
PRIORITY CH
CH: 16
CH: 15
CH: 14
CH: 13
P-CH
2. Select “
SETUP
” with the ▲ / ▼ / ◄ / ► keys,
then press the
SELECT
soft key.
3. Press the ▲ / ▼key to select “
C H A N N E L
SETUP
”, then press the
SELECT
soft key.
4. Press the ▲ / ▼ key to select “
PRIORITY CH
”,
then press the
SELECT
soft key.
5. Press the ▲ / ▼ keys to select the priority
channel.
6. Press the
ENTER
soft key to store the selected
setting.
7. Press the
BACK
soft key to exit the menu.
NOTE
8.6.5 Priority Scanning (P-SCAN)
1. Adjust the
SQL
knob until background noise disappears.
2. Select “
PRIORITY SCAN
” as scan type via the SETUP menu.
3. Press one of the soft keys, then press the
SCAN
soft key (it may be necessary to press
the ◄ / ► key to locate the
SCAN
soft key).
“
P-SCN
” appears on the LCD. Scanning will
proceed between the memorized channels and
the priority channel. The priority channel will
be scanned after each programmed channel.
BUSY
MEM
A
C
INTL
25W
P-SCN
P
16
4. Scanning will stop on a channel when a trans-
mission is received. The channel number will
blink during reception.
5. To stop scanning, press the
16/S
key or press one of the soft keys, then
press the
SCAN
soft key.
Priority Channel can be set for each Chan-
nel Group.


