background image

GX1200E

Page 70

9.12  DSC LOG OPERATION

The 

GX1200E

 logs transmitted DSC calls, received distress calls, and other 

calls (individual, group, all ships, etc.). The DSC log feature is similar to an 
answer  machine  where  calls  are  recorded  for  review  and  a  “ ”  icon  will 
appear  on  the  radio's  display. The 

GX1200E

  can  store  up  to  the  latest  20 

transmitted calls, up to the latest 20 distress calls, and up to the latest 38 

other calls.

NOTE

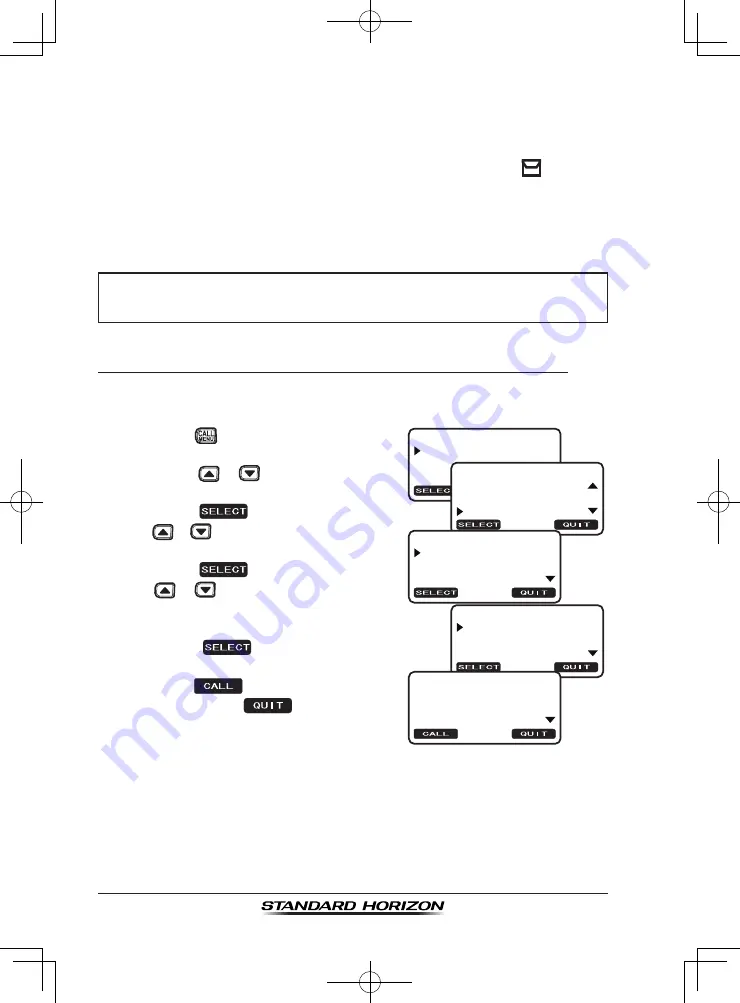
9.12.1  Reviewing and Resending a Logged Transmitted Call

The 

GX1200E

  radios  allows  logged  transmitted  calls  to  be  reviewed  and 

resend the call.

1.  Press the 

 key. The “

DSC MENU

” will 

appear.

 -DSC MENU-

INDIVIDUAL

GROUP

ALL SHIPS

 -TRANS. LOG-

YAESU

STANDARD

123456789

 -DSC MENU-

POS REQUEST

POS REPORT

DSC LOG

-DSC LOG MENU-

TRANSMITTED

DISTRESS

OTHER CALL

 -TRANS. LOG-

INDIVIDUAL

123456789

--/--

2.  Press  the 

  / 

  key  to  select  “

DSC 

LOG

” menu.

3.  Press  the 

  soft  key,  then  press 

the 

 / 

 key to select “

TRANSMIT-

TED

”.

4.  Press  the 

  soft  key,  then  press 

the 

  / 

  key  to  select  the  station 

(name  or  MMSI  number)  you  want  to 

review and/or resend the call.

5.  Press  the 

  soft  key,  to  review 

details for the selected station.

6.  Press the 

 soft key to resend the 

call or press the 

 soft key to go 

back to the DSC transmitted call list.

When  the  “

DSC LOG

”  menu  is  selected,  the 

GX1200E

  may  display 

high-priority logged call automatically.

Содержание ECLIPSE DSC+ GX1200E

Страница 1: ...al group all ships position request position report and DSC test call Programmable scan priority scan and dual watch NMEA in and output connections to a compatible GPS chart plotter Microphone capable of selecting 16 and 9 changing channels and H L transmit power All USA International and Canadian marine channels Capable of the ATIS Function in the Inland Water Way Meets ITU R M493 13 class D DSC ...

Страница 2: ...19 7 CONTROLS AND INDICATORS 20 7 1 Front Panel 20 7 2 Rear Panel 22 7 3 Microphone 23 8 BASIC OPERATION 24 8 1 RECEPTION 24 8 2 TRANSMISSION 24 8 3 TRANSMIT TIME OUT TIMER TOT 24 8 4 SIMPLEX DUPLEX CHANNEL USE 25 8 5 INTERNATIONAL USA AND CANADA MODE 25 8 6 SCANNING 26 8 6 1 Selecting the Scan Type 26 8 6 2 Scan Memory Programming 27 8 6 3 Memory Scanning M SCAN 27 8 6 4 Priority Scanning P SCAN ...

Страница 3: ...Report Call 64 9 8 3 Setting up a Position Report Ringer 64 9 9 POLLING CALL 65 9 9 1 Transmitting a Polling Call 65 9 9 2 Receiving a Polling Call 67 9 10 DSC TEST CALL 68 9 11 MANUAL INPUTTING OF THE GPS LOCATION LAT LON 69 9 12 DSC LOG OPERATION 70 9 12 1 Reviewing and Resending a Logged Transmitted Call 70 9 12 2 Reviewing a Logged DSC Distress Call 71 9 12 3 Reviewing a Logged Other Calls 71 ...

Страница 4: ...ation 85 10 3 11 No Action during Distress Operation 86 11 MAINTENANCE 87 11 1 REPLACEMENT PARTS 87 11 2 FACTORY SERVICE 87 12 MAINTENANCE 89 12 1 REPLACEMENT PARTS 89 12 2 FACTORY SERVICE 89 12 3 TROUBLESHOOTING CHART 90 13 CHANNEL ASSIGNMENTS 91 14 SPECIFICATIONS 94 14 1 GENERAL 94 14 2 TRANSMITTER 94 14 3 RECEIVER 95 14 4 GX1200E DIMENSIONS 96 ...

Страница 5: ... j u s t t h i s control clockwise t o s q u e l c h o r counter clockwise un squelch the radio 16 9 Key Press to recall channel 16 Press and hold to recall channel 9 Press again to revert to the last selected channel CALL MENU Key Press to access the DSC MENU Press and hold to access the setup menus Channel Select Keys Selects the operating channel MIC Hole Be sure your mouth is about 1 3 cm from...

Страница 6: ...l currently allocated marine channels which are switchable for use with either International USA or Canadian regulations It has an emergency channel 16 which can be immediately selected from any channel by pressing the red key Other features of the transceiver include scanning priority scanning high and low voltage warning and GPS repeatability 2 PACKING LIST When the package containing the transc...

Страница 7: ...plaince exposure requirements to be be exceeded In all cases any possible risk depends on the transmitter being activated for long periods actual recommendation limits are specified as an average of 6 minutes Normally the transmitter is not active for long periods of time Some radio licenses will require that a timer circuit automatically cuts the transmitter after 1 2 minutes Do not transmit with...

Страница 8: ...distance can be greater than 8 km in line of sight 5 2 SELECTING AN ANTENNA Marine antennas are made to radiate signals equally in all horizontal direc tions but not straight up The objective of a marine antenna is to enhance the signal toward the horizon The degree to which this is accomplished is called the antenna s gain It is measured in decibels dB and is one of the major factors in choosing ...

Страница 9: ...ice For runs over 6 m but less than 15 m the larger RG 8X or RG 213 U should be used For cable runs over 15 m RG 8X should be used For installation of the connector onto the coaxial cable refer to the figure below To get your coax cable through a fitting and into your boat s interior you may have to cut off the end plug and reattach it later You can do this if you follow the directions that are su...

Страница 10: ... other distinguishing marks The total transmission should not exceed 1 minute 9 End the message by saying OVER Release the microphone button and listen 10 If there is no answer repeat the above procedure If there is still no response try another channel NOTE The GX1200E have DSC Distress calling that can transmit a distress call digitally to all ships with compatible DSC radios Refer to section 9 ...

Страница 11: ...ssel After a transmission say over and release the microphone s push to talk PTT switch When all communication with the other vessel is completed end the last transmission by stating your Call Sign and the word out Note that it is not necessary to state your Call Sign with each transmission only at the beginning and end of the contact Remember to return to Channel 16 when not using another channel...

Страница 12: ...he compass or that the radios performance is not affected by the antenna location temporarily connect the radio in the desired location and a Examine the compass to see if the radio causes any deviation b Connect the antenna and key the radio Check to ensure the radio is operating correctly by requesting a radio check 6 2 MOUNTING THE RADIO 6 2 1 Supplied Mounting Bracket The supplied mounting bra...

Страница 13: ...eiver at least 17 cm deep There should be at least 1 3 cm between the transceiver s heatsink and any wiring cables or structures 3 Cut out the rectangular hole and insert the transceiver 4 Fasten the brackets to the sides of the transceiver with the lock washer nut combination so that the mounting screw base faces the mounting surface 5 Turn the adjusting screw to adjust the tension so that the tr...

Страница 14: ... Connect the black power wire to a negative ground 3 If an optional remote extension speaker is to be used refer to next section for connections 4 It is advisable to have a Certified Marine Technician check the power output and the standing wave ratio of the antenna after installation Figure 1 General Installation Reverse polarity connections will damage the radio GPSChart 150 GPS Navigation Recei...

Страница 15: ...plastic tape around the ferrite core toprevent vibration from causing the two halves to split apart Fuse Replacement To take out the Fuse from the Fuse Holder hold both ends of the Fuse Holder and pull the Fuse Holder apart do not bend the Fuse Holder When you replace the Fuse please confirm that the Fuse is tightly fixed on the metal contact located inside the Fuse Holder If the metal contact hol...

Страница 16: ... to the GPS chart plotter s single NMEA signal ground wire and leave the NMEA output open In case the assignment of power supply and ground of a GPS chart plotter to be used is different from that of the radio connect the signal ground wire of the GPS chart plotter to the ground terminal GND on the rear panel of the radio The GPS must have the NMEA Output turned on and set to 4800 Baud in the setu...

Страница 17: ...displays your current location Latitude Longitude on the display NOTE If there is a problem with the NMEA input from a GPS the satellite icon will blink continuously until the connection is corrected If a GPS with NMEA output is not connected to the radio the GX1200E will beep 10 minutes after the radio is turned on After that the GX1200E will beep every 4 hours alerting to connect a GPS ...

Страница 18: ...ME OFFSET 01 00 00 30 00 00 2 Select GENERAL SETUP with the keys then press the soft key 3 Select TIME OFFSET with the keys then press the soft key 4 Press the keys to select time offset from UTC See illustration below to find your offset time from UTC If 00 00 is assigned the time is the same as UTC Universal Time Coordinated or GMT Greenwich Mean Time 5 Press the soft key to store the time offse...

Страница 19: ...ected setting 6 Press the key or press the soft key twice to exit the menu and return to radio operation mode 6 8 CHANGING THE TIME FORMAT This menu item allows you to choose to show time in 12 hour or 24 hour format 1 Press and hold the key until SETUP MENU appears SETUP MENU GENERAL SETUP CH FUNC SETUP DSC SETUP GENERAL SETUP TIME OFFSET TIME DISPLAY TIME FORMAT TIME FORMAT 12H 24H 2 Select GENE...

Страница 20: ...not activate the audio circuits but a received signal will This point is called the squelch threshold Further adjustment of the squelch control will degrade reception of wanted transmissions e Soft Keys The 3 programmable soft keys can be customized by the setup menu mode see the section 10 1 7 SOFT KEYS When one of the soft keys is pressed briefly the functions will appear above each key on the d...

Страница 21: ...S REPORT DIST ALT MSG DSC LOG DSC TEST and POLLING functions can be accessed from the DSC MENU NOTE Secondary use Press and hold the key to access the SETUP MENU The GENERAL SETUP refer to section 10 1 GENERAL SETUP CH FUNC SETUP refer to section 10 2 CHANNEL FUNCTION SETUP DSC SETUP refer to section 10 3 DSC SETUP POS INPUT and MMSI SETUP functions can be accessed from the SETUP MENU u DISTRESS K...

Страница 22: ...y and optimum perfor mance Normally the GND connection to the heat sink is not needed However when the DC power cable connection to the radio has a long run the transmitter may become unstable and the receiving audio may be noisy In such a case connect a large diameter short cable between this termi nal on the heat sink and battery ground Install only the supplied screw or similar size M3x6 Stainl...

Страница 23: ...hannel 16 from any channel location Pressing and holding this key recalls channel 9 Pressing the key again reverts to the previously selected working channel Q7 Key Press this key to toggle the transmit output power between 25 W High and 1 W Low power When the key is pressed while the transceiv er is on channel 13 or 67 the power will temporarily switch from LO to HI power until the PTT is release...

Страница 24: ... 2 TRANSMISSION 1 Perform steps 1 through 6 of RECEPTION 2 Before transmitting monitor the channel to ensure it is clear THIS IS AN FCC REQUIREMENT 3 Press the PTT push to talk switch The indicator in the LCD is displayed 4 Speak slowly and clearly into the microphone NOTE 5 When the transmission is finished release the PTT switch 8 3 TRANSMIT TIME OUT TIMER TOT When the PTT switch on the micropho...

Страница 25: ... key 5 Press the key to select desired channel group USA INT or CAN 6 Press the soft key to store the selected setting 7 Press the key or press the soft key twice to exit the menu and return to radio operation mode Refer to the VHF MARINE CHANNEL CHART page 92 for allocated channels in each mode When a transmission was shut down by the TOT the GX1200E can not transmit afterwards for 10 seconds All...

Страница 26: ...SETUP CH FUNC SETUP CH GROUP SCAN MEMORY SCAN TYPE SCAN TYPE PRIORITY SCAN MEMORY SCAN 2 Select CH FUNC SETUP with the keys then press the soft key 3 Select SCAN TYPE with the keys then press the soft key 4 Press the keys to select PRIORITY SCAN or MEMORY SCAN 5 Press the soft key to store the selected setting 6 Press the key or press the soft key twice to exit the menu and return to radio operati...

Страница 27: ...els to be scanned 7 To delete a channel from the list select the channel then press the soft key The MEM icon disappears from the display 8 Press the key or press the soft key three times to exit the menu and return to radio operation mode 8 6 3 Memory Scanning M SCAN 1 Adjust the SQL knob until background noise disappears 2 To start scanning press one of the soft keys then press the soft key it m...

Страница 28: ...morized channels and the priority channel The priority channel will be scanned after each programmed channel 3 To stop scanning press the key or press one of the soft keys then press the soft key 8 6 5 Priority Channel Setting 1 Press and hold the key until S E T U P MENU appears SETUP MENU GENERAL SETUP CH FUNC SETUP DSC SETUP CH FUNC SETUP SCAN TYPE SCAN RESUME PRIORITY CH PRIORITY CH 16 15 14 2...

Страница 29: ...ne of the soft keys then press the soft key it may be necessary to press the soft key to locate the soft key The display will scan between CH16 and the channel that was selected in step 2 If a transmission is received on the channel selected in step 2 the GX1200E will dual watch to CH16 4 To stop Dual Watch press one of the soft keys then press the soft key again NOTE 8 7 PRESET CHANNELS 0 9 10 pr...

Страница 30: ...o the preset channel 5 Repeat steps 1 through 4 to program the desired channels into the preset channels 0 9 8 7 2 Operation 1 Press one of the soft keys then press the PRESET soft key to recall the preset channel The PSET icon will appear on the display 2 Press the key to select the desired preset channel 0 to 9 The preset channel number appears P0 to P9 while selecting the preset channel 3 Press...

Страница 31: ...t channel to be deleted 3 Press one of the soft keys then press and hold the PRESET soft key until the channel number blinks 4 Press the soft key to delete the channel from the preset channel 5 Repeat steps 2 through 4 to delete the desired channels from the preset channels 0 to 9 6 To finish the deleting the preset Channel press the soft key ...

Страница 32: ...eceive Distress Urgency Safety Routine POSITION REQUEST POSITION SEND and Group calls to or from another vessel equipped with a DSC transceiver 9 2 MARITIME MOBILE SERVICE IDENTITY MMSI 9 2 1 What is an MMSI An MMSI is a nine digit number used on Marine radios capable of using Digital Selective Calling DSC This number is used like a telephone number to selectively call other vessels THIS NUMBER MU...

Страница 33: ...e entering in the MMSI number press the soft key until the wrong number is selected then press the key to correct the entry and press the soft key 7 When finished programming the MMSI number press and hold the soft key The radio will ask you to input the MMSI number again Use steps 4 through 6 above 8 After the second number has been input press and hold the soft to store the MMSI 9 Press the soft...

Страница 34: ...ll appear on the LCD and the radios display will count down 3S 2S 1S and then transmit the distress alert The backlight of the LCD and keypad flashes while the radios display is counting down DISTRESS UNDESIGNATED TIME FOR 3S DISTRESS UNDESIGNATED TIME FOR 3S DISTRESS TRANSMITTING TX IN 0 00 2 The GX1200E watches for an acknowledg ment call on channel 70 or a voice call on channel 16 from another ...

Страница 35: ... any key Transmitting a DSC Distress Alert with Nature of Distress The GX1200E is capable of transmitting a DSC distress alert with the follow ing Nature of Distress categories Undesignated Fire Flooding Collision Grounding Capsizing Sinking Adrift Abandoning Piracy Mob 1 Press the key The D S C M E N U will appear DSC MENU POS REQUEST POS REPORT DIST ALT MSG DISTRESS UNDESIGNATED 33 37 1N 118 09 ...

Страница 36: ... menu will appear on the LCD Press the soft key 4 Enter UTC time in the 24 hour format and the latitude longitude of your vessel Press the keys to select the number and press the soft key to move the cursor to the next character If you make a mistake you may back space the cursor by pressing the soft key 5 When you have completed your selection press and hold the soft key for two seconds to save t...

Страница 37: ...radio will show the display as on the right Looking at this display you will notice TX in 2 25 this is the time when the radio will re transmit the distress call DISTRESS WAIT FOR ACK TX IN 2 25 DISTRESS PAUSING 2 To suspend re transmitting the distress call press the soft key 3 To resume counting down to transmit the distress call press the soft key Canceling a DSC Distress Alert The GX1200E has ...

Страница 38: ...lly switch to channel 16 for you to monitor distress communications 5 To immediately switch to channel 16 press the soft key 6 Press the soft key to suspend the acknowledgement Press the soft key to resume the acknowledgement DISTRESS PAUSING 7 If you want the radio to stay on the channel you were on before receiv ing the distress call press the soft key 8 If the position of the vessel distress da...

Страница 39: ...ological message This call is the same as saying Securite Securite Securite 9 4 1 Transmitting an All Ships Call 1 Press the key The DSC MENU will appear DSC MENU INDIVIDUAL GROUP ALL SHIPS DSC MENU INDIVIDUAL GROUP ALL SHIPS CATEGORY SAFETY URGENCY SELECT CH 16 06 08 ALL SHIPS SAFETY TRANSMIT ALL SHIPS SAFETY CH 16 TRANSMITTING ALL SHIPS SAFETY CH 16 0 01 2 Press the keys to select ALL SHIPS 3 Pr...

Страница 40: ...To show the nature of the call of the vessel press the key 4 If a key is not pressed for thirty seconds by default refer to the section 10 3 8 Auto Channel Switching Time after an all ships call is received the GX1200E will automatically switch to the requested channel for you to monitor communications 5 To immediately switch to requested channel press the soft key 6 Press the soft key to suspend ...

Страница 41: ...he persons you wish to call similar to a cellular phones directory 1 Press and hold the key until S E T U P MENU appears SETUP MENU GENERAL SETUP CH FUNC SETUP DSC SETUP SETUP MENU GENERAL SETUP CH FUNC SETUP DSC SETUP DSC SETUP INDIVI DIR INDIVI REPLY INDIVI ACK INDIVI DIR STATION NAME ID INDIVI DIR ADD EDIT DELETE 2 Press the keys to select D S C SETUP menu 3 Press the soft key then select INDIV...

Страница 42: ...er another individual address repeat steps 4 through 12 14 To exit this menu and return to radio opera tion mode press the key or press the soft key three times 9 5 2 Setting up Individual Call Reply Allows setting up the radio to automatically default setting or manually respond to a DSC individual call requesting you to switch to a working channel for voice communications When the manual respons...

Страница 43: ...tion is set to AUTO 1 Press and hold the key until SETUP MENU appears SETUP MENU GENERAL SETUP CH FUNC SETUP DSC SETUP SETUP MENU GENERAL SETUP CH FUNC SETUP DSC SETUP DSC SETUP INDIVI DIR INDIVI REPLY INDIVI ACK INDIVI ACK ABLE UNABLE 2 Press the keys to select DSC SETUP menu 3 Press the soft key then select INDIVI ACK with the keys 4 Press the soft key 5 Turn the keys to select ABLE or UNABLE 6 ...

Страница 44: ...e transceiv er will beep and the INDIVIDUAL menu will appear The previous four individual contacts will be listed 4 Press the keys to select an individual you want to contact Press the soft key to select an individual other than those on the display 5 Press the soft key then press the keys to select the operating channel you want to communicate on and press the soft key 6 Press the soft key to tra...

Страница 45: ...y 4 Press the keys to select MANUAL then press the soft key 5 Press the keys to scroll through numbers 0 to 9 To enter the desired number and move one space to the right press the soft key Repeat this procedure until all nine spaces of the MMSI number which you want to contact are entered 6 If a mistake was made entering in the MMSI number repeat pressing the soft key until the wrong number is sel...

Страница 46: ... is calling before replying to the call Automatic reply 1 When an individual call is received a ringing alarm sounds The GX1200E automatically switches to the requested channel The display shows the MMSI or the name of the vessel transmitting the individual call 2 Press any key to stop the alarm RESEND INDIVIDUAL 234567891 CONNECTED SINCE 0 01 3 Press the soft key to return to radio operation 4 Mo...

Страница 47: ...y to return to radio operation 9 5 6 Setting up the Individual Call Ringer When an individual call is received the radio will produce a ringing tone for 3 minutes by default This selection allows the individual call ringer time to be changed 1 Press and hold the key until SETUP MENU appears SETUP MENU GENERAL SETUP CH FUNC SETUP DSC SETUP SETUP MENU GENERAL SETUP CH FUNC SETUP DSC SETUP DSC SETUP ...

Страница 48: ...TUP GROUP DIR POS REPLY DSC BEEP 2 Press the keys to select DSC SETUP menu 3 Press the soft key then select DSC BEEP with the keys 4 Press the soft key 5 Press the keys to select INDIVIDUAL then press the soft key 6 Press the keys to select OFF 7 Press the soft key to store the selected setting 8 To exit this menu and return to radio operation mode press the key or press the soft key twice If you ...

Страница 49: ...is 366123456 366 is MID which denote the country and 123456 is the ships ID for you Group MMSI Group MMSI numbers are not assigned by the FCC or other organiza tions licensed to assign ship MMSI numbers The first digit of a group MMSI is always set to 0 by the international rules All Standard Horizon radios are preset so when programming a group MMSI the first digit is set to 0 The USCG recommends...

Страница 50: ...ame To clear the previous letter press the soft key 9 After the eleventh letter or space has been entered press and hold the soft key to advance to the MMSI number Maritime Mobile Service Identity Number entry 10 Press the keys to scroll through numbers 0 to 9 To enter the desired number and move one space to the right press the soft key Repeat this procedure until all nine space of the MMSI numbe...

Страница 51: ...d the GROUP menu will appear The previous four group contacts will be listed 4 Press the keys to select a group you want to contact Press the soft key to select a group other than those on the display 5 Press the soft key then press the keys to select the operat ing channel you want to communicate on and press the soft key 6 Press the soft key to transmit the group call signal 7 After the group ca...

Страница 52: ...select MANUAL then press the soft key 5 Press the keys to scroll through numbers 0 to 9 To enter the desired number and move one space to the right press the soft key Repeat this procedure until all nine space of the MMSI number which you want to contact are entered 6 If a mistake was made entering in the MMSI number repeat pressing the soft key until the wrong number is selected then press the ke...

Страница 53: ...you to monitor communications 5 To immediately switch to requested channel press the soft key 6 Press the soft key to suspend the acknowledgement Press the soft key to resume the acknowledgement GROUP PAUSING 7 If you want the radio to stay on the channel you were on before receiving the group call press the soft key RX GROUP 023456789 SINCE 0 01 ROUTINE 8 Press the soft key to display the operati...

Страница 54: ...C SETUP DSC SETUP GROUP DIR POS REPLY DSC BEEP 2 Press the keys to select DSC SETUP menu 3 Press the soft key then select DSC BEEP with the keys 4 Press the soft key 5 Press the keys to select GROUP then press the soft key 6 Press the keys to select OFF 7 Press the soft key to store the selected setting 8 To exit this menu and return to radio operation mode press the key or press the soft key twic...

Страница 55: ...l see the MMSI or persons name shown on the display allowing you to choose to send your position to the requesting vessel 1 Press and hold the key until SETUP MENU appear SETUP MENU GENERAL SETUP CH FUNC SETUP DSC SETUP SETUP MENU GENERAL SETUP CH FUNC SETUP DSC SETUP DSC SETUP INDIVI RING GROUP DIR POS REPLY POS REPLY AUTO MANUAL 2 Press the keys to select DSC SETUP menu 3 Press the soft key then...

Страница 56: ...how the position request directory The previous four position request contacts will be listed 4 Press the keys to select a name then press the soft key Press the soft key to select a name other than those on the display This directory uses the individual direc tory information 5 Press the keys to select the category ROUTINE or SAFETY for the position request call then press the soft key NOTE SAFET...

Страница 57: ...tter via NMEA 0183 DSC BEEP needs to be enabled to hear alarm 8 Press any key to stop the alarm 9 Press the key to show the position from the polled vessel transferred on the display 10 Press the soft key to show the position data again as the OTHER LOG menu Press the soft key again to return to radio operation mode 11 If the GX1200E does not receive a reply the display will be as shown in the ill...

Страница 58: ...ect the MANUAL then press the soft key 5 Press the keys to scroll through numbers 0 to 9 To enter the desired number and move one space to the right press the soft key Repeat this procedure until all nine space of the MMSI number which you want to contact are entered 6 If a mistake was made entering in the MMSI number repeat pressing the soft key until the wrong number is selected then press the k...

Страница 59: ...d from another vessel a ringing alarm will sound and POS REQUEST will be shown in the LCD Operation and transceiver function differs depending on POS REPLY in the DSC SETUP menu setting Automatic reply 1 When a position request call is received the GX1200E will transmit your position to the vessel who requested it POS REPLY YAESU REPLIED SINCE 0 01 2 To exit from position request display press the...

Страница 60: ...EQUEST BEEP ON DSC BEEP SELECT CALL POS REQUEST BEEP OFF 2 Press the keys to select DSC SETUP menu 3 Press the soft key then select DSC BEEP with the keys 4 Press the soft key 5 Press the keys to select POS REQUEST 6 Press the soft key 7 Press the keys to select OFF 8 Press the soft key to store the selected setting 9 To exit this menu and return to radio operation mode press the key or press the ...

Страница 61: ...EPORT YAESU STANDARD 234567891 POS REPORT MANUAL YAESU STANDARD CATEGORY ROUTINE SAFETY 2 Press the keys to select the POS REPORT 3 Press the soft key to show the position report directory The previous four position report contacts will be listed 4 Press the keys to select a name you want to send your position to then press the soft key Press the soft key to select a name other than those on the d...

Страница 62: ... INPUT MMSI ID 2 Press the keys to select the POS REPORT 3 Press soft key to show the position report directory The previous four position report contacts will be listed Press the soft key 4 Press the keys to select MANUAL then press the soft key 5 Enter the MMSI number nine digits which you want to contact Press the keys to scroll through numbers 0 to 9 To enter the desired number and move one sp...

Страница 63: ...891 TRANSMITTED SINCE 0 01 9 Press the soft key to send your position to the selected vessel 10 Press the soft key to return the display to the radio operation mode display NOTE SAFETY is normally used as the category for position report calls However ROUTINE should be selected when calling a vessel with radios of certain legacy models that cannot accept position report calls categorized as SAFETY...

Страница 64: ... display to the radio operation mode display 9 8 3 Setting up a Position Report Ringer The GX1200E has the capability to turn off the position report ringer 1 Press and hold the key until SETUP MENU appears DSC BEEP SELECT CALL POS REPORT BEEP ON DSC BEEP SELECT CALL POS REPORT BEEP OFF SETUP MENU GENERAL SETUP CH FUNC SETUP DSC SETUP SETUP MENU GENERAL SETUP CH FUNC SETUP DSC SETUP DSC SETUP GROU...

Страница 65: ... keys to select the POLLING 3 Press the soft key to show the polling directory 4 Press the keys to select an individual you want to contact on then press the soft key 5 Press the soft key to transmit a polling call to the selected vessel 6 After a polling call is transmitted if the reply signal is not received WAIT FOR ACK is shown on the display which means the GX1200E is waiting for the vessel y...

Страница 66: ...s the keys to select MANUAL then press the soft key 5 Enter the MMSI number nine digits which you want to contact Press the keys to scroll through numbers 0 to 9 To enter the desired number and move one space to the right press the soft key Repeat this procedure until all nine spaces of the MMSI number which you want to contact are entered 6 If a mistake was made entering in the MMSI number repeat...

Страница 67: ...e display shows the vessel s MMSI or name and how long since the call was received REPLY RX POLLING YAESU SINCE 0 01 POLLING YAESU REPLIED SINCE 0 01 2 Press the keys to change the display to view the received data 3 Press the REPLY soft key to send your acknowledgement to the calling vessel 4 Press the soft key to return the display to the radio operation mode display ...

Страница 68: ...ter the MMSI number nine digits which you want to send the test signal to To do this press the keys to scroll through numbers 0 to 9 then press the soft key to move the entry location to the right If a mistake was made entering in the MMSI number repeat pressing the soft key until the wrong number is selected then press the keys to correct the entry When finished entering the MMSI number press and...

Страница 69: ...P SETUP MENU CH FUNC SETUP DSC SETUP POS INPUT POS INPUT UTC 12 35 LAT 33 34 N LON 118 08 W 2 Press the keys to select POS INPUT menu 3 Press the soft key The display will be as shown in the illustration on the right 4 Enter UTC time in the 24 hour format Use the soft key and the soft key to navigate to each column of the time then use the keys to select the desired numbers in each column Repeat f...

Страница 70: ... and resend the call 1 Press the key The DSC MENU will appear DSC MENU INDIVIDUAL GROUP ALL SHIPS TRANS LOG YAESU STANDARD 123456789 DSC MENU POS REQUEST POS REPORT DSC LOG DSC LOG MENU TRANSMITTED DISTRESS OTHER CALL TRANS LOG INDIVIDUAL 123456789 2 Press the key to select DSC LOG menu 3 Press the soft key then press the key to select TRANSMIT TED 4 Press the soft key then press the key to select...

Страница 71: ... soft key to review details for the selected station 6 Press the soft key to go back to the DSC distress call list 9 12 3 Reviewing a Logged Other Calls Reviewing a logged other calls individual group all ships etc 1 Press the key The DSC MENU will appear DSC MENU INDIVIDUAL GROUP ALL SHIPS OTHER LOG YAESU STANDARD 123456789 DSC MENU POS REQUEST POS REPORT DSC LOG DSC LOG MENU TRANSMITTED DISTRESS...

Страница 72: ...to select L O G DELETE menu 4 Press the soft key then press the key to select the category TRANSMITTED DISTRESS or OTHER CALL to be deleted 5 Press the soft key 1 If you want to delete all logged calls at one time select the DEL ALL LOG with the key then press the soft key The display will show A r e y o u r sure and then press the soft key Press the soft key several times to return to radio opera...

Страница 73: ...level 6 To exit this menu and return to radio operation mode press the key or press the soft key twice 10 1 2 LCD Contrast This selection sets up the display for best viewabilty for the varying mounting locations overhead or below 1 Press and hold the key until S E T U P MENU appears SETUP MENU GENERAL SETUP CH FUNC SETUP DSC SETUP GENERAL SETUP DIMMER CONTRAST TIME OFFSET CONTRAST 14 13 12 2 Sele...

Страница 74: ...lect GENERAL SETUP with the keys then press the soft key 3 Select TIME OFFSET with the keys then press the soft key 4 Press the keys to select time offset from UTC See illustration below to find your offset time from UTC If 00 00 is assigned the time is the same as UTC Universal Time Coordinated or GMT Greenwich Mean Time 5 Press the soft key to store the time offset 6 To exit this menu and return...

Страница 75: ...o exit this menu and return to radio operation mode press the key or press the soft key twice 10 1 5 Time Format This selection selects the time format between the 12 hour system and the 24 hour system 1 Press and hold the key until S E T U P MENU appears SETUP MENU GENERAL SETUP CH FUNC SETUP DSC SETUP GENERAL SETUP TIME OFFSET TIME DISPLAY TIME FORMAT TIME FORMAT 12H 24H 2 Select GENERAL SETUP w...

Страница 76: ...tem assigns the number of soft keys soft key selection and how long the display will show the soft key icon after a soft key is pressed 10 1 7 1 Selecting the Number of Soft Keys 1 Press and hold the key until SETUP MENU appears then select GENERAL SETUP with the key SETUP MENU GENERAL SETUP CH FUNC SETUP DSC SETUP NUMBER OF KEY 3 4 5 GENERAL SETUP TIME DISPLAY KEY BEEP SOFT KEYS SOFT KEYS NUMBER ...

Страница 77: ... the key to select the key that you want to change 5 Press the soft key then press the key to select the new function to be assigned and press the soft key Available functions are listed below DISPLAY FUNCTION SCAN Starts and stops scanning DW Starts and stops the dual watch scan PRESET Saves or deletes the preset memory channel WX Immediately recalls the last select weather channel PRE0 to PRE9 I...

Страница 78: ...KEYS NUMBER OF KEYS KEY ASSIGN KEY TIMER 2 Press the soft key then press the key to SOFT KEYS 3 Press the key then press the key to select KEY TIMER selects how long the soft key icon will be shown on the display after a soft key is pressed default is 4 seconds Then press the soft key 4 Press the key to select the time 5 Press the soft key to store the selected setting 6 To exit this menu and retu...

Страница 79: ...etting 7 To exit this menu and return to radio operation mode press the key or press the soft key twice 10 2 2 Scan Memory To be able to scan channels the radio must be programmed This section allows channels to be stored in scan memory 1 Press and hold the key until S E T U P MENU appears CH FUNC SETUP CH GROUP SCAN MEMORY SCAN TYPE SETUP MENU GENERAL SETUP CH FUNC SETUP DSC SETUP SCAN MEMORY 16 ...

Страница 80: ... key to select CH FUNC SETUP 3 Press the soft key then select SCAN TYPE with the key 4 Press the soft key 5 Press the key to select PRIORITY SCAN or MEMORY SCAN 6 Press the soft key to store the selected setting 7 To exit this menu and return to radio operation mode press the key or press the soft key twice 10 2 4 Scan Resume This selection is used to select the time the GX1200E waits after a tran...

Страница 81: ...he soft key twice 10 2 5 Priority Channel Allows selection of the priority channel 1 Press and hold the key until S E T U P MENU appears SETUP MENU GENERAL SETUP CH FUNC SETUP DSC SETUP CH FUNC SETUP SCAN TYPE SCAN RESUME PRIORITY CH PRIORITY CH 16 15 14 2 Select CH FUNC SETUP with the keys then press the soft key 3 Select PRIORITY CH with the keys then press the soft key 4 Press the keys to selec...

Страница 82: ...DSC individual call requesting you to switch to a working channel for voice communications When the manual response is selected the MMSI of the calling vessel is shown allowing you to see who is calling This function is similar to caller id on a cellular phone Refer to section 9 5 2 Setting up Individual Call Reply for setting 10 3 3 Individual Acknowledgement The radio can be setup to transmit a ...

Страница 83: ... the requesting vessel Refer to section 9 7 1 Setting up the Position Reply for setting 10 3 7 DSC Beep This feature allows the alarm beeps to be turned on default setting or off when a DSC call is received The DSC calls that can be customized are individual group all ships position request position report geographical call using the procedure below 1 Press and hold the key until S E T U P MENU ap...

Страница 84: ... the key until S E T U P MENU appears DSC SETUP POS REPLY DSC BEEP AUTO CH SW SETUP MENU GENERAL SETUP CH FUNC SETUP DSC SETUP AUTO CH SW 10 SEC 20 SEC 30 SEC PM 2 Press the key to select DSC SETUP menu 3 Press the soft key then select AUTO CH SW with the key 4 Press the soft key then press the key to the desired time and press the soft key Note When OFF is selected here the icon will appear on th...

Страница 85: ... press the soft key 5 To exit this menu and return to radio operation mode press the key or press the soft key twice 10 3 10 No Action during DSC Operation If a key is not pressed during the DSC operation the GX1200E will automati cally return to radio operation This menu selection allows the automatic switching time to be changed The default selection is 15 minutes 1 Press and hold the key until ...

Страница 86: ...n is OFF 1 Press and hold the key until S E T U P MENU appears DSC SETUP NO ACT MENU NO ACT DSC NO ACT DIST SETUP MENU GENERAL SETUP CH FUNC SETUP DSC SETUP NO ACT DIST OFF 1 MIN 2 MIN 2 Press the key to select DSC SETUP menu 3 Press the soft key then select NO ACT DIST with the key 4 Press the soft key then press the key to the desired time and press the soft key 5 To exit this menu and return to...

Страница 87: ...U P MENU appears SETUP MENU POS INPUT MMSI SETUP ATIS SETUP ATIS SETUP ATIS CODE GROUP ATIS SETUP SELECT GROUP INT ATIS OFF ATIS SETUP SELECT GROUP INT ATIS ON 2 Press the keys to select the ATIS SETUP 3 Press the soft key then press the keys to select the GROUP 4 Press the soft key 5 Press the keys to select the channel group you wish to change the setting then press the soft key 6 Press the keys...

Страница 88: ... the keys to selec the first number of your ATIS then press the soft key to move the entry location to the right If a mistake was made entering in the ATIS number repeat pressing the soft key until the wrong number is selected then press the keys to correct the entry 6 Repeat step 5 to set your ATIS ten digits 7 When finished programming the ATIS number press and hold the soft key The radio will a...

Страница 89: ... contact your Dealer or our repair facility 12 1 REPLACEMENT PARTS Commonly requested parts and their part numbers are listed below Power Cord T9025406 VOL SQL Knob Black RA097700A VOL SQL Knob White RA097310A Mounting Bracket Black RA097840A Mounting Bracket White RA097830A Mounting Bracket Knob Black RA0978600 Mounting Bracket Knob White RA0978500 Microphone Hanger Black RA0458800 Microphone Han...

Страница 90: ...the internal or external speaker Accessory cable Check the connections of the accessory cable Possible short circuit on the External speaker cable WHITE SHIELD Receiving station report low transmit p o w e r e v e n w i t h transceiver set to HI power Antenna Have the antenna checked or test the trans ceiver with another antenna If the problem persists contact your Dealer for servicing HI BATTERY ...

Страница 91: ...an A adjacent to the alpha channels on the display on others alpha is not indicated but the proper channel is selected based on the U I C setting 3 Bridge to Bridge channels for example Channel 13 are for use by bridge operators on inter coastal waterways and rivers It is also used by marine vessels in the vicinity of these bridges for navigation and for communicating with the bridge operators Not...

Страница 92: ...EX LOW SAR 18 156 900 161 500 DUPLEX INTL 19 156 950 161 550 DUPLEX INTL 20 157 000 161 600 DUPLEX PORT OPR 21 157 050 161 650 DUPLEX INTL 22 157 100 161 700 DUPLEX INTL 23 157 150 161 750 DUPLEX INTL 24 157 200 161 800 DUPLEX TELEPHONE 25 157 250 161 850 DUPLEX TELEPHONE 26 157 300 161 900 DUPLEX TELEPHONE 27 157 350 161 950 DUPLEX TELEPHONE 28 157 400 162 000 DUPLEX TELEPHONE 60 156 025 160 625 ...

Страница 93: ...75 161 675 DUPLEX INTL 82 157 125 161 725 DUPLEX INTL 83 157 175 161 775 DUPLEX INTL 84 157 225 161 825 DUPLEX TELEPHONE 85 157 275 161 875 DUPLEX TELEPHONE 86 157 325 161 925 DUPLEX TELEPHONE 87 157 375 157 375 SIMPLEX PORT OPR 88 157 425 157 425 SIMPLEX PORT OPR M1 157 850 157 850 SIMPLEX M2 161 425 161 425 SIMPLEX NOTE 1 Channel M1 and M2 are assigned to only U K version 2 Channel Asignment is ...

Страница 94: ...Directory Memory 20 DSC Log Memory Transmitted 20 DSC Log Memory Distress 20 DSC Log Memory Received 38 Dimensions W x H x D 155 x 60 x 170 mm Flush Mount Dimensions W x H x D 131 x 51 x 170 mm Weight 920 g 14 2 TRANSMITTER Frequency Range 156 025 to 157 425 MHz RF Output 25 W Hi 1 W Lo Conducted Spurious Emissions 80 dB Hi 66 dB Lo Audio Response within 1 3 of a 6 dB octave pre emphasis character...

Страница 95: ...on Acceptance Bandwidth 7 5 kHz Selectivity Spurious and Image Rejection 75 dB Intermodulation and Rejection at 12 dB SINAD 70 dB Audio Output 4 5 W Audio Response within 1 3 of a 6 dB octave de emphasis characteristic at 300 to 3000 Hz Frequency Stability 20 C to 50 C 0 0003 Channel Spacing 25 kHz DSC Format ITU R M 493 NMEA Input Output Output DSC DSE Input GLL GGA RMC and GNS ...

Страница 96: ...GX1200E Page 96 14 4 GX1200E DIMENSIONS ...

Страница 97: ...Page 97 GX1200E MEMO ...

Страница 98: ...pplier representative or service center for information about the waste collection system in your country Attention in case of use This transceiver works on frequencies which are not generally permitted For frequency allocation apply for a licence at your local spectrum management authority For actual usage contact your dealer or sales shop in order to get your transceiver adjusted to the allocate...

Страница 99: ... ku Tokyo 140 0002 Japan Applicable Standards This equipment is tested to and conforms to the essential requirements of directive as included in following standards Radio Standard EN 300 698 01 V1 4 1 EN 300 698 03 V1 2 1 EN 301 025 02 V1 4 1 EN 301 025 03 V1 4 1 EMC Standard EN 301 843 1 V1 2 1 EN 301 843 2 V1 2 1 Safety Standard EN 60950 1 2006 A12 2011 EN 50385 2002 RF Safety EN 50581 2012 The ...

Страница 100: ...EN CO LTD Printed in China YAESU MUSEN CO LTD Tennozu Parkside Building 2 5 8 Higashi Shinagawa Shinagawa ku Tokyo 140 0002 Japan YAESU USA 6125 Phyllis Drive Cypress CA 90630 U S A YAESU UK Unit 12 Sun Valley Business Park Winnall Close Winchester Hampshire SO23 0LB U K YAESU HK Unit 2002 20 F 9 Chong Yip Street Kwun Tong Kowloon Hong Kong EM037N220 ...

Отзывы: