8
9
17.05.2019
17.05.2019
EN
EN
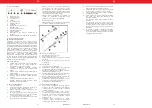
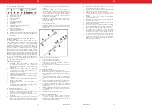
3.1. DEVICE DESCRIPTION
A.
Clamping sleeve
B.
Fastening nut
C.
Soldering tip
D. Heater
E.
Heater fastener
F.
Rubber cap
G. LED
H.
Temperature control knob
I.
ON/OFF slider
J.
Soldering iron handle
K.
Cable strain relief
L.
Power cord
M. Internal control system (not part of the image)
N.
Soldering iron stand (not part of the image)
I J
H
G
K
L
F
E
D
C
B
A
2.
Carefully unpack all components and check them for
damage and / or missing items.
3. Make sure that the device is not connected to
a power source.
4.
Place the device on an even and stable surface.
5.
Connect the other plug of the cord to the power
source.
6.
Start the device with the power switch.
NOTE: Unused soldering iron should always be left
on the rack.
3.3. DEVICE USE
I.
Normal operating mode
1.
Start the device by pushing the slider [I] to the "ON"
position. The LED [G] will turn on.
2.
Set the desired temperature value using the knob
[H].
3.
After heating the [C] tip of the soldering iron, coat
the tip with solder. This will protect the tip and
extend its life.
4.
When you have finished work, always place the
soldering iron on the stand.
PLEASE NOTE: It is recommended to reduce the
tip heating temperature using the knob when the
device is not in use. Leaving the device set to high
temperature has a negative effect on the life of the
tip and other heating elements.
NOTE: Before inspecting or repairing electric cables,
etc., make sure that they are not live.
II.
Replacing the device components
NOTE: Before replacing the components, turn off the
device and disconnect it from the power source.
d)
Detach the used heater [D] from the control system
[M], and install a new heater.
e)
Insert the heater [D] and the control system [M] into
the soldering iron holder [J].
f)
Install the temperature control knob [H] and slider [I]
on the soldering iron holder [J].
g)
Install the heater holder [E].
3.4. CLEANING AND MAINTENANCE
a)
Unplug the mains plug and allow the device to cool
completely before each cleaning, adjustment or
replacement of accessories, or if the device is not
being used.
b)
Use only non-corrosive cleaners to clean the surface.
c)
After cleaning the device, all parts should be dried
completely before using it again.
d)
Store the unit in a dry, cool place, free from moisture
and direct exposure to sunlight.
e)
Do not spray the device with a water jet or submerge
it in water.
f)
Do not allow water to get inside the device through
vents in the housing of the device.
g)
Clean the vents with a brush and compressed air.
h)
The device must be regularly inspected to check its
technical efficiency and spot any damage.
i)
Use a soft, damp cloth for cleaning.
j)
Do not use sharp and/or metal objects for cleaning
(e.g. a wire brush or a metal spatula) because they
may damage the surface material of the appliance.
k)
If you use the device often, it is recommended to
disassemble the soldering tip at least once a week,
and clean the dust accumulated inside.
A
C
E
B
D
M
J
H
I
F
K
L
k)
Keep packaging elements and small assembly parts
in a place not available to children.
l)
Keep the device away from children and animals.
m) When working with the device, harmful fumes are
generated. The workplace must be well ventilated
to protect unauthorized persons from the harmful
effects of fumes.
2.3. PERSONAL SAFETY
a)
Do not use the device when tired, ill or under the
influence of alcohol, narcotics or medication which
can significantly impair the ability to operate the
device.
b)
The device is not designed to be handled by persons
(including children) with limited mental and sensory
functions or persons lacking relevant experience
and/or knowledge unless they are supervised by
a person responsible for their safety or they have
received instruction on how to operate the device.
c)
When working with the device, use common sense
and stay alert. Temporary loss of concentration while
using the device may lead to serious injuries.
d) Use personal protective equipment as required
for working with the device, specified in section 1
(Legend). The use of correct and approved personal
protective equipment reduces the risk of injury.
e)
To prevent the device from accidentally switching on,
make sure the switch is on the OFF position before
connecting to a power source.
f)
The device is not a toy. Children must be supervised
to ensure that they do not play with the device.
2.4. SAFE DEVICE USE
a) Do not overload the device. Use the appropriate
tools for the given task. A correctly-selected device
will perform the task for which it was designed better
and in a safer manner.
b)
Do not use the device if the ON/OFF switch does not
function properly (does not switch the device on and
off). Devices which cannot be switched on and off
using the ON/OFF switch are hazardous, should not
be operated and must be repaired.
c) Disconnect the device from the power supply
before commencement of adjustment, cleaning and
maintenance. Such a preventive measure reduces
the risk of accidental activation.
d)
When not in use, store in a safe place, away from
children and people not familiar with the device who
have not read the user manual. The device may pose
a hazard in the hands of inexperienced users.
e) Keep the device in perfect technical condition.
Before each use check for general damage and
especially check for cracked parts or elements and
for any other conditions which may impact the safe
operation of the device. If damage is discovered,
hand over the device for repair before use.
f)
Keep the device out of the reach of children.
g)
Device repair or maintenance should be carried out
by qualified persons, only using original spare parts.
This will ensure safe use.
h)
To ensure the operational integrity of the device, do
not remove factory-fitted guards and do not loosen
any screws.
i)
Do not leave this appliance unattended while it is in
use.
j)
Clean the device regularly to prevent stubborn grime
from accumulating.
k)
The device is not a toy. Cleaning and maintenance
may not be carried out by children without
supervision by an adult person.
l)
It is forbidden to interfere with the structure of
the device in order to change its parameters or
construction.
m) Keep the device away from sources of fire and heat.
n)
Always place the soldering iron on the holder if it is
not in use.
o) Keep the soldering tip and parts that can get hot
away from your body, clothing and flammable
objects / substances.
p)
The soldering tip remains hot even after the power
is turned off. Before cleaning or replacing parts, wait
until the device has cooled down completely.
q)
Exercise caution and do not inhale solder fumes.
REMEMBER!
When using the device, protect
children and other bystanders.
3. USE GUIDELINES
The device is designed for soldering, desoldering or
shrinking electronic and electrical connections.
The user is liable for any damage resulting from
unintended use of the device.
ATTENTION!
Despite the safe design of the device
and its protective features, and despite the use of
additional elements protecting the operator, there
is still a slight risk of accident or injury when using
the device. Stay alert and use common sense when
using the device.
3.2. PREPARING FOR USE
APPLIANCE LOCATION
The temperature of environment must not be higher than
40°C and the relative humidity should be less than 85%.
Ensure good ventilation in the room in which the device
is being used. There should be at least 10 cm distance
between each side of the device and the wall or other
objects. The device should always be used when positioned
on an even, stable, clean, fireproof and dry surface, and
be out of the reach of children and persons with limited
mental and sensory functions. Position the device such that
you always have access to the power plug. The power cord
connected to the appliance must be properly grounded
and correspond to the technical details on the product
label.
ASSEMBLING THE APPLIANCE
1.
ATTENTION: Before carrying out any soldering work,
make sure that the power source is compatible with
the device.
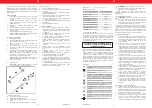
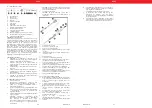
1. Soldering tip replacement
a)
Unscrew the fixing nut [B]
b)
Remove the mounting sleeve [A]
c)
Remove the used soldering tip [C] and replace it with
a new one.
d)
Secure the tip with the mounting sleeve [A] and the
nut [B].
2. Heater replacement
a)
Unscrew the heater fixing [E]
b)
Remove the temperature control knob [H] and the
slider [I] from the soldering iron holder [J].
c)
Pull the heater [D] together with the control system
[M] from the soldering iron holder [J].


