background image

ASSEMBLY INSTRUCTIONS

7

Shoulder

Shoulder

STEP 2

NOTE: 

The 

RIGHT PEDAL(8)

 has an 

R

 stamped on the end of the pedal shaft. The 

RIGHT PEDAL(8)


has right hand threads and is tightened by turning clockwise. The 

LEFT PEDAL(7)

 has an 

L

 stamped on the end of the pedal shaft. The 

LEFT PEDAL(7)

 has left hand threads and is 

tightened by turning counterclockwise.

Thread the 

LEFT PEDAL(7)

 to the right side of the 

LEFT CRANK(18)

 as shown. Tighten the pedal 

securely. The shoulder of the 

PEDALS(7, 8)

 should be in contact with the 

CRANKS(18, 19)

 when 

securely tightened. Do the same to attach the 

RIGHT PEDAL(8)

 to the 

RIGHT CRANK(19).

STEP 3

Install two AA batteries into the 

METER(17),

  the batteries are not included. See page 8 for detailed 

battery installation instructions. Slide the 

METER(17)

 onto the plate on the 

MAIN FRAME(1).

Содержание Wirk

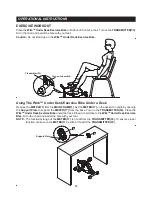
Страница 1: ...efore beginning any exercise program with this equipment If you feel faint or dizzy immediately discontinue use of this equipment Serious bodily injury can occur if this equipment is not assembled and...

Страница 2: ...encing an exercise program and follow his her recommendations in developing your fitness program If at any time during exercise you feel faint dizzy or experience pain stop and consult your physician...

Страница 3: ......

Страница 4: ...with the parts that are labeled Read this manual carefully before using the WirkTM Under Desk Exercise Bike Although Stamina constructs its products with the finest materials and uses the highest sta...

Страница 5: ...ed to help identify the warning caution and notice labels on the WirkTM Under Desk Exercise Bike Please take a moment to familiarize yourself with all of the warning caution and notice labels EQUIPMEN...

Страница 6: ...d place them back into the box Do not dispose of the packing materials until assembly is completed Read each step carefully before beginning If you are missing a part please go to staminaproducts com...

Страница 7: ...s and is tightened by turning counterclockwise Thread the LEFT PEDAL 7 to the right side of the LEFT CRANK 18 as shown Tighten the pedal securely The shoulder of the PEDALS 7 8 should be in contact wi...

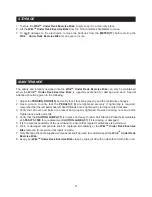
Страница 8: ...isplays the calorie burned from zero to 999 9 Kcal The calorie readout is an estimate for an average user It should be used only as a comparison between workouts on this unit SPEED SCAN TIME DISTANCE...

Страница 9: ...pen the Battery Cover on the TRANSMITTER 33 3 The TRANSMITTER 33 operates with a CR2032 button battery Refer to the illustration to install or replace the battery 4 Use a coin to close the Battery Cov...

Страница 10: ...urn on the switch Support Plate Remove the METER 17 from the MAIN FRAME 1 Set the METER 17 on the desk at an angle by opening the Support Plate to support the METER 17 from the back Turn on the TRANSM...

Страница 11: ...ely If tightening is required remember that the left pedal has left hand threads and is tightened by turning counterclockwise 3 Verify that all nuts and bolts are present and properly tightened Replac...

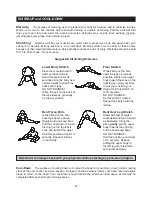
Страница 12: ...of your maximum heart rate zone Start at the lower intensity and build up to higher intensity as you become more aerobically fit If you feel dizzy or lightheaded you should slow down or stop exercisin...

Страница 13: ...cool down should include the stretches listed above and should be completed after each strength training session Lower Body Stretch Place feet shoulder width apart and lean forward Keep this position...

Страница 14: ...PRODUCT PARTS DRAWING 14 FRONT BACK...

Страница 15: ...000ZZ 2 28 Ball Bearing 6202RS 15 1 29 Ball Bearing 6003ZZ 2 30 Idler Shaft 1 31 Caution Label 1 32 Magnet 1 33 Transmitter 1 34 Eye Bolt M6 x 1 2 35 Screw Round Head M4 2 x 16mm 8 36 Bolt Round Head...

Страница 16: ...TY INCLUDING MERCHANTABILITY AND FITNESS FOR A PARTICULAR PURPOSE MAY BE COMMENCED MORE THAN ONE 1 YEAR AFTER DELIVERY OF THE PRODUCT TO THE PURCHASER These warranties are not transferable IF ANY PART...

Страница 17: ...NOTES 17...
Страница 18: ...nvenience Stamina s customer care representatives can be reached by email at customer care staminaproducts com or by phone at 1 800 375 7520 in the U S Our customer care representatives are available...

Отзывы: