52
3
52
3
52
52
2
OPERATIONAL INSTRUCTIONS
12
PEDAL STRAP ADJUSTMENT
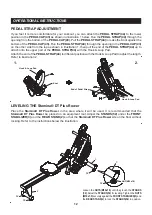
If you feel it is more comfortable for your workout, you can attach the
PEDAL STRAP(44)
to the lower
position in the
PEDAL CAP(43)
as shown in illustration 1 below. Run the
PEDAL STRAP(44)
through the
opening from the bottom of the
PEDAL CAP(43).
Pull the
PEDAL STRAP(44)
to make the Knot against the
bottom of the
PEDAL CAP(43).
Run the
PEDAL STRAP(44)
through the opening in the
PEDAL CAP(43)
on the other side from the top as shown in illustration 1, then pull the end of the
PEDAL STRAP(44)
up to
attach onto the upper part of the
PEDAL STRAP(44)
with the Hook & Loop Pad.
Attach the end of the
PEDAL STRAP(44)
to different position with the Hook & Loop Pad to adjust the length.
Refer to illustration 2.
Hook & Loop Pad
Hook & Loop Pad
Knot
1.
2.
End of Pedal Strap
LEVELING THE Stamina® DT Plus Rower
Place the
Stamina® DT Plus Rower
in the area where it will be used. It is recommended that the
Stamina® DT Plus Rower
be placed on an equipment mat. Adjust the
STANDS(52)
under the
FRONT
STABILIZER(3)
and the
REAR STAND(2)
so that the
Stamina® DT Plus Rower
sits on the floor without
rocking. Refer to the instructions below the illustration.
Loosen the
NUTS(M10x1.5)
until they touch the
STANDS
(52)
. Adjust the
STANDS(52)
for leveling. Tighten the
NUTS
(M10x1.5)
securely against the
FRONT STABILIZER(3)
and
the
REAR STAND(2)
to lock the
STANDS(52)
in position.
NUT(M10x1.5)


