background image

Page 94

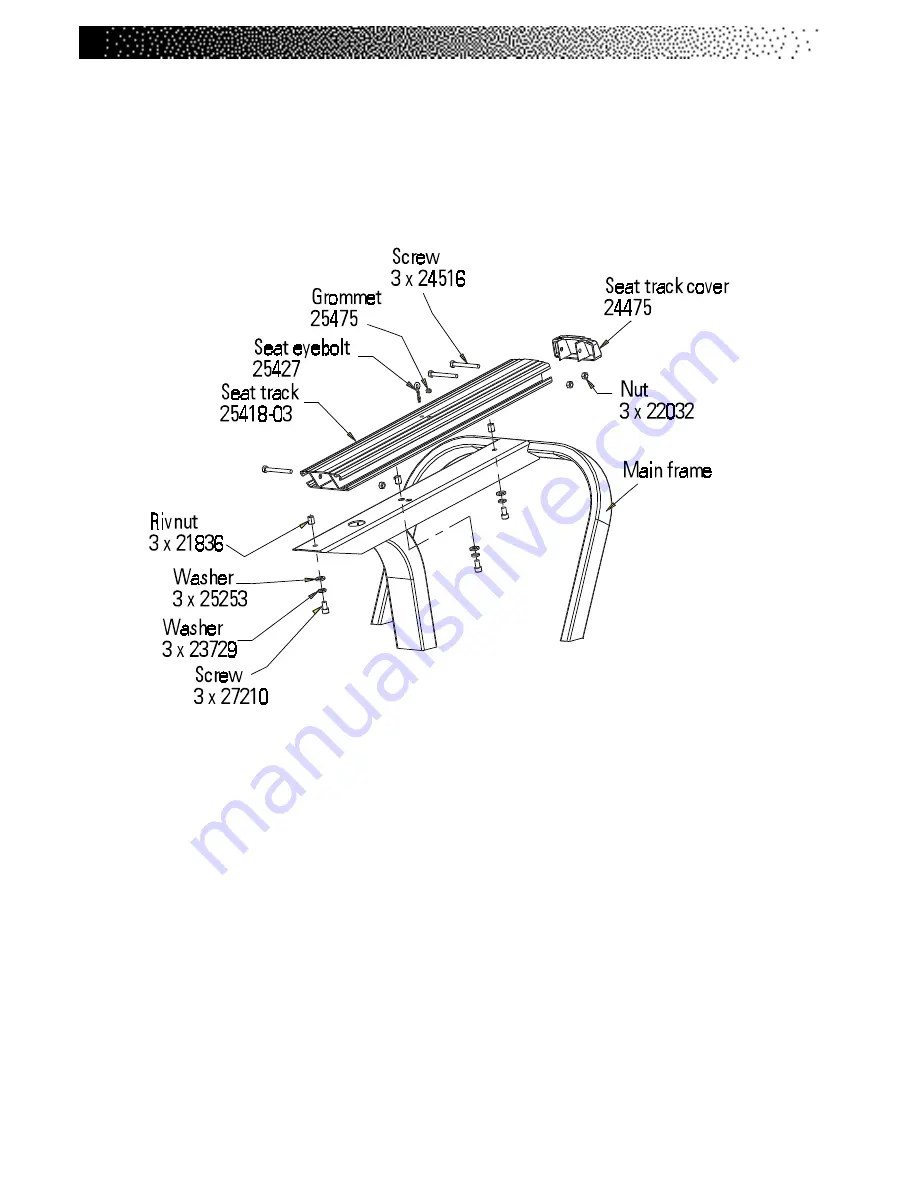
Figure 44: Seat Track Assembly, 3800 RC

Содержание FreeClimber

Страница 1: ...GENERAL MAINTENANCE REFERENCE MANUAL 1 800 331 3578 FAX 425 814 0601 INTERNATIONAL 425 823 1825 FAX 425 820 7505 www stairmaster com...

Страница 2: ...land WA 98034 1 800 331 3578 FAX 425 814 0601 INTERNATIONAL 425 823 1825 FAX 425 820 7505 www stairmaster com 2002 StairMaster Health Fitness Products StairMaster 4000 PT Crossrobics FreeClimber FreeR...

Страница 3: ...on 8000 General Troubleshooting 47 Gravitron 8000 Specific Troubleshooting 48 THE CROSSROBICS EXERCISE SYSTEMS 52 Crossrobics Electrical Troubleshooting 53 Crossrobics Mechanical Troubleshooting 54 Cr...

Страница 4: ...Figure 25 Pedal Arm Assembly 58 Figure 26 Right Side View 2650 UE 59 Figure 27 Top View 2650 UE 60 Figure 28 Weight Stack Assembly 61 Figure 29 3300 CE Right Side View 67 Figure 30 3300 CE Left Side V...

Страница 5: ...onitor and the cost efficient FreeClimber 4200 PT all designed especially for health clubs The StairMaster FreeClimber and the 4000 PT exercise systems are vertical climbing machines with an independe...

Страница 6: ...ap signal sent through the blue wire and sends another signal back down the brown wire to the alternator Alternator Provides the resistance which is varied by the pulsed field signal sent from the con...

Страница 7: ...if no resistance is found Don t forget about the possibility of mechanical resistance Worn chains bushings etc may provide some resistance Field Circuit Check VDC at the end of removed brown wire Per...

Страница 8: ...ed for an assistant Voltage under load should be between 9 12 VDC on the older style and no less than 12 VDC on the newer style power supply 8 Verify DC voltage on the grey cable pins 4 5 4000 PT pins...

Страница 9: ...ower supply board Check AC voltage at TP1 and TP2 on power supply board while stepping minimum 3 5 VAC 6 Reconnect the gray cable at the power supply board and remove console Test AC voltage in pins 2...

Страница 10: ...o this bridge the two small holes located at JP1 with a small flat blade screwdriver a small wire or a paper clip When you do this does the console power up YES Adjust the inductive switch closer to t...

Страница 11: ...on drive sprocket input one complete revolution The transmission pulley output should turn 19 times 6 Check that the transmission drive sprocket set screw is tight 7 Remove step chains return springs...

Страница 12: ...Page 13 BISON TRANSMISSION DETAIL...

Страница 13: ...e chain and inspect for frozen links Check that the transmission drive sprocket set screw is tight 6 Spin First Reduction Shaft Assy to check bearings and inspect for excessive wear 7 Remove step chai...

Страница 14: ...o t o m W 0 3 l i o n i a h C p e t S n o i t c e n n o C s t n i o P d n a n a e l C e t a c i r b u l 3 y r e v E 0 0 9 r o s h t n o m s r u o h y r d n a e l C g a r i t l u M e s o p r u p e s a...

Страница 15: ...Page 16 Figure 1 Final Assembly Left 4600 PT...

Страница 16: ...Page 17 Figure 2 Final Assembly Right 4600 PT...

Страница 17: ...Page 18 Figure 3 Final Assembly Left 4600 CL...

Страница 18: ...Page 19 Figure 4 Final Assembly Right 4600 CL...

Страница 19: ...Page 20 Figure 5 Covers 4600 PT CL...

Страница 20: ...Page 21 Figure 6 Pedal Arm Assembly First Reduction Shaft Assembly 4600 4400 PT CL 4200 PT...

Страница 21: ...Page 22 Figure 7 Drive Shaft Assembly Eccentric Hub Assembly 4600 4400 PT CL 4200 PT...

Страница 22: ...Page 23 Figure 8 Final Assembly Left 4400 4200 PT...

Страница 23: ...Page 24 Figure 9 Final Assembly Right 4400 4200 PT...

Страница 24: ...Page 25 Figure10 Final Assembly Left 4400 CL...

Страница 25: ...Page 26 Figure 11 Final Assembly Right 4400 CL...

Страница 26: ...Page 27 Figure 12 Covers 4400 PT CL 4200 PT...

Страница 27: ...Page 28...

Страница 28: ...l climbing machines with a rotating staircase which provides an aerobic workout equivalent to climbing stairs without the impact loads and skeletal trauma common to most aerobic activities Regular use...

Страница 29: ...does apply to the 7000 PT 1 Perform the AC tap alternator test 107 enter 1 this tests the blue wire Pin 3 While standing on the stairs the lower left LED should light up on the console indicating a go...

Страница 30: ...cable Grey cable pin 2 TP2 brown Field signal from console same as pin 2 of console cable Grey cable pin 3 TP3 blue AC tap signal to console same as pin 3 of console cable connected to alternator AC...

Страница 31: ...do not short relay is bad 2 When the relay is de energized LED indicator off TPC and TPB contact should be shorted If not relay is bad F Load Resistor 1 Turn the power off 2 Measure resistance betwee...

Страница 32: ...thin itself or from B to normally open post this is normal only while under console control TPA red lead to TPC black lead DVM on ohms OL This tests whether or not the load resistor is shorted to B wh...

Страница 33: ...Page 34 4 AC Tap End of blue wire red to TP3 black DVM 1 ohm or less TP3 red to J1 3 black DVM 1 ohm or less...

Страница 34: ...wing wires using your voltmeter set on Ohms Disconnect the main cable from the console before testing All tests should read 1 0 Ohms A Disconnect the DC cable Test between Pin 4 of the main cable conn...

Страница 35: ...Page 36...

Страница 36: ...rocket input one complete revolution The transmission pulley output should turn 19 times 7 Check that the transmission drive sprocket set screw is tight 8 Visually inspect both upper and lower sprocke...

Страница 37: ...ive teeth 42 P N 23424 03 Transmission Drive Sprocket teeth 12 P N 23427 Transmission internal ratio 18 75 1 P N 20001 Transmission Pulley diameter 22 P N 20208 Alternator Pulley diameter 18 P N 21157...

Страница 38: ...Page 39...

Страница 39: ...W A N n i a h C p e t S y l b m e s s A e t a c i r b u L r o y l h t n o M 0 0 3 r e t f a e s u f o s r u o h A N r o t o m W 0 3 l i o d n a n a e l C e t a c i r b u l r o y l r e t r a u Q 0 0 9...

Страница 40: ...Page 41 Figure 13 Parts Needing Periodic Lubrication...

Страница 41: ...Page 42 Figure 14 Side Cover and Handrail Assemblies...

Страница 42: ...Page 43 Figure 15 Poly V Belt Tension...

Страница 43: ...Page 44 Figure 16 Drive Chain Assembly...

Страница 44: ...Page 45 Figure 17 Step Assembly...

Страница 45: ...Page 46 Figure 18 Step Chain and Sprocket Assemblies...

Страница 46: ...Page 47 Figure 19 Transmission and Alternator Assemblies...

Страница 47: ...Page 48 Figure 20 Wiring Diagram 1...

Страница 48: ...Page 49 Figure 21 Wiring Diagram 2...

Страница 49: ...Page 50 Figure 22 Wiring Diagram 3...

Страница 50: ...es 110 volts AC power to the air compressor and solenoid B Converts 110 volts AC to 12 volts DC minimum for the console C Converts 110 volts AC to 5 volts DC for the transducer 3 GFI Cord Contains a s...

Страница 51: ...Page 52 7 Solenoid Release valve that opens at completion of a program and expels air and moisture from the accumulator tank The valve is normally closed...

Страница 52: ...orm 2 Program a workout for a 200 lb person at level 9 3 After compressor turns off lift the platform assembly up to full extension 4 Slowly lower platform assembly until it stops on its own 5 The pla...

Страница 53: ...er module 4 If voltage is present replace solenoid SYMPTOM PROGRAM GETS HARDER DURING WORKOUT SLOW LEAK 1 Perform leak test on and off platform 2 Use soapy water solution to spray over all components...

Страница 54: ...r pyramiding instruction 1 This system has a leak that must be repaired 2 Possible bad keypad in console SYMPTOM WHEN PROGRAMMED FOR HIGHER LEVELS THE PLATFORM WILL NOT RISE AFTER COMPRESSOR SHUTS OFF...

Страница 55: ...cal friction Lubricate oilite bushings with 30W oil SYMPTOM AT THE END OF WORKOUT OR WHEN MACHINE IS POWERED UP CONSOLE FLASHES ZEROS 4 TIMES 1 Power module is too far out of zero adjust power module...

Страница 56: ...Page 57 ELECTRICAL DETAIL...

Страница 57: ...Page 58 SAFETY VALVE...

Страница 58: ...e between the Crossrobics 1650 LE conditioning system and other types of exercise is the patented Crossrobics loading system The Crossrobics loading system allows the user independent control of both...

Страница 59: ...as a ground Use leads with alligator clips to eliminate the need for an assistant Voltage under load should be between 9 12 VDC on the older style and no less than 12 VDC on the newer style power supp...

Страница 60: ...step chains for frozen links 4 2650 UE Align the adapter blocks vertically and verify that the handlebar is parallel to the weight stack Inspect the input chains for twisting near the adapter blocks a...

Страница 61: ...n i a h C n i a h C e v i r D e t a c i r b u L r o k e e w h c a E s r u o h 0 7 r e t f a A N r o t o m W 0 3 l i o n a e l c e v o m e R e t a c i r b u l d n a 3 y r e v E 0 0 9 r o s h t n o m s...

Страница 62: ...Page 63 Figure 23 Right Side View 1650 LE...

Страница 63: ...Page 64 Figure 24 Left Side View 1650 LE...

Страница 64: ...Page 65 Figure 25 Pedal Arm Assembly...

Страница 65: ...Page 66 Figure 26 Right Side View 2650 UE...

Страница 66: ...Page 67 Figure 27 Top View 2650 UE...

Страница 67: ...Page 68 Figure 28 Weight Stack Assembly...

Страница 68: ...ograms The Stratus uses a variable resistance system to maintain constant power within any given intensity level The resistance decreases as you pedal faster and increases as you pedal slower The vari...

Страница 69: ...tch connector while pedaling VAC should increase with RPM 7 Re connect the inductive switch connector to the power control board 8 Measure VAC between test points 10 and 12 of the power control board...

Страница 70: ...hain removed to check the pedal bearings and inspect the crank assembly for wear 6 Loosen the J bolt assembly and lower the Alternator Flywheel assembly 7 Verify that the jam nut on the flywheel and t...

Страница 71: ...p s n i d n a n a e l C r o k e e w h c a E 0 7 y r e v e r e t f a e s u f o s r u o h r e t a w d n a p a o S d l o h e s u o h d e t u l i d r e n a e l c A N t s o p t a e S t c e p s n i d n a n...

Страница 72: ...ock will be considered part of the power control board assembly and will be attached to every control board Heat sink paste thermal compound will be used to help dissipate heat part 13590 7 groove Pol...

Страница 73: ...Page 74 Figure 29 3300 CE Right Side View...

Страница 74: ...Page 75 Figure 30 3300 CE Left Side View...

Страница 75: ...Page 76 Figure 31 3900 RC Right Side View...

Страница 76: ...Page 77 Figure 32 3900 RC Left Side View...

Страница 77: ...Page 78 Figure 33 3300 CE Seat Adjustment Pin...

Страница 78: ...Page 79 Figure 34 3900 RC Seat Assembly...

Страница 79: ...Page 80 Figure 35 Drive Chain Assembly...

Страница 80: ...Page 81 Figure 36 Intermediate Shaft Assembly...

Страница 81: ...Page 82 Figure 37 J Bolt Assembly...

Страница 82: ...Page 83 Figure 38 Crank Assembly...

Страница 83: ...Page 84 Figure 39 Alternator Assembly...

Страница 84: ...tum uses a variable resistance system to maintain constant power within any given intensity level The resis tance decreases as you pedal faster and increases as you pedal slower The variable resistanc...

Страница 85: ...red is below 6 0 VDC then the battery is bad 5 Plug the battery connector back into the power control board 6 Test the main cable Remove the four console knobs from the console Gently lift the console...

Страница 86: ...the diode to the FLD terminal of the alternator 17 Reconnect the alternator wiring connector to the power control board 18 Test the load resistor Unplug the load resistor from the power control board...

Страница 87: ...crank assembly are tight 4 Spin the crank assembly with the belt removed and listen for any clicking or grinding noises The crank should spin freely 4 or 5 revolutions Resume troubleshooting at step...

Страница 88: ...t u l i d d l o h e s u o h r e n a e l c t a e S n a e l C k e e w h c a E r e t f a r o 0 7 y r e v e e s u f o s r u o h p a o S r e t a w d e t u l i d d l o h e s u o h r e n a e l c s l a d e P...

Страница 89: ...Page 90 Figure 40 Final Assembly Right Side View 3400 CE...

Страница 90: ...Page 91 Figure 41 Final Assembly Left Side View 3800 RC...

Страница 91: ...Page 92 Figure 42 Seat Post Assembly 3400 CE...

Страница 92: ...Page 93 Figure 43 Seat Assembly 3800 RC...

Страница 93: ...Page 94 Figure 44 Seat Track Assembly 3800 RC...

Страница 94: ...Page 95 Figure 45 Intermediate Poly V Assembly...

Страница 95: ...nk Assembly Install with flange to the inside HTD Sprocket Assy 25601 Pedals pair 25642 Bicycle Crank 25643 RH Bearing nut assy 24434 Crank shield 24083 03 Jam nut 24073 LH Bearing nut assy 24435 Main...

Страница 96: ...Page 97 Figure 47 Alternator Flywheel Assembly...

Страница 97: ...Page 98 Figure 48 Wire Connections...

Страница 98: ...Page 99 Figure 49 Power Control Board Plug Ins...

Страница 99: ...Alternator P N 2 0 2 0 5 Load Resistor P N 25611 5 O hm 240 W att Positive O utput B W HITE G round T erminal BLACK Field T erminal BR O W N 3400 Upper M ain C able P N 25462 Console to Inline C onnec...

Страница 100: ...roup exercise bikes The LeMond RevMaster bike was designed by Greg LeMond Paul Swift and the StairMaster Team Greg LeMond is the first American to win the Tour de France and the only American to ever...

Страница 101: ...Page 102...

Страница 102: ...Page 103...

Страница 103: ...Page 104...

Страница 104: ...Page 105...

Страница 105: ...Page 106...

Страница 106: ...cover Use the 4 mm hex key to remove the four mounting screws on the right side cover Use a philips screwdriver to remove the two philips screws on the left side cover Lift the right side cover over t...

Страница 107: ...m Rotate the pedals a few revolutions and then tighten the crank arm bolt again to ensure that the crank arm is tightened to 29 5 foot lbs 3 Apply a thin coat of grease on the right bottom bracket sha...

Страница 108: ...r Kit 22029 Wheel hardware nut 2 22086 Side Panel Rivets 10 22322 Pedals LH and RH 1 pair 24032 Bearing 15x28 mm RH 1 24387 Bearing 15x35 mm LH 1 24410 Drive Chain 1 24564 Wheel Track Seat Molded 3600...

Страница 109: ...al Weight Stack Indicator 1 24437 Handgrips 2 7000 PT Spare Parts Kit 24729 22 00 Part Description Qty Per Kit 20157 Master Link 40 1 20202 Timing Belt Poly V 1 22086 Side Panel Rivets 10 23257 Drive...

Страница 110: ...r Spare Parts Kit 1 10778 INSTRUCT BEARING REPLMNT 4000 1 20015 CAP LEVELING ARM 2 20030 RING RETAINING LEVELING ARM 2 20768 CONNECTOR SPRING CHAIN 1 20769 SLEEVE BEARING INSERT 3 21094 PULLEY SPRING...

Страница 111: ...ve Sprocket Assy 1 21519 Spring Pulley T2 Units 2 24723 FreeClimber SILVER Spare Parts Kit 1 FreeClimber PLATINUM Spare Parts Kit 675 00 Part Description Qty Per Kit 24724 FreeClimber GOLD Spare Parts...

Страница 112: ...minute or 8 75 METs 8 step 40 revolutions of alternator 70 SPM 2 800 RPM of alternator 2 800 RPM 41 25 MPH in automobile 41 25 MPH x 3 650 hours 150 562 5 equivalent miles year VERTICAL FEET CONVERSI...

Страница 113: ...re State Building New York 102 985 Eiffel Tower Paris 92 853 Trans America Building San Francisco 81 726 Hoover Dam Nevada 72 630 Gateway Arch St Louis 63 555 Washington Monument DC 55 482 Great Pyram...

Отзывы: