background image

ST
AGE CONTROL

stage accompany

R

DS20 USER MANUAL

5-6

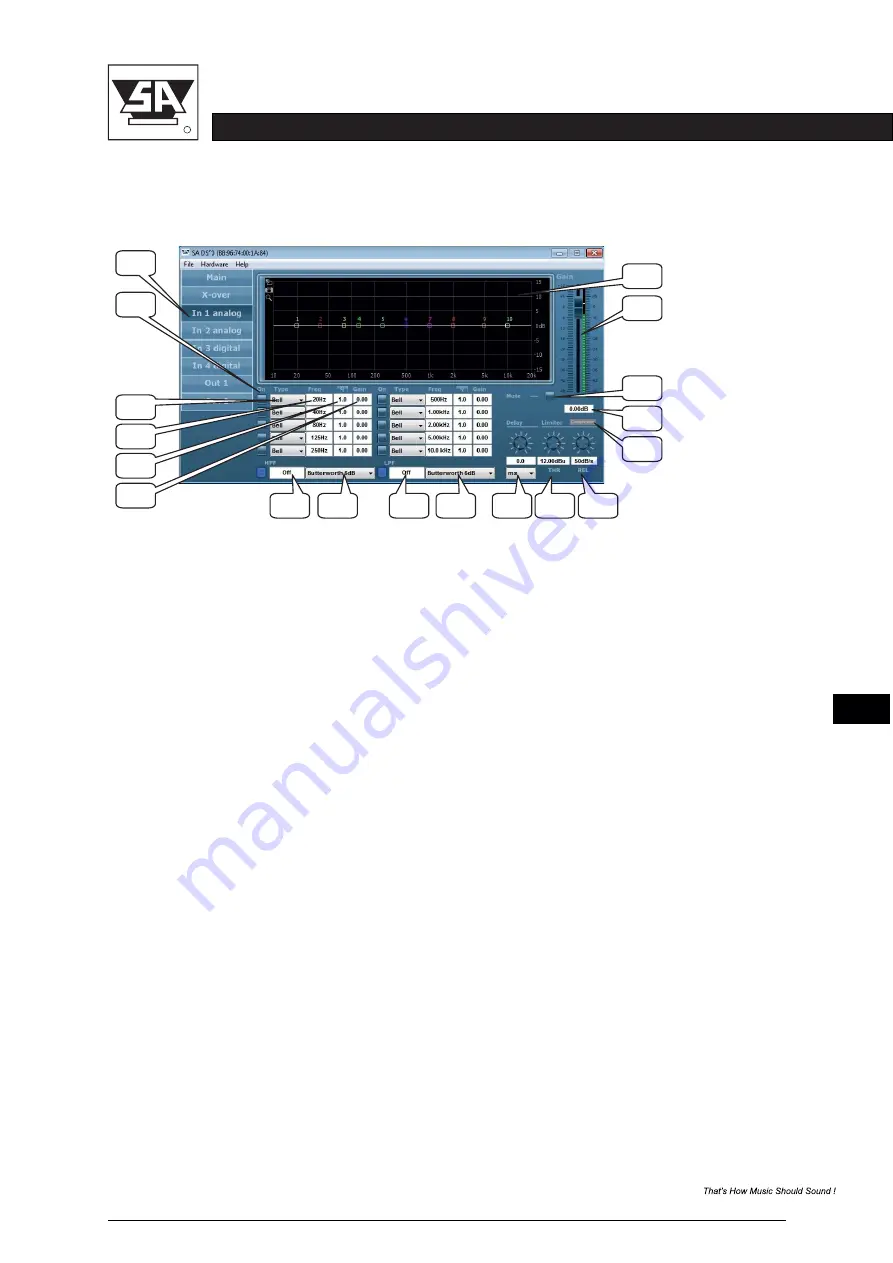
Input Window

1.

Input tab: clicking on this tab will open the input processing window

.

2.

PEQ on/off button: clicking these buttons enable the corresponding parametric equalizer
(PEQ). When a PEQ is enabled the corresponding button lights up.

.

3.

EQ type: here you can choose Bell, Notch, high shelving, low shelving All Pass, Band Pass,
High Pass or Low Pass equalizers.

4.

Center or shelving frequency: here you can set the equalizer frequency.

5.

Q-factor: the Q factor is a value of how sharp the equalizer-curve is. A high value means

a sharp curved EQ. This is either a narrow band or a sharp increase or decrease with

with shelving equalizers. Use your ears to judge and check with the frequency response
windows of the software.

6.

Gain: set the amount of boost or cut in this field.

7.

High pass and low pass filter: also known as low-cut (sub-sonic) and high-cut respectively,

these filters remove frequencies below or above the chosen frequency.

8.

Slope: this determents the steepness of the filter. The same types and slopes are available
at the cross-over settings.

9.

Delay: the maximum delay permitted is 1000ms, in steps of 0.1ms. It can be displayed
in feet, inch, m, mil, mm, ms and s.

10.

Limiter threshold: this is the level above which the limiter becomes active. Set this level
to the maximum desired output.

11.

Limiter release: this is the setting to determine how fast the limiter function (gain reduction)
is returned to normal (no limiting). This value is time-dependent.

12.
13.

Input Gain: this is the field to set the absolute value of the gain setting.
Compressor tab: clicking on this tab will open the compressor processing window..

14.

Mute button: input channel mute button.

15.

Input Gain: this is the input channel gain setting fader and input level meter.

16.

Frequency response window: this window gives a graphical representation of the cross-
settings.

.

Note:

When using EQ; use narrow EQ mostly to cut and not to boost.
Use narrow EQ (high Q) for correction and low Q (wide EQ) for getting the desired sound.

1

2

5

4

3

6

7

8

7

8

9

10

11

16

15

14

13

12

2

Содержание DS20 Series

Страница 1: ...DIGITAL SERIES DS20 User Manual Version 1 2 Digital Power Amplifier stage accompany R DS20 USER MANUAL...

Страница 2: ...The Netherlands This manual is intended to provide information about the Stage Accompany DS20 Every effort has been made to make this manual complete and as accurate as possible However no warranty o...

Страница 3: ...stage accompany R DS20 USER MANUAL Table of Contents Quick Introduction to the DS20 Introduction Connections Operation Stage Control Recommendations Technical Specifications Warranty Overview...

Страница 4: ...5 4 2 1 4 3 1 4 2 2 4 3 2 4 2 3 4 3 3 4 2 4 4 3 4 4 2 5 4 3 5 4 2 6 4 3 6 4 2 7 4 3 7 4 2 8 4 3 8 4 2 9 4 3 9 Gain Gain Input Selection Delay Delay Low Pass Filter Low Pass Filter High Pass Filter Hi...

Страница 5: ...k configuration 5 5 Main Window 5 6 X over window 5 7 Input Window 5 8 Output window 5 9 Compressor window 4 8 4 8 5 1 5 1 5 2 5 4 5 4 5 5 5 6 5 7 5 8 4 4 1 4 4 2 4 4 3 4 4 4 Load Preset Save Preset A...

Страница 6: ...n be found in the table in paragraph 3 1 Connect the DS20 to your signal sources via the INPUT connectors Connect this amplifier to other units via the LINK outputs using short signal leads Connect yo...

Страница 7: ...m of 30 DS20 amplifiers to a 600 ohms source like a mixing console If more than 30 units need to be connected to a single source a seperate signal driver must be used The DS20 is protected against the...

Страница 8: ...at frequency response irrespective Two XLR 3 AES EBU connectors for input and buffered output are mounted at the rear An internal high performance 10 100Mbps Ethernet switch module provides a simple n...

Страница 9: ...xact voltages are stated at the rear of the amplifier Switching between mains voltages has to done by an authorised Stage Accompany service centre Connecting to the wrong voltage is dangerous and may...

Страница 10: ...e same type and value Current Table Below the current consumption of the DS20 is tabulated for two selectable mains voltages The power consumption shown applies 1 8 of maximum output power pink noise...

Страница 11: ...in meters given the cable gauge in square millimeters and the number of DS20s supplied through the cable Maximum Length ML G 22 5 N Maximum Length ML G 90 N 110 120 V Cable Gauge mm 2 1 5 2 5 4 0 6 0...

Страница 12: ...he output of the preceding equipment If this is not possible connect pin 3 to pin 1 at the input of the DS20 NEUTRIK 1 2 3 220 240 V Cable Gauge mm 2 1 5 2 5 4 0 6 0 10 0 16 0 No of 1 90 225 360 540 9...

Страница 13: ...Control terminals are linked together at the loudspeaker terminal The signal and DDC terminals are linked at the loudspeaker terminal A maximum damping is obtained with these connections If your speak...

Страница 14: ...Since you are disabling the amplifier s feedback network signal gain will be almost infinite The smallest input signal will result in full power output with the possibility of square waves damaging y...

Страница 15: ...and DDC leads as soon as possible behind the output terminals of the DS20 see figure 3 7 on this and figure 3 8 on the next page 2 2 1 1 SPEAKON NL4FC Figure 3 7 Try to avoid this way of connecting se...

Страница 16: ...closures which means extra losses 2 The DDC only works for the first enclosure Splitting the leads at the amplifier output terminals solves these problems see figure 3 8 The DDC system corrects the pe...

Страница 17: ...loudspeaker cable power loss Per loudspeaker impedance a table is shown in tables 3 4 to 3 7 with the proportional power loss given the loudspeaker cable gauge in square millimeters and the cable leng...

Страница 18: ...1 2 8 1 7 1 1 30 14 5 9 3 7 8 6 0 4 1 2 5 1 6 40 18 5 12 0 10 2 7 8 5 4 3 3 2 1 50 22 1 14 5 12 4 9 6 6 6 4 1 2 6 100 36 2 25 4 22 1 17 5 12 4 7 8 5 0 Table 3 6 Proportional power loss as a function o...

Страница 19: ...D display will show the last used preset different items press the SELECT button and rotate the encoder The DSP loudspeaker management part of the DS20 offers a wide range of tools for sound system de...

Страница 20: ...s Freq 14500Hz Enabled On Type BUT 24dB Set the delay time by turning the encoder The delay time on the front will be shown in ms by Adjust the Low Pass Filter frequency by turning the rotary encoder...

Страница 21: ...rclockwise until the frequency passes 20Hz complete frequency range of 20Hz to 20kHz Adjust the frequency by dialing the rotary encoder Press the rotary encoder to change the filter type Select the ty...

Страница 22: ...0ms Ratio 5 00 1 Att 50ms Rel 50dB s Off Rel 500ms Gain 0dB The Compressor is a true RMS compressor Turn the rotary encoder to set the threshold The limiter is a zero attack peak limiter Only the tres...

Страница 23: ...B Adjust the Low Pass Filter frequency by turning the rotary encoder You can switch the low pass filter off by turning the rotary encoder up clockwise until the frequency passes 20kHz Press the rotary...

Страница 24: ...unterclockwise until the frequency passes 20Hz complete frequency range of 20Hz to 20kHz Adjust the frequency by dialing the rotary encoder Press the rotary encoder to change the filter type Select th...

Страница 25: ...ompr Out 1 Compr Thr 23 00dBu Thr 12 00dBu Normal Hold 100ms Ratio 5 00 1 Att 50ms Rel 50dB s Inverted Rel 500ms Gain 0dB The Compressor is a true RMS compressor Turn the rotary encoder to set the thr...

Страница 26: ...ning the rotary encoder pushing the rotary encoder confirms the character The presets contain all filter dynamics gain settings etc in other words everything that selected and moves the cursor to the...

Страница 27: ...he amplifier has reached its limit The indication is correct for every connected impedance When the clip LEDs flash fre quently distortion is to be expected 4 4 3 Access Level The DS20 has the option...

Страница 28: ...gital Series through USB or internet Supported operating systems The following operating systems are supported Microsoft Windows XP with Service Pack 2 32 bit and 64 bit Microsoft Windows Vista 32 bit...

Страница 29: ...uble clicking the desktop icon or by selecting Start Programs Stage Accompany Stage Control MAC OS X Download the installation package from our website and open it http www stageaccompany com support...

Страница 30: ...Series amp s you do the following Connect your SA Digital Series amp s to your PC using the USB port on the front or if your PC is connected to a LAN use one of the two switched 10 100Base TX Ethernet...

Страница 31: ...e corresponding input window 4 Output tabs clicking on these tabs will open the corresponding output window 5 Preset choose load or store to manage presets 6 Choose a preset or name a preset in these...

Страница 32: ...ons mute the corresponding channel When a channel is muted the corresponding button lights up 9 Phase invert to compensate for phase behavior of the chosen filter slope loudspeaker or loudspeaker posi...

Страница 33: ...encies below or above the chosen frequency 8 Slope this determents the steepness of the filter The same types and slopes are available at the cross over settings 9 Delay the maximum delay permitted is...

Страница 34: ...king on this tab will open the compressor processing window The output window gives access to an independent set of EQ s high pass low pass filters delay compressor and output limiter The buttons and...

Страница 35: ...the compressor circuit begins to function The Compressor window gives access to several ways of protecting your loudspeaker system depending on type and power handling Notes The Stage Control configu...

Страница 36: ...one of the same type and value A When built into a flightcase ensure yourself that there are sufficient possibilities for the plifier switched on different fuse can cause permanent damage to the ampl...

Страница 37: ...and data connections 1 x Neutrik USB connector located at the front 2 x XLR 3 female connector for input signal 2 x XLR 3 male connector for signal link 4 x SpeakON NL4 for output signal 1 x 32A Powe...

Страница 38: ...es hinges fans etc one year from the date of the first consumer purchase To validate warranty the purchaser must always keep the original receipt of purchase to establish the date of purchase Appeal o...

Страница 39: ...the service centre or factory However Stage Accompany will pay for the costs of return shipment to the customer if repairs are covered by warranty Caution Warranty work can only be performed at autho...

Страница 40: ...n Signal and Clip LEDs Channel 1 Power Amp On Signal and Clip LEDs Channel 2 USB connection Fuse Channel 2 Fuse Channel 1 Output Channel 2 Input Channel 2 Output Channel 1 Input Channel 1 AES EBU digi...

Отзывы: