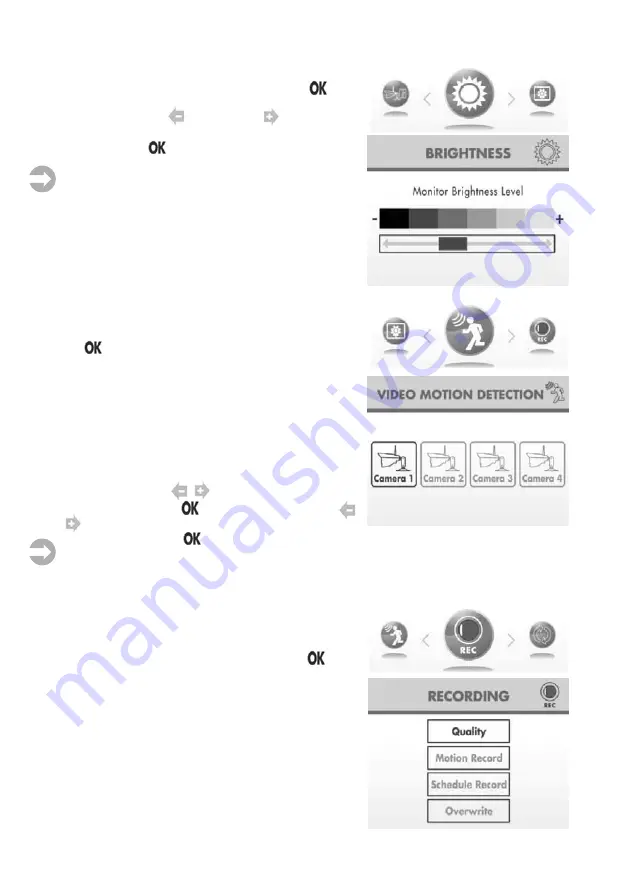
stabo multifon security III Скачать руководство пользователя страница 13

Brightness

Öffnen Sie das Untermenü 

Brightness

 mit der 

-Taste,

um die Bildschirmhelligkeit einzustellen:
Wählen Sie mit den 

- (dunkler) und  - (heller)-Tasten

die gewünschte Helligkeit und bestätigen Sie Ihre Ein-

stellung mit der 

-Taste. Der Monitor wechselt zurück

ins Menü.

Hinweis:

 Im Quad-Modus ist diese Funktion nicht

verfügbar.

Video Motion Detection

Öffnen Sie das Untermenü 

V

ideo 

M

otion 

D

etection

 mit

der 

-Taste, um die Empfindlichkeit für die Videobewe-

gungserkennung einzustellen.
Die zur Verfügung stehenden Empfindlichkeits-Stufen

(

Day

/

Tag: off/aus, low/niedrig, medium/mittel, high/hoch,

Night/Nacht: off/aus, low/niedrig)

 können für jede einzelne

Kamera separat eingestellt werden. (

Low/

niedrige

Empfindlichkeit: bei einer starken Veränderung im Bild

wird die Aufzeichnung gestartet, 

high/

hohe Empfindlichkeit:

bei einer leichten Veränderung im Bild wird eine Aufzeich-

nung gestartet.)
Wählen Sie mit den 

/

-Tasten die Kamera aus und

bestätigen Sie mit der 

-Taste. Stellen Sie mit den 

/

-Tasten die gewünschte Empfindlichkeit ein und

bestätigen Sie mit der 

-Taste.

Hinweis:

 Ist die Einstellung 

OFF/aus

 aktiviert, so wird

eine Aufzeichnung nur über den Bewegungsmelder der

Kamera gestartet.

Recording

Öffnen Sie das Untermenü 

Recording

 mit der 

-Taste,

um Ihre Einstellungen für die Aufzeichnung von Aufnah-

men festzulegen, hier stehen 4 Menüpunkte zur Auswahl:

Quality:

 Wahl der Bildauflösung

Motion Recording:

 Einstellungen für Automatische

Aufzeichnungen

Scheduled Recording/Timer:

 Einstellungen für

Programmierte Aufzeichnungen

Overwirte:

 automatisches Überschreiben alter Dateien

durch aktuelle Aufzeichnungen

13

Содержание multifon security III

Страница 1: ...ting instructions Keep these operating instructions in a safe place it contains important hints for operating the device Bedienungs anleitung User manual digital radio technology 2 4 GHz digitale Funk...

Страница 2: ...erung Monitor Antenne USB Kabel CD mit Treibersoftware f r Webcamfunktion AV Audio Video Kabel Bedienungsanleitung deutsch englisch Bitte berpr fen Sie den Packungsinhalt auf Vollst ndigkeit Pr fen Si...

Страница 3: ...werblichen Fl chen unbedingt die entsprechenden Hinweispflichten Nicht den Witterungseinfl ssen im Freien aussetzen Die Kamera des stabo multifon security lll ist wetterfest Schutzart IP 65 und zur Mo...

Страница 4: ...n der einzelnen Einstellungen im Systemmen Quad Anzeige Taste Einfacher Tastendruck aktiviert die autom Umschaltung alle 5 Sek zwischen den verf gbaren Kameras doppelter Tastendruck aktiviert die Quad...

Страница 5: ...eige x2 Verschieben des Bildausschnitts mit den Lautst rke Kanal Tasten m glich 8 Joystick Gezieltes L schen einzelner Aufzeichnungsdateien im Wiedergabe Modus 9 TV AV Taste Aktivieren Deaktivieren de...

Страница 6: ...automatisch 16 Hochleistungs Infrarot LEDs Sichtweite bis ca 12 m bei idealen Bedingungen das empfangene Monitorbild ist dann schwarz wei 6 Pair Taste Ankoppeln optionaler Zusatzkamera s 7 PIR Sensor...

Страница 7: ...es f r die Kamera folgende Punkte Erfassungsbereich ca 60 und Reichweite ca 5 m des Bewegungsmelders Beleuchtungssituation Die Kamera sollte nicht direkt auf starke s Lichtquellen Sonnenlicht ausgeric...

Страница 8: ...n der Kanal up down Taste manuell zwischen den verf gbaren Kameras umschalten f r einen automatischen Wechsel dr cken Sie die Quad Anzeige Taste 3 Neue Aufnahme Symbol Wenn eine neue Aufzeichnung been...

Страница 9: ...GB in den Kartenschacht Formatieren Sie Ihre SD Karte vor der erstmaligen Benutzung Achten Sie darauf dass die Karte nicht schreibgesch tzt ist Je nach Bedarf k nnen Sie eine Aufzeichnung manuell durc...

Страница 10: ...im Display NEW leuchtet am oberen Monitorrand Wiedergabe einer gespeicherten Aufzeichnung Dr cken Sie im Vollbild Modus die Taste um in den Wiedergabe Modus zu wechseln ffnen Sie durch Dr cken der Ta...

Страница 11: ...selt der Monitor in den Vollbildmodus Settings ffnen Sie mit der Taste das Untermen Settings hier stehen 6 Men punkte zur Auswahl Date Time Eingabe von Datum und Uhrzeit Alarm Volume Lautst rke Einste...

Страница 12: ...eint Delete all data L schen aller Daten W hlen Sie mit der Taste Yes ja und best tigen Sie mit der Taste oder brechen Sie die Formatierung mit No nein ab Nach erfolgter Formatierung erscheint Format...

Страница 13: ...lichkeit bei einer starken Ver nderung im Bild wird die Aufzeichnung gestartet high hohe Empfindlichkeit bei einer leichten Ver nderung im Bild wird eine Aufzeich nung gestartet W hlen Sie mit den Tas...

Страница 14: ...fnahmedauer 5 15 30 Sek und best tigen Sie mit der Taste W hlen Sie mit den Tasten Mode und best tigen Sie mit der Taste W hlen Sie mit den Tasten Single Channel Aufzeichnung Einzelkamera oder 4 Chann...

Страница 15: ...tlich an schlie en Jede Zusatzkamera muss einzeln mit dem Monitor gekoppelt werden die im Lieferumfang enthaltene Kamera Cam1 ist bereits werksseitig mit dem Monitor gekoppelt Schalten Sie dazu Zusatz...

Страница 16: ...GE MODE erscheint Sollte stattdessen USB PC CAMERA MODE im Display erscheinen trennen Sie bitte Monitor und PC und f hren die Verbindungsschritte erneut aus Ihr PC meldet dann den Anschluss eines Wech...

Страница 17: ...em im Lieferumfang befindlichen AV Kabel Stecken Sie dazu den 3 5 mm Klinkenstecker in die AV Buchse des Monitors und die Cinchstecker gelber Stecker f r Video wei er Stecker f r Audio in die daf r vo...

Страница 18: ...icture daf r nutzen oder einen kleineren Bildschirm verwenden Aufnahme kann nicht durchgef hrt werden Keine Speicherkarte im SD Kartenschacht Die Speicherkarte ist schreibgesch tzt oder nicht formatie...

Страница 19: ...ting bracket for monitor Antenna for monitor USB cable CD with driver software for webcam function AV cable User manual Check your package to confirm that you have received the complete system includi...

Страница 20: ...eillance Make sure that neither neigh bouring plots nor public areas are covered If commercial areas are affected observe the corre sponding information obligations Do not expose to the effects of the...

Страница 21: ...ystem mode Quad display key A simple keystroke activates the automatic switching every 5 sec between the available cameras a double keystroke activates the quad function simultaneous display of all av...

Страница 22: ...tion dual magnification display shows x2 Use the up down left right keys to shift the image 8 joystick Targeted deletion of individual recording files in playback mode 9 TV AV key Activates deactivate...

Страница 23: ...lly activates 16 high perfor mance infrared LEDs visibility range up to 12 m in ideal conditions image on the monitor is then black white 6 Pair button optional coupling of accessory camera s 7 PIR se...

Страница 24: ...ower supply Do not expose the power supply to the effects of the weather Protect the connector assembly against moisture Fastening The degree of protection IP 65 allows fastening outside though the ca...

Страница 25: ...the icon appears in the display 6 Record icon If a recording is started either manually or automatically via timer PIR sensor or Video Motion Dectection the red REC icon appears in the display Below t...

Страница 26: ...u Video Motion Detection Press the key to activate the Automatic Recording Mode MOTION appears at the top edge of the monitor As soon as the system detects motion in the camera image the recording wil...

Страница 27: ...ast forward or fast rewind up to 16 times to stop or pause press the keys Use the joystick to select record files you want to delete from the SD card Press the key 3 times to return to full screen mod...

Страница 28: ...e whether the receiver is permanently open all sounds are heard or the receiver is muted it will be turned on for about 5 sec if a sound is detected Use the keys to select ON or OFF and confirm your c...

Страница 29: ...bmenu with the key to adjust the sensitivity for video motion detection The available sensitivity levels day low medium high night off low can be set separately for each camera Low a strong change in...

Страница 30: ...h the key Use the keys to select the duration 5 15 30 sec and confirm your choice with the key Use the keys to select Mode and confirm with the key Use the keys to select Single Channel or 4 Channel a...

Страница 31: ...l cameras optional Each additional camera must be individually connected to the monitor the camera included in the scope of supply has already been paired factory made Switch on the additional camera...

Страница 32: ...MODE appears on the monitor If instead USB PC CAMERA MODE appears on the monitor unplug the monitor and the PC and run again the connection steps Your PC will indicate the connection of a removable m...

Страница 33: ...s on a larger screen please connect one end of the included AV cable to the AV output of the monitor and the other end to the Video IN Yellow and Audio IN White ports on the TV VCR or other viewing re...

Страница 34: ...TV Monitor PIP Picture in Picture function Check your TV Monitor product manually to see if this feature is available on your TV Monitor View video on a smaller screen TV Monitor Recording Problems Ma...

Страница 35: ...befugt ge ffnet oder ver ndert wurden Funktionen die nicht in der Bedienungsanleitung beschrieben sind Fehler durch unsachgem e Handhabung mutwillige Besch digung mechanische ber beanspruchung berm ig...

Страница 36: ...Schwierigkeiten das neue Ger t in Betrieb zu nehmen Hochwertige elektronische Ger te sind sehr komplex kleine Ursachen haben manchmal gro e Wirkung Viele Probleme lassen sich jedoch schnell und unkom...

Отзывы: