background image

INSTALLATION

S

unLite

®

LTC Lamp Housing Installation 

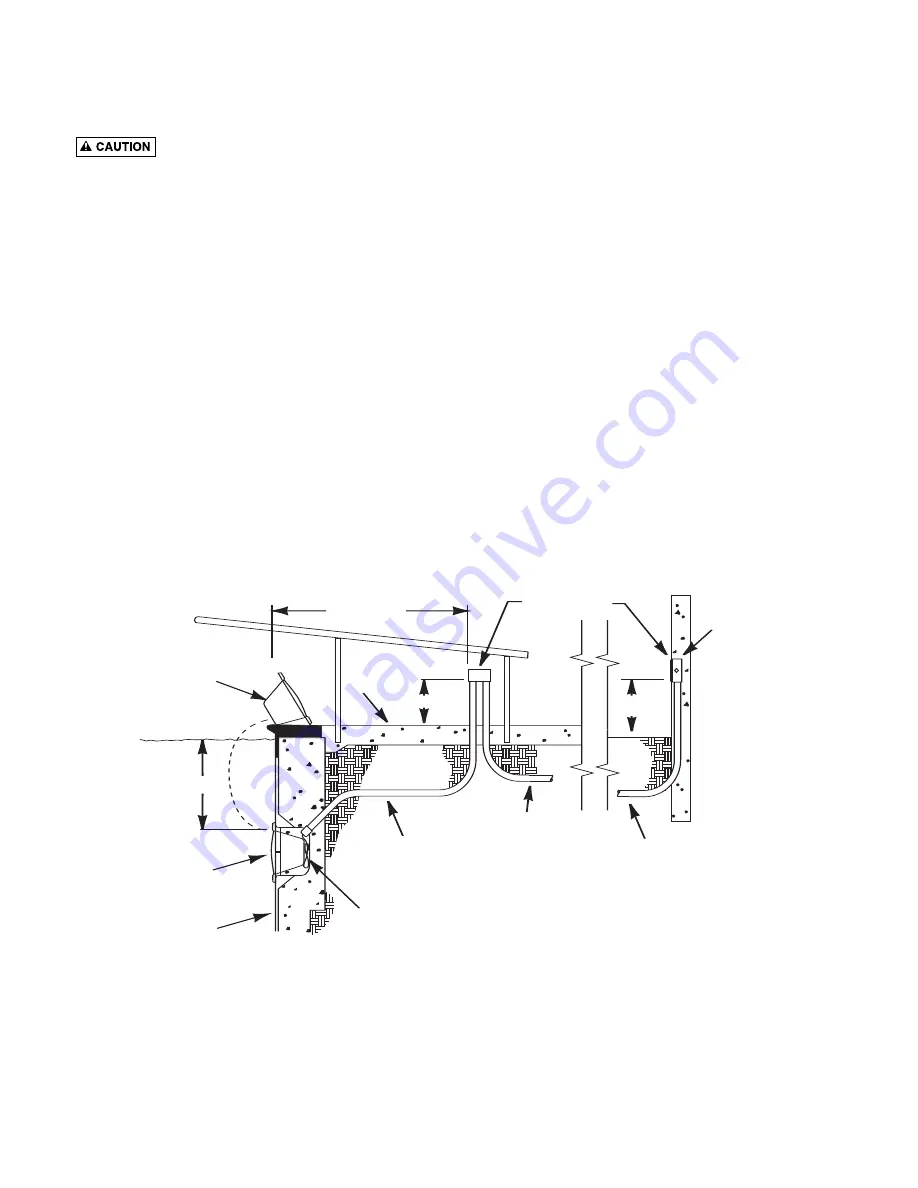
(Refer to Figure 1, below)

Burn hazard. 

This light should never be

energized while laying face down on the pool deck.

Installation of a 12 Volt transformer is required when

installing the 12 Volt model of this light.

The transformer

must be located:

• at least 10’ from the pool wall,

• installed near a grounded, 3-prong, 120V, GFCI

protected outlet. If you do not have a GFCI protected

outlet, have a qualified electrician install one.

Do not use a 3-prong adapter.

The adapter voids the

grounding of the system.

Do not cut the grounding pin.

Do not use an extension cord!

Purchase a light with a

longer cord.

1. Be sure the power is off.

2. Place lamp housing on the deck above the niche.

Feed the cord through the back of the lamp housing

and to the conduit box. Make sure that there is

enough cord to allow the fixture to be placed on the

deck for re-lamping. 

3. Make connections in the conduit box (be sure to fol-

low code requirements!). Connect the supply circuit

grounding wire (green, green and yellow, or bare

copper) to the green ground conductor from the light

fixture. Connect the line supply wire (the black or

’hot’ wire) to the black wire from the light fixture.

Connect the neutral (white) supply wire to the neutral

(white) wire from the light fixture.

4. Coil the remaining cord in the back of the niche and

place the lamp housing in the niche. The mounting

tab on the bottom of the lamp housing must be in the

notch at the bottom of the niche.

5. Fasten the lamp housing into the niche with the 

captive leader screw at the top of the lamp housing

(use a No. 2 Phillips screwdriver). Tighten this screw

securely (20 inch-pounds torque) to insure good 

electrical bonding.

NOTICE: 

The leader screw in the face ring may be

recessed.

NOTE:

Do not try to loosen the strain relief (cord nut) on

the back of the lamp housing; the cord is not detachable

from the lamp housing. Attempting to loosen the strain

relief will damage the lamp housing assembly, void the

warranty and may cause an electrical shock hazard if the

pool bonding is not connected and functioning correctly

(see “General Safety”, Page 2).

5

Sufficient cord to allow fixture to
be put on the deck for relamping

Brass conduit

Pool wall

Fixture

18” Min.

Low level
probe

To service

To fixture

To
service

8” Min.

8” Min.

Fixture removed
for relamping

4 Ft. Min.

Junction box

Max. water
level

Figure 1: Lamp Housing Installation

Содержание Small Underwater Pool Lights SunLite LTC

Страница 1: ...330 800 831 7133 or 919 566 8000 10951 West Los Angeles Ave Moorpark CA 93021 800 831 7133 or 805 553 5000 Visit us on the Internet at www pentairpool com or www staritepool com S715 Rev A 10 29 07 This manual should be furnished to the end user of this light its use will reduce service calls and chance of injury and will lengthen light life 3051 0997 ASB ...

Страница 2: ...ght installations must conform with all codes Under no circumstances replace lights by splicing wire under water or behind niche WARNING RISK OF ELECTRIC SHOCK AND INJURY USE ONLY THE INSTALLATION METHOD SPECIFIED BELOW Important Safety Information for Fountain Fixture Installations Location of Pentair Fountain Fixture Required Installation Method Luminaire Use P N 560000 P N 560001 P N 560002 P N...

Страница 3: ...tem must meet all applicable code requirements for bonding Burn hazard Never operate this light fix ture for more than 10 seconds unless it is completely submerged in water This fixture requires total submer sion for cooling Breakage hazard Install fixture in a vertical pool or spa wall not in floor Failure to install the fix ture properly could result in personal injury and or prop erty damage Do...

Страница 4: ...ll lighted 2 Never install lights in end walls at end of swimming lanes However if short course racing is provided across width of a 50 meter course light fixtures may be installed between lanes under racing lines on a seperate switch Table I SPECIFICATIONS Model No Cord Length in Feet m 12V 75 Watts 05603 2030 30 9 1 05603 2050 50 15 2 05603 2100 100 30 5 120V 100 Watts 05605 2030 30 9 1 05605 20...

Страница 5: ...t fixture Connect the line supply wire the black or hot wire to the black wire from the light fixture Connect the neutral white supply wire to the neutral white wire from the light fixture 4 Coil the remaining cord in the back of the niche and place the lamp housing in the niche The mounting tab on the bottom of the lamp housing must be in the notch at the bottom of the niche 5 Fasten the lamp hou...

Страница 6: ...e fingers If contact occurs clean the lamp glass with alcohol and a clean cloth 6 To close the fixture make sure the clamp ring is open to about 4 inches and that the nut is at the end of the leader screw 7 Lay the face ring face down on a flat surface Carefully align the clear lens Key No 4 and lens gasket Key No 5 over the flanged hole in the face ring key No 2 with the word top on the lens line...

Страница 7: ...1 0014 05601 0014 05601 0014 6 Clamp Ring Assembly 1 05601 0006 05601 0006 05601 0006 7 Lamp Housing 1 Lamp 100W 120V Halogen T 4 MC 1 79102900 Lamp 75W 12V Halogen MR 16 1 79112400 Lamp 250W 130V Halogen T 4 MC 1 79113800 Replacement Screw Kit 1 05601 0101 05601 0101 05601 0101 REPAIR PARTS LIST SUNLITE LTC LAMPS Not sold separately Not illustrated Included with Replacement Screw Kit 1 2 3 5 6 7 ...

Страница 8: ...pa Inc All rights reserved 1620 HawkinsAve Sanford NC 27330 800 831 7133 or 919 566 8000 10951 W Los Angeles Ave Moorpark CA 93021 800 831 7133 or 805 553 5000 This document is subject to change without notice 8 S715 Rev A 10 29 07 ...

Отзывы: