background image

5

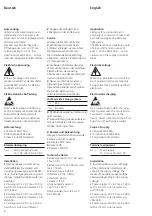
Brightness specification (Lux) 

depends on the distance.

Servicing

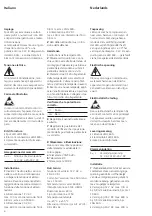
Changing the LED lamp

Unlock the light module using 

the Vario key and remove from 
the mounting frame. Remove the 
peripheral module seal and release 
the front panel using 4 screws.

Loosen the two connecting cores 

of the LED lamp at the terminal. 
Unscrew the threaded ring and 
remove the lamp from the front.

Insert the new lamp, position the 

distance ring and screw back on 
with the threaded ring. Connect the 
two cores to the terminal.

Ensure correct polarity.

+ rt

Red

- sw

Black

Replace the front panel and screw 

fasten.

Replace the module seal. Ensure 

that the seal is seated correctly all 
round the periphery.

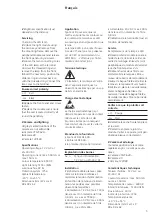
8 Camera and lighting

All grey marked positions of the 
camera are not admissible.

a

 Camera VTMC 640-…

b

 Camera 80

c

 Camera 130/180

Specifications

Operating voltage: 12 V AC or 
20–30 V DC
Operating current: max. 500 mA or 
max. 150 mA
Colour temperature: 6000 K
Light intensity: 5134 cd/klm
Luminous flux: 28 lm
Protection system: IP 54

Ambient temperature: 

–20 °C to +55 °C
Dimensions (mm) W x H x D: 
99 x 99 x 62

Application

Spot à LED pour accentuer et 
mettre en évidence les contours ou 
les numéros de maison avec LED 
économique en énergie en tant que 
lampe.
La lampe à LED a un angle d’ouver-

ture de 30° environ et sa puissance 
est de 3 W. Le raccordement du 
LEDS 600-… s’effectue par l’inter

-

médiaire du bornier joint.

Tension électrique

L‘installation, le montage et l‘entre-
tien d‘appareils électriques ne 
doivent être réalisés que par un spé-
cialiste en électricité.

Charge électrostatique

La charge électrostatique peut 
détruire l’appareil en cas de contact 
direct avec la carte de circuits 
imprimés. Evitez par conséquent 
tout contact direct avec la carte de 
circuits imprimés.

Etendue de la fourniture

• 

Spot à LED LEDS 600-…

• 

Bornier LEDS 600-…

• la présente information produit 

Implantation des bornes

b+, c-

Tension d'alimentation 

12 V AC ou 20–30 V DC

Installation

Emboîter le câble plat avec prise 

mâle sur la borne combinée et 
raccorder la tension d’alimentation. 
En fonction de la tension d’alimen-
tation, les portées max. possibles 
doivent être respectées.

• 

Alimentation 12 V AC max. 130 m 

dans le cas d’un diamètre de fil de 
0,8 mm, p. ex. avec TR 603-…

• 

Alimentation 30 V DC max. 600 m 

dans le cas d’un diamètre de fil de 
0,8 mm, p. ex. LNG 600-…

Français

• 

Alimentation 20 V DC max. 200 m 

dans le cas d’un diamètre de fil de 
0,8 mm

Indication de la luminosité (Lux) en 

fonction de la distance.

Service

Remplacement de la lampe à LED

Déverrouiller le module lumière à 

l’aide de la clé Vario et le retirer du 
cadre de montage. Enlever le joint 
périphérique du module et desserrer 
le cache frontal par les 4 vis.

Débrancher les deux fils de rac

-

cordement de la lampe à LED au 
niveau de la borne de raccordement. 

Dévisser la bague filetée et retirer la 

lampe en la repoussant vers l’avant.

Mettre en place la nouvelle lampe, 

placer la bague entretoise et la 

revisser à l’aide de la bague filetée. 
Raccorder les deux fils à la borne de 

raccordement.

Veiller à ce que la polarité soit 
correcte.

+ rt

Rouge

- sw

Noir

Remettre le cache frontal en place 

et le visser.

Remettre en place le joint du 

module. Veiller à ce que le joint péri-
phérique plaque correctement.

8 Caméra et éclairage

Toutes les positions de la caméra, 
repérées en gris, ne sont pas auto-
risées.

a

 Caméra VTMC 640-…

b

 Caméra 80

c

 Caméra 130/180

Caractéristiques techniques

Tension d’entrée : 12 V AC ou 
20–30 V DC
Courant de service : max. 500 mA 
ou max. 150 mA
Température de couleur : 6000 K
Intensité lumineuse : 5134 cd/klm
Flux lumineux : 28 lm
Indice de protection : IP 54

Température ambiante : 

–20 °C à +55 °C
Dimensions (mm) l x H x P : 
99 x 99 x 62

Содержание LEDS 600-0

Страница 1: ...oduit Spot à LED Opuscolo informativo sul prodotto LED Spot Productinformatie LED spot Produktinformation LED spot Produktinformation LED spot Información de producto Foco LED Informacja o produkcie Spot LED Информация о продуктах Подсветка на основе светодиодов LEDS 600 0 ...

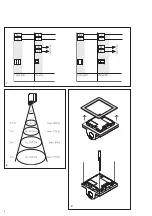
Страница 2: ...2 1 3 2 LNG 600 ...

Страница 3: ...3 4 5 7 6 8a LEDS LEDS LEDS b c ...

Страница 4: ... mit Gewindering wieder verschrauben Die beiden Adern an der Anschlussklemme anschließen Auf korrekte Polung achten rt Rot sw Schwarz 6 Frontblende wieder aufsetzen und verschrauben 7 Moduldichtung wieder aufsetzen Auf den korrekten Sitz der umlau fenden Dichtung achten 8 Kamera und Beleuchtung Alle grau markierten Positionen der Kamera sind nicht erlaubt a Kamera VTMC 640 b Kamera 80 c Kamera 130...

Страница 5: ...te de circuits imprimés Etendue de la fourniture Spot à LED LEDS 600 Bornier LEDS 600 la présente information produit Implantation des bornes b c Tension d alimentation 12 V AC ou 20 30 V DC Installation 1 Emboîter le câble plat avec prise mâle sur la borne combinée et raccorder la tension d alimentation En fonction de la tension d alimen tation les portées max possibles doivent être respectées Al...

Страница 6: ...nuova lampada appli care l anello distanziatore e riavvitare con l anello filettato Collegare i due fili sul morsetto di collegamento Verificare che la polarità sia corretta rt Rosso sw Nero 6 Riapplicare il pannello anteriore e avvitarlo 7 Riapplicare la guarnizione del modulo Verificare che il posiziona mento della guarnizione perimetrale sia corretto 8 Telecamera e illuminazione Non sono consen...

Страница 7: ...af en aut elinstal latør Elektrostatisk opladning Elektrostatisk opladning kan øde lægge enheden ved direkte kontakt med printpladen Undgå derfor direkte berøring af printpladen Leveringsomfang Lysdiodespot LEDS 600 Klemblok LEDS 600 Denne produktinformation Klemmekonfiguration b c Forsyningsspænding 12 V AC eller 20 30 V DC Installation 1 Slut fladbåndskablets stik til kombiklemmen og tilslut for...

Страница 8: ...n ledardiameter på 0 8 mm t ex LNG 600 Försörjning 20 V DC max 200 m vid en ledardiameter på 0 8 mm Svenska 2 Uppgiften om ljusstyrkan lux beror på avståndet Service Byte av LED lampan 3 Öppna lampmodulens låsning med Vario nyckeln och ta ut den ur mon teringsramen Ta bort tätningen som omsluter modulen och skruva loss frontskyddet med de 4 skruvarna 4 Lossa LED lampans båda anslut ningsledare på ...

Страница 9: ...tro de cable de 0 8 mm Ej con una LNG 600 Alimentación 20 V DC longitud máx 200 m con un diámetro de cable de 0 8 mm 2 Las especificaciones de brillo Lux depende de la distancia Servicio Sustitución de lámpara led 3 Desbloquear el módulo de luces con la llave Vario y extraer del bas tidor de montaje Extraer la junta del módulo que lo rodea y soltar la tapa frontal con 4 tornillos 4 Soltar los dos ...

Страница 10: ...ks 600 m przy średnicy żył 0 8 mm np LNG 600 Polski zasilanie 20 V DC maks 200 m przy średnicy żył 0 8 mm 2 Podanie jasności w luksach zależnie od odległości Serwis Wymiana żarówki LED 3 Odblokować moduł światła za pomocą klucza Vario i wyjąć z ramy montażowej Zdjąć uszczelkę na obwodzie i odkręcić osłonę czołową z 4 śrubami 4 Odkręcić obydwie podłączone żyły żarówki LED z zacisku przyłączenio weg...

Страница 11: ...При напряжении 30 В макс 600 м при диаметре жилы 0 8 мм например LNG 600 При напряжении 20 В макс 200 м при диаметре жилы 0 8 мм 2 Параметры освещённости люкс зависит от расстояния Сервис Замена светодиодной лампы 3 Открыть модуль освещения с помощью ключа Vario и снять с монтажной рамки Снять уплот нение установленное по пери метру модуля и разблокировать переднюю панель ослабив 4 винта 4 Ослабит...

Страница 12: ...Telefon und Telegrafenwerke OHG Postfach 1155 78113 Furtwangen Bregstraße 1 78120 Furtwangen Telefon 49 7723 63 0 Telefax 49 7723 63 300 www siedle de info siedle de 2007 09 15 Printed in Germany Best Nr 0 1101 036608 ...

Отзывы: