P52110_MXXXXX_Jan2020
PAGE 7
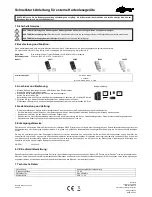
PARTS
KEY #
PART #
DESCRIPTION
KEY #
PART #
DESCRIPTION
1
40002
ROUND SCREEN
21
36208
#6 X 3/8” TYPE 25 PHPS S.S.
2
60332
HOPPER ASSEMBLY (2150/2150T)
22
12317SSC
New SSC SHUT OFF PLATE
3
33117
AGITATOR
23
25222
LOWER HANDLE SQ (2150’s/2170’s)
4
12220
GEAR BOX BUSHING (2050)
24
25108
FRAME (2150,2170,C22,C24,C25,F-Series)
5
31104
#14 X 1 1/2 TYPE 25 FHPS ZINC
25
44249
FRAME BRACE (2150/2170)
6
32103
1/4-20 NYLON INS LOCKNUT ZINC
26
25228
CROSS BRACE (2150/2170/S25) 11.25 REV908
7
11927
SHUTOFF SUPPORT- LARGE
27
31106
1/4-20 X 2 1/4” HHCS ZINC
8
31120
1/4-20 X 2” HHCS ZINC
28
12110
IMPELLER 9” Round Dished
9
60300
PIVOT & BRACKET ASSEMBLY (2150/2170)
29
25723
FRAME FOOT
10
12274
GRIP (2150/2170) 7.5” LONG
30
70138
PNEUMATIC DRIVE WHEEL STUD (2150/S25)
11
44251
PIVOT ROD (2150/2170/C22/C24)
31
60333
New Floating GEAR BOX (2150/C22)
12
60298
GAUGE & LEVER ASSEMBLY (2150/C22)
32
12148
AXLE BEARING (2130/2150/2170/S25)
13
60175
UPPER HANDLE SQUARE W/GRIP
33
12152
AXLE BUSHING (2130/2150/2170/S25)
14
24500
AXLE COINED
34
33109
3/16” X 2” COTTER PIN ZINC
15
31100
1/4-20 X 1 1/2 HHMS ZINC
35
60027
WING NUT ASSEMBLY BLACK
16
25223
HANDLE SHAFT SQ (2150)
36
37100
1/4-20 X 1” CARRIAGE BOLT ZINC
17
42256
CONTROL ROD (2150/C24SS)
37
12147
SPACER (PIVOT LINK)
18
31138
#8 X 3/8” PMT #8 HD COARSE BLACK
19
33108
3/16” X 1” COTTER PIN ZINC
20
32100
1/4-20 HEX NUT ZINC
44249
23
10
24
7
22
28
21
9
11
20
6
2
3
1
19
30
31
32
33
34
29
23
25
26
8
5
8
6
6
17
20
27
15
25
15
13
35
36
37
14
16
15
27
12
4
18
15
77001
OPTIONAL
Heavy-Duty
Rain Cover
60166R
OPTIONAL
3-Side Salt
Deflector Kit