background image

40

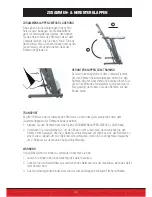
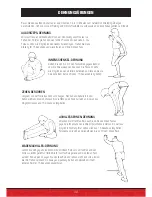
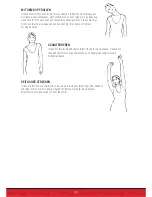
MIT DEM KOPF ROLLEN   

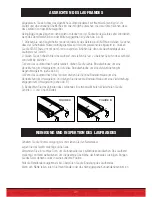
SEITLICHES STRECKEN

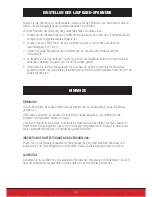
SCHULTERHEBEN 

Drehen Sie den Kopf nach rechts für eine Sekunde, fühlen Sie die Streckung auf 
der linken Seite des Nackens, dann drehen Sie den Kopf zurück für eine Sekunde, 
recken Sie Ihr Kinn nach oben und lassen Ihren Mund geöffnet.  Drehen Sie Ihren 
Kopf nach links für eine Sekunde, dann senken Sie Ihren Kopf auf die Brust 
für eine Sekunde.

Öffnen Sie Ihre Arme zur Seite und heben sie an, bis sie über Ihrem Kopf sind. Strecken 
Sie Ihren rechten Arm so weit wie möglich in Richtung Decke für eine Sekunde. 
Wiederholen Sie diese Aktion mit dem linken Arm.

Heben Sie Ihre rechte Schulter zu Ihrem Ohr an für eine Sekunde.  Danach die 
linke Schulter für eine Sekunde anheben und dabei gleichzeitig die rechte 
Schulter ablassen.

Содержание DFT500

Страница 1: ...FITNESS TECHNOLOGY MADE IN GERMANY DFT500 DE EN ...

Страница 2: ......

Страница 3: ...utorials für dich Aufbau Benutzung Abbau In 3 einfachen Schritten zum schnellen und sicheren Start 1 QR Code scannen 2 Videos anschauen 3 schnell und sicher starten Link zu den Videos www sportstech de qr dft500 html ...

Страница 4: ...t den Anweisungen entsprechend Die Betriebssicherheit und die Funktion des Gerätes können nur dann gewährleistet werden wenn sowohl die allgemeinen Sicherheits und Unfallverhütungsvorschriften des Gesetzgebers als auch die Sicherheitshinweise in diesem Benutzerhandbuch beachtet werden Wir übernehmen keine Haftung für Schäden die durch unsachgemäßen Gebrauch bzw fehlerhafte Bedienung entstehen i Bi...

Страница 5: ...e Für Programme 20 Hauptkonsole Funktionsbeschreibung 23 Hauptkonsolen Bedienung 24 Sekundär Bediendfeld Funktionen 26 Bedienung Über App 28 Zusammen Herunterklappen 30 Ausrichten Des Laufbandes 31 Reinigung Und Inspektion Des Laufbandes 31 Einstellen Der Laufband Spannung 32 Hinweise 32 Teile Liste II 34 Explosionszeichnung 36 Wann und wie Sie Ihre Laufband warten 37 Dehnungsübungen 39 ...

Страница 6: ...er ausgesetzt wurde Kontaktieren Sie Ihren Händler für Serviceempfehlungen Es empfiehlt sich dass Sie vor Beginn eines Übungsprogramms Ihren Arzt konsultieren Stoppen Sie das Training mit diesem Gerät wenn Sie Schwindel oder Unwohlsein empfinden Bestätigung medizinischer Unbedenklichkeit und sorgfältige Überwachung sind notwendig wenn das Gerät von oder in der Nähe von behinderten Personen verwend...

Страница 7: ... wird empfohlen stets Sportschuhe während der Benutzung dieses Laufbandes zu tragen Nicht in lose sitzender langer Kleidung wie z B langen Hosen Pyjamas oder Kleidern laufen oder joggen Beim Laufen oder Joggen immer auf dem vorderen Teil des Laufbands bleiben Joggen oder laufen Sie niemals schneller als es für Sie bequem ist Springen Sie nicht auf dem Laufband von Seite zu Seite Stellen Sie keine ...

Страница 8: ...gen an dem mit dem Laufband gelieferten Stecker vor Wenn er nicht zu Ihrer Steckdose passt sollten Sie eine ordnungsgemäss geerdete Steckdose von einem qualifizierten Elektriker installieren lassen Dieses Gerät muss an einen Stromkreis mit einer Nennspannung von 110 Volt 60 Hz 15 AMP oder 220 240 Volt 50 60 Hz 10 AMP angeschlossen werden und es muss ein Erdungsstecker vorhanden sein Steckdosen die...

Страница 9: ...die Benutzug ab und kontaktieren Ihren Händler wegen notwendiger Wartung 2 Bitte beachten Sie die nachstehenden Hinweise unter LAUFDECK SCHMIERUNG wegen der notwendigen regelmässigen Wartung für dauerhaften und funktionsgerechten Betrieb BITTE BEACHTEN SIE DASS OHNE PERIODISCHE WARTUNG DIE GARANTIE UNWIRKSAM WIRD LAUFDECK SCHMIERUNG Warum schmieren Wenn das Schmiermittel austrocknet wird die Reibu...

Страница 10: ...ckoberfläche etwa 45 cm von der Motorabdeckung aus zu erreichen pumpen Sie das Silikon mithilfe des Röhrchens über das Deck parallel zur Motorab deckung in einer Linie von etwa 30 cm Länge Diese Linie sollte in der Mitte des Decks aufgebracht werden möglichst in gleichem Abstand von den beiden Seitenrändern des Laufbandes Wiederholen Sie das oben beschriebene Verfahren um Silikon an 3 weiteren Ste...

Страница 11: ...önnen 2 Falls das Laufband nicht zentriert ist sehen Sie bitte unten im Abschnitt Ausrichten des Laufban des nach 3 Wenn das Band nicht richtig läuft wird die Anwendung von Silikon auf dem laufenden Deck auch dazu beitragen das Problem zu lösen TEILELISTE No Beschreibung Anz 1 Hauptrahmen 1 A Knopf Unterlegscheibe 4 4 B Stift 1 C Werkzeuge 1 1 D Stromkabel 1 D 2 3 1 ...

Страница 12: ...ken den Plattenrahmen 7 8 nach unten wie in Abb 1 gezeigt Achten Sie darauf dass Sie den Plattenrahmen mit dem Untergestellrahmen 2 genau und eng überlappen dann ziehen Sie den Knopf und die Unterlegscheibe A wie in Abb 2 gezeigt fest Plattenrahmen 7 8 und Bodenrahmen 2 sind nicht eng und flach überlappt Plattenrahmen 7 8 und Bodenrahmen 2 sind eng und flach überlappt 3 PLATE FRAME 8 2 1 PLATE FRA...

Страница 13: ...hmen hoch und heben das Luftfederelement an 2 Klappen Sie den Rahmen etwas nach unten um die U förmige Halterung am Rahmen am Kopf des Federelements zu befestigen 3 Stecken Sie den Stift B in die Bohrungen der U Halterung und des Federlements um es zu befestigen Schritt 4 Klappen Sie die Griffstange und das Pult herunter Schritt 5 Verwenden Sie den Knopf A um die beiden Handgriffstangen an der Obe...

Страница 14: ...itsfläche zu werden und verwenden Sie das sekundäre Bedienfeld um bei max 6 0 km h zu gehen Die Arbeitsfläche kann zu Ihrem Körper hinbewegt werden damit Sie daran beim Gehen arbeiten können Der Sicherheit wegen ist die Neigung nicht einstellbar Diese Arbeitsfläche ist mit einem Fach Tablet PC Steckplatz und Lautsprecher ausgestattet RUNNING Renn MODUS Schieben Sie die Arbeitsfläche nach oben und ...

Страница 15: ...4 Drehen Sie im Uhrzeigersinn um den Knopf festzuziehen DIE HÖHE DER ARBEITSFLÄCHE EINSTELLEN Es gibt 8 Stufen für Höhenverstellung 1 Gegen den Uhrzeigersinn drehen um die Knöpfe auf den 2 vorderen Säulen zu lösen bis die Arbeitsfläche nach oben und unten bewegt werden kann 2 Schieben Sie die Arbeitsfläche rauf oder runter auf die gewünschte Höhe um sich Ihrer Körperlänge anzupassen 3 Drehen Sie d...

Страница 16: ...itsschlüssel positioniert ist Das Gerät ist im MANUAL Modus und alle Funktionen sind für den manuellen Betrieb bereit HAUPTKONSOLEN BETRIEB 0 8 18km h Für Schnellstart manuell Drücken Sie die Taste um den Lauf zu starten Zeit Distanz Schritte und Kalorien zählen von 0 aus herauf Der erste Punkt blinkt auf der Geschwindigkeits Matrix und 0 erscheint auf der Neigungs Matrix Wenn die 0 auf 1 springt ...

Страница 17: ...er Computer den Puls des Benutzers und zeigt ihn auf dem Computer an für den weiteren Betrieb 2 Wenn der Computer den Puls des Benutzers innerhalb von 30 Sekunden nicht erkennen konnte wird die Maschine stoppen und die Anzeige auf dem Puls Display wird 3 mal blinken 3 Minuten danach wird die Maschine wieder in den Standby Modus versetzt 3 Wenn der tatsächliche Herzschlag des Benutzers höher als vo...

Страница 18: ...llung 30 Jahre alt Stufe 1 220 Alter x 60 Stufe 2 220 Alter x 75 Stufe 3 220 Alter x 85 Für Benutzerprogramm U1 U2 1 Drücken Sie SPEED oder INCLINE um das Benutzerprogramm U1 oder U2 zu wählen 2 Halten Sie die Taste gedrückt bis Sie einen Piep Ton hören und 0 im Neigungsfenster erscheint 0 8 auf dem Geschwindigkeitsfenster erscheint und jeweils der erste Punkt auf beiden Punktmatrices blinkt 3 Drü...

Страница 19: ...hlen Zielzeit Programm 1 Drücken Sie um die Zielzeit zu wählen Die Standardeinstellzeit 30 00 blinkt drücken Sie INCLINE oder um die gewünschte Trainingszeit von 10 99 Minuten einzustellen 2 Drücken Sie und um den Lauf zu starten Zieldistanz Programm 1 Drücken Sie um die Zieldistanz zu wählen Die Standardeinstellung 1 0 blinkt drückten Sie INCLINE oder um die gewünschte Trainingsdistanz von 1 20 k...

Страница 20: ... SPEED INCLINE SPEED INCLINE 0 0 0 0 0 0 0 0 0 0 0 4 2 0 KPH 3 0 KPH 4 0 KPH 5 0 KPH 2 0 KPH 3 0 KPH 4 0 KPH 5 0 KPH 2 0 KPH 3 0 KPH 4 0 KPH 5 0 KPH 2 0 KPH 4 0 KPH 6 0 KPH 2 0 KPH 4 0 KPH 6 0 KPH 2 0 KPH 4 0 KPH 6 0 KPH 2 0 KPH 4 0 KPH 6 0 KPH Interval 1 Interval 2 Interval 3 Interval 4 Interval 5 Interval 6 Interval 7 Interval 8 Interval 9 Interval 10 Interval 11 Interval 12 0 0 0 0 0 0 0 0 0 0 ...

Страница 21: ... 4 0 KPH 4 0 KPH 4 0 KPH 4 0 KPH 4 0 KPH 4 0 KPH 4 0 KPH Interval 1 Interval 2 Interval 3 Interval 4 Interval 5 Interval 6 Interval 7 Interval 8 Interval 9 Interval 10 Interval 11 Interval 12 4 0 KPH 4 0 KPH 4 0 KPH 4 0 KPH 4 0 KPH 4 0 KPH 4 0 KPH 4 0 KPH 4 0 KPH 4 0 KPH 4 0 KPH 4 0 KPH 4 0 KPH 4 0 KPH 4 0 KPH 4 0 KPH 4 0 KPH 4 0 KPH 4 0 KPH 4 0 KPH 4 0 KPH 4 0 KPH 4 0 KPH 4 0 KPH 4 0 KPH 4 0 KPH ...

Страница 22: ... 8 0 KPH 3 0 KPH 6 0 KPH 8 0 KPH 3 0 KPH LEVEL 1 P9 P10 P11 P12 SPEED INCLINE SPEED INCLINE SPEED INCLINE SPEED INCLINE 2 4 6 8 6 4 2 4 6 8 6 4 2 3 4 2 3 4 5 7 8 2 3 4 2 0 KPH 3 0 KPH 4 0 KPH 5 0 KPH 2 0 KPH 3 0 KPH 4 0 KPH 5 0 KPH 2 0 KPH 3 0 KPH 4 0 KPH 5 0 KPH 2 0 KPH 4 0 KPH 6 0 KPH 2 0 KPH 4 0 KPH 6 0 KPH 2 0 KPH 4 0 KPH 6 0 KPH 2 0 KPH 4 0 KPH 6 0 KPH Interval 1 Interval 2 Interval 3 Interva...

Страница 23: ...ung 1 km 10 LEVEL L1 L3 STEP Schritt Hinweise 1 Dieses Gerät bietet die Funktion für das Geh Training die zurückgelegte Gesamtschrittzahl zu erkennen und mit dem eingestellten Schritt Ziel des Benutzers abzugleichen 2 Die Schrittzählung beginnt in 20 Sekunden nachdem der Benutzer das Laufband betreten hat und etwa 20 30 Schritte gegangen ist Die Schrittzählung wird fehlerhaft sein wenn der Benutze...

Страница 24: ...ur schnellen Auswahl eines Programms drücken Sie die Zahlen Taste und drücken dann ENTER Beispiel MANUAL Drücken Sie 0 und drücken danach ENTER P1 Drücken Sie 1 und drücken dann ENTER P12 Drücken Sie 1 2 und drücken dann ENTER H1 P13 Drücken Sie 1 3 dann drücken Sie ENTER H3 P15 Drücken Sie 1 5 und drücken dann ENTER U1 P16 Drücken Sie 1 6 und drücken Sie dann ENTER U2 P17 Drücken Sie 1 7 danach d...

Страница 25: ...Scan Modus wenn der Benutzer den Sender trägt springt und bleibt die Anzeige auf PULSE um die Herzfrequenz anzuzeigen Dann können Sie MODE drücken um zu STEP weiterzuspringen Drücken Sie erneut MODE und TIME blinkt um zum Scan Modus zurückzukehren und alle Funktionen nacheinander anzuzeigen Wenn der Benutzer den Sender abnimmt um den Pulsimpuls zu stoppen wird ein erneuter Scan gestartet von STEP ...

Страница 26: ...stellten Schritt Ziel des Benutzers abzugleichen 2 Schrittzählung beginnt in 20 Sekunden nachdem der Benutzer das Laufband betritt Die Schrittzählung wird fehlerhaft sein wenn der Benutzer nicht auf dem Laufband geht 3 Die Zählgenauigkeit wird weniger exakt sein für diejenigen die nur leicht auftreten Demnach werden Benutzer über 45 kg die bei 2 6 km h mit festem Schritt gehen eine höhere Genauigk...

Страница 27: ...RESET Taste um in den Standby Modus zurückzugelangen 2 Während der Programmauswahl drücken Sie die RESET Taste um in den Standby Modus zurückzugelangen 3 Wenn Sie die Daten einstellen drücken Sie die RESET Taste um in die Standardeinstellung zurückzukehren HINWEIS Wenn niemand auf dem Laufband läuft stoppt das Gerät automatisch nach 3 Minuten GESCHWINDIGKEITSTASTE AN DER GRIFFSTANGE Die Geschwindi...

Страница 28: ...com um zu lesen wie die Installation funktioniert 1 Drücken Sie die grüne Taste START an der Konsole anstatt der grünen Taste START auf dem Smartphone um das Laufband zu starten 2 Das Tonsignal soll den Benutzer darauf aufmerksam machen dass das Laufband gleich starten wird 3 Um den Modus für Laufen mit Kartenanzeige zu starten drücken Sie den blauen Pfeil in der oberen rechten Ecke bevor Sie die ...

Страница 29: ...gsmotor für 6 Sekunden nicht lesen konnte wird E6 auf dem Computer angezeigt Falls irgendwelche Schwierigkeiten auftreten wenden Sie sich bitte an Ihren Händler E3 FEHLER 3 Es geschieht nur im HRC Modus H1 H2 oder H3 wenn die Herzfrequenz des Benutzers 20 Schläge mehr als die Zielherzfrequenz beträgt und dies länger als 30 Sekunden andauert Zu Ihrer Sicherheit sollten Sie aufhören zu laufen wenn E...

Страница 30: ... Boden herab TRANSPORT Es gibt 4 Räder an der Vorderseite des Rahmens So kann das Gerät problemlos nach dem Zusammenklappen des Rahmens bewegt werden 1 Klappen Sie den Rahmen nach oben siehe ZUSAMMENKLAPPEN ZWECKS LAGERUNG 2 Schrauben Sie 4 Ausgleicher ein um den Boden nicht zu berühren dann schieben Sie den Rahmen zum Bewegen Um die 4 Balancer einzuschrauben empfiehlt es sich den Rahmen an einer ...

Страница 31: ...n das Laufband nach rechts tendiert drehen Sie die rechte Einstellschraube um eine Vierteldrehung im Uhrzeigersinn und die linke Einstellschraube um eine Vietelumdrehung im Gegenuhrzeigersinn siehe Abb A 4 Wenn das Laufband nach links tendiert drehen Sie die linke Einstellschraube um eine Vierteldrehung im Uhrzeigersinn und drehen Sie die rechte Einstellschraube um eine Vierteldrehung entgegen dem...

Страница 32: ... noch rutscht Wenn das Laufband rutscht um eine weitere Viertelumdrehung im Uhrzeigersinn anpassen und Schritt 4 bei Bedarf wiederholen REINIGUNG Zuerst sicherstellen dass das Laufband ausgeschaltet und der Kabelstecker aus der Steckdose gezogen ist Um Staub zu entfernen verwenden Sie eine kleine Staubsaugerdüse um sorgfältig um alle sichtbaren Komponenten herum zu saugen Um einen Schmutzfilm oder...

Страница 33: ...uenz ist ein individueller Wert der von Mensch zu Mensch unterschiedlich ist Als Richtwert gilt 220 Minus Lebensalter Das heisst wenn Sie 20 Jahre alt sind Ihre maximale Herzfrequenz ist ungefähr 200 Wenn Sie 40 sind ist es etwa 180 Es kann jedoch gefährlich sein wenn Sie mit maximaler Herzfrequenz trainieren Physiologen haben herausgefunden dass eine sichere Herzfrequenz Zielherzfrequenz für die ...

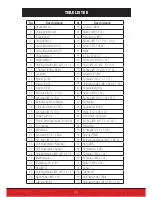
Страница 34: ...olzen M8 x 15L 16 Schraube M6 x 35L 51 Buchse Ø15 8 x 2 6t x 51L 17 Befestigung Für Luftfeder 52 Computer 18 Luftfeder Element 492L 53 Audiokabel 600L 19 Schraube M4 x 10L 54 Platte 110 x 25 x 2t 20 Sicherheitsrohr 56 Sicherheits Schlüssel 21 Plastik Unterlegscheibe 01 N2B 57 Buchse Ø8 x Ø11 5 x 6 5L 22 Pu Schaum 58 Federblatt 23 Mittelleiste 59 Endkappe 25 4 x 50 8 24 Schraube 5 32 x 50L 60 Ablag...

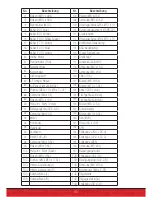
Страница 35: ...Element 905L 122 Bolzen M10 x 70L 87 Buchse Ø20 10 x Ø8 x 7 3L 123 Kabel 200 blue 88 Schraube M6 x 6L 124 Tischgehäuse Oben 89 Bolzen M10 x 15L 125 Tischgehäuse Unten 90 Platte In L Form Unten 126 Bolzen M8 x 75L 91 Befstigungsclip UCR 0 5 127 Schieberegler 92 Schraube M4 x 6L 129 Bolzen M10 x 50L 93 Motor 130 Rad Ø46 94 Fronträder 131 Hülse 50 x 100 95 Heckräder 132 Stift 96 Laufband 133 Endkappe...

Страница 36: ...48 87 85 38 88 40 97 94 28 101 62 62 38 48 66 38 09 09 102 108 110 41 45 44 43 42 60 65 42 118 112 116 46 15 123 119 71 73 73 72 70 80 47 89 70 93 69 92 120 117 92 92 91 132 9 10 15 96 11 99 95 9 98 15 104 103 124 125 52 100 17 18 19 20 28 38 31 37 73 34 35 30 115 107 28 99 119 116 114 119 38 56 5 6 7 8 32 25 29 33 113 113 99 39 47 49 51 53 54 55 68 68 84 86 90 33 28 38 121 48 48 48 57 57 133 134 ...

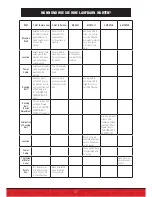
Страница 37: ... Belt Assure no bjects on the belt and run the machine at 3 5 kph to see if the belt drifts Please refer to ALIGNING THE RUNNING BELT to adjust Use dry cloth to wipe and clear the surface of running belt Use dry cloth to Use damp cloth to clean Do not use Solubility Cleaners Running Belt Tension Adjustment Check if running belt is slipping Please refer to ADJUSTING RUNNING BELT TENSION to adjust i...

Страница 38: ...e Wartung durchzuführen 2 Drücken Sie eine beliebige Taste um den Alarm zu beenden Das Wort LUBE wird wieder auftauchen wenn die Maschine erneut startet wenn der Benutzer den Schritt 3 nicht durchgeführt hat 3 Drücken Sie gleichzeitig die Tasten STOP und SPEED Slow um den alarm auszuschalten Die Laufstecke wird sich weiter ansammeln SCHMIERUNGSALARM ...

Страница 39: ...n bis die Hände den Boden erreichen So weit wie möglich strecken und 15 Sekunden lang halten Lehnen Sie sich gegen eine Wand mit dem linken Bein vor dem rechten und den Armen vorwärts gerichtet Halten Sie Ihr rechtes Bein gerade und den linken Fuss auf dem Boden dann beugen Sie das linke Bein und lehnen sich nach vorne indem Sie Ihre Hüften zur Wand hin bewegen Spannung halten und dasselbe mit dem...

Страница 40: ...n Sie Ihren Kopf nach links für eine Sekunde dann senken Sie Ihren Kopf auf die Brust für eine Sekunde Öffnen Sie Ihre Arme zur Seite und heben sie an bis sie über Ihrem Kopf sind Strecken Sie Ihren rechten Arm so weit wie möglich in Richtung Decke für eine Sekunde Wiederholen Sie diese Aktion mit dem linken Arm Heben Sie Ihre rechte Schulter zu Ihrem Ohr an für eine Sekunde Danach die linke Schul...

Страница 41: ...gabe des enthaltenen Schwermetalls Solche Schwerme talle erfordern eine umweltgerechte Entsorgung daher ist jeder Verbraucher gesetzlich dazu verpflichtet Batterien und Akkus bei der entsprechenden Sammelstelle seiner Stadt oder Gemeinde bzw im Handel abzugeben Erkundigen Sie sich im Zweifelsfall bei Ihrer Stadt bzw Gemeindeverwaltung nach einer sach und umweltgerechten Entsorgungsmöglichkeit Euro...

Страница 42: ......
Страница 43: ...Our video tutorials for you construction use reduction 3 simple steps for a fast and safe start 1 scan the QR code 2 watch videos 3 start fast and safely Link to the videos www sportstech de qr f65 html ...

Страница 44: ...aining and use the device according to the instructions The operational safety and function of the device can only be guaranteed if the legal pro visions on general safety and accident prevention as well as the safety instructions in this user manual are observed We shall not assume any liability for damages resulting from improper use or incorrect operation i Please ensure that all persons using ...

Страница 45: ...rofiles For Programs 61 Master Console Function Description 64 Master Console Button Operation 65 Secondary Control Panel Function Description 67 App Operation 69 Folding And Collapsing 71 Aligning The Running Belt 72 Cleaning And Inspecting The Running Belt 72 Adjusting The Running Belt Tension 73 Tips 73 Parts List II 75 Exploded View 77 When and how to maintain yourtreadmill 78 Stretching Excer...

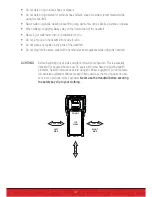
Страница 46: ...e the treadmill only for its intended use as described in this manual Do not pull the treadmill by the power cord or use it as a handle Keep power cord away from heated surfaces and oven flame Do not use or store outdoors Do not operate where aerosol products are being used or where oxygen is being administered While turning on the power please stand beside the treadmill not on the treadmill Maxim...

Страница 47: ...s on any parts of the treadmill Do not plug into the same outlet with any other electrical appliance while using this treadmill 2 FEET MIN 2 FEET MIN 2 FEET MIN LEFT SID E RIGH T SIDE REAR TOP VIEW FRON T ACHTUNG Before beginning any exercise program consult your physician This is especially important for people who are over 35 years old or who have pre existing health problems Read all instructio...

Страница 48: ...trician if you are in doubt as to whether the product is properly grounded Do not modify the plug provided with the treadmill If it will not fit your outlet have a properly grounded outlet installed by a qualified electrician This unit must be plugged into a nominal 110 Volt 60 Hz 15 AMP or 220 240 Volt 50 60 Hz 10 AMP cir cuit which has a grounding plug Outlets that service multiple appliances or...

Страница 49: ...tributor for necessary maintenance 2 Please refer to below RUNNING DECK LUBRICATION to do necessary periodical maintenance for long term and functional operation PLEASE NOTE WITHOUT DOING PERIODICAL MAINTENANCE THE WARRANTY MIGHT BECO ME VOID RUNNING DECK LUBRICATION Why to lubricate If the lubricant dries out the friction between the belt and the deck will rise and place undue stress on the drive...

Страница 50: ...the running belt to reach to the deck surface about 18 inches from motor cover pump out the silicone of the tube across the deck parallel to the motor cover in about one foot line The one foot line should be in the middle of the deck at approximately equal distance from both side edges of the belt Repeat above procedures to distribute onto 3 spots on the running deck as shown on drawi ng Once the ...

Страница 51: ...easy lubrication 2 IF belt is not centered please refer to Aligning The Running Belt 3 IF static symptom happens adding silicone on the running deck will also help solve it PARTS LIST No Description Anz 1 Main Frame 1 A Knob Washer 4 4 B Pin 1 C Tools 1 1 D Power Cable 1 D 2 3 1 ...

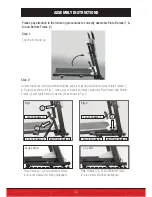
Страница 52: ...ion and press Plate Frames 7 8 down as shown in Fig 1 make sure to closely and flatly overlap the Plate Frame with Bottom Frame 2 and tighten Knob washer A as shown in Fig 2 3 PLATE FRAME 8 2 1 PLATE FRAME 8 BOTTOM FRAME 2 PLATE FRAME 7 PLATE FRAME 7 BOTTOM FRAME 2 f åÅçê êÉÅí çê êÉÅí Plate Frames 7 8 and Bottom Frame 2 are not closely and flatly overlapped Plate Frames 7 8 and Bottom Frame 2 are ...

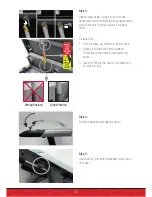
Страница 53: ... steps to fix 1 Fold the frame up and lift up the air shock 2 Slightly fold down the frame to attach U bracket on the frame to the head of air shock 3 Insert Pin B into the hole of U bracket and air shock to fix it Step 4 Fold the handlebar and desktop down Wrong Position Right Position Step 5 Use knob A to fix both handlebars to the top of front post 1 2 3 ...

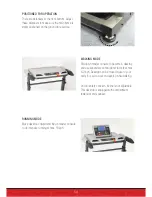
Страница 54: ...down master console to become a desktop and use secondary control panel to walk at max 6 0 kph Desktop can be moved close to your body for you to work on desktop while walking And for safety concern incline is not adjustable This desktop is equipped with compartment tablet slot and speaker RUNNING MODE Move desktop onward and flip up master console to do intensive running at max 18kph ...

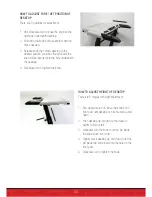
Страница 55: ... into the hole underneath the desktop 4 Clockwise turn to tighten the knob HOW TO ADJUST HEIGHT OF DESKTOP There are 8 ranges for height adjustment 1 Anti clockwise turn to loose the knobs on 2 front post until desktop can be moved up and down 2 Push desktop up or down to the desired height to fit your tall 3 Clockwise turn the knob to let the pin inside the knob touch front post 4 Slightly move d...

Страница 56: ... LCD 2 When safety key is positioned It is in MANUAL mode and all the functions are ready for manual operation MASTER CONSOLE OPERATION 0 8 18KPH For quick start manual Press button to start running Time distance step and calories will count up from 0 First dot will flash on the Speed Dot Matrix and 0 appears on Incline Dot Matrix 0 jumping to 1 means 400 meters of running And you may press INCLIN...

Страница 57: ...n 30 seconds after pressing START button computer will detect user s pulse and show it on the computer for further operation 2 If computer could not detect user s pulse in 30 seconds machine will stop and figure on the pulse display will flash 3 times 3 minutes after machine will be resumed to standby mode 3 If user s actual heartbeat is higher than preset max heart beat speed will decrease 0 2 kp...

Страница 58: ...n MAXIMUM HEARTBEAT SETTING Default setting 30 years old Level 1 220 age x 60 Level 2 220 age x 75 Level 3 220 age x 85 For User Program U1 U2 1 Press SPEED or INCLINE to choose User program U1 or U2 2 Press and hold button until you hear a bi sound and 0 appears on incline window 0 8 appears on speed window and first dot flashes on both Dot Matrix 3 Press INCLINE and SPEED to set desired incline ...

Страница 59: ...n exercise Target Time Program 1 Press to choose target time Default setting time 30 00 flashes press INCLINE or SPEED to set desired workout time from 10 99 minutes 2 Press and to start running Target Distance Program 1 Press to choose target distance Default setting 1 0 flashes press INCLINE or to set desired workout distance from 1 20 km 2 Press and to start running Target Calories Program 1 Pr...

Страница 60: ...NCLINE SPEED INCLINE 0 0 0 0 0 0 0 0 0 0 0 4 2 0 KPH 3 0 KPH 4 0 KPH 5 0 KPH 2 0 KPH 3 0 KPH 4 0 KPH 5 0 KPH 2 0 KPH 3 0 KPH 4 0 KPH 5 0 KPH 2 0 KPH 4 0 KPH 6 0 KPH 2 0 KPH 4 0 KPH 6 0 KPH 2 0 KPH 4 0 KPH 6 0 KPH 2 0 KPH 4 0 KPH 6 0 KPH Interval 1 Interval 2 Interval 3 Interval 4 Interval 5 Interval 6 Interval 7 Interval 8 Interval 9 Interval 10 Interval 11 Interval 12 0 0 0 0 0 0 0 0 0 0 0 4 0 0 ...

Страница 61: ... 0 KPH 4 0 KPH 4 0 KPH 4 0 KPH 4 0 KPH 4 0 KPH 4 0 KPH Interval 1 Interval 2 Interval 3 Interval 4 Interval 5 Interval 6 Interval 7 Interval 8 Interval 9 Interval 10 Interval 11 Interval 12 4 0 KPH 4 0 KPH 4 0 KPH 4 0 KPH 4 0 KPH 4 0 KPH 4 0 KPH 4 0 KPH 4 0 KPH 4 0 KPH 4 0 KPH 4 0 KPH 4 0 KPH 4 0 KPH 4 0 KPH 4 0 KPH 4 0 KPH 4 0 KPH 4 0 KPH 4 0 KPH 4 0 KPH 4 0 KPH 4 0 KPH 4 0 KPH 4 0 KPH 4 0 KPH 4 ...

Страница 62: ...H 8 0 KPH 3 0 KPH LEVEL 1 P9 P10 P11 P12 SPEED INCLINE SPEED INCLINE SPEED INCLINE SPEED INCLINE 2 4 6 8 6 4 2 4 6 8 6 4 2 3 4 2 3 4 5 7 8 2 3 4 2 0 KPH 3 0 KPH 4 0 KPH 5 0 KPH 2 0 KPH 3 0 KPH 4 0 KPH 5 0 KPH 2 0 KPH 3 0 KPH 4 0 KPH 5 0 KPH 2 0 KPH 4 0 KPH 6 0 KPH 2 0 KPH 4 0 KPH 6 0 KPH 2 0 KPH 4 0 KPH 6 0 KPH 2 0 KPH 4 0 KPH 6 0 KPH Interval 1 Interval 2 Interval 3 Interval 4 Interval 5 Interval...

Страница 63: ...efault setting 1 KM 10 LEVEL L1 L3 STEP Remarks 1 This machine offers function of walking training to detect and accumulate total walking steps to incorporate user s own count goal 2 Step count will start in 20 seconds after user steps on the machine and walks around 20 30 steps Step count will be mistakes if user does not walk on the machine 3 The accuracy will be less for those who walk lightly ...

Страница 64: ...line is adjusted to 5 3 For quick selection of program press figure then press ENTER Ex MANUAL Press 0 then press ENTER P1 Press 1 then press ENTER P12 Press 1 2 then press ENTER H1 P13 Press 1 4 then press ENTER H3 P15 Press 1 5 then press ENTER U1 P16 Press 1 6 then press ENTER U2 P17 Press 1 7 then press ENTER 5 RESET BUTTON 1 In Stop mode press RESET button to resume to standby mode 2 In selec...

Страница 65: ...PULSE and STEP in sequence 3 In scan mode when user wears transmitter it will jump and stay on PULSE to show heart rate Then you may Press MODE to jump to STEP Press MODE again TIME flashes to switch back to scan mode to show all function in sequence When user takes off transmitter to stop detecting pulse it restarts to scan from STEP then TIME SPEED DISTANCE CALORIES and PULSE in sequence 4 In sc...

Страница 66: ...ng steps to incorporate user s own count goal 2 Step count will start in 20 seconds after user steps on the machine and walks around 20 30 steps Step count will be mistakes if user does not walk on the machine 3 The accuracy will be less for those who walk lightly So users over 45 5kg 100lbs and walk at 2 6 kph 1 25 3 75mph in stable step will get higher accuracy around 97 SECONDARY CONTROL PANEL ...

Страница 67: ...the machine 5 SLOW FAST BUTTON To decrease or increase speed 6 10W USB CHARGER for tablet and cell phone 7 FOR HEADPHONE 8 FOR AUDIO INPUT NOTE If no one runs on the treadmill machine will stop automatically stop after 3 minutes HANDLEBAR SPEED BUTTON Speed can be controlled from handlebar speed button by increasing or decreasing 0 5 KPH HANDLEBAR INCLINE BUTTON Incline can be controlled from hand...

Страница 68: ... or link to website www jkexer com to read how to operate 1 Press the green START button on the console instead of the green START button on the smart device to start the treadmill 2 The TA sound is to keep user alert that the treadmill is about to start 3 To start the Map Run Mode press Blue Arrow on the upper right corner before pressing the START button on the console https itunes apple com us ...

Страница 69: ...ead the VR signal from incline motor for 6 seconds E6 will be shown on the computer If any above trouble happens please consult the distributor E3 ERROR 3 It happens only in HRC mode H1 H2 or H3 when user s heart rate is 20 beats more than target heart rate and last for over 30 seconds For your safety you should stop running when E3 appears SMELL If any smell comes out from motor please firstly sp...

Страница 70: ...ame onto the ground HOW TO TRANSPORT There are 4 wheels at the front bottom of frame So the machine can be easily moved after frame is folded up 1 Fold the frame up Please refer to HOW TO FOLD UP FOR STORAGE 2 Screw in 4 balancers not to touch ground then push frame for moving To screw in 4 balancers we suggest you may tilt the frame in one side to screw in two balancers then do the same to screw ...

Страница 71: ...s drifting 3 If the belt drifts to the right turn the right adjustment bolt one quarter of a turn clockwise and the left adjustment bolt one quarter counter clockwise See Fig A 4 If the belt drifts to the left turn the left adjustment bolt one quarter of a turn clockwise and turn the right adjustment bolt one quarter turn counter clockwise See Fig B 5 Observe the tracking of the belt for about two...

Страница 72: ...alking downhill 5 Then stepping heavily on the belt to see if the belt slips If the belt slips adjust one quarter turn clockwise and repeat STEP 4 if necessary CLEANING Firstly make sure the treadmill is off and unplugged from the electrical outlet To remove dust use a small vacuum nozzle to carefully vacuum around all visible components To remove film or dust use a slightly damp rag with a mild c...

Страница 73: ...erson your maximum heart rate is roughly 220 minus your age That is if you are 20 years old your maximum heart rate is about 200 If you are 40 it is about 180 However it could be dangerous if exercise at your maximum heart rate And physiologists have figured out a safe heart range for most people They call it Target Heart Rate This Target Heart Rate as it is called in cardiovascular exercise progr...

Страница 74: ... CABLE FIXER 15 SCREW 5 32 x 16L 50 BOLT M8 x 15L 16 SCREW M6 x 35L 51 BUSH Ø15 8 x 2 6t x 51L 17 AIR SHOCK FASTENER 52 COMPUTER 18 AIR SHOCK 492L 53 AUDIO CABLE 600L 19 SCREW M4 x 10L 54 PLATE 110 x 25 x 2t 20 SAFETY TUBE 56 SAFETY KEY 21 PLASTIC WASHER 01 N2B 57 BUSH Ø8 x Ø11 5 x 6 5L 22 PU FOAM 58 SPRING PLATE 23 CENTER BAR 59 END CAP 25 4 x 50 8 24 SCREW 5 32 x 50L 60 RACK POM 25 SCREW M5 x 30...

Страница 75: ...L 122 BOLT M10 x 70L 87 BUSH Ø20 10 x Ø8 x 7 3L 123 CABLE 200 blue 88 SCREW M6 x 6L 124 TABLE CASE UPPER 89 BOLT M10 x 15L 125 TABLE CASE BOTTOM 90 L PLATE BOTTOM 126 BOLT M8 x 75L 91 FIXING CLIP UCR 0 5 127 SLIDER 92 SCREW M4 x 6L 129 BOLT M10 x 50L 93 MOTOR 130 WHEEL Ø46 94 FRONT ROLLER 131 SLEEVE 50 x 100 95 REAR ROLLER 132 POP PIN 96 RUNNING BELT 133 END CAP 25 4 x 25 4 97 BELT 190 J8 134 END ...

Страница 76: ...87 85 38 88 40 97 94 28 101 62 62 38 48 66 38 09 09 102 108 110 41 45 44 43 42 60 65 42 118 112 116 46 15 123 119 71 73 73 72 70 80 47 89 70 93 69 92 120 117 92 92 91 132 9 10 15 96 11 99 95 9 98 15 104 103 124 125 52 100 17 18 19 20 28 38 31 37 73 34 35 30 115 107 28 99 119 116 114 119 38 56 5 6 7 8 32 25 29 33 113 113 99 39 47 49 51 53 54 55 68 68 84 86 90 33 28 38 121 48 48 48 57 57 133 134 135...

Страница 77: ...Belt Assure no bjects on the belt and run the machine at 3 5 kph to see if the belt drifts Please refer to ALIGNING THE RUNNING BELT to adjust Use dry cloth to wipe and clear the surface of running belt Use dry cloth to Use damp cloth to clean Do not use Solubility Cleaners Running Belt Tension Adjustment Check if running belt is slipping Please refer to ADJUSTING RUNNING BELT TENSION to adjust it...

Страница 78: ...r to do the maintenance 2 Press any button to jump out of the alert mode Word of LUBE will show up again whenever the machine re starts if the user doesn t eliminate the word by taking action of No 3 as below 3 Press STOP SPEED Slow buttons at the same time to eliminate the word of LUBE but distance will keep accumulating LUBRICATION ALERT ...

Страница 79: ...floor then bend the left leg and lean forward by moving your hips toward the wall Hold then repeat on the other side for 15 counts Sit with the soles of your feet together and your knees pointing outward Pull your feet as close to your groin as possible Gently push your knees toward the floor Hold for 15 counts Extend your right leg Rest the sole of your left foot against your right inner thigh St...

Страница 80: ...ing your mouth open Rotate your head to the left for one count then drop your head to your chest for one count Open your arms to the side and lift them until they are over your head Reach your right arm as far toward the ceiling as you can for one count Repeat this action with your left arm Lift your right shoulder toward your ear for one count Then lift your left shoulder up for one count as you ...

Страница 81: ... Beside this symbol there is usually information about the contained heavy metal Such heavy metals require an enviroment friendly disposal As an end user you are legally obliged to submit used batteries at the appropriate collection point of your city or commercially If you have doubts contact your local authorities for information about a correct and environment friendly disposal option European ...

Страница 82: ...Verkauf durch Distributed by Distribuido por Distribué Distribuito da InnovaMaxx GmbH Potsdamer Platz 11 10785 Berlin 49 30 220 663 569 service innovamaxx de http www sportstech de ...

Отзывы: