background image

50

Losing weight

In order to lose weight it’s necessary to burn fat. Our body starts burning the fat that is 

stacked up all over it only when the very last reserve of sugar has been used. A long training 

is intended to first burn all the sugar that is in your blood and only afterwards burn the fat. 

Pedaling for 30, 40 minutes (longer if the last meal before the training was excessively 

rich) setting the resistance adjustment knob (36) at a very low level (from 

1

 to 

4

) should be 

enough to start this process.

Toning muscles

In order to tone muscles you have to have them work hard. Set the


resistance adjustment 

knob (36) at a very high level (from 

5

 to 

8

) and push hard on the pedals.

An interesting variation is the training in intervals. This training method alternates very 

brief efforts at a very high intesity to very long efforts at a very low intesity. This roughly 

combines the benefits of the “Toning muscles” and “Losing weight”.


9.  TROUBLESHOOTING – PROBLEMS WITH THE COMPUTER DISPLAY 

“No function values are displayed. Only the pulse display works” 

This could mean there is a defect in the transmission between the Hometrainer and the 

computer. Check to see that all wires are properly connected to one another and that all 

wires are not damaged.

“The pulse display does not work anymore / always displays zero”. 

If all other computer function values are being displayed, then the problem is either the 

hand sensor or the wire connection of the sensor to the computer. Check to see that all 

wires are properly connected to one another and that all wires are undamaged. 

TROUBLESHOOTING

Problem

Solution

No computer display.

Replace the computer’s batteries by new batteries.

Erroneous computer 

display.

-   Check cables leading towards the computer.

-  Remove and reinsert batteries after one minute.

Pedal resistance does 

not change.

Check connection of tension cable (17) and tension hook 

(18) (Assembly: Step 2). Both tension cables need to be 

able to move by about 1cm whilst the resistance knob is 

set from 

1

 to 

8

.

No pulse display (“P” 

shown in display).

Check the cable connection leading towards front handle 

bar tube.

Pulse display data 

imprecise.

Moisten your palms a little, and clasp the contacts with 

equal force – measuring pulse data via hand contacts 

will not be as precise as measuring with a chest belt. For 

precise measurements, use a pulse monitor watch.

SP-HT-2700-DE-GB-08.indb   50

6/3/2010   5:21:58 PM

Содержание SP-HT-2700

Страница 1: ...HEIMTRAINER BEDIENUNGSANLEITUNG SP HT 2700 NAN 0724452 Order No 103635 DE GB INSTRUCTION MANUAL HOMETRAINER...

Страница 2: ...erheitshinweise und benutzen Sie das Produkt nur wie in der Anleitung beschrieben damit es nicht versehentlich zu Verletzungen oder Sch den kommt Bewahren Sie diese Anleitung zum sp teren Nachlesen au...

Страница 3: ...hrlich sein Bewahren Sie Batterien deshalb f r Kinder unerreichbar auf Wurde eine Batterie verschluckt muss sofort medizinische Hilfe in Anspruch genommen werden Kinder erkennen nicht die Gefahr die...

Страница 4: ...ungsanleitung beschrieben werden Sch tzen Sie das Produkt vor Wasserspritzern Feuchtigkeit hohen Temperaturen und direkter Sonneneinstrahlung HINWEISE ZUM UMGANG MIT BATTERIEN Entnehmen Sie Batterien...

Страница 5: ...efahrenfreie Arbeitsumgebung lassen Sie z B kein Werkzeug umherliegen Deponieren Sie Verpackungsmaterial so dass keine Gefahren davon ausgehen k nnen Folien oder Kunststofft ten bergen eine Erstickung...

Страница 6: ...6 25 26 25 24 23 22 21 20 16 19 16 17 18 15 5 9 4 3 2 5 6 12 1 11 28 29 30 31 32 33 34 35 9 5 13 14 9 7 8 10 9 27 3 EXPLOSIONSZEICHNUNG...

Страница 7: ...s 1 13 Pedal rechts 1 14 Feststellschraube M16 1 15 Unteres Computerkabel 1 16 Oberes Computerkabel 1 17 Oberes Spannseil 1 18 Unterer Spannhaken 1 19 Vorderes Lenkerrohr 1 20 Schraube M5 10 befinden...

Страница 8: ...e sch tzende Bodenunterlage Der Zusammenbau der Einzelteile sollte von 2 Personen durchgef hrt werden berpr fen Sie vor dem Zusammenbau anhand der Teileliste die Vollst ndigkeit der gelieferten Einzel...

Страница 9: ...n 6 8 gebogenen Unterlegscheiben 5 und M8 60 mm Bolzenschrauben 4 an dem Hauptrahmen 1 Schieben Sie den hinteren Standfu 7 auf den Hauptrahmen 1 und achten Sie darauf dass die offene Seite nach oben z...

Страница 10: ...Sie das obere Computerkabel 16 mit dem unteren Computerkabel 15 Verbinden Sie dann das Spannseil 17 mit dem Spannhaken 18 Schieben Sie das vordere Lenkerrohr 19 auf den Hauptrahmen fixieren Sie diese...

Страница 11: ...11 DEUTSCH 25 26 25 24 23 22 19 31 29 SCHRITT 3 Verbinden Sie den Lenker 22 mit dem vorderen Lenkerrohr 19 und fixieren Sie diese mit der Lenkerfeststellschraube 31...

Страница 12: ...raube 34 und der Unterlegscheibe 30 Montieren Sie den Sattel 32 an der Sattelst tze 33 und fixieren Sie diesen gut mit den Bolzen angebracht am Sattel links und rechts Sie k nnen den Sattel 32 durch N...

Страница 13: ...n und passen Sie die Montagel cher genau ab die korrekte H heneinstellung kann nach vollst ndigem Zusammenbau des Heimtrainers vorgenommen werden Sichern Sie die Sitzposition mit der Feststellschraube...

Страница 14: ...echts Verbinden Sie diese mit den entsprechenden Pedalkurbelarmen 11 Der rechte Pedalkurbelarm befindet sich bei Sitzposition auf der rechten Seite des Heimtrainers Beachten Sie dass das rechte Pedal...

Страница 15: ...Sie diesen mit zwei M5 10 Schrauben 20 die auf der Computerr ckseite vormontiert sind an den oberen beiden Bohrungen der Computerhalterung Achten Sie darauf dass keine Kabel eingeklemmt oder besch di...

Страница 16: ...werden kontinuierlich gemessen gespeichert und auf der Anzeige wiedergegeben Zum Anhalten des Computers unterbrechen Sie einfach das Training Zuerst wird der Computer alle Werte welche als letzte auf...

Страница 17: ...f dem Display angezeigt F r diese Funktion kann kein bestimmter Wert voreingestellt werden Die zuletzt gemessene Werte werden vom Computer nicht gespeichert STRECKE ANZEIGE IM DISPLAY DIST Diese Funkt...

Страница 18: ...MODUS RESET so oft bis ein Punkt vor dem gew nschten Symbol aufleuchtet W hlen Sie mit den Tasten oder Ihr Trainingsziel aus und best tigen Sie dieses mit der Taste MODE RESET Sobald der Geschwindigk...

Страница 19: ...elt es sich nur um grobe Vorschl ge f r ein Trainingsprogramm Konsultieren Sie falls notwendig Ihren Arzt f r Ratschl ge entsprechend Ihrer pers nlichen Bed rfnisse Die folgenden Seiten erkl ren detai...

Страница 20: ...Ern hrung welche in Einklang mit demTrainingsziel stehen muss und k rperlicher Ert chtigung drei bis f nf Mal pro Woche Ein normaler Erwachsener muss zweimal pro Woche trainieren um sein ihr aktuelles...

Страница 21: ...nspruchung wieder herabzusetzen Generell gilt dass Sie alle Dehnungen niemals bis zum Extrem ausf hren d rfen Sollten Sie Schmerzen versp ren l sen Sie sofort die Dehnung und f hren Sie diese in Zukun...

Страница 22: ...um sehr generelle Trainingstipps Diese verf gen ber keinen medizinischen Wert und dienen lediglich der Informationsvergabe zu verschiedenen Trainingsarten Zur Entwicklung eines pers nlichen detaillier...

Страница 23: ...in die Pedale Eine interessante Variante ist das Intervalltraining Diese Trainingsmethode wechselt zwischen kurzen Anstrengungen bei gro er Intensit t und langen Anstrengungen bei sehr niedriger Inten...

Страница 24: ...ie nach dem Zusammenbau und vor dem Einsatz des Heimtrainers ob alle Bolzen Muttern vollst ndig und korrekt angezogen sind Reinigen Sie den Heimtrainer regelm ig mit einem leicht angefeuchteten Tuch u...

Страница 25: ...erwaltung Altger te geh ren nicht in den Hausm ll Entsorgen Sie auch Altger te fachgerecht Sie tragen damit zum Umweltschutz bei ber Sammelstellen und ffnungszeiten informiert Sie Ihre rtliche Verwalt...

Страница 26: ...Uhr Servicehotline 0700 77 67 87 587 12ct min aus dem dt Festnetz 41 315500845 Schweiz 43 720880801 sterreich E Mail Service SportPlus org URL http www SportPlus org Bitte achten Sie darauf dass Sie h...

Страница 27: ...odukt nicht fehlerfrei sein wenden Sie sich bitte innerhalb der Frist von 24 Monaten ab Kaufdatum an unseren Kundendienst Von der Gew hrleistung ausgenommen sind Sch den durch u ere Gewalteinwirkung E...

Страница 28: ...160 155 150 145 140 135 130 125 120 115 110 105 150 136 127 105 20 25 30 35 40 45 50 55 60 65 70 131 136 140 144 148 153 157 Berechnungsformeln Maximalpuls 220 Alter 90 des Maximalpulses 220 Alter x 0...

Страница 29: ...ructions carefully and use the equipment only as described in the manual to avoid hazards and personal injury Please retain this manual for future reference Should you pass on this product ensure to i...

Страница 30: ...s can be extremely dangerous if swallowed Therefore store batteries out of the reach of children If a battery has been swallowed immediately contact a doctor Children do not recognize the danger conne...

Страница 31: ...for the intended purposes as described in this manual Protect this product from splashes humidity high temperatures and direct sunlight ADVICE WITH REGARD TO BATTERIES Remove the batteries if they ar...

Страница 32: ...avoid danger please keep the working area clear of tools Dispose of all the packaging materials in such a way that danger can be avoided Foils and plastic bags are potentially hazardous to children da...

Страница 33: ...33 ENGLISH 25 26 25 24 23 22 21 20 16 19 16 17 18 15 5 9 4 3 2 5 6 12 1 11 28 29 30 31 32 33 34 35 9 5 13 14 9 7 8 10 9 27 3 EXPLOSION VIEW...

Страница 34: ...4 Adjustment knob M16 1 15 Lower computer wire 1 16 Upper computer wire 1 17 Upper tension cable 1 18 Lower tension hook 1 19 Front handle bar tube 1 20 Screw M5 10 located on computer s rear 2 21 Sto...

Страница 35: ...When doing this use a floor protecting underlay Assembly of the individual parts should be carried out by 2 people Before assembly check the parts list to see whether all parts are present Some parts...

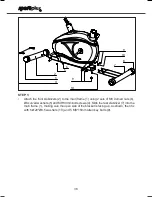
Страница 36: ...e main frame 1 using 2 sets of M8 domed nuts 6 8 curved washers 5 and M8 60mm bolt screws 4 Slide the rear stabilizer 7 into the main frame 1 making sure the open side of the bracket is facing up as s...

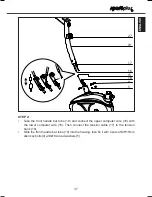
Страница 37: ...tube 19 and connect the upper computer wire 16 with the lower computer wire 15 Then connect the tension cable 17 to the tension hook 18 Slide the front handle bar tube 19 into the housing then fix it...

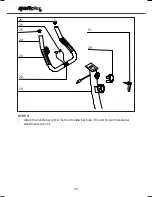
Страница 38: ...38 25 26 25 24 23 22 19 31 29 STEP 3 Attach the handle bar 22 to the front handle bar tube 19 and fix it with handle bar adjustment knob 31...

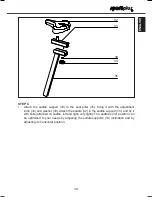
Страница 39: ...the adjustment knob 34 and washer 30 Attach the saddle 32 to the saddle support 33 and fix it with bolts attached on saddle left and right very tightly The saddle s 32 position can be optimized to yo...

Страница 40: ...nto the housing and line up the holes the correct height adjustment can be made when the hometrainer is fully assembled Secure the seat in position with the adjustment knob 14 Warning Do not adjust th...

Страница 41: ...d L and R Left and Right Connect them to their appropriate crank arms 11 The right crank arm is on the right hand side of the Hometrainer as you sit on it Note that the right pedal 13 should be thread...

Страница 42: ...5 10 20 The screws have been pre assembled in the two upper drill holes of the computer holder Make sure not to pinch or damage any of the cables 6 RESISTANCE ADJUSTMENT KNOB The resistance adjustment...

Страница 43: ...The individual training values will be continuously measured saved and shown on the display To stop the computer just stop exercising The computer will save the values that were last displayed on the...

Страница 44: ...measured speed during a training unit is shown in km h on the display For this function no preset value can be entered The last measured values are not saved by the computer DISTANCE DISPLAY SHOWS DI...

Страница 45: ...he a dot appears in front of the icon to be preset Choose the training goal by pressing the buttons or and confirm by pressing the MODE RESET button As soon as the speed sensor receives any signal inp...

Страница 46: ...ew training device and will illustrate the fundamentals of fitness training In order to reach your desired training goal it is imperative to inform yourself about important points for creating a train...

Страница 47: ...is her current level of fitness In order to improve his her condition and to change body weight a person requires minimum 3 training sessions per week 3 TRAINING PHASES Each training session should co...

Страница 48: ...e of thumb never complete all stretches to the extreme Should you feel pain stop the stretch immediately and try it again a bit later but less intensively EXERCISE 1 STRETCHING THE QUADRICEPS FRONT TH...

Страница 49: ...S ON TRAINING These are very general tips on training they have no medical value and their only purpose is to provide you with basic knowledge about different kinds of training For a personal detailed...

Страница 50: ...is a defect in the transmission between the Hometrainer and the computer Check to see that all wires are properly connected to one another and that all wires are not damaged The pulse display does not...

Страница 51: ...To do this open the battery compartment cover on the back of the computer and insert new batteries Needed are 2x 1 5 V AAA batteries Always replace all old batteries with new ones and pay attention to...

Страница 52: ...Service time Monday to Friday 9 00 a m to 6 p m Service hotline 0700 77 67 87 587 12 cent min from the German network 41 315500845 Switzerland 43 720880801 Austria E Mail Service SportPlus org URL htt...

Страница 53: ...be defective please consult our customer service team within 24 months starting at the date of purchase The warranty cannot be honoured when defects or damages occur as a result of External forceful i...

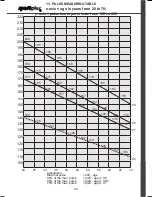
Страница 54: ...170 165 160 155 150 145 140 135 130 125 120 115 110 105 150 136 127 105 20 25 30 35 40 45 50 55 60 65 70 131 136 140 144 148 153 157 13 PULSE MEASURING TABLE x axis age in years from 20 to 70 y axis p...

Страница 55: ...SportPlus Vertriebsges mbH Frankenstrasse 16 20097 Hamburg Germany...

Отзывы: