background image

92

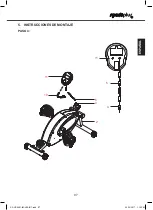
PIEZAS PREMONTADAS

Número de 

pieza

Descripción

Figura

Cantidad

1

Cuadro principal

1

2

E s t a b i l i z a d o r 

delantero

1

3

Estabilizador trasero

1

5

Pedal 

Cable del sensor

1

8/9

Pedal (L/R) 

1

10/11

Ordenador,

Soporte de 

ordenador

1

SP-HT-0001-IM-V05-INT.indb   92

22/12/2017   1:15 PM

Содержание SP-HT-0001

Страница 1: ...szse A5 MINI HEIMTRAINER DE USER MANUAL MINI EXERCISE BIKE GB MODE D EMPLOI MINI TRAINER D APPARTEMENT FR MANUALE UTENTE MINI CYCLETTE IT MANUAL DE INSTRUCCIONES MINI BICICLETA EST TICA ES SP HT 0001...

Страница 2: ...sen auf Falls Sie das Produkt einmal an eine andere Person weitergeben m chten legen Sie bitte diese Bedienungsanleitung immer mit dazu INHALT 1 TECHNISCHE ANGABEN 2 2 SICHERHEITSHINWEISE 3 3 EXPLOSIO...

Страница 3: ...nderh nde gelangt Es besteht Erstickungsgefahr VORSICHT VERLETZUNGSGEFAHR Benutzen Sie kein besch digtes oder defektes Produkt Wenden Sie sich in diesem Fall an eine Fachwerkstatt oder unseren Kundend...

Страница 4: ...Verpackungsmaterial und legen dann die einzelnen Teile auf eine freie Fl che Dieses verschafft Ihnen einen berblick und erleichtert das Zusammenbauen Sch tzen Sie die Aufbaufl che durch eine Unterlage...

Страница 5: ...5 DEUTSCH 3 EXPLOSIONSZEICHNUNG SP HT 0001 IM V05 INT indb 5 22 12 2017 1 14 PM...

Страница 6: ...10 Computerhalterung 1 11 Computer 1 12 Magnetklammer 1 13 Bolzen 1 14 Schraube M4x10L 1 15 Selbstschneidende Schraube ST4 2x20L 8 16 Sechskantschraube ST4 2x20L 1 17 Sechskantmutter M10x8t 2 18 Flans...

Страница 7: ...ager 6003ZZ 2 35 Spannrolle 1 1 36 Schraube M5x30L 1 37 Lagerblock 2 38 Spannrolle 2 1 39 Endkappe f r Stabilisator 4 40 Endkappe f r vorderes Rohr 2 41 Kurbelabdeckung 2 42 Linke Geh useabdeckung 1 4...

Страница 8: ...mer Beschreibung Abbildung Anzahl 1 Hauptrahmen 1 2 Vorderer Stabilisator 1 3 Hinterer Stabilisator 1 5 Mittleres Sensorkabel 1 8 9 Pedale L R 1 10 11 Computer Computerhalterung 1 SP HT 0001 IM V05 IN...

Страница 9: ...UND TEILELISTE F R DIE MONTAGE Teilnummer Beschreibung Abbildung Anzahl Set A Gebogene Unterlegscheibe 4 Hutmutter M8x16t 4 Schlossschraube 4 B Multifunktions Werkzeug 1 SP HT 0001 IM V05 INT indb 9...

Страница 10: ...en Sie diese auf eine flache Oberfl che Benutzen Sie dabei eine sch tzende Bodenunterlage berpr fen Sie vor dem Zusammenbau anhand der Teileliste die Vollst ndigkeit der gelieferten Einzelteile SCHRIT...

Страница 11: ...11 DEUTSCH 5 MONTAGEHINWEISE SCHRITT 2 8 9 7 6 SP HT 0001 IM V05 INT indb 11 22 12 2017 1 14 PM...

Страница 12: ...12 5 MONTAGEHINWEISE SCHRITT 3 11 4 4 11 2 SP HT 0001 IM V05 INT indb 12 22 12 2017 1 14 PM...

Страница 13: ...13 DEUTSCH 5 MONTAGEHINWEISE SCHRITT 4 11 11 10 5 2 5 4 4 SP HT 0001 IM V05 INT indb 13 22 12 2017 1 15 PM...

Страница 14: ...tors abnehmen 2 2AAA Batterien mit korrekter Polung in das Fach einlegen undAbdeckung anbringen 3 L sst sich das Display nicht mehr ablesen oder sind lediglich einige Segmente sichtbar nehmen Sie bitt...

Страница 15: ...einander auf dem LCD Display angezeigt Nach ca 6 Sekunden wird die jeweils n chste Funktion angezeigt TIME ZEIT Misst automatisch die Zeit sobald mit dem Training begonnen wird 0 00 99 59 MIN SPEED GE...

Страница 16: ...vor Festlegung des notwendigen Trainingsaufwands beachtet werden 1 INTENSIT T Der Grad physischer Anstrengung w hrend des Trainings muss h her als bei normaler Belastung liegen darf dabei jedoch nicht...

Страница 17: ...bis 10 Minuten erreicht werden Nach dem Aufw rmen sollte das wirkliche Training beginnen Trainingsphase Die Trainingsintensit t sollte f r die ersten wenigen Minuten gering sein und sollte dann f r e...

Страница 18: ...ungen durchf hren m ssen gr enm ig zu schrumpfen um die Anstrengung auch ber einen l ngeren Zeitraum ausf hren zu k nnen Beim Trainieren muss jeder seine pers nlichen Ziele definieren und sich dann st...

Страница 19: ...en Sie ob alle Kabel korrekt miteinander verbunden sind und ob keines der Kabel besch digt ist PROBLEMBEHANDLUNG Problem L sung Keine Bildschirmanzeige Tauschen Sie die Batterien des Computers gegen n...

Страница 20: ...zen Sie neue Batterien ein Es werden zwei 1 5V AAA Batterien ben tigt Ersetzen Sie alte Batterien immer durch neue Batterien und achten Sie beim Einsetzen immer auf die korrekte Polarit t 10 ENTSORGUN...

Страница 21: ...ie darauf dass Sie hierzu folgende Informationen zur Hand haben Bedienungsanleitung Modellnummer diese befindet sich auf dem Deckblatt dieser Anleitung Beschreibung der Zubeh rteile Zubeh rnummer Kauf...

Страница 22: ...ein wenden Sie sich bitte innerhalb der Frist von 24 Monaten ab Kaufdatum an unseren Kundendienst Von der Gew hrleistung ausgenommen sind Sch den durch u ere Gewalteinwirkung Eingriffe Reparaturen und...

Страница 23: ...this product ensure to include the corresponding instruction manual CONTENTS 1 TECHNICAL DATA 23 2 SAFETY INSTRUCTIONS 24 3 EXPLOSION VIEW 26 4 PART LIST 27 5 ASSEMBLY INSTRUCTIONS 31 6 USING THE COMP...

Страница 24: ...kshop or our customer service Always verify that the product is in impeccable condition before use Defective components must be replaced immediately as failure to do so may impair the functioning and...

Страница 25: ...laying down suitable padding Check the components against the components list to make sure all are present Do not dispose of all packaging materials until assembly is completed Please note that there...

Страница 26: ...26 3 EXPLOSION VIEW SP HT 0001 IM V05 INT indb 26 22 12 2017 1 15 PM...

Страница 27: ...R 1 8 Footplate L 1 9 Footplate R 1 10 Computer mount 1 11 Computer 1 12 Magnetic mount 1 13 Bolt 1 14 Screw M4X10L 1 15 Self tapping screw ST4 2x20L 8 16 Hex screw ST4 2x20L 1 17 Hex nut M10x8t 2 18...

Страница 28: ...Ball bearing 6003ZZ 2 35 Tension roller 1 1 36 Screw M5x30L 1 37 Bearing block 2 38 Tension roller 2 1 39 End cap for main frame 4 40 End cap for front tube 2 41 Crank cover 2 42 Left housing cover 1...

Страница 29: ...TED PARTS Part number Description Illustration Quantity 1 Frame 1 2 Front stand 1 3 Rear stand 1 5 Middle Sensor cable 1 8 9 Pedals L R 1 10 11 Computer Computer mount 1 SP HT 0001 IM V05 INT indb 29...

Страница 30: ...30 TOOLS AND PARTS LIST FOR ASSEMBLY Part number Description Illustration Quantity Set A Bent washer 4 Cap Nut M8x16t 4 Carriage bolt 4 B Multi tool 1 SP HT 0001 IM V05 INT indb 30 22 12 2017 1 15 PM...

Страница 31: ...carefully and place them on a flat surface When doing this use suitable padding to protect the working surface Before assembly check the parts list to verify that all parts are present STEP 1 Set A x...

Страница 32: ...32 5 ASSEMBLY INSTRUCTIONS STEP 2 8 9 7 6 SP HT 0001 IM V05 INT indb 32 22 12 2017 1 15 PM...

Страница 33: ...33 ENGLISH 5 ASSEMBLY INSTRUCTIONS STEP 3 11 4 4 11 2 SP HT 0001 IM V05 INT indb 33 22 12 2017 1 15 PM...

Страница 34: ...34 5 ASSEMBLY INSTRUCTIONS STEP 4 11 11 10 5 2 5 4 4 SP HT 0001 IM V05 INT indb 34 22 12 2017 1 15 PM...

Страница 35: ...k of the monitor 2 Heeding correct polarity insert 2 AAA batteries into the compartment and replace the cover 3 If the display can no longer be read or if only some segments are visible please remove...

Страница 36: ...isplay now shows all functions and values in succession Each function is shown for approx 6 seconds TIME Automatically measures the time as soon as training begins 0 00 99 59 MIN SPEED Shows the curre...

Страница 37: ...e determining the necessary training effort 1 INTENSITY The level of physical strain during training must exceed the normal burden without reaching a point of breathlessness or exhaustion A suitable g...

Страница 38: ...astic exercise or stretches lasting from 5 to 10 minutes After the warm up the real training should begin training phase Training intensity should be low for the first few minutes and should then incr...

Страница 39: ...ver longer periods they tend to decrease in size in order to sustain the effort for an extended time When training each individual needs to set his or her own goals and then strongly commit to these v...

Страница 40: ...uter Check to see that all cables are properly connected to one another and that none of the cables is damaged TROUBLESHOOTING Problem Solution No computer display Replace the computer batteries with...

Страница 41: ...teries Two 1 5 V AAA batteries are required Always replace all old batteries with new ones and always heed correct polarity when inserting new batteries 10 NOTES ON DISPOSAL Packaging materials are ra...

Страница 42: ...ntract Please have the following information at hand when you call Instruction manual Model number located on the title page of this manual Description of accessory parts Accessory number Proof of pur...

Страница 43: ...e product you have purchased is defective please contact our service team within 24 months from the date of purchase Excluded from the warranty are Damage due to external force Interference repairs or...

Страница 44: ...produit une autre personne veuillez toujours transmettre son mode d emploi PIECES CONTENUES 1 INDICATIONS TECHNIQUES 44 2 CONSIGNES DE S CURIT 45 3 VUE CLAT E 47 4 LISTE DES PI CES 48 5 NOTICES EXPLI...

Страница 45: ...e produit lorsqu il est endommag ou d fectueux Dans ce cas adressez vous un service technique ou notre service apr s vente Avant chaque utilisation contr lez le produit afin de v rifier son parfait ta...

Страница 46: ...montage l aide d un rev tement afin de ne pas la salir et ou la rayer Contr lez maintenant avec la liste des pi ces si tous les l ments sont disponibles Mettez au rebut recyclez les mat riaux d embal...

Страница 47: ...47 FRAN AIS 3 VUE CLAT E SP HT 0001 IM V05 INT indb 47 22 12 2017 1 15 PM...

Страница 48: ...velle R 1 8 P dale L 1 9 P dale R 1 10 Support de l ordinateur 1 11 Ordinateur 1 12 Clip aimant 1 13 Boulon 1 14 Vis M4x10L 1 15 Vis autotaraudeuse ST4 2x20L 8 16 Vis hexagonale ST4 2x20L 1 17 crou he...

Страница 49: ...billes 6003ZZ 2 35 Poulie de tension 1 1 36 Vis M5x30L 1 37 Bloc support 2 38 Poulie de tension 2 1 39 Capuchon d extr mit pour stabilisateur 4 40 Capuchon d extr mit pour tube avant 2 41 Capuchon du...

Страница 50: ...Description Illustration Quantit 1 Cadre principal 1 2 Stabilisateur avant 1 3 Stabilisateur arri re 1 5 Au centre C ble du capteur 1 8 9 P dale L R 1 10 11 Ordinateur Support de l ordinateur 1 SP HT...

Страница 51: ...LS ET DE PI CES POUR LE MONTAGE Num ro des pi ces Description Illustration Quantit Jeu A Rondelle incurv e 4 crou borgne M8x16t 4 Vis t te bomb e 4 B Outil multifonctionnel 1 SP HT 0001 IM V05 INT ind...

Страница 52: ...allage et mettez celles ci sur une surface plane Utilisez pour cela un rev tement prot geant le sol Avant l assemblage contr lez l exhaustivit des pi ces livr s au moyen de la liste des pi ces 1 RE TA...

Страница 53: ...53 FRAN AIS 5 NOTICES EXPLICATIVES DE MONTAGE 2E TAPE 8 9 7 6 SP HT 0001 IM V05 INT indb 53 22 12 2017 1 15 PM...

Страница 54: ...54 5 NOTICES EXPLICATIVES DE MONTAGE 3E TAPE 11 4 4 11 2 SP HT 0001 IM V05 INT indb 54 22 12 2017 1 15 PM...

Страница 55: ...55 FRAN AIS 5 NOTICES EXPLICATIVES DE MONTAGE 4E TAPE 11 11 10 5 2 5 4 4 SP HT 0001 IM V05 INT indb 55 22 12 2017 1 15 PM...

Страница 56: ...oniteur 2 Ensuite ins rez 2 piles de type AAA en respectant bien la polarit indiqu e dans le compartiment refermez le couvercle 3 Si l affichage n est plus lisible ou si seulement quelques segments so...

Страница 57: ...ne derri re l autre sur l affichage cristaux liquides Apr s environ 6 secondes la prochaine fonction est indiqu e TIME DUR E Mesure automatiquement la dur e d s que l entra nement est commenc 0 00 99...

Страница 58: ...du volume d entra nement n cessaire 1 INTENSIT Le degr d effort physique durant l entra nement doit tre cependant plus lev que la normale mais ne doit pas d clencher une dyspn e ou un puisement Une in...

Страница 59: ...endant 5 10 minutes Apr s l chauffement le r el entra nement devrait commencer phase d entrainement L intensit de l entra nement devrait tre faible durant les premi res minutes et devrait ensuite tre...

Страница 60: ...ros efforts sur une plus longue p riode commencent r tr cir de par leur taille afin de pouvoir effectuer cet effort aussi sur une plus longue p riode Lors de l entra nement chacun doit d finir et pr c...

Страница 61: ...nateur Contr lez si tous les c bles sont correctement raccord s et si aucun des c bles n est endommag D PANNAGE DES PROBL MES Probl me Solution Pas d affichage sur le moniteur Remplacez les piles de l...

Страница 62: ...t faites toujours attention la polarit correcte lors de l insertion 10 CONSIGNES POUR LA MISE AU REBUT Les mat riaux d emballage sont des mati res premi res et peuvent tre r utilis s Pr parez les emba...

Страница 63: ...er que vous avez sous la main les informations suivantes Mode d emploi num ro du mod le celui ci se trouve sur la page de couverture de ce mode d emploi description des pi ces accessoires num ro des p...

Страница 64: ...r de la date d achat dans un d lai de 24 mois notre service client le Sont exclus de la garantie les dommages caus s par l exercice d une force les interventions r parations et modifications r alis es...

Страница 65: ...di cessione anche occasionale del prodotto a terzi accludere sempre parimenti questo manuale CONTENUTO 1 DATI TECNICI 65 2 AVVERTENZE PER LA SICUREZZA 66 3 DISEGNO ESPLOSO 68 4 ELENCO DELLE PARTI 69 5...

Страница 66: ...i della Societ Prima di ogni utilizzo esaminare il prodotto per verificare l assenza di danni Sostituire immediatamente le parti difettose cos da non compromettere la funzionalit e la sicurezza Assicu...

Страница 67: ...l montaggio Proteggere la superficie di montaggio da sporco e graffi utilizzando un apposito rivestimento Usando come riferimento l elenco delle parti controllare che la confezione sia integra Smaltir...

Страница 68: ...68 3 DISEGNO ESPLOSO SP HT 0001 IM V05 INT indb 68 22 12 2017 1 15 PM...

Страница 69: ...lla L 1 7 Manovella R 1 8 Pedale L 1 9 Pedale R 1 10 Supporto computer 1 11 Computer 1 12 Clip magnetica 1 13 Bullone 1 14 Vite M4x10L 1 15 Vite autofilettante ST4 2x20L 8 16 Vite esagonale ST4 2x20L...

Страница 70: ...enditore a rulli 1 1 36 Vite M5x30L 1 37 Supporto cuscinetto 2 38 Tenditore a rulli 2 1 39 Chiusura per stabilizzatore 4 40 Chiusura per tubo anteriore 2 41 Copertura manovella 2 42 Coperchio alloggia...

Страница 71: ...Illustrazione Quantit 1 Telaio principale 1 2 S t a b i l i z z a t o r e anteriore 1 3 S t a b i l i z z a t o r e posteriore 1 5 Centrale Cavo sensore 1 8 9 Pedale L R 1 10 11 Computer Supporto com...

Страница 72: ...ONENTI PER IL MONTAGGIO Numero di parte Descrizione Illustrazione Quantit Set A Rondella convessa 4 Dado cieco M8x16t 4 Vite con quadro sottotesta 4 B Utensile multifunzione 1 SP HT 0001 IM V05 INT in...

Страница 73: ...e su una superficie piana A tal fine stendere sul pavimento un rivestimento protettivo Usando come riferimento l elenco delle parti verificare che non vi siano pezzi mancanti prima di procedere al mon...

Страница 74: ...74 5 NOTE PER IL MONTAGGIO PASSAGGIO 2 8 9 7 6 SP HT 0001 IM V05 INT indb 74 22 12 2017 1 15 PM...

Страница 75: ...75 ITALIANO 5 NOTE PER IL MONTAGGIO PASSAGGIO 3 11 4 4 11 2 SP HT 0001 IM V05 INT indb 75 22 12 2017 1 15 PM...

Страница 76: ...76 5 NOTE PER IL MONTAGGIO PASSAGGIO 4 11 11 10 5 2 5 4 4 SP HT 0001 IM V05 INT indb 76 22 12 2017 1 15 PM...

Страница 77: ...atterie sul retro del monitor 2 Inserire 2 batterie AAA nel vano osservando la corretta polarit e riposizionare il coperchio 3 Se non pi possibile leggere il display o sono visibili solo pochi segment...

Страница 78: ...e tutte le funzioni e tutti i valori Il passaggio alla funzione successiva richiede ca 6 secondi TIME TEMPO Misura automaticamente il tempo trascorso dall inizio dell allenamento 0 00 99 59 MIN SPEED...

Страница 79: ...ma di pianificare l allenamento necessario 1 INTENSIT Il grado di sforzo fisico durante l allenamento deve essere superiore al carico normale e tuttavia non deve causare affanno n affaticamento Un ott...

Страница 80: ...possibile eseguire esercizi ginnici o di stretching per 5 10 minuti Dopo il riscaldamento inizia la fase di allenamento vero e proprio Allenamento L intensit dell allenamento dovrebbe essere minima pe...

Страница 81: ...o periodo i muscoli iniziano a ridursi per poter sostenere sforzi similari in un periodo di tempo parimenti esteso Durante l allenamento ognuno deve definire i propri personali obiettivi e attenersi s...

Страница 82: ...tti i cavi siano collegati correttamente e che nessuno di essi sia danneggiato RISOLUZIONE DEI PROBLEMI Problema Soluzione Nessuna visualizzazione a schermo Sostituire le batterie del computer con bat...

Страница 83: ...di quelle esaurite Sono necessarie due batterie AAA da 1 5 V Sostituire sempre le batterie vecchie con delle batterie nuove facendo attenzione a osservare la giusta polarit 10 CONSIGLI PER LO SMALTIME...

Страница 84: ...a disposizione le informazioni seguenti Istruzioni per l uso Numero di modello riportato sulla copertina del manuale Descrizione degli accessori Numero degli accessori Prova d acquisto con indicata l...

Страница 85: ...olgersi entro il periodo di 24 mesi a decorrere dalla data di acquisto al servizio clienti della Societ La garanzia non copre Danni causati da forze esterne Interventi riparazioni o modifiche a opera...

Страница 86: ...na coloque siempre este manual de instrucciones CONTENIDO 1 DATOS T CNICOS 86 2 INDICACIONES DE SEGURIDAD 87 3 PLANO DETALLADO 89 4 LISTA DE PIEZAS 90 5 INSTRUCCIONES DE MONTAJE 94 6 FUNCIONAMIENTO DE...

Страница 87: ...e PRECAUCI N RIESGO DE LESIONES No utilice un producto da ado o defectuoso En ese caso dir jase a un taller especializado o a nuestro servicio de atenci n al cliente Compruebe que el producto est en p...

Страница 88: ...montaje y coloque las piezas sobre una superficie libre De esta manera obtendr una vista general y le facilitar el montaje Proteja la superficie de montaje colocando una base para evitar que se raye o...

Страница 89: ...89 ESPA OL 3 PLANO DETALLADO SP HT 0001 IM V05 INT indb 89 22 12 2017 1 15 PM...

Страница 90: ...ela R 1 8 Pedal L 1 9 Pedal R 1 10 Soporte de ordenador 1 11 Ordenador 1 12 Im n de montaje 1 13 Pernos 1 14 Tornillo M4x10L 1 15 Tornillo autorroscante ST4 2x20L 8 16 Tornillo hexagonal ST4 2x20L 1 1...

Страница 91: ...de bolas 6003ZZ 2 35 Polea tensora 1 1 36 Tornillo M5x30L 1 37 Soporte de rodamiento 2 38 Polea tensora 2 1 39 Tapa final para estabilizador 4 40 Tapa final para tubo delantero 2 41 Tapa manivela 2 4...

Страница 92: ...ripci n Figura Cantidad 1 Cuadro principal 1 2 E s t a b i l i z a d o r delantero 1 3 Estabilizador trasero 1 5 Pedal Cable del sensor 1 8 9 Pedal L R 1 10 11 Ordenador Soporte de ordenador 1 SP HT 0...

Страница 93: ...TAS Y PIEZAS PARA EL MONTAJE N mero de pieza Descripci n Figura Cantidad Juego A Arandela c ncava 4 Tuerca de sombrerete M8x16t 4 Tornillo carrocero 4 B Herramienta multifunci n 1 SP HT 0001 IM V05 IN...

Страница 94: ...quelas en una superficie plana Para ello utilice una esterilla protectora del suelo Compruebe la integridad de los elementos suministrados antes del montaje verific ndolos con la lista de piezas PASO...

Страница 95: ...95 ESPA OL 5 INSTRUCCIONES DE MONTAJE PASO 2 8 9 7 6 SP HT 0001 IM V05 INT indb 95 22 12 2017 1 15 PM...

Страница 96: ...96 5 INSTRUCCIONES DE MONTAJE PASO 3 11 4 4 11 2 SP HT 0001 IM V05 INT indb 96 22 12 2017 1 15 PM...

Страница 97: ...97 ESPA OL 5 INSTRUCCIONES DE MONTAJE PASO 4 11 11 10 5 2 5 4 4 SP HT 0001 IM V05 INT indb 97 22 12 2017 1 15 PM...

Страница 98: ...ila en la parte trasera del monitor 2 2 AAA Inserte las pilas en el compartimento con la polaridad correcta y coloque la tapa 3 Si no se puede leer la pantalla o se ve nicamente algunos segmentos extr...

Страница 99: ...onsecutivamente todas las funciones y valores Transcurridos 6 segundos se mostrar la siguiente funci n TIME TIEMPO Mide autom ticamente el tiempo tan pronto haya empezado el entrenamiento 0 00 99 59 M...

Страница 100: ...guientes factores antes de determinar el esfuerzo de entrenamiento necesario 1 INTENSIDAD El grado de esfuerzo f sico durante el ejercicio debe ser superior al esfuerzo normal pero sin causar dificult...

Страница 101: ...e lograrse a trav s de Ejercicios gimn sticos o estiramiento durante 5 a 10 minutos El entrenamiento comenzar despu s de haber calentado Fase de entrenamiento La intensidad de entrenamiento debe ser b...

Страница 102: ...tiempo se empezar n a contraer en igual medida para tambi n poder realizar el esfuerzo durante un largo periodo de tiempo Durante el entrenamiento cada uno deber marcar sus objetivos personales y mant...

Страница 103: ...ruebe que todos los cables est n correctamente conectados entre s y que no haya ninguno da ado SOLUCI N DE PROBLEMAS Problema Soluci n Pantalla de visualizaci n peque a Cambie las pilas del ordenador...

Страница 104: ...nserte unas nuevas Se necesitar n dos pilas 1 5 V AAA Sustituya siempre las pilas gastadas por unas nuevas prestando atenci n a la correcta polaridad a la hora de colocarlas 10 INDICACIONES DE ELIMINA...

Страница 105: ...de tel fono Aseg rese de recibir la siguiente informaci n Manual de instrucciones N mero de modelo este se encuentra en la portada de este manual Descripci n de los accesorios N mero del accesorio Fac...

Страница 106: ...on nuestro servicio de atenci n al cliente en el plazo de 24 meses a partir de la fecha de compra Quedar n excluidos de la garant a Los da os por aplicaci n de fuerza Intervenciones reparaciones y mod...

Страница 107: ...ine 33 176 361 493 Les frais d appel d pendent de votre op rateur votre abonnement t l phonique Adresse lectronique service sportplus org Site Internet http www sportplus org IT Linea diretta per l as...

Отзывы: