background image


P n e u m a t i c

  D r i l l  

2   1 3 6 2   0 0 1 0


Translation of the original manual, 
compiled: 01.09.21 

213620010_BA_en_Version_01.doc 

Page 7 of 30 


Startup 

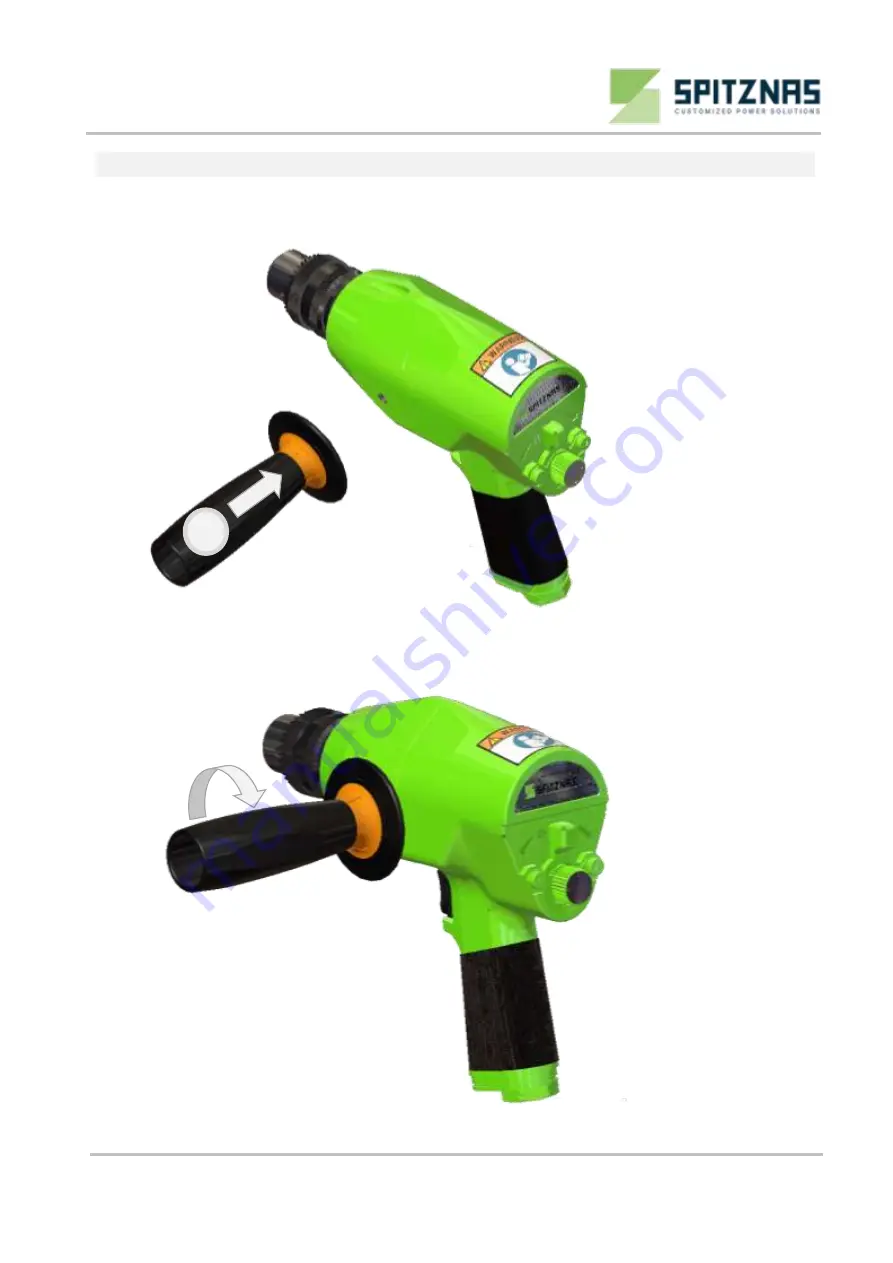
Assembly of the handle 

Fix the second handle item 10 at the side (see fig. 3 and 4).  


Fig. 3                                                                                                                                                                                                        


Fig. 4 

Turn  

10 

B.V.Technisch Bureau Duspra  Amersfoortseweg 24-14   3951 LB  Maarn  The Netherlands

Tel: +31(0)180-410100 E: [email protected]   W: www.duspra.nl

Содержание 2 1362 0010

Страница 1: ... 1362 0010 ATEX Tool Illustration can differ from the original Translation of the original manual compiled 01 09 21 Techn Doc No 251 Operation and Maintenance Manual B V Technisch Bureau Duspra Amersfoortseweg 24 14 3951 LB Maarn The Netherlands Tel 31 0 180 410100 E sales duspra nl W www duspra nl ...

Страница 2: ... 20 Basic Safety Instructions 21 Employer s Obligations 21 Operator s Obligations 21 Explanation of Symbols for Protective Equipment and for Accident Prevention 22 Safety Instructions for avoiding Safety Hazards 23 26 Service and Maintenance 27 28 Disassembly Re assembly 28 Storage 28 Disposal 28 Environmental Regulations 28 Troubleshooting 29 Warranty and Liability 29 Declaration of Conformity 30...

Страница 3: ...tances can mix and result in an explosive atmosphere In areas exposed to explosion hazards supplementary instructions and directives apply Observe the safety instructions of the employer as well WARNING explosive material Caution should be exercised when working with explosive material or in its surrounding area PROHIBITION No naked flame fire or ignition source and no smoking Prevent from fire an...

Страница 4: ... 3 dB A Measurement uncertainty K 1 5 m s2 The performance specifications are guide values only they depend basically on the application the working pressure and the accessories used Intended Use SPITZNAS machines are designed for industrial use only Only trained skilled personnel are allowed to operate the machine The drill serves for drilling Wood plastic non ferrous metal cast iron steel and st...

Страница 5: ...ed regulator 6 Motor housing with pistol grip 7 Drill chuck key 8 Drill chuck 9 Gear housing 10 Second Handle Scope of Delivery Check if the scope of delivery is complete 1 Pneumatic Drill 1 Operation and Maintenance Manual 1 Carrying case and accessories if applicable 4 6 2 3 5 7 8 9 1 10 B V Technisch Bureau Duspra Amersfoortseweg 24 14 3951 LB Maarn The Netherlands Tel 31 0 180 410100 E sales d...

Страница 6: ...ry high level of safety High level of safety Normal level of safety 1 2 3 Ex Atmosphere G Gas vapor and mist Marking according to standard Ex Symbol Ignition protection category h Code letter h for all non electrical equipment Explosion group IIB e g Methane Propane e g Ethylene Town gas e g Hydrogene Acethylene IIA IIB IIC Temperature class T Surface limit temperature 450 C 300 C 200 C 135 C 100 ...

Страница 7: ...compressed air has to be free of Foreign particles humidity Pay attention that all hoses Have a cross section being large enough do not have any restrictions or kinks are designed for a minimum operating pressure of 6 bar are replaced regularly at preventative maintenance have an oil resistant inner surface and an abrasion resistant outer surface are proved and specified to be non conductive when ...

Страница 8: ...1 213620010_BA_en_Version_01 doc Page 7 of 30 Startup Assembly of the handle Fix the second handle item 10 at the side see fig 3 and 4 Fig 3 Fig 4 Turn 10 B V Technisch Bureau Duspra Amersfoortseweg 24 14 3951 LB Maarn The Netherlands Tel 31 0 180 410100 E sales duspra nl W www duspra nl ...

Страница 9: ...oc Page 8 of 30 Connection of the air supply Sample application Quick coupling for the air connection Screw in nipple not contained in the scope of delivery see fig 5 and 6 Fig 5 Fig 6 B V Technisch Bureau Duspra Amersfoortseweg 24 14 3951 LB Maarn The Netherlands Tel 31 0 180 410100 E sales duspra nl W www duspra nl ...

Страница 10: ...ose being under pressure see safety instructions for prevention of hazards caused by compressed air When connecting the machine pay attention that the valve trigger 2 see fig 7 is not actuated First connect the machine and then connect the compressed air supply Make a test run Fig 7 2 B V Technisch Bureau Duspra Amersfoortseweg 24 14 3951 LB Maarn The Netherlands Tel 31 0 180 410100 E sales duspra...

Страница 11: ... bit When mounting the drill bit ensure that the pneumatic hose ist not connected respectively that the pneumatic supply is deactivated Depressurize the pneumatic drill and disconnect the pneumatic hose see fig 8 Fig 8 B V Technisch Bureau Duspra Amersfoortseweg 24 14 3951 LB Maarn The Netherlands Tel 31 0 180 410100 E sales duspra nl W www duspra nl ...

Страница 12: ..._01 doc Page 11 of 30 Open the drill chuck item 8 by turning until the drill bit can be mounted see fig 9 and 10 Fig 9 Fig 10 Mount the drill bit see fig 11 Fig 11 Turn to open 8 B V Technisch Bureau Duspra Amersfoortseweg 24 14 3951 LB Maarn The Netherlands Tel 31 0 180 410100 E sales duspra nl W www duspra nl ...

Страница 13: ...the drill chuck item 8 and tighten the drill bit evenly Tighten Fig 13 When connecting the machine ensure that the valve trigger item 2 see fig 13 is not actuated Never connect a pressurized pneumatic hose see safety instructions for prevention of hazards caused by pneumatic First connect the machine and then the pneumatic supply Turn to shut 2 8 7 8 B V Technisch Bureau Duspra Amersfoortseweg 24 ...

Страница 14: ... is properly connected That the rotation direction is adjusted with the reverse slide item 1 and the speed stage is correctly adjusted with the speed regulator item 5 see fig 14 and 15 Start the machine by actuating the valve trigger item 2 and start operating The drill bit has to be cooled with water in order to avoid sparks After finishing the work Release valve trigger Shut the pneumatic supply...

Страница 15: ... the drill bit as the drill bit and the drill chuck can strongly heat up during longer operation Put the drill chuck key item 7 see fig 16 in the corresponding drillings of the drill chuck item 8 and undo the drill bit Undo Fig 16 Open the drill chuck item 8 by turning and take the drill bit out of the drill chuck see fig 17 and 18 Fig 17 Fig 18 Mount the drill bit see fig 19 Fig 19 Turn to open 8...

Страница 16: ...ill chuck key item 7 see fig 21 in the corresponding drillings of the drill chuck key item 8 and tighten the drill bit evenly Tighten Fig 21 Actuate the pneumatic supply Adjust the rotation direction see Adjusting the rotation direction on page 13 and start drilling Turn to shut 2 8 7 8 B V Technisch Bureau Duspra Amersfoortseweg 24 14 3951 LB Maarn The Netherlands Tel 31 0 180 410100 E sales dusp...

Страница 17: ...e The second handle item 10 can be mounted at two positions Undo the second handle item 10 see fig 22 and 23 Fig 22 Fig 23 Mount the second handle item 9 at the opposite side see fig 24 and 25 Fig 24 Fig 25 10 10 B V Technisch Bureau Duspra Amersfoortseweg 24 14 3951 LB Maarn The Netherlands Tel 31 0 180 410100 E sales duspra nl W www duspra nl ...

Страница 18: ...cing the drill chuck to avoid injuries Open the drill chuck item 8 by turning see fig 26 Fig 26 Put the hexagon screw driver SW 5 through the drill chuck item 8 on the socket head screw see fig 27 and 28 Fig 27 Fig 28 Turn the hexagon screw driver SW 5 until the drill chuck item 8 becomes loose and pull it from the shaft see fig 29 and 30 Fig 29 Fig 30 Turn to open 8 Undo by turning 8 8 B V Techni...

Страница 19: ...31 and 32 Fig 31 Fig 32 Disassembling the quick release chuck SPITZNAS part no 9 2902 0040 Put a wedge with the pneumatic drill on a support Put a second wedge on the top and drive the quick release chuck off the shaft by slightly hammering see fig 33 to 36 Fig 33 Fig 34 Fig 35 Fig 36 B V Technisch Bureau Duspra Amersfoortseweg 24 14 3951 LB Maarn The Netherlands Tel 31 0 180 410100 E sales duspra...

Страница 20: ...n_Version_01 doc Page 19 of 30 Mounting the exhaust connection SPITZNAS part no 6 1034 9100 Fig 37 A Exhaust connection with hose nozzle B Hose nozzle for air supply A B B V Technisch Bureau Duspra Amersfoortseweg 24 14 3951 LB Maarn The Netherlands Tel 31 0 180 410100 E sales duspra nl W www duspra nl ...

Страница 21: ...oc Page 20 of 30 Remove connecting nipple and exhaust plate see fig 38 and 39 Fig 38 Fig 39 Mount exhaust connection and fix it with the threaded nozzle see fig 40 and 41 Fig 40 Fig 41 B V Technisch Bureau Duspra Amersfoortseweg 24 14 3951 LB Maarn The Netherlands Tel 31 0 180 410100 E sales duspra nl W www duspra nl ...

Страница 22: ...on installation of electrical and mechanical systems as well as radio interference must be considered IMPORTANT The employer must make sure that risk assessment is carried out for the specific risks which can occur due to any operation of the machine the function of the safety equipment is regularly checked the safety symbols and safety notes on the machine device and the operating instruction boo...

Страница 23: ... hot material or hazardous substances can be avoided by appropriate protective shoes Equip your staff with appropriate protective shoes and identify those requirements properly Use hand protection Identify convincingly the safety requirement Use hand protection by a gloves sign respectively a gloves symbol Use respiratory protection Ensure that the specified protection equipment is available and t...

Страница 24: ...n directives Technical specification of the machine Markings on the machine Avoid the generation of sparks When operating the machine do not push or beat against other material and hold the machine firmly and safely by hand Do not slide the machine over the ground If heat generation exceeds the specified surface temperature the machine has to be stopped instantly It may be re started only after ha...

Страница 25: ...ohol or with any other constraints on your vision reaction time or judgment Work in the best possible position so that you can react with both hands to any normal or unexpected movements of the machine Maintain a balanced body position and secure footing in order to avoid improper strain and to be able to support the reaction torque of the machine If you cannot safely support the reaction torque o...

Страница 26: ...ion of Vibration Hazards Vibrations can cause damage of nerves and blood vasculares in hands and arms Wear warm clothing and keep your hands warm and dry when working in cold conditions Exercise hands and fingers regularly Use stands and or weight balancers if possible When using a support e g stand make sure the machine is securely fixed If no support is used hold the machine with light but safe ...

Страница 27: ...nsumables which are recommended by the manufacturer Make sure choosing the correct size and the correct type Use only accessories which are in proper condition CAUTION Injury due to carelessness If the machine is fixed to suspension equipment make sure that it is secure Never hang the machine onto the supply line Separate the machine from any external energy source before changing the machine tool...

Страница 28: ...rformance and an increase in maintenance work Check the adherence to the technical specifications according to the operation manual after each maintenance work IMPORTANT There is no warranty for damages and liability is disclaimed if non original spare parts are used Maintenance Instruction Generally pneumatic machines need little maintenance If the following rules are observed the machine will ha...

Страница 29: ...tion c constructive safety All work executed on the machine influencing the explosion protection e g repairs with mechanical machining require an approval of an authorized expert or have to be done by the manufacturer The internal structure must remain unmodified Storage Unused machines and machine tools should be kept in a dry closed room Keep them free from damaging influences such as damp frost...

Страница 30: ...e worn out parts Disassemble motor and clean it replace worn out parts Disassemble motor and clean it replace worn out parts Gear makes loud noises Needle cages are defective Gear teeth are chattering Ball bearings are defective Disassemble gear clean it replace worn out parts Drill bit cannot be clamped in the drill chuck Drill chuck defective Diameter of drill bit too small Replace drill chuck U...

Страница 31: ...014 34 EU ATEX group II category 2 G Ex h IIB T5 Gb Applied harmonized norms are DIN EN ISO 12100 DIN EN ISO 11148 3 DIN EN 60079 0 DIN EN ISO 80079 36 DIN EN ISO 80079 37 According to section 13 1 b ii of the Directive 2014 34 EU the technical documentation is deposited under reference No 557 Ex Ab 2236 14 at the following office TÜV Rheinland Industrie Service GmbH Am Grauen Stein 51105 Köln Reg...

Страница 32: ...sanleitung erstellt 24 02 17 213620010_BA_en_Version_01 doc Tools for the Specialist B V Technisch Bureau Duspra Amersfoortseweg 24 14 3951 LB Maarn The Netherlands Tel 31 0 180 410100 E sales duspra nl W www duspra nl ...

Отзывы: