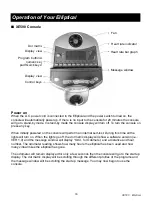
Spirit XE500 Скачать руководство пользователя страница 18


XE500    Elliptical

17

Console Operation

Safety lock

When the elliptical is powered on the resistance at the pedals will be set to the very highest
setting. This is a safety feature that makes sure that you have a stable platform to stand on and
the footpads won t move suddenly while setting the console data. It also ensures that children
cannot operate the elliptical unsupervised and injure themselves by pedaling too fast.

You can turn this feature off and have the elliptical set to the lightest resistance at power-up by
entering the maintenance menu:

l

Press and hold down the Start, Stop and Enter keys. Keep holding the keys down for
about 5 seconds and the message window will display  ALTXXXX Engineering mode .

l

Press the enter key. Scroll down the menu to  Functions  and press the enter key. Scroll
down to  Safety  and press the enter key to toggle the setting to  OFF . Press the stop key
twice to exit to the start-up display.

Quick Start

This is the quickest way to start a workout. After the console powers up you just press the Start
key to begin, this will initiate the Quick Start mode. In Quick Start the Time will count up from zero
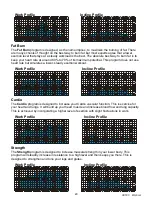
and the workload and Incline may be adjusted manually by pressing the Up or Down buttons. The
dot matrix display will have only the bottom row lit at first. As you increase the workload more rows
will light indicating a harder workout. The elliptical will get harder to pedal as the rows increase.
When you press the Incline buttons, the dot matrix display will switch to show the incline profile.
There will also be a blue LED light next to the matrix that is lit, indicating the Incline profile is being
displayed. You can press the  Display  button to scroll through the different matrix displays.

Basic information

The

Message Window

 will initially be displaying Time and Distance information. On the bottom

left of the message window is a Display button. Each time this Display button is pressed the next
set of information will appear, four windows in all.

l

Time

 and

Distance

l

Pulse

 and

Calories

(

Kcal

 is shorthand for the standard measurement of nutritional calories)

l

Speed in

RPM

 and

MPH

l

Work Level

 and

Watts

 (Watts is a measure of work. If the display reads 100 Watts, then you

are doing enough work to continuously light a 100 Watt light bulb.)

l

Incline level

l

Scan

 (If the Display button is pressed during the Level and Watts display the

Scan

 light will

come on and the message window will show each set of data for four seconds then switch to
the next set of data in a continuous loop. Pressing the Display button again will bring you
back to the beginning).

To the right of the Dot matrix display is a

Heart Icon

 and a

Bar graph

that shows your heart rate

as a percent of maximum

.

The XE Series Elliptical has a built in heart rate monitoring system.

Simply grasping the hand pulse sensors on the stationary handle bars, or wearing the heart rate
transmitter will start the

Heart Icon

 blinking (this may take a few seconds). The Message Window

will display your heart rate, or Pulse, in beats per minute. The

Bar Graph

 represents the

percentage of your maximum heart rate you are currently achieving. See page 22 for more
information about heart rate.

l

NOTE: You must enter your age for the Bar Graph to be accurate. Refer to Heart Rate
section for details about these features and how they can help you work out more efficiently.

Содержание XE500

Страница 1: ...PLEASE CAREFULLY READ THIS ENTIRE MANUAL BEFORE OPERATING YOUR NEW ELLIPTICAL Z100 Z300 Z500 Z700 OWNER S MANUAL...

Страница 2: ...3 Important Electrical Information 4 Important Operation Instructions 5 Assembly Pack Check List 6 Assembly Instructions 9 Features 15 Operation of Your New Elliptical 16 Using a Heart Rate Transmitte...

Страница 3: ...dealer their telephone number and the date of purchase below to make any future needed contact easy We appreciate your support and we will always remember that you are the reason that we are in busine...

Страница 4: ...tered Sparks from the motor may ignite a highly gaseous environment Never drop or insert any object into any openings Do not use outdoors To disconnect turn all controls to the off position then remov...

Страница 5: ...all local codes and ordinances DANGER Improper connection of the equipment grounding conductor can result in a risk of electric shock Check with a qualified electrician or serviceman if you are in dou...

Страница 6: ...ressure Pushing harder is not going to make the unit go faster or slower If you feel the buttons are not functioning properly with normal pressure contact your Spirit dealer The elliptical has a safet...

Страница 7: ...lit Washer 1pc 85 M5x10m m Phillips Head Screw 4pcs 167 5 16 x 2 1 4 Hex Head Bolt 4pcs 96 3 8 x 19 x 1 5T Flat Washer 2pcs 100 5 16 x 20x 1 5T Flat Washer 4pcs Step1 1 104 3 8 x 23 x 2T Curved Washer...

Страница 8: ...x 20 x 1 5T Flat Washer 2pcs 107 3 5x12m m Self Tapping Screw 10pcs Step 2 107 3 5x12m m Self Tapping Screw 8pcs 76 3 8 x 3 4 Hex Head Bolt 2pcs 91 5 16 x 7T Nylon Nut 2pcs 79 5 6 x 1 1 4 Hex Head Bo...

Страница 9: ...XE500 Elliptical 8 126 Phillips Screw Driver 1 pc 125 Short Screw Driver 1 pc 129 12m m Wrench 2pcs 124 13 14m m Wrench 1pc Tools...

Страница 10: ...r connector Not shown in the drawing Locate the Console Mast 12 and Console Mast Cover 49 and slide the Cover onto the Mast as far as it will go Make sure the Console Mast Cover is facing the correct...

Страница 11: ...XE500 Elliptical 10 32 85 85 146 1 39 146 36 44 12 96 128 75 89 96 178 100 77 167 1 77 37 38 104 49 76 2 179 179 100 178...

Страница 12: ...ad Bolts 76 and install and tighten in the threaded holes in the ends of the axle 4 Connect the two wires on the L R sides together and store the excess including plastic connectors back into the cons...

Страница 13: ...ing arms 8 9 Align the hole in the rod ends with the hole in the brackets of the left and right Handle Bar 10 11 The rod end should be on the inside of the U shaped Handle Bar bracket Secure with A 5...

Страница 14: ...m Phillips Head Screws 82 4 Install the Front Stabilizer Cover 59 on the front stabilizer with two M5x15mm Phillips Head Screws 82 5 Install the front 120 1 and rear 120 console mast covers with three...

Страница 15: ...liptical 14 73 82 82 72 1 82 107 72 82 71 82 107 82 71 1 82 64 156 157 82 64 82 82 73 2 9 8 73 3 82 82 82 82 60 82 82 120 61 82 59 82 82 107 120 1 82 157 156 82 72 1 72 82 107 82 71 1 107 71 82 1 9611...

Страница 16: ...g the 2 degree angle positions the user back into a neutral alignment which eases the over stressing of the outer ankles knees and hips The second solution was to make the foot pedal adjustable to the...

Страница 17: ...ow a software version i e VER 1 0 and the message window will display Odo for Odometer and a distance and hour number The odometer reading shows how many hours the elliptical has been used and how man...

Страница 18: ...matrix that is lit indicating the Incline profile is being displayed You can press the Display button to scroll through the different matrix displays Basic information The Message Window will initial...

Страница 19: ...keys on the right are for incline settings the key farthest to the right HR2 is for the Auto pilot function so it does not operate as a quick key When pressed the Quick keys will allow you to jump di...

Страница 20: ...l key then press the Enter key 2 The message window will ask you to enter your Age You may enter your Age using the Up and Down keys or the numeric key pad then press the Enter key to accept the new n...

Страница 21: ...a lower steady exertion workout Work Profile Incline Profile Cardio The Cardio program is designed to increase your Cardio vascular function This is exercise for your heart and lungs It will build up...

Страница 22: ...and just use the manual Incline switches during the program 7 Now you are finished editing the settings and can begin your workout by pressing the Start key You can also go back and modify your setti...

Страница 23: ...nking and you are asked to adjust the workload level for the first segment of the workout When you finish adjusting the first segment or if you don t want to change then press enter to continue to the...

Страница 24: ...t below represent the Maximum Heart Rate for a person whose age is listed at the bottom of each column The heart rate training zone for either cardiovascular fitness or weight loss is represented by t...

Страница 25: ...ort 6 Minimal 7 Very very light 8 Very very light 9 Very light 10 Very light 11 Fairly light 12 Comfortable 13 Somewhat hard 14 Somewhat hard 15 Hard 16 Hard 17 Very hard 18 Very hard 19 Very very har...

Страница 26: ...strap doesn t affect performance 6 Your workout must be within range distance between transmitter receiver to achieve a strong steady signal The length of range may vary somewhat but generally stay cl...

Страница 27: ...t the Time and press enter to continue 5 Now you are asked to adjust the Heart rate Level This is the heart rate level you will experience during the program Adjust the level and then press enter 6 No...

Страница 28: ...software The console has built in maintenance diagnostic software The software will allow you to change the console settings from English to Metric and turn off the beeping of the speaker when a key i...

Страница 29: ...sement period for elliptical not requiring component replacement or elliptical not in ordinary household use 3 Damages caused by services performed by persons other than authorized Spirit service comp...

Отзывы: