background image

4. System Setup 

4-7. System Setup 

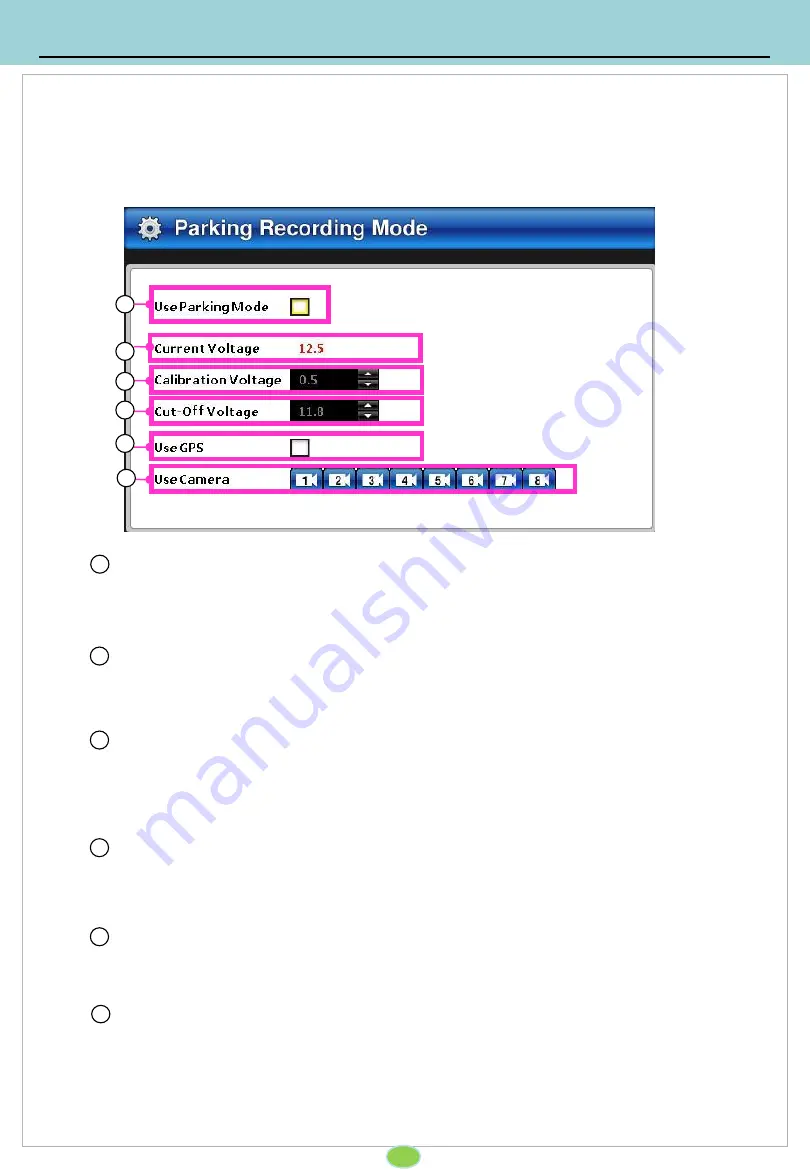
     4-7-4. Parking mode setup 

Set up for parking mode.  

23 

1  Use Parking mode  


Select the check box to enable/disable the parking mode. 

Current voltage  


Display the current voltage information after power connection. 

Calibration Voltage  


Between the cable and the power boxes, depending on the environment, the actual voltage 
and the equipment’s voltage is different. Set the calibration voltage after checking the 
equipment’s voltage and the current voltage. It’s used for clarifying the blocking voltage. 


Cut-off voltage 


Set up for preventing battery’s discharge.  

Use GPS


 From the parking mode, enable/disable the GPS.  

Use camera


Enabling the camera while parking mode. While parking, by checking the 
channel, enable the recording camera. 

Содержание SAC8

Страница 1: ...SAC8 User s Guide 8Ch Car Driving Recorder...

Страница 2: ...Language 21 3 7 2 Time setup 21 3 7 3 Password setup 22 3 7 4 Parking mode setup 23 3 7 5 Signal type 24 3 7 6 Audio recording setup 24 3 7 7 Disk management 25 3 7 8 Set up for vehicle information 2...

Страница 3: ...ive and nontransferable license to use the PC Viewer software in object code form solely on a single central processing unit owned or leased by Customer or otherwise embedded in equipment provided by...

Страница 4: ...rting up the vehicle may damage the product if it is already connected CAUTION Damages due to production malfunction loss of data or other damages occurring while using this product shall not be the r...

Страница 5: ...elements on the windshields 3 If equipment generating electromagnetic waves that interfere with the GPS signal is installed in the vehicle e g other GPS devices such as certain types of wireless acti...

Страница 6: ...ffer from the actual product The user manual in order to improve product performance and are subject to change without notice to users Blackbox Remote control A V out Cameras Power cable GPS Antenna R...

Страница 7: ...tch Power On Off 2 Reset Button Reset as factory default 3 USB 2 0 Upgrade or backup for USB memory 4 Audio Output port Playback audio 5 LED indicators Indicate the device s status with LED 6 SSD HDD...

Страница 8: ...emote contoller receiver Receive the signal to execute the external remote controller GPS Port Connect external GPS Ethernet connector Supports network connection Sensor in output Serial port Support...

Страница 9: ...er Video channels can be selected Channel selection in the search screen PWR Output to an external monitor On Off EMER Emergency recording start recording in situations that require urgent recording T...

Страница 10: ...t Rec Gray Video Loss 1 2 3 4 5 6 7 8 2 1 5 6 3 4 7 8 3 Live Monitoring 3 1 Live Display 9 Audio Record Indicate the audio recording status Backup Indicate the backup status GPS Indicate the GPS recep...

Страница 11: ...yback window Backup Enter the backup window Setup Enter the system setup window after input the password Password Input Using remote controller s numeric button or virtual keyboard input the password...

Страница 12: ...3 Using the remote control s enter key input a z Enable to change the camera name 1 The name change of the camera default Camera 1 8 2 4 Space key 5 Enable to change the alphabet and number key 6 Del...

Страница 13: ...ord to login the system 1 Password Only if the password set up password window will be appeared Using virtual keyboard password can be typed Click Ok to enter the next step 4 System Setup 4 2 Input th...

Страница 14: ...a s name 1 Enable the camera set up for enabling disabling cameras ON Enable the camera OFF Disabling the camera 2 Camera Name Change the camera title Using virtual keyboard set up the camera title 4...

Страница 15: ...Sensor Name Set up for sensor name using virtual keyboard 2 Sensor type Normal Open Alarm can be triggered when the signal becomes CLOSED Normal Close Alarm is triggered when the signal becomes OPEN 4...

Страница 16: ...isualy Brightness Set up the brightness 20 20 Saturation Set up the saturation 20 20 Contrast Set up the contrast 20 20 Tone Setup the tone 20 20 2 Default Reset to default 3 Apply to All Apply the cu...

Страница 17: ...r 8ch 100fps can be recorded in total Event Frame Set up for event recoding NTSC 1 30 For 8ch 120fps can be recorded in total PAL 1 28 For 8ch 100fps can be recorded in total Recording Quality Set up...

Страница 18: ...ed data 2 Driving mode Parking mode Driving mode event recording set up while driving Parking mode event recording set up while parking 3 Recording Condition Alarm recording Setup for sensor recording...

Страница 19: ...2 Enabling motion detection Enable Disable the motion detection motion detection recording the sensor output is are linked with the event Sensitivity Set up for sensiity of motion detection 1 3 3 is m...

Страница 20: ...ecording Motion detection with motion detected enabling sensor output 1 output 2 or recording Impact detection with impact detected enabling sensor output 1 output 2 or recording Set up how DVR operat...

Страница 21: ...setup 20 Set up for rear side s image and sensor 4 6 2 Setup for rear guide 1 2 Select for rear signal Setup the position for the camera which is connected with rear side s gear Rear Sensor setup Set...

Страница 22: ...tart automatically 4 System setup 4 7 System Setup 4 7 1 Language Select the language 1 Set up for time date and speed unit 4 7 2 Time setup 1 Standard Time Set up for standard time using GMT 2 3 1 2...

Страница 23: ...7 3 Password setup Setup the password to log in 22 1 2 Current password Using virtual keyboard type the current password Confirm password Confirm the new password by typing new password again 3 New pa...

Страница 24: ...ower boxes depending on the environment the actual voltage and the equipment s voltage is different Set the calibration voltage after checking the equipment s voltage and the current voltage It s used...

Страница 25: ...ding 4 7 6 Audio recording setup 1 Audio recording Checking on audio will be recorded with video 1 PAL NTSC Set up for PAL and NTSC Exit the setup menu DVR will restart automatically To apply the chan...

Страница 26: ...Reset the configuration to factory default 3 Disk scanning Scanning for logical examination of the disk 1 2 3 4 7 8 Set up for vehicle information Set up for vehicle s information Company name Plate n...

Страница 27: ...Time scroll bar Indicate the recording data per channel Date Time Select the date and time to playback Calendar Click the calendar to find the recording data Playback control Press to play reverse or...

Страница 28: ...ecording data shown on the time graph will be displayed in different colors depending on the recording type 5 3 Time scroll bar 1 With the remote controllers arrow key move the focus to calendar butto...

Страница 29: ...or push the number button to select unselect the camera 3 Set the playback speed with the remote controller s arrow key and OK 4 Set the audio volume with the remote controller s arrow key and OK 5 M...

Страница 30: ...tup 29 1 Except the selected channel playback 2 Select the screen to display the split screens 3 To view a full screen while playback push the number to select the desired channel 4 To view as split s...

Страница 31: ...Time Set up the back up time from the calendar Back up period Set up the period for back up Clicking and button set up for back up period 10sec 1 10min USB Status Indicate the USB s connection status...

Страница 32: ...7 Viewer 7 1 Installation for viewer Playback the image Run the execution file to install the viewer 31 1 3 5 2 4 Select the language and speed unit Change the speed unit Then click accept 6 1 2 1 2...

Страница 33: ...of dismantled HDD Make sure the power has turned off 2 Connect the recording device SSD HDD with PC Connect the recording device SSD HDD with SATA to USB cable Connect the USB to PC Make sure to use...

Страница 34: ...C 33 4 Run the PC Viewer By double clicking the viewer icon execute the viewer as administrator Click allow if the security window is appeared 5 Checking the driver from the PC viewer Showing the view...

Страница 35: ...ll be appeared while playback GPS is available with internet connection Orange Continuous recording Blue Motion recording Dark Green Sensor recording Yellow Impact recording Purple Emergency recording...

Страница 36: ...ecording data capture print back up viewer setup black box set up and exit 3 Layout selection Split into 4 8 9 selection 4 Playback date Select the date and time for playback 4 division 8 division 9 d...

Страница 37: ...ps By sliding the time slide bar on the bottom for more precise changes 9 Driving information These screens can be displayed their location speed impact sensitivity and the vehicle s information 10 Ba...

Страница 38: ...rgency event recording can be playback 37 Event recording playback Indicate the event recording item Motion Event for motion detection Sensor Event for sensor detection Impact Event for impact sensor...

Страница 39: ...cator Calendar button 1 2 3 4 1 2 3 Camera Select the camera number Time scroll bar By scrolling the bar move to the exact time to playback Recording Type Recording data shown on the time graph will b...

Страница 40: ...bar usage a Time graph zoom in 39 1 Click the left side of the mouse on time graph 2 Time graph will be zoomed by multiple clicking 1 Click the right side of the mouse on time graph 2 Time graph will...

Страница 41: ...a 40 1 2 3 4 5 Camera Select the camera number to playback Camera information Indicate the event recording channel Time Event recording started time Events Showing the event type Link Information Even...

Страница 42: ...e image while playback It can work the playback pause Save as jpg or png 41 7 6 Print the image Print the image while pause status Type the title and contents Preview the image which will be printed o...

Страница 43: ...om the viewer only b AVI Backup as AVI file Backup time setup Setup the time and date for backup a Start Select the date and time for starting backup b Period Select the period for backup 10sec 1 10mi...

Страница 44: ...Set up for viewer s language speed unit and update 43 1 Language setup Select the language DVR should be restarted Speed unit setup Select the speed unit Km h Mile h Update Update the latest firmware...

Страница 45: ...7 Viewer 7 9 DVR setup Set up for DVR s configuration This configuration can be uploaded with SSD HDD CF CARD and USB 44 Detailed settings refer to the manual of the main unit Refer 36 page...

Страница 46: ...sor GPS External GPS G mouse type Recording Type Continuous Event Impact Sensor Motion Emergency Compression H 264 Mpeg 4 part 10 Recording device 2 5inch SSD HDD CF memory A V out Playback or live di...

Страница 47: ...8 Supplement 8 2 Dimensions 46...

Страница 48: ...vent that you encounter a problem with this product it should be returned to the place of purchase Optional Item Safe Power Cable Model name SPWR 1 The safe power supply cable will allow you to hard w...

Страница 49: ...49...

Страница 50: ...Drive Partner for your Safety...

Отзывы: