background image

7

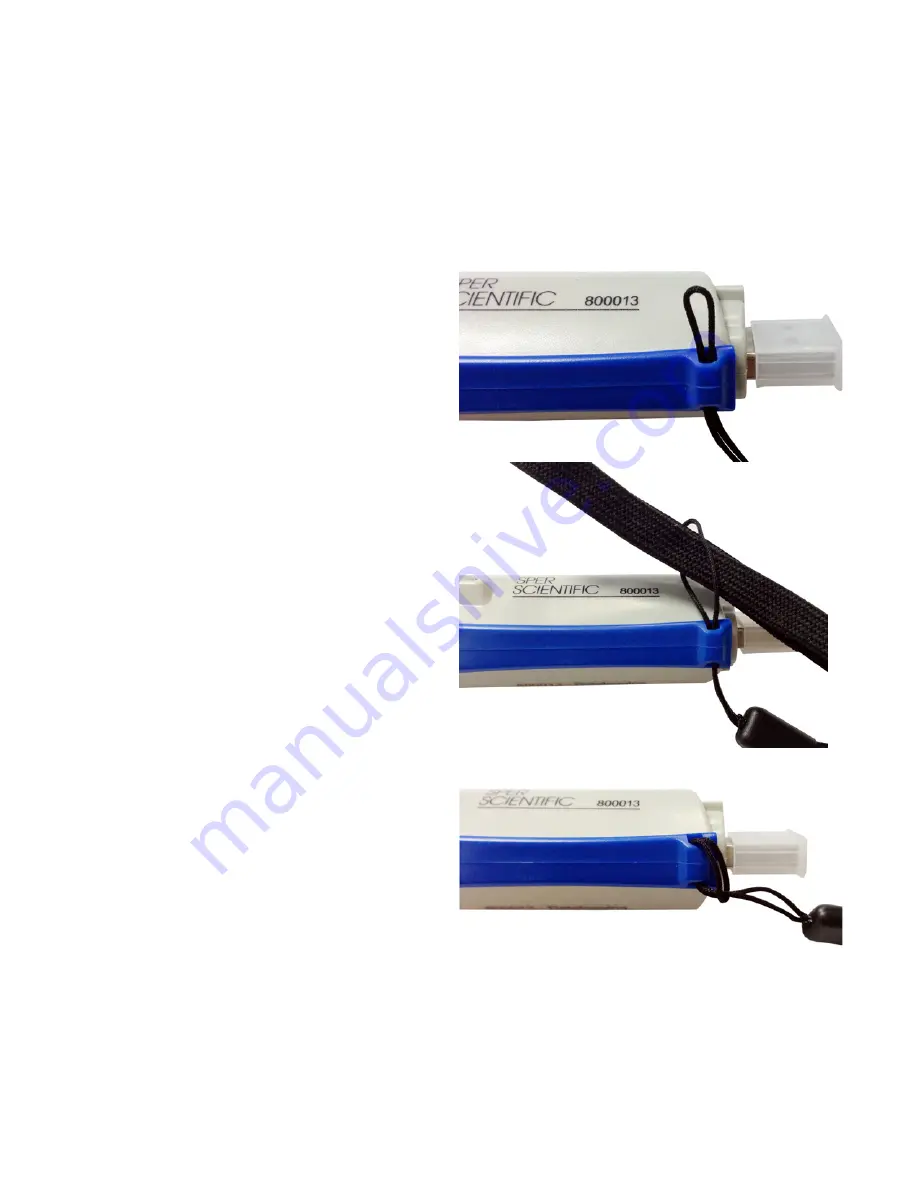
WRIST STRAP INSTALLATION

1.  Grasp the thinner thread loop attached to the wrist 

strap so that your thumb and forefinger press the 


end of the loop flat.  

2.  Guide the closed loop 

into the small receptacle  

on the underside of  

the datalogger pen  

near the USB. Pull the 

loop through until it is 

stopped by the  

plastic fastener.

3.  Hold the loop open and 

guide the thicker end of 


the wrist strap through 

the open loop.

4.  Pull the wrist strap 


all the way through  

the loop.

Содержание 800013

Страница 1: ...1 Datalogging RH Temperature Pen 800013 Instruction Manual ...

Страница 2: ... USA The contents of this manual may not be reproduced or transmitted in any form or by any means electronic mechanical or other means that do not yet exist or may be developed including photocopying recording or any information storage and retrieval system without the express permission from Sper Scientific ...

Страница 3: ...ARE INSTALLATION 8 7 RUNNING THE SOFTWARE 9 8 DATALOGGER SETTINGS 10 Setting Options 10 Comm Port Setting 10 Basic Logger Setting 12 Logger Alarm Sensor Setting 12 Logger Sampling Setting 13 Setting Start Modes 14 9 DATA SAMPLING AND RECORDING 17 10 DOWNLOADING DATA 20 11 BATTERY REPLACEMENT 22 12 SPECIFICATIONS 23 13 WARRANTY 24 ...

Страница 4: ... 32 000 data points which can be downloaded by plugging the pen directly into a USB port No cradle or cable is necessary Green and red LED lights indicate datalogging and alarms MATERIALS SUPPLIED Datalogging RH Temperature Pen with USB Cap and Sensor Cap Go to www sperdirect com software htm and find 800013 Datalogging RH Temperature Pen or search for 800013 and download from product page One 3 6...

Страница 5: ...ature can be programmed to log date time humidity air temperature dew point and wet bulb readings Highly accurate microcomputer circuit Direct upload of data to Excel Manual datalogger option LEDs indicate datalogging and alarms Tripod mounting screw ...

Страница 6: ...ndicators a Green LED flashing Logging is in progress b Red LED flashing Reading exceeds Hi Lo alarm threshold 4 Power Button Key Start 5 Battery Compartment 6 USB Drive 7 Sensor Cap not shown 8 Tripod Mounting Screw on back not shown 1 2 5 6 3a 3b 4 ...

Страница 7: ...e end of the loop flat 2 Guide the closed loop into the small receptacle on the underside of the datalogger pen near the USB Pull the loop through until it is stopped by the plastic fastener 3 Hold the loop open and guide the thicker end of the wrist strap through the open loop 4 Pull the wrist strap all the way through the loop ...

Страница 8: ... find your meter or search for you meter 800013 and download from product page Installing the Software Package 1 Open the Downloaded software file 2 Open the Volume File 3 Open the Setup Application 4 When the dialog box appears Click Run 5 Click YES to allow setup exe to make changes to your computer 6 Click NEXT 7 Click FINISH 8 Restart your computer ...

Страница 9: ...ort 2 Open the Start Menu and select the Data Logger Icon from the programs list 3 The USB Data Logger Monitor screen displays Note If the datalogger is not plugged into the USB port an error message will appear Make sure that the logger is plugged in correctly ...

Страница 10: ... finish Logger Setting BASIC Pic 3 1 ID setting Maximum 20 characters name y to confirm 2 Current Date Time Clock setting the system automa time of your pc Press OK to con Note Schedule date time refe Please click OK to sync the me 2 Remember the Comm port number and go back to so 3 Click Setting Comm port select the port number a see from step 1 then press OK button NOTE If software message box s...

Страница 11: ...nder Device Manager However depending upon your version of Windows the intial steps below to access Device Manager may differ slightly 1 Open the Start Menu on the computer 2 Select Control Panel 3 Select Hardware and Sound 4 Select Device Manager 5 Double click on the Ports option 6 The correct port will list Prolific USB to Serial Comm Port followed by the communication port number in parenthese...

Страница 12: ...the current computer date and time Select OK to save your entry and sync the meter s current date and time Logger Alarm and Sensor Setting This menu allows you to set minimum and maximum values for temperature and humidity If a reading is outside these parameters the red LED will flash a warning 1 Select Log Setting from the Setting options The Logger Setting menu appears 2 Select the Alarm Sensor...

Страница 13: ...h choice For example if you select both temperature and relative humidity there will be 8K of data storage available for each parameter Logger Sampling Setting 1 Select Log Setting from the Setting options The Logger Setting menu appears 2 Select the Setting tab 3 The meter sampling range is 1 second to 6 59 59 Adjust the or indicators to specify the sampling rate in hours minutes and seconds 4 Ad...

Страница 14: ...number of sample points in thousands from 1000 to 32 000 2 Adjust the or indicators to toggle between units C or F 3 Select Ok to save the settings and exit the menu or Cancel to exit without saving the new settings Real time start mo Schedule start mod Select the date and time m Please follow the date an SETT 1 Se mem 2 Set Selec Selec Imm Sch Re Key Ro ear 3 Sel OK to Pic 5 1 After set start mod...

Страница 15: ...units C or F 3 Select Ok to save the settings and exit the menu or Cancel to exit without saving the new settings Setting Key Start Mode This option allows you to take readings without having the datalogger connected to a computer Measurement will not begin until the grey button is pressed 1 Adjust the or indicators to specify the number of sample points in thousands from 1000 to 32 000 2 Adjust t...

Страница 16: ... Adjust the or indicators to toggle between units C or F 3 Select Ok to save the settings and exit the menu or Cancel to exit without saving the new settings Setting Schedule Mode This option allows you to pre set the date and time that the meter will automatically begin recording Note The date and time formats must be Month Day Year and H M S 1 Adjust the or indicators to specify the number of sa...

Страница 17: ...elect Ok to save the settings and exit the menu or Cancel to exit without saving the new settings DATA SAMPLING AND RECORDING Sampling and Recording in Immediate Mode 1 The green LED will flash to indicate that the logger is recording data 2 Remove the datalogger from the computer as desired Recording will continue 3 The datalogger will record up to 32 000 data points Once the memory is full recor...

Страница 18: ... recording by pres when memory are full Roll over earliest memory automatically 3 Select Unit Select Temperature u OK to confirm Pic 5 2 In real time mode it shows STOP button instead of at the right corner Press STOP to stop real time recor change into DOWNLOAD Press DOWNLOAD for dow Before exit software data has to be downloaded 1 After set start mode at real time datalogger starts login records...

Страница 19: ...a points When the memory is full the meter will continue recording over the oldest records Sampling and Recording in Schedule Mode 1 At the scheduled start date and time the green LED will flash to indicate that the logger is recording data 2 Remove the datalogger from the computer as desired Recording will continue 3 The datalogger will record up to 32 000 data points Once the scheduled stop date...

Страница 20: ...meter and selection LOGGER Status Before download data press to show LOGGER status Unit NOTE Once button is pressed recording Download Logger function Download data Press DOWNLOAD button data download in few seco automatically NOTE Please do not press DOWNLOAD button if you You can press LOGGER STATUS button to see record 3 Click the Download button to download the data A graph of the data will ap...

Страница 21: ... the graph size will return to the default Printing the Graph 1 Click the Printer Icon button to print the graph 2 Click OK to confirm the selection Viewing and Printing Data Tables 1 Click the View button and select Data Table to view the data in table format 2 To print data from the table click the Printer Icon button The Printing Table Data dialogue box will open 3 Enter the record range you wi...

Страница 22: ...D REPLACEMENT The meter is powered by one 3 6v AA lithium battery Battery life is approximately one year depending on the ambient temperature the sample rate and the sample point setting To change the battery 1 Press and hold POWER for 2 seconds to turn the meter off 2 Slide the battery cover in the direction of the arrow and remove it from the meter 3 Remove the old battery and replace it with a ...

Страница 23: ... 20 to 50 C otherwise 1 2 C 2 F RH 0 1 to 99 9 0 1 3 25 C 10 to 99 RH otherwise 5 Display Type LCD Sampling Interval 1 second to 6 hours Measurement Units C F Operating Temp 0 to 50 C 32 to122 F Operating RH 80 RH Memory Capacity 32 000 data points Dimensions 1 5 25 133 mm Weight 1 2 oz 34 g ...

Страница 24: ...lable This warranty does not cover probes batteries battery leakage or damage resulting from accident tampering misuse or abuse of the product Opening the meter to expose its electronics will void the warranty To obtain warranty service ship the unit postage prepaid to SPER SCIENTIFIC LTD 8281 E Evans Rd Suite 103 Scottsdale AZ 85260 The defective unit must be accompanied by a description of the p...

Отзывы: