18
aSSeMbly InStRUCtIOnS
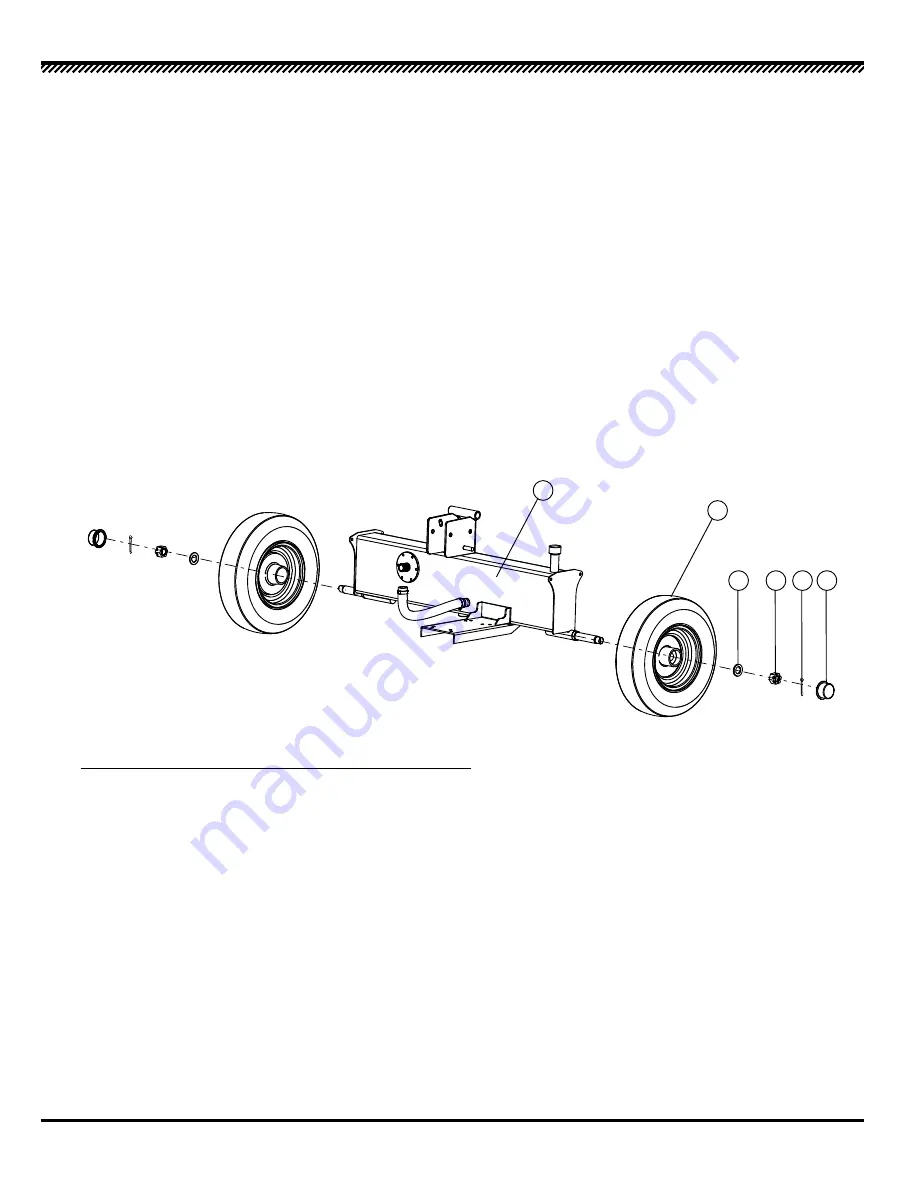
Step 3:
3a: Rotate tank tongue assembly on the crate base corner so that axles are clear of the base .
3b: Locate wheel assemblies, Flat washers, Castle nuts, Cotter pins and Dust caps from the hardware kit .
3c: Remove the protective cover from one axle shaft and the plastic cover from one wheel .
3d: Install the wheel (with the valve stem pointed out), outer bearing, flat washer, and castle nut .
3e: Tighten the castle nut until snug and rotate the wheel three full turns to seat the bearings .
3f: Back off (loosen) the castle nut just enough to align the hole in the axle with the notches in the castle
nut, allowing installation of the cotter pin . Do not loosen more than necessary to install cotter pin .
3g: Spin the wheel to verify it spins freely . Note: A small amount of play is acceptable .
3h: Insert cotter pin and split/bend the pin end left and right .
3i: Install the dust cap .
3j: Repeat steps outlined above for the other wheel installation .
1
2
3
4
5 6
Item Description
Quantity
1
Tank Assembly
2
2
Wheel Assembly
2
3
Flat Washer
2
4
Castle Nut
2
5
Cotter Pin
2
6
Dust Cap
2
Содержание PS35TKO-1
Страница 15: ...15 Safety Decals PART NUMBER 621827 LOCATION ENGINE FUEL TANK...
Страница 37: ...37...
Страница 52: ...52 Autocollants de s curit NUM RO DE PI CE 621827 EMPLACEMENT R SERVOIR DE CARBURANT...
Страница 87: ...87 Calcoman as de seguridad N MERO DE PIEZA 621827 UBICACI N TANQUE DE COMBUSTIBLE DEL MOTOR...
Страница 109: ......
Страница 110: ......
Страница 111: ......
Страница 112: ...622604 AA 09 20 Blount Inc 800 525 8322 CustomerSupport SpeeCo com SpeeCo com...


