background image

Connecting to Other Devices

7

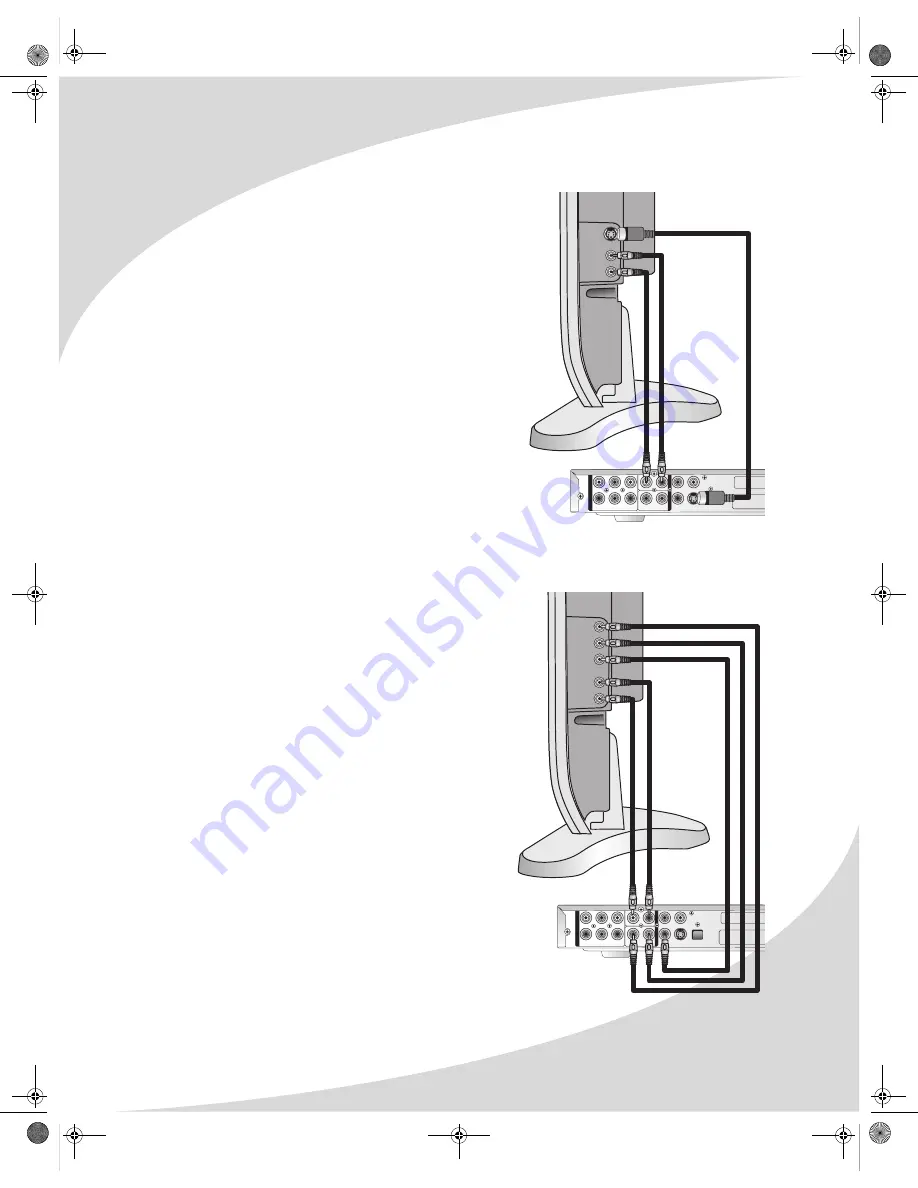
Connecting to a Display Using S-Video

S-Video provides better image quality than composite 
video, but lower image quality than component video. It 
is available on most displays.

Note:

The pins used in S-Video connectors are fragile. 
Use care when handling S-Video cables to avoid 
bending or breaking pins.

To connect to a display using S-Video:

1. Using an S-Video cable, connect the S-VIDEO output 

on the player to the S-Video input on the display.

2. (OPTIONAL) To connect the audio output to the 

display as well, use the red (right) and white (left) 
connectors on the included audio/video cable to 
connect the AUDIO jacks on the rear of the player to 
the display’s audio input.

3. Select 

S-Video

 as the Video Output setting under 

the Video setup menu on the player (see 
“Configuring the Player” on page 23).

4. Select the appropriate TV Shape and TV System 

settings under the Video setup menu.

Connecting to a Display Using Component Video

The progressive scan component video output on your 
DVD player provides the highest quality video 
available.

Note:

To be able to use a component video 
connection, your display must also support 
progressive scan video.

To connect to a display using component video:

1. Use three RCA cables to connect the Y, Pb/Cb, and 

Pr/Cr jacks on the rear of the player to the 
corresponding component video inputs on the 
display.

2. (OPTIONAL) To connect the audio output to the 

display as well, use the red (right) and white (left) 
connectors on the included audio/video cable to 
connect the AUDIO jacks on the rear of the player 
to the display’s audio input.

3. Select 

YPbPr

 as the Video Output setting under 

the Video setup menu on the player (see 
“Configuring the Player” on page 23).

4. Select the appropriate TV Shape and TV System 

settings under the Video setup menu.

SL

CEN

FL

Y

Pb/Cb

Pr/Cr

S-VIDEO OPTICAL OUTPUT

5.1CH

AUDIO

COMPONENT

R

AUDIO

(OPTIONAL)

VIDEO

L

SL

CEN

FL

Y

Pb/Cb

Pr/Cr

S-VIDEO OPTICAL OUTPUT

5.1CH

AUDIO

COMPONENT

Y

Pr

Pb

R

AUDIO

(OPTIONAL)

VIDEO

L

OMPHT300X-1.book  Page 7  Thursday, August 10, 2006  8:19 PM

Содержание PHT-300X

Страница 1: ...V I D E O PHT 300X Home Theater System User s Manual OMPHT300X 1 book Page i Thursday August 10 2006 8 19 PM ...

Страница 2: ...vides it only as a guide to operation All statements technical information and recommendations in this manual and in any guides or related documents are believed reliable but the accuracy and completeness thereof are not guaranteed or warranted and they are not intended to be nor should they be understood to be representations or warranties concerning the products described Specifications are subj...

Страница 3: ...and the point where they exit from the apparatus 11 Only use attachments accessories specified by the manufacturer 12 Use only with the cart stand tripod bracket or table specified by the manufacturer or sold with the apparatus When a cart is used use caution when moving the cart apparatus combination to avoid injury from tip over 13 Unplug this apparatus during lightning storms or when unused for...

Страница 4: ...a damp cloth for cleaning Never use liquid or aerosol cleaners To prevent overheating and ensure reliable operation place the system only in a well ventilated location Avoid cramped or inadequately ventilated locations Note Read all safety and operating instructions before operating your new home theater system V I D E O V I D E O V I D E O CAUTION Laser radiation when open Do not stare into beam ...

Страница 5: ...er Connect the equipment to an outlet on a circuit different from that to which the receiver is connected Consult the dealer or an experienced radio TV technician for help Caution To comply with the limits for an FCC Class B computing device the user should use the shielded signal cable and power cord supplied with the unit The FCC warns that changes or modifications of the unit not expressly appr...

Страница 6: ...iv OMPHT300X 1 book Page iv Thursday August 10 2006 8 19 PM ...

Страница 7: ... 15 Controlling Playback 15 Selecting the Audio Channel 15 Selecting the Subtitle Channel 15 Repeating Chapters 15 Repeating an Arbitrary Section 16 Searching to a Specified Location 16 Bookmarking Locations 16 Playing Video CDs 17 The On Screen Display 17 Using Playback Control 17 Navigating Menus 17 Controlling Playback 17 Repeating Tracks 17 Repeating an Arbitrary Section 18 Playing Audio CDs 1...

Страница 8: ...ring the Player 23 Language 23 Video 24 Audio 25 Rating 26 Misc 26 Troubleshooting 27 Support Information 28 Specifications 29 General 29 Speaker System 29 Video 29 Audio 29 Limited Warranty 30 OMPHT300X 1 book Page vi Thursday August 10 2006 8 19 PM ...

Страница 9: ...he included 300 watt 5 1 channel surround sound speaker system gives you realistic 3D audio for the most immersive movie experience Features 300 watt 5 1 channel surround sound speaker system Fully compatible with DVD DVD R RW Audio CD Video CD Super Video CD Kodak Picture CD CD ROM and CD R RW media Displays JPEG images stored on data CDs Plays MP3 files stored on data CDs 24 bit 96kHz digital au...

Страница 10: ...here should be five speakers and a subwoofer 4 In addition to the player and speakers the box should contain the items indicated below If anything is missing or damaged contact the seller immediately V I D E O Remote Control 2 AAA Batteries Audio Video Cable User s Manual 3 Speaker Cables ENTER MASTER VOLUME RETURN VIDEO SW PROGRAM SETUP PBC CLEAR SEARCH MENU ANGLE MUTE STOP PLAY PAUSE LANGUAGE SU...

Страница 11: ...insert the wire then release the tab to capture the exposed end of the wire 3 Using the speaker cables connect the the 5 1 channel audio outputs on the back of the player to the associated AUDIO INPUT connectors on the back of the subwoofer The outputs on the player have the same layout as the inputs on the subwoofer but rotated You can also use the auxiliary input above the 5 1 channel terminals ...

Страница 12: ...EN Place above or below the display centered Front speakers FL FR Place on each side of and at an equal distance from the display at approximately 45 degrees from the listening position Side speakers SL SR Place on each side of and at an equal distance from the listening position facing the listening position at ear level 1 MIC 2 OPEN CLOSE PLAY PAUSE STOP R L MAX MIN MAX MIN MIC VOL V I D E O PDS...

Страница 13: ...er into a wall socket 8 Install two AAA batteries included in the remote Ensure they are oriented as indicated in the battery compartment ON OFF 120V CAUTION RISK OF ELECTRIC SHOCK DO NOT OPEN FL CEN AUDIO INPUT FR L R SW SL SR FL FL CEN CEN AUDIO OUTPUT FR SL SL SR SR FR 2 1CH 5 1CH SWITCH OMPHT300X 1 book Page 5 Thursday August 10 2006 8 19 PM ...

Страница 14: ...low RCA connector to the composite video input on the display and attach the other yellow RCA connector to the yellow video jack on the rear of the player 2 OPTIONAL To connect the audio output to the display as well use the red right and white left RCA connectors on the included audio video cable to connect the AUDIO jacks on the rear of the player to the display s audio input 3 Select YUV as the...

Страница 15: ... Display Using Component Video The progressive scan component video output on your DVD player provides the highest quality video available Note To be able to use a component video connection your display must also support progressive scan video To connect to a display using component video 1 Use three RCA cables to connect the Y Pb Cb and Pr Cr jacks on the rear of the player to the corresponding ...

Страница 16: ...io 1 Use a digital coaxial cable to connect the orange coaxial output to the right of the AUDIO jacks on the player to a coaxial S PDIF audio input on the audio system 2 Select the appropriate Digital Output setting under the More Aud setup menu on the player see Configuring the Player on page 23 To connect to an audio system using optical digital audio 1 Use a TOSLINK cable to connect the OPTICAL...

Страница 17: ...c Adjusting the Volume Use the MASTER VOLUME buttons on the remote to adjust the player s output volume Use the VOLUME knob on the subwoofer to adjust the speakers output volume Use the BASS knob on the subwoofer to adjust the bass volume Use the BALANCE knob on the subwoofer to adjust the front rear audio balance Understanding the Readout The readout on the front of the player displays informatio...

Страница 18: ...udio and language settings control access to mature programming and configure other general behavior See Configuring the Player on page 23 for more information To access the Setup menu press the SETUP button on the remote PBC Playback control is on Video CDs When playback control is on the Video CD s menu will be available The player is in a repeat mode DTS multi channel sound is enabled Dolby Dig...

Страница 19: ...ir functions Button Function Turns the player on and off Opens and closes the disc receptacle Erases an entry Selects the video output used by the player Component YPbPr S Video or Composite YUV ENTER MASTER VOLUME RETURN VIDEO SW PROGRAM SETUP PBC CLEAR SEARCH MENU ANGLE MUTE STOP PLAY PAUSE LANGUAGE SUBTITLE TITLE PREV NEXT STEP SLOW ZOOM A B REPEAT AUDIO BOOKMARK SHUFFLE DISPLAY OMPHT300X 1 boo...

Страница 20: ...us menu When playing a Video CD turns playback control menu play on and off When playback control is on any menu on the disc will display when the player begins playing the disc and the menu will be accessible by pressing RETURN When off playback will begin with the first track and the menu will not be available When playing a DVD this button returns to the menu When viewing a DVD menu this button...

Страница 21: ...rd speeds Zooms in on the picture Pressing this button repeatedly cycles through the zoom levels Slows down the playback speed of a DVD Pressing this button repeatedly cycles through the available speeds Steps forward one frame at a time Cycles through the available audio channels on a DVD When playing back an audio CD this button cycles through stereo mono left channel and mono right channel play...

Страница 22: ...sure on the rear of the remote To replace the batteries 1 Slide the cover off the bottom of the remote 2 Remove the old batteries and replace them with the new batteries Ensure the batteries are oriented as indicated in the enclosure 3 Slide the cover back onto the remote OMPHT300X 1 book Page 14 Thursday August 10 2006 8 19 PM ...

Страница 23: ... DVD at the current location Press a second time to stop the DVD completely When the DVD is playing press to pause it Press to return to the previous chapter Press to skip to the next chapter Press to fast reverse the DVD Press to fast forward the DVD Repeated presses cycle through the speed options 2 4 8 or 16 Press SLOW to play the video at a slower speed Repeated presses cycle through the speed...

Страница 24: ...r Time 3 Enter the desired location using the keypad on the remote 4 Press ENTER to search to the specified location To exit the Search display without going to a location press SEARCH once more Bookmarking Locations You can save up to three locations on the CD and then jump to them later using the BOOKMARK button To bookmark a location 1 Press BOOKMARK to bring up the Bookmark display 2 Select an...

Страница 25: ...rol is off playback will begin with the first track and the menu will not be available Navigating Menus Press and to scroll through menu pages To view an item enter its number on the keypad and then press ENTER Note To view an item the menu page containing the item must be visible before you enter the item s number Controlling Playback Press to move to the next track or image Press to return to th...

Страница 26: ...sing the A B button To repeat an arbitrary selection 1 Press A B to mark the beginning of the section to be repeated 2 Press A B again the mark the end of the section The section will begin repeating and will continue until you press A B again OMPHT300X 1 book Page 18 Thursday August 10 2006 8 19 PM ...

Страница 27: ... stopped To skip directly to a track enter the track number on the keypad and then press ENTER Repeating Tracks Press REPEAT to cycle through the repeat options the current track all tracks on the disc and off Repeating an Arbitrary Section You can repeat an arbitrary section of audio using the A B button To repeat an arbitrary selection 1 Press A B to mark the beginning of the section to be repea...

Страница 28: ...hem later using the BOOKMARK button To bookmark a location 1 Press BOOKMARK to bring up the Bookmark display 2 Select an empty bookmark by pressing and 3 Press ENTER To jump to a saved bookmark 1 Press BOOKMARK to bring up the Bookmark display 2 Select the desired bookmark by pressing and 3 Press ENTER To erase a bookmark 1 Press BOOKMARK to bring up the Bookmark display 2 Select the bookmark to b...

Страница 29: ...allows you to navigate and playback the files on the current disc When playing MPEG or JPEG files press to bring up the directory structure When playing MP3 files the directory structure will display at all times Use the arrow controls to scroll through the files on the disc and press ENTER to play back a file Press to access the options on the right of the screen Use and to highlight an option th...

Страница 30: ...deshows press ANGLE repeatedly to cycle through the options None Wipe Down Wipe Up Center In Center Out Vertical Blind Random Kodak Picture CDs Kodak Picture CDs behave the same as data CDs containing JPEG files All the same functions and menus are available OMPHT300X 1 book Page 22 Thursday August 10 2006 8 19 PM ...

Страница 31: ... SETUP button to exit the menu The following is a description of the contents of the Setup menu and their use Language This menu allows you to change the language used by the player for menus audio and subtitles OSD Language Changes the language of the Setup menu and the OSD which displays information about the current media and settings The options are English French and Spanish Subtitle Changes ...

Страница 32: ... scan for 4 3 format displays cropping the video so it fits the screen TV System Selects the video format used by the disc being played NTSC A format used primarily in North and Central America PAL A format used in various parts of the world including Europe Asia South America and the Middle East Automatic Automatically detects the video format Video Output Sets the video output format used by the...

Страница 33: ...ize of the surround speakers Small or Large Subwoofer Turns the subwoofer on and off Test Tones Allows you to play a test tone through each of the speaker channels Center Spkr Delay Delays the center speaker audio by up to 1 7 meters in increments of one third of a meter Surr Spkr Delay Delays the surround speaker audio by up to 5 1 meters in increments of approximately 1 meter Digital Output Sets...

Страница 34: ...en select Set Password a second time press ENTER enter the new password and then press ENTER again Misc The Misc menu contains general player settings that do not belong in the other categories Use Default Settings Resets the player to factory settings Select and press ENTER then select Yes to reset or No to abort Screen Saver Turns the screen saver on and off When enabled the screen saver will bl...

Страница 35: ... brightness too low or too high Adjust the contrast and or brightness to desired setting on the display Distorted image Display format set incorrectly Check that the correct display format is selected in the Setup menu see Video on page 24 Unclear or noisy picture Signal cable s not securely connected Make sure the signal cable s are firmly connected Radio interference Check for any electronic dev...

Страница 36: ...the audio settings in the Setup menu see Audio on page 25 Speaker system format set incorrectly Make sure the 2 1CH 5 1CH switch on the back of the subwoofer is set correctly Audio cable s not securely connected Make sure the audio signal cable s are firmly connected Remote control not functioning Battery inserted improperly Make sure the batteries are inserted and oriented properly Battery low on...

Страница 37: ...cal audio TOSLINK 1 stereo audio RCA 1 5 1 channel audio RCA Power Input AC110 230V 50 60Hz Power Consumption 12W Storage Temperature 0 60 C Operating Temperature 5 45 C Operating Humidity 10 90 Subwoofer Output Power 30W Subwoofer Frequency Response 85Hz 2kHz Satellite Output Power 5W Satellite Frequency Response 200Hz 20kHz Sample Rate 54MHz Resolution 10 bits Display Resolution 500 lines S N Ra...

Страница 38: ...ping the product for repair Signal reception problems caused by external antenna cable systems or interference Incompatibility due to a change in TV CATV broadcast systems after the product was sold Batteries Images burnt onto the screen Initial installation and related adjustments Power surge and or damage by lightning Force majeure or uncontrollable external force damage Product shipped for serv...

Страница 39: ...r Under no circumstance shall Spectroniq be liable for any loss or consequential damage arising out of the use of this product This warranty gives specific legal right However you may have other rights that may vary from state province to state province Some states provinces do not allow limitations on implied warranties or exclusions of consequential damage Therefore these restrictions may not ap...

Страница 40: ...OMPHT300X 1 book Page 32 Thursday August 10 2006 8 19 PM ...

Страница 41: ...OMPHT300X 1 book Page 33 Thursday August 10 2006 8 19 PM ...

Страница 42: ...OMPHT300X 1 book Page 34 Thursday August 10 2006 8 19 PM ...

Страница 43: ...OMPHT300X 1 book Page 35 Thursday August 10 2006 8 19 PM ...

Страница 44: ...http www protronusa com PHT 300X OMPHT300X 1 OMPHT300X 1 book Page 36 Thursday August 10 2006 8 19 PM ...

Отзывы: