background image


BlueScale Vision Camera   

Quick Start Guide 

 
Use this guide to quickly configure the BlueScale

®

 Vision™ camera’s fixed IP address 

and other settings. Read the 

BlueScale Vision Camera User’s Guide

, included on the 

documentation CD that came with your library, for detailed information about using the 
wizard to configure the camera. 
 

Configuring the Camera IP Address 

Initial setup should be performed using the supplied Windows-based Setup Wizard, 
as follows. 

1.  Insert the Product Documentation CD included with your library into your drive. 

Run 

NetworkCamera.exe

, which is located in the NetworkCamera folder on the 

CD.  

  You will see the 

Welcome 

screen. 


Click the 

Setup Camera 

button to start the Setup Wizard.


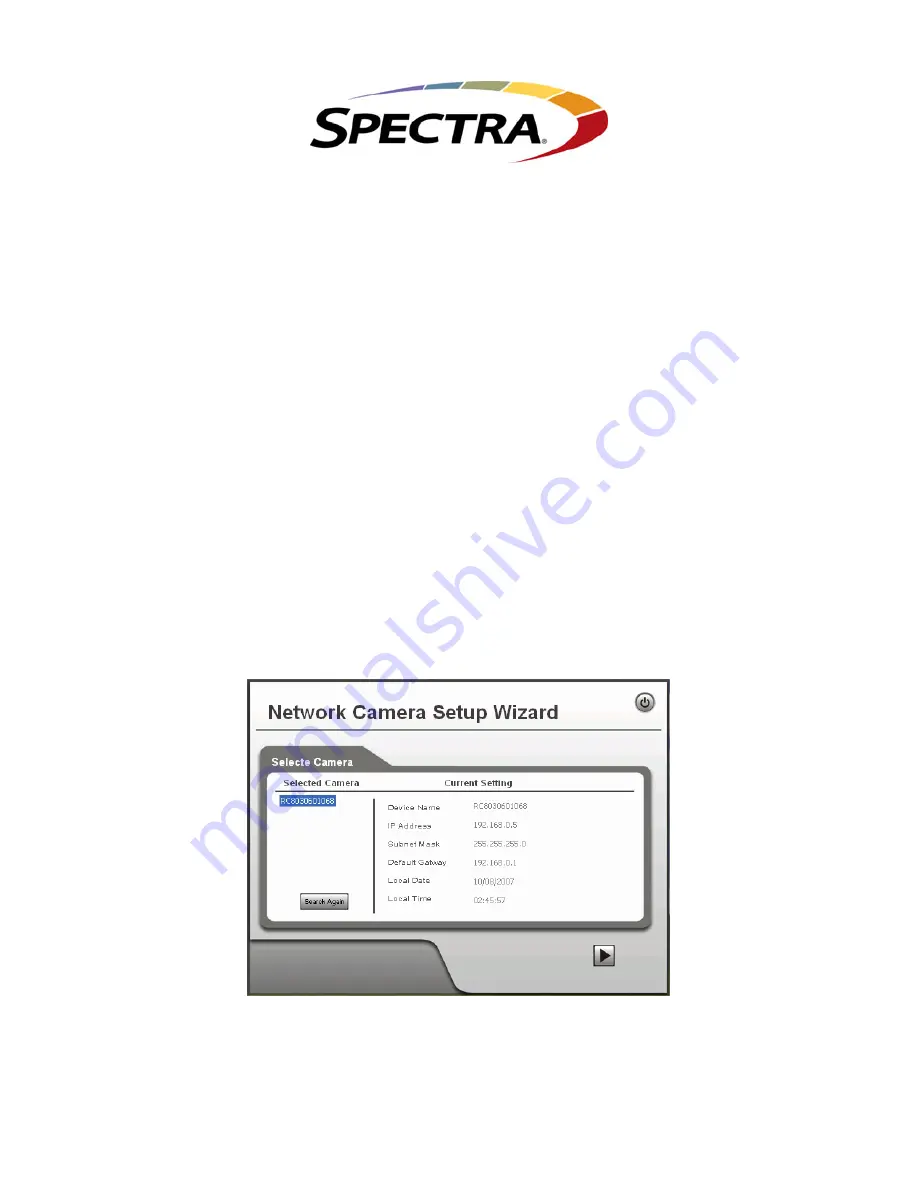
2.  The next screen, shown below, will list all of the BlueScale Vision cameras on 

your LAN. 


  Select the desired camera from the list on the left. The default name for the 

BlueScale Vision camera is RC4030

nnnnnn

. The current settings for the 

selected camera are displayed in the table on the right. 

3. Click 

Next 

to continue. 

Page 1 

Содержание Spectra BlueScale Vision

Страница 1: ...ed Windows based Setup Wizard as follows 1 Insert the Product Documentation CD included with your library into your drive Run NetworkCamera exe which is located in the NetworkCamera folder on the CD You will see the Welcome screen Click the Setup Camera button to start the Setup Wizard 2 The next screen shown below will list all of the BlueScale Vision cameras on your LAN Select the desired camera...

Страница 2: ...e password blank Otherwise enter the Administrator Name and Administrator Password set on the Maintenance screen 5 Click Next to continue The Camera Settings screen lets you to enter a suitable Description and set the correct Date Time and Time Zone 6 Make any desired changes and then click Next to continue 7 Choose the Fixed IP option on the IP Address Settings screen Page 2 ...

Страница 3: ...ary DNS address is required in order to use the E Mail alert or Dynamic DNS features Enter the DNS Domain Name Server address recommended by your ISP The Secondary DNS is optional If provided it will be used if the Primary DNS is unavailable 9 Click Next to continue The New Settings screen displays all of the settings for the camera 10 Click Next if the settings are correct or click Back to modify...

Страница 4: ...on use a web browser to log into the BlueScale user interface on your library 2 From the menu toolbar select Configuration System to display the System Setup screen 3 Scroll down to see the Other Setting pane in the System Setup screen 4 Enter the IP address for the camera in the BlueScale Vision IP Address field 5 Use a shielded Ethernet cable to connect the BlueScale Vision connector on the back...

Страница 5: ...h the preset positions in a sequence defined by the Camera Administrator Click to cause the camera lens to pan from left to right automatically Click to cause the camera lens to move to the Motion Detection Preset position Click to point the camera lens to the desired position There may be a short delay after clicking the desired icon Wait a couple of seconds instead of clicking again Read to the ...

Отзывы: