background image

26

AFTER SALES SUPPORT 

0345 605 2067  

OPERATE

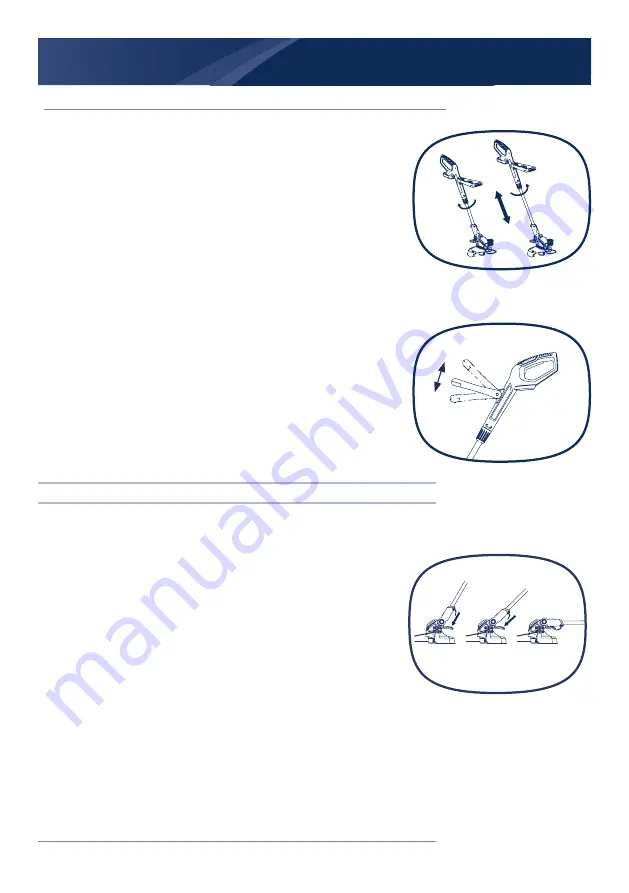
Height adjustment

i.  Loosen the locking sleeve counter clockwise.  

ii.  Adjust the pole length to fit your body height.

iii. Tighten the locking sleeve anti-clockwise.

Handle adjustment

Adjust the angle of the auxiliary handle to ease operation and 
prevent loss of control.

i.  Loosen the knob and move the handle up or downward.

ii. Tighten the knob to secure the auxiliary handle in the 

adjusted position.

Tilt adjustment

Adjust the vertical angle of the trimmer head to fit the 
trimming conditions.  

i. Press the tilt adjustment pedal down with your foot.

ii. Adjust the angle of the pole, up or down.

iii. Release the unlock pedal and keep moving the pole until 

it locks in place.

NOTE: Always ensure that the pedal snaps into place after 

adjusting the trimmer in one of the three positions!

Содержание S3630CT

Страница 1: ...e instructions contain important information that will help you get the best from your trimmer ensuring it is assembled correctly and safely If you need help or have damaged or missing parts call the...

Страница 2: ...year manufacturers war ranty and a comprehensive after sales service The warranty covers manufacturing faults however in the event that the item has been deliberately damaged used in a commercial env...

Страница 3: ...aining 18 Prepare 18 Operate 18 Maintenance and storage safety 19 Intended use 19 Box Content Parts 21 Assemble 22 Unpacking 22 Front handle assemble 22 Plant protector assemble 23 Charging the batter...

Страница 4: ...The charger is for indoor use only Double insulation Pole orientation Fuse Waste electrical products should not be disposed of with household waste Please recycle where facilities exist Check your Loc...

Страница 5: ...ain Li ion waste batteries should be sorted for eco friendly Do not dispose of waste batteries as unsorted municipal waste Do not dispose of batteries in rivers or immerse in water Do not litter to fi...

Страница 6: ...appliance Local regulations may restrict the age of operator Never operate the tool under the influence of alcohol medication or drugs Use appropriate tool This device is only intended for trimming gr...

Страница 7: ...when operating the appliance Do not operate the tool when you are tired Grip the tool securely Operator should have one hand on the main handle the other on the front handle Keep finger off trigger u...

Страница 8: ...from oil and grease Have your tool repaired by an authorized service agent This tool is manufactured in accordance with the relevant safety regulations To avoid danger electrical appliances must only...

Страница 9: ...ugs with earthed grounded power tools Unmodified plugs and matching outlets will reduce risk of electric shock Avoid body contact with earthed or grounded surfaces such as pipes radiators ranges and r...

Страница 10: ...r source and or battery pack picking up or carrying the tool Carrying power tools with your finger on the switch or energy sing power tools that have the switch on invites accidents Remove any adjusti...

Страница 11: ...Store idle power tools out of the reach of children and do not allow persons unfamiliar with the power tool or these instructions to operate the power tool Power tools are dangerous in the hands of un...

Страница 12: ...connection from one terminal to another Shorting the battery terminals together may cause burns or a fire Under abusive conditions liquid may be ejected from the battery avoid contact If contact acci...

Страница 13: ...e Avoid storage in direct sunlight Do not subject battery pack to mechanical shock In the event of battery leaking do not allow the liquid to come into contact with the skin or eyes If contact has bee...

Страница 14: ...attery pack out of the reach of children Retain the original product literature for future reference Remove the battery from the equipment when not in use Dispose of properly SAFETY WARNINGS FOR YOUR...

Страница 15: ...otected from moisture Do not use the charging device in the open Do not short out the contacts of battery or charger Respect the polarity when charging Do not open the unit and keep out of the reach o...

Страница 16: ...en operating this tool Wear gloves when operating this tool Do not expose the tool to rain or high humidity Be familiar with the controls and proper use of trimmer Never allow children or people unfam...

Страница 17: ...ng elements Never use replacement parts or accessories not provided or recommended by the manufacturer Remove the battery before checking cleaning or working on the trimmer and when it is not in use A...

Страница 18: ...he appliance while people especially children or pets are nearby The operator or user is responsible for accidents or hazards occurring to other people or their property Wear safety goggles and ear mu...

Страница 19: ...work Use only the manufacturer s recommended replacement parts and accessories Inspect and maintain the product regularly Have the product repaired only by an authorised service centre or similar qual...

Страница 20: ...SUPPORT 0345 605 2067 SAFETY INFORMATION Please read these instructions fully before operating or maintaining your machine considered unauthorized use and relieves the manufacturer from his or her le...

Страница 21: ...utton Knob Front handle Locking sleeve height adjustment Pivoting head Line trimming blade Plant protector Line spool cover Safety guard 1 2 12 3 13 4 14 5 15 6 16 7 17 9 8 18 10 16 15 9 8 10 11 6 17...

Страница 22: ...nts a hazard to people and property iv Ensure that you have all the accessories and tools needed for assembly and operation This also includes suitable personal protective equipment Safety guard assem...

Страница 23: ...knob NOTE This battery pack has been shipped in a low charge condition It should be fully charged before first use Make sure the main voltage is the same as rating label which located on the charger W...

Страница 24: ...he battery pack is charged when the air temperature is between 18 24 C Do not charge the battery pack in a very low or very high air temperature This is important and will prevent serious damage to th...

Страница 25: ...of metallic particles should be kept away from charger cavities Always unplug the charger from the power supply when there is no battery pack in the cavity Unplug charger before attempting to clean D...

Страница 26: ...l i Loosen the knob and move the handle up or downward ii Tighten the knob to secure the auxiliary handle in the adjusted position Tilt adjustment Adjust the vertical angle of the trimmer head to fit...

Страница 27: ...cking button iii Twist the plant protector to an angle of 90 90o 90o Install the battery to product i Keep the battery pack in line with the holder on the device ii Push it forward until it reaches th...

Страница 28: ...y before turning on the appliance again The lines are automatically cut to the correct length by the line cutter Plant protector Use the plant protector to keep distance to plants like flowers trees o...

Страница 29: ...ving this label ii Adjust the trimmer head angle to a proper position for trimming operation iii Hold the grass trimmer firmly keeping your balance with feet slightly apart Alter the height of the pro...

Страница 30: ...fore checking vii Trim longer grass in stages do not cut long grass in one cut For the best results cut longer grass in steps viii Place the trimmer along the edge of the lawn ix Turn product on and p...

Страница 31: ...e ground or other surfaces iii Pay special attention when performing the work close to trees and bushes The cutting head could damage sensitive bark and damage fence posts iv Fold the plant protector...

Страница 32: ...together both locking device tabs on the spool cover and remove the cover ii Remove the old spool from the spool cover iii Clean out any dirt or grass residue iv Put the new spool in the spool housing...

Страница 33: ...AINTENANCE i Hold the loose ends of the line together with one hand insert one end of the line into the groove on the spool ii Wind the line following the directional arrows on the spool housing and h...

Страница 34: ...ycling and disposal i Waste electrical products should not be disposed of with household waste Please recycle where facilities exist Check with your Local Authority or local store for recycling advice...

Страница 35: ...Vibrations 2 176 m s K 1 5 m s Charger Model no B0Q SP02 36 Input voltage current 220 240V 50 60Hz 100W Output voltage current 40V d c 2 0A Battery pack Model no B0P SP02 36 Battery type Lithium Ion B...

Страница 36: ...red vibration value may also be used in a preliminary assessment of exposure WARNING Depending on the actual use of the product the vibration values can differ from the declared total Adopt proper mea...

Страница 37: ...list if you cannot solve the problem yourself Gloves and appropriate protective clothing must be worn when performing these instructions Problem Possible Cause Solution Product not running Battery dis...

Страница 38: ...or industrial applications any signs of use of the equipment in these application or equivalent activities invalidates the warranty 5 The following are also excluded from our warranty A Faults due to...

Страница 39: ...39 AFTER SALES SUPPORT 0345 605 2067...

Отзывы: