Part 4 Maintenance
4.2
Span Calibration using a Certified Span Gas
Calibration involves using a known span gas to match and adjust the oxygen sensor / analyzer
combo to a known value. This can be as simple as using ambient air that tends to be a constant
20.9% or a bottle of certified span gas from your local air separation company. For this section,
we will focus on using a certified span gas from your local air separation company. When using
a certified bottle, it is recommended to get a span gas equal to 90% of the range you want to use.
If you are measuring in the 0 - 1000ppm range, a 900 ppm N2 / balance O2 would be idea.
For a decision on which type of calibration is good for your process, consult the factory for a
recommendation.
Calibration using Certified Span Gas:
It is recommended to read through the calibration prior to performing
an air calibration to ensure all instructions are understood. Consult
the factory if any questions arise.
Note: For a new sensor, purging with a zero gas for 4 - 6 hours will help
the low end stability and response.
Connect the gas sample line and set the pressure / flow per section 2.5
of the users manual.
Once the gas is flowing, let the reading stabilize for about 2 - 5 minutes
and then proceed.
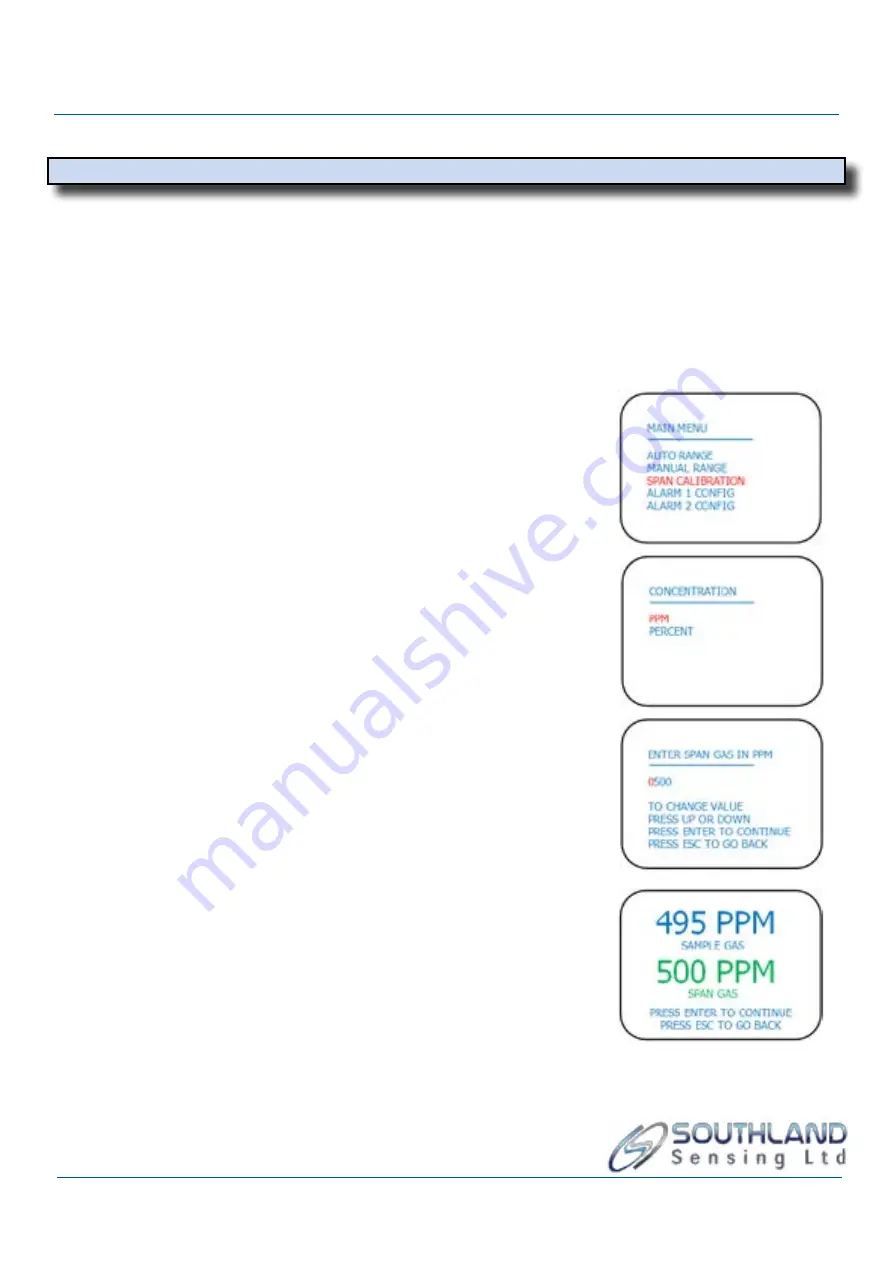
SPAN CALIBRATION: To calibrate the indicator, press MENU key
Use UP/DOWN keys to bring cursor besides the option SPAN
CALIBRATION and press the ENTER key.
Select PPM or PERCENT concentration.
Edit the digit in RED by using the UP / DOWN key. You can shift to
the next digit by pressing the ENTER key. For example, if the current
reading is 495ppm, you will need to set it to 500 ppm, which is our
arbitrary span calibration value (500pp O2 balance N2).
Once ENTER has been pressed, the display will show “PASSED” or
“FAILED”. If passed, promptly put the sensor in a zero or low oxygen
gas. This will help extend the life of the sensor and speed of response.
If failed, repeat calibration steps or consult the factory.
The sensor should be exposed to ambient air for less than 4 minutes.


