background image

S O U N D C R A F T   S I G N AT U R E   M T K  

R E C O R D I N G   G U I D E

11

6.  Close the REAPER preferences screen and return  

to the blank project.

7.  Go into ‘insert’ at the top of the screen and select  

multiple tracks

8.  Enter your desired amount of record tracks in the  

insert how many tracks box. The maximum is 14 for  

the Signature 12MTK so for this example we will  

insert 14 tracks.  


a. The maximum recording  


channels on the 22MTK is 24, so to  


record all available input signals,  


add 24 tracks into REAPER.

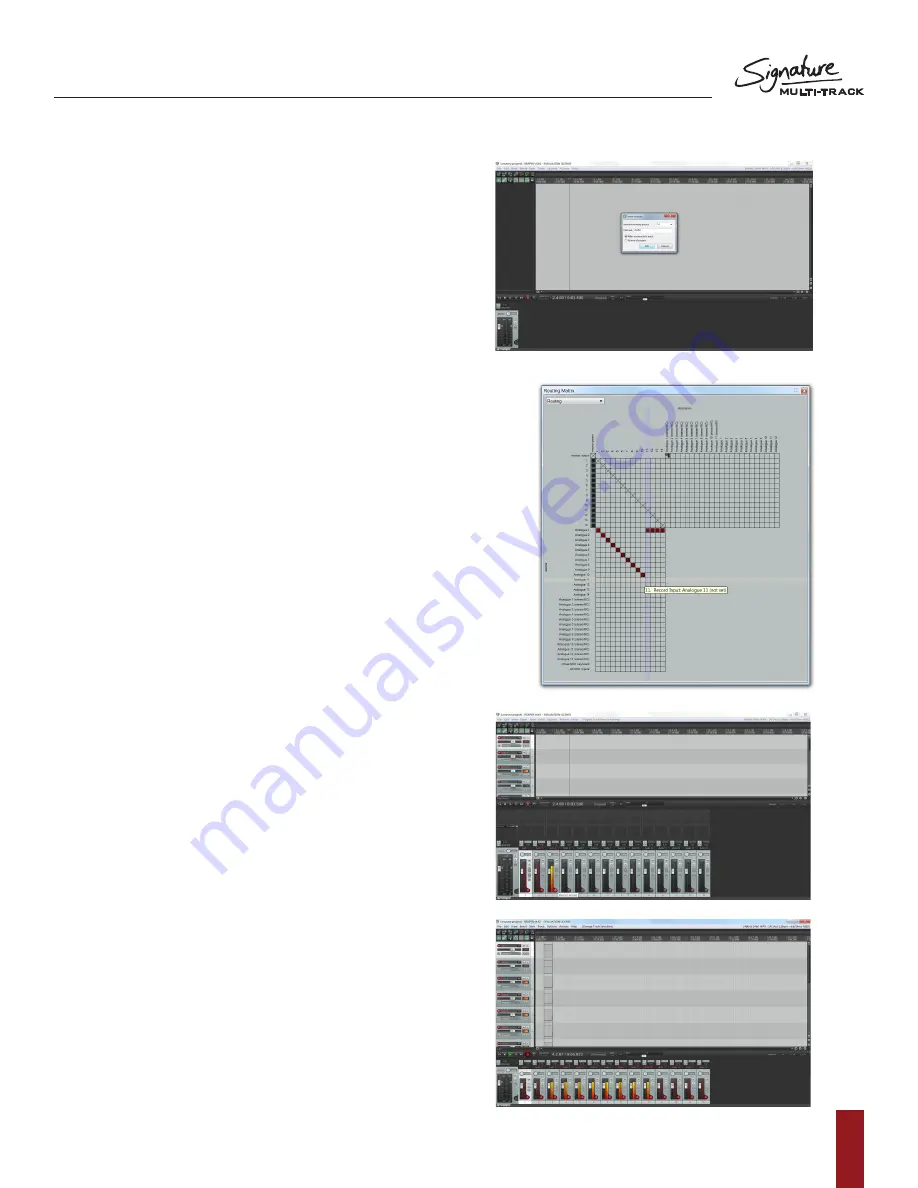
9.  Next we must assign the channels within REAPER to 

receive signals incoming via USB FROM the console into 

the appropriate tracks in REAPER. Go into View at the top 

of the screen and open up the Routing Matrix.


a. You will be presented with a Matrix  


    that has Sources down the left column  


    and destinations across the top.


b. In order to patch 1:1 the console  


    USB sends and REAPER channels  


    we must engage the connection  


    between the source and destination.


c. Engaging a connection is done simply  


    by clicking in the appropriate box in the grid.

10.  Scroll across the top through all of the track names and 

assign the patches to the desired analogue input.


a. Track 1 to Analogue 1, Track 2 to analogue 2,  


     Track 3 to analogue 3...


b. When a patch is made you will see a red circle    


    appear in the desired patch.


c. You will end up with a diagonal line running from   


    track 1 input 1 to track 14 input 14.  


    (Track 24 to input 24 on signature 22MTK)


d. After all the patches have been made,  


    exit out of the routing matrix.

11.  Open up the mixer view from the View tab by entering  

View at the top of the screen and selecting Mixer.   

(It may already be open at the bottom of the screen).

12.  Record enable all of your input tracks by engaging the 

record arm key on each channel fader. 

13.  At this point, if any input sources are coming into the  

desk, you will see the channel meters on REAPER  

begin to show level.

Содержание SIGNATURE MTK

Страница 1: ...Soundcraft Signature MTK Recording Guide...

Страница 2: ...S O U N D C R A F T S I G N AT U R E M T K R E C O R D I N G G U I D E 2...

Страница 3: ...07 Recording to the LR 07 Stereo Playback 08 Stereo Playback Using a PC 08 Stereo Playback Using a MAC 09 REAPER 10 Multi track Recording Using REAPER 10 Multichannel Playback Using REAPER 12 Inserti...

Страница 4: ...used to adjust settings such as buffer depth and streaming mode MAC computers do not require these drivers as the Signature MTK USB audio interface uses Apple Core Audio drivers Installing The Drivers...

Страница 5: ...er size of 1024 samples is enough to ensure reliable operation and clean audio The streaming mode settings modify the bahaviour of the USB driver for maximum optimization when set in conjunction with...

Страница 6: ...track Master Left Right output uses the last 2 USB channels on each console and is always actively sending post fader level down the USB stream Console channels can be set up to receive USB Input and...

Страница 7: ...re reserved for the LR stereo signal This allows the user to record the final mix on the console back into the DAW for an audio mix down or analogue summing purpose The A D conversion the process of c...

Страница 8: ...k even when interval mute is engaged To assign stereo playback out of the desired USB channel 1 Firstly enter the control panel and select Hardware and Sound Or just sound depending on your view setti...

Страница 9: ...is device for sound output 4 You then need to set the output to USB channels 11 12 21 22 on 22MTK a To do this you need to right click the Soundcraft x channel audio driver and select configure speake...

Страница 10: ...PER to use the Soundcraft Multichannel audio interface 1 Firstly go into the options tab at the top of the screen and scroll down to preferences 2 On the left menu scroll down to device under the audi...

Страница 11: ...tch 1 1 the console USB sends and REAPER channels we must engage the connection between the source and destination c Engaging a connection is done simply by clicking in the appropriate box in the grid...

Страница 12: ...creen 1 Firstly open up the routing matrix via the view menu at the top of the screen 2 Along the top of the grid you can see the possible destinations USB Outputs and down the left of the grid you ca...

Страница 13: ...gh the input channels a After engaging this button on each track you should notice an input meter on channel begin to show level 4 You can now click on the rectangular insert points above the fader an...

Страница 14: ...series Multi track consoles 6 Now it is time to add the audio tracks for recording Above the temporary audio track we created earlier there is a small icon Select this button and you will be presente...

Страница 15: ...All that is required by the user is to disable the record enable icon on each DAW track enable the USB RTN switch on the console channels and to press play on the DAW s transport controls If you did...

Страница 16: ...more accurate monitoring The downside to lowering the buffer size is that it puts more pressure on your computer s processors and forces them to work harder The lowest buffer size that can be achieved...

Страница 17: ...ng on your settings Before tracks can be added and recording can begin you must first assign ABLETON LIVE LITE to use the Soundcraft Multichannel audio interface 1 First you must open up the preferenc...

Страница 18: ...audio from the console This can be done using the drop down located in the audio track f Turn on input monitoring by engaging the IN beneath the input selection drop down After doing this you will th...

Страница 19: ...g on each channel a This allows the audio to pass through the audio tracks channel strip and back out of the USB channel 2 On each audio channel you need to select ON which is located just beneath the...

Страница 20: ...nborne House Cranborne Road Potters Bar Hertfordshire EN6 3JN UK T 44 0 1707 665000 F 44 0 1707 660742 E soundcraft harman com Soundcraft USA 8500 Balboa Boulevard Northridge CA 91329 USA T 1 818 893...

Отзывы: