background image

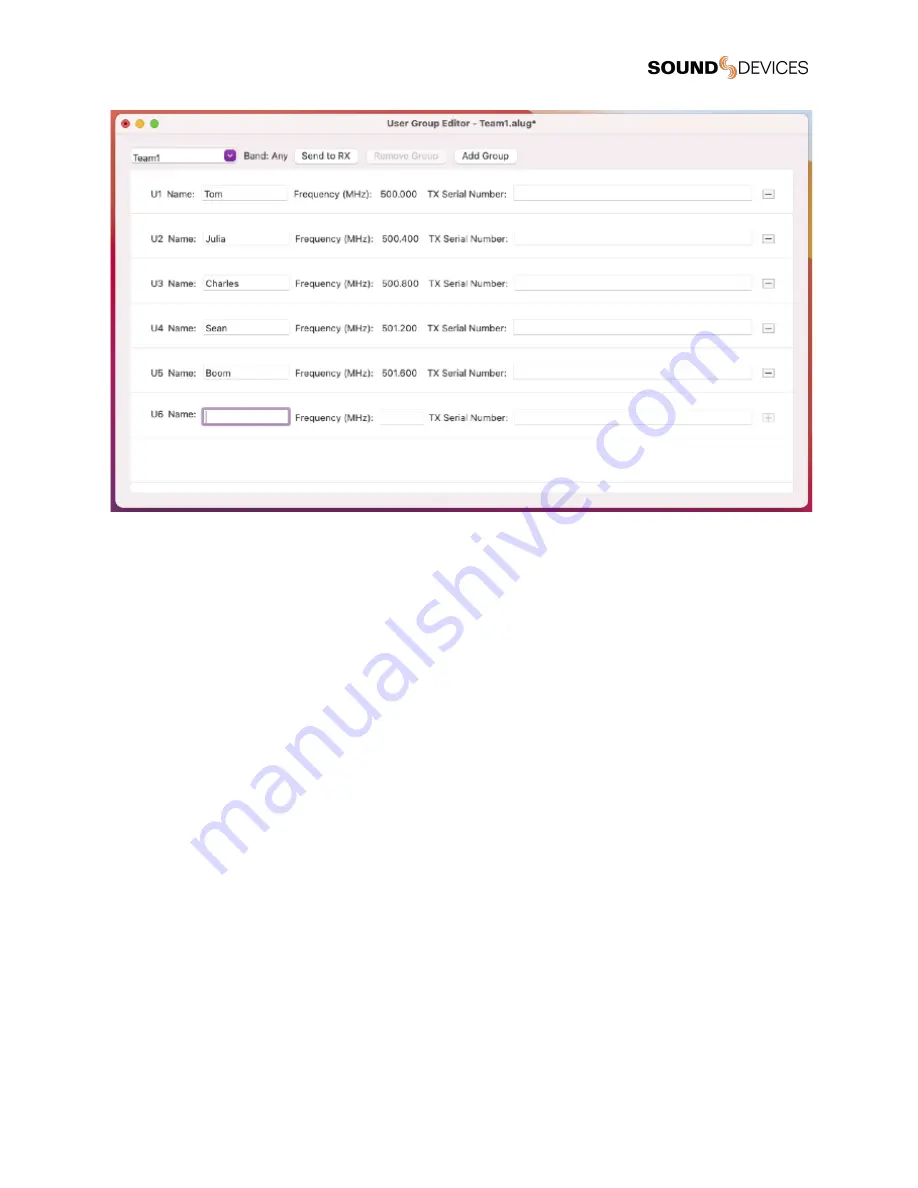
SD-Utility supports the creation of up to eight User Groups, each with a max of 32 users, per User Group file. User Group files have
a file extension of .ALUG.

To add additional user groups:

1.

In SD-Utility, select Add Group.

2.

Name the new group and select the band of frequencies for the group.

3.

Add users (defining name and frequencies) to the group.

User Group files may be saved for future use and modification. When saving the User Group file, SD-Utility defaults the file name to
the first User Group name in the drop-down list.

To load an User Group file into SD-Utility:

1.

In SD-Utility, select User Group File > Open.

2.

Choose an .ALUG file on your computer.

To remove a user group:

1.

In SD-Utility, select a User Group in the drop-down list.

2.

Select Remove Group.

Sending and Loading User Groups onto A20-RX

While each User Group file may contain up to eight user groups, only one group at a time may be sent to and loaded on an A20-RX.
A user group is sent to the A20-RX-XLR by directly connecting it to a computer via USB. Sending a user group to the A20-RX-SL is
achieved via the A10-RACK or the Sound Devices 8-Series Mixer-Recorders with attached SL-2 or SL-6.

For instructions on sending user groups to A10 transmitters, see the A10-TX User Guide or the A10-TX-US User Guide.

To send a user group to an A20-RX via A-XLR, A-TA3, A-RXMON, or A-15PIN:

1.

Start the SD-Utility application.

2.

Connect the A20-RX via USB to the computer. The A-XLR and A-RXMON connect via Micro-USB. The A-TA3 and
A-15PIN connect via USB-C. Note: A USB 3.0 port is required to power the A20-RX via the A-TA3 and A-15PIN. If a USB
3.0 port is not available, connect two USB 2.0 ports to the A-TA3 or A-15PIN using the Sound Devices MX-USB Y USB-C
to two USB-A Y-Cable.

3.

Load the .ALUG file into SD-Utility.

4.

Select Send to RX. SD-Utility detects and displays the connected receiver.

A20-RX

User Guide

26

Содержание A20-RX

Страница 1: ...A20 RX Two Channel True Diversity Receiver with SpectraBand Technology User Guide v6 00 ...

Страница 2: ...X 7 Power 8 Main Display 10 A20 Mini GainForward Input Menu 13 Selection Menu 14 Operating the A20 RX 19 Audio Output and Control 23 SuperSlot 23 User Groups 24 Firmware Update 27 Accessories and Adapters 29 Antenna Guide 37 Servicing the A20 RX 38 Warranty 38 Legal Notices 39 A20 RX User Guide 2 ...

Страница 3: ...digital long range modulation delivers the longest transmission distance of any digital system on the market GainForward Architecture compatible with the A20 Mini Set the Mini s gain levels via trim control with an 8 Series or at the A20 RX for other mixers Full 10 Hz 20 kHz audio bandwidth 100 digital RF modulation and transmission SuperSlot compatible with the SL 2 and 8 Series mixer recorders E...

Страница 4: ...Hz ISM Band 902 928MHz The 950 MHz STL Band 941 5 960 MHz The 1 5 GHz AFTRCC band 1435 1525 MHz with an appropriate license In the UK the available frequency ranges are The core UK UHF TV band 470 702 MHz The 800 MHz duplex gap 823 832 MHz The 800 MHz guard band 863 865 MHz The DME bands 961 1015 MHz 1045 1075 MHz 1105 1154 MHz with an appropriate license The IMT band 1518 1525 MHz Please see http...

Страница 5: ...uminates solid red when the receiver channel loses lock to the transmitter signal due to weak signal or transmitter being turned off Channel s green and red LEDs are off at the fringe of reception Solid green LED and flashing red LED on both channels 1 2 when RF signal is approaching overload on either channel Channel s red LED flashes when RF overload is occurring 4 Left Button Moves the menu sel...

Страница 6: ...ccessories to the A20 RX 2 Multi Pin Accessory Connector Allows connection to various accessories and adapters A20 RX either includes the A SL A XLR or A TA3 coming soon depending on the model purchased See Accessories and Adapters for details A20 RX User Guide 6 ...

Страница 7: ...al buttons toggle through the Dual Channel screen Single Channel screen GainForward Input menu under certain conditions and the Transmitter Information screens Press the opposite direction to return to the previously displayed screen Press the Center button to access the Selection Menu for the channel displayed The Channel 1 Selection Menu is always accessed from the Dual Channel screen The Select...

Страница 8: ...g A20 RX for a single wireless channel best practice is to power down the unused channel Channel Power LEDs The A20 RX has blue Channel Power LEDs for each of its two channels When first powering the A20 RX without transmitters present the LEDs illuminate indicating the receiver channel is powered The receiver channel can connect or pair to an A10 TX or A20 Mini transmitter that is powered on and ...

Страница 9: ...ts to power channels on or off To quickly power channel 1 on and off press and hold the Left and Center button for two seconds To quickly power channel 2 on and off press and hold the Right and Center button for two seconds Standby Mode The A20 RX enters Standby mode when the receiver is powered and both channels are powered off Pressing any button displays the following Power on any channel to ex...

Страница 10: ...larger audio meter display set Menu Settings Display Q meter to small 5 Transmitter Limiter Overload Mute Displays the Limiter Overload or Mute status of the tuned transmitter L Limiter Overload M Mute 6 Transmitter Record Status The Record indicator is displayed when the tuned transmitter is recording 7 Frequency Displays the receiver channel frequency Region X Y Z TV Channel and sub channel are ...

Страница 11: ...eft or Right button again shows the A10 TX Information screen When the channel is paired with an A20 Mini pressing the Left or Right button enters the A20 RX Input menu The Input Menu is not available when the A20 RX is connected to the 833 888 or Scorpio via the SL 2 or SL 6 With this setup the A20 Mini Information screen is displayed See GainForward Input Menu for more details Mute Function on t...

Страница 12: ...Overload Indication When an RF signal is approaching overload on either channel the A20 RX s green LED is solid and its red LED flashes on both channels 1 and 2 When the RF input is overloading on a channel only the red LED flashes for that channel This is an indication that the quality of the signal is degrading Correct an overload condition by Reducing RF power on the transmitter Changing the tu...

Страница 13: ...lect a sub menu to adjust gain low cut or limiter of the incoming A20 Mini transmitted signal When the A20 RX receiving A20 Mini signal is slotted into the SL 2 or SL 6 the A20 RX Input menu settings are bypassed and hidden All gain low cut and limiter activity are performed and controlled by the 833 888 or Scorpio See the Mixer Recorder User Guides for more information The A10 TX does not support...

Страница 14: ...s are dependent on the Country setting Outputs Enters the Outputs sub menu Maximum Level Audio Polarity Mode Test Tone Scan Enters the Scan menu Scanner displays RF activity Perform a scan on any available Band in the 470 1525 MHz range the entire UHF Band 470 694 MHz UHF1 470 578 MHz UHF2 578 694 MHz or User Groups frequencies when activated The RF scan plot is displayed while a scan is in progre...

Страница 15: ...ries Normal Inverted Mode Choose the audio output type of the A20 RX When the A20 RX XLR is set to AES the channel 2 XLR connection is not used This setting applies to both channels Mode is not available when A20 RX is mounted via A SL to SL 2 and 8 Series Analog AES Test Tone Activates a 1 kHz tone oscillator sent directly to the outputs The transmitter audio signal on the receiver output is disr...

Страница 16: ...cts the country of operation This determines the bands frequencies and TV channel mapping of preset frequencies for your area Use the Other option if your location is not listed Display Enters Display sub menu Brightness Screensaver Orientation Options Q meter LEDs When set to On the LEDs remain illuminated Off deactivates the LEDs On Off A20 RX User Guide 16 ...

Страница 17: ... an orientation with the buttons below the screen normal or with the buttons to the top flipped Normal Flipped Options Sets whether Frequency or TV Channel is displayed on the main display Frequency TV Ch Q Meter Determines the size of the Q meter displayed on the single and dual channel screens The audio meter display size is larger when Q Meter is set to small and is reduced when Q Meter is Larg...

Страница 18: ...e factory default settings Restore sets Country to Other Select the current Country in your locality before proceeding Cancel Restore Info Shows information about the A20 RX Serial Number Firmware Version DSP Version Frequency Range A20 RX User Guide 18 ...

Страница 19: ...Mini or A10 TX and the A20 RX in order for the transmitted signal to be received SpectraBand The A20 Digital Wireless System incorporates SpectraBand technology This allows operation across a frequency range of 470 1525 MHz making it possible to find available frequencies wherever you are To Set Band 1 Press the Center button to enter the Menu 2 Select Frequency 3 Select Band 4 Use the Left and Ri...

Страница 20: ...Presets 1 Press the Center button to enter the Menu 2 Select Frequency to enter the Frequency menu Be sure that Band set to operate within UHF 470 694 MHz country dependent 3 Highlight TV Ch then press the Center button to change the TV Channel Frequency Preset 4 Highlight TV Ch then press the Center button to edit the TV Channel 5 Use Left and Right buttons to adjust the TV Ch value then press th...

Страница 21: ...selection the following confirmation appears Change Tuning Band Yes changes the band and frequency of the Rx Channel No frequency and band remains unchanged and returns to the scan results Frequency AutoAssign AutoAssign scans the current tuning band and selects available frequencies for the A20 RX s two channels This feature is designed to make frequency selection quick and easy There are two way...

Страница 22: ... SMA antenna connectors are used to mount the included 1 4 wave whip antenna For specialty applications external high gain receiving antennae can be attached to the SMA connectors Ensure that the antennae used are built for the correct frequency See Antenna Guide for more details For best operation and reception with the included 1 4 wave antenna keep it in the free field away from metal objects o...

Страница 23: ...annel 2 appears at AES right With the A20 RX XLR the channel 1 XLR connector is used for AES3 output The channel 2 XLR connector is not active when set to AES output SuperSlot The A20 RX SL with A SL accessory backplate slots directly into the Sound Devices SL 2 for powering audio and communication with the 8 Series Mixer Recorders Visit the respective 8 Series Mixer Recorder User Guide for full d...

Страница 24: ... as secondary users in the 1435 1525 MHz AFTRCC band This is detailed in the FCC Part 74 rules https www ecfr gov current title 47 chapter I subchapter C part 74 One section of the Part 74 rules that s of particular interest to operators seeking an AFTRCC band license is 74 803 d https www ecfr gov current title 47 chapter I subchapter C part 74 p 74 803 d Similar to the 914 5 944 MHz band nationw...

Страница 25: ...equencies via the Band drop down list Options include A B C D and Any This will automatically restrict users in the group to the frequencies within the frequencies for the various A10 TX models available Selecting Any allows all frequencies available on the A10 system for assignment to users in the group 5 All A10 TX will have the available bands listed on the printed label inside the battery comp...

Страница 26: ... contain up to eight user groups only one group at a time may be sent to and loaded on an A20 RX A user group is sent to the A20 RX XLR by directly connecting it to a computer via USB Sending a user group to the A20 RX SL is achieved via the A10 RACK or the Sound Devices 8 Series Mixer Recorders with attached SL 2 or SL 6 For instructions on sending user groups to A10 transmitters see the A10 TX U...

Страница 27: ...se the Select knob to select SuperSlot SL 2 Receiver Overview 5 Select a channel 6 Slide RTN FAV switch right to select Options 7 Select User Groups User Load New 8 Select a user group to load from the User Group file Loading User Groups on A20 RX While the SD card can have multiple ALUG files each with up to eight groups only one user group at a time may be loaded to a receiver A20 RX receivers c...

Страница 28: ...X 6 From SD Utility select File Update RX and then select the firmware PRG file to install 7 Follow the on screen prompts To update A20 RX firmware via A10 RACK 1 Download new A20 RX firmware PRG file from the Sound Devices website 2 Launch the SD Utility application 3 Connect the A10 RACK back panel USB B port to the computer s USB A port using a standard USB A to B cable 4 Ensure all A20 RX rece...

Страница 29: ...ress the Select knob to select a receiver This accesses the Receiver Details screen 6 Slide RTN FAV switch to select Options 7 Select Update Firmware Confirm the selected file when prompted and select OK to continue As the receiver is updated its screen will display Programming and the LEDs will turn off Repeat steps for each receiver in the SL 2 or SL 6 A20 RX User Guide 29 ...

Страница 30: ... active antennas Up to eight channels of audio from single or dual channel receivers appear on both its XLR outputs and over Dante audio over Ethernet A 15PIN Cradle for A20 RX with 15pin D type adapter For use with Sony camcorders that have slot in for wireless or Sony extension units with slot in for wireless The A 15PIN allows the A20 RX to be used in the Sony slot without the need for external...

Страница 31: ...ing connection to the A20 RX s Multi Pin Accessory connector then replace the screws removed in step 1 A20 RX SL DB 25 Connector Pin Assignments The illustration below shows the pin assignments of the A20 RX SL when viewing the bottom connector A20 RX User Guide 31 ...

Страница 32: ...6 18 VDC Power supply 6 0 18 0 V 6 W max 6 no connection 7 no connection 8 no connection 9 no connection 10 no connection 11 no connection 12 no connection 13 Ground Ground connection 14 Ground Ground connection 15 Ch 2 analog Ch 2 analog audio out 2 dBu level 0 5 dB balanced 16 Ch 2 analog Ch 2 analog audio out 2 dBu level 0 5 dB balanced 17 no connection 18 no connection 19 no connection 20 no c...

Страница 33: ...24 no connection 25 Ground Ground connection A20 RX User Guide 33 ...

Страница 34: ...evel 0 5 dB balanced Alternately Ch 1 and Ch 2 AES3 balanced 110 ohm transformerless XLR Output 2 1 Ground Ground connection 2 Ch 2 analog Ch 2 analog audio out 2 dBu level 0 5 dB balanced 3 Ch 2 analog Ch 2 analog audio out 2 dBu level 0 5 dB balanced Hirose DC In 1 Power 2 Not connected 3 Not connected 4 Power 6 18 VDC Hirose DC Loop Through 1 Power 2 Not connected 3 Not connected 4 Power 6 18 V...

Страница 35: ... 1 2 AES Ch 1 analog audio out 2 dBu level 0 5 dB balanced Alternately Ch 1 and Ch 2 AES3 balanced 110 ohm transformerless TA3 Output 2 1 Ground Ground connection 2 Ch 2 analog Ch 2 analog audio out 2 dBu level 0 5 dB balanced 3 Ch 2 analog Ch 2 analog audio out 2 dBu level 0 5 dB balanced TA4 DC In 1 Power 2 Not connected 3 Not connected 4 Power 6 18 VDC Hirose DC In 1 Power 2 Not connected 3 Not...

Страница 36: ...using USB C power needs to be applied to the TA 4 or Hirose A20 RX User Guide 36 ...

Страница 37: ...o Frequency Response 10 Hz 20 kHz Maximum Output Level 14 dBu 2 dBu 10 dBu or 22 dBu menu selectable with a 0 dBFS signal at the transmitter input 130 ohms output impedance Digital Audio Output AES3 balanced connection 110 ohms output impedance left channel 1 right channel 2 Menu and Controls OLED menu display 3 button navigation Privacy User settable 4 digit PIN Powering 6 18 VDC approx 3 1 W wit...

Страница 38: ... the frequency for intended use Determine the frequency range intended for the uncut antenna using the Antenna Length chart Measure the antenna for the cut point Measurements should begin from the bottom of the SMA connector Using a pair of cutters cut the quarter wave antenna at the specified cut point Position the antenna cap onto the cut end of the antenna and push the cap firmly onto the anten...

Страница 39: ...asis THE WARRANTY AND REMEDIES SET FORTH ABOVE ARE EXCLUSIVE SOUND DEVICES LLC DISCLAIMS ALL OTHER WARRANTIES EXPRESS OR IMPLIED INCLUDING WARRANTIES OF MERCHANTABILITY AND FITNESS FOR A PARTICULAR PURPOSE SOUND DEVICES LLC IS NOT RESPONSIBLE FOR SPECIAL INCIDENTAL OR CONSEQUENTIAL DAMAGES ARISING FROM ANY BREACH OF WARRANTY OR UNDER ANY OTHER LEGAL THEORY Because some jurisdictions do not permit ...

Страница 40: ...LTIES DELAY DAMAGES LIQUIDATED DAMAGES AND OTHER DAMAGES AND LIABILITIES WHICH END USER SHALL BE OBLIGATED TO PAY OR WHICH END USER OR ANY OTHER PARTY MAY INCUR RELATED TO OR ARISING OUT OF ITS CONTRACTS WITH ITS CUSTOMERS OR OTHER THIRD PARTIES NOTWITHSTANDING AND WITHOUT LIMITING THE FOREGOING IN NO EVENT SHALL SOUND DEVICES BE LIABLE FOR ANY AMOUNT OF DAMAGES IN EXCESS OF AMOUNTS PAID BY THE EN...

Страница 41: ...t conforme aux CNR d Industrie Canada applicables aux appareils radio exempts de licence L exploitation est autorisée aux deux conditions suivantes 1 l appareil ne doit pas produire de brouillage et 2 l utilisateur de l appareil doit accepter tout brouillage radioélectrique subi même si le brouillage est susceptible d en compromettre le fonctionnement WEEE Statement If you wish to discard a Sound ...

Страница 42: ...A20 RX User Guide 42 ...

Страница 43: ...Post Office Box 576 E7556 State Rd 23 and 33 Reedsburg Wisconsin 53959 USA support sounddevices com 1608 524 0625 main 800 505 0625 toll free U S only www sounddevices com A20 RX User Guide 43 ...

Отзывы: