Soul P910B Скачать руководство пользователя страница 12

Using the Source Menus of the PIAB

If you are using your PIAB to transmit a signal to another source such as another PIAB or other product with an open KleerNet 

protocol then you are ready to pair with the receiving device. If the PIAB is in receiving mode from prior use select the 
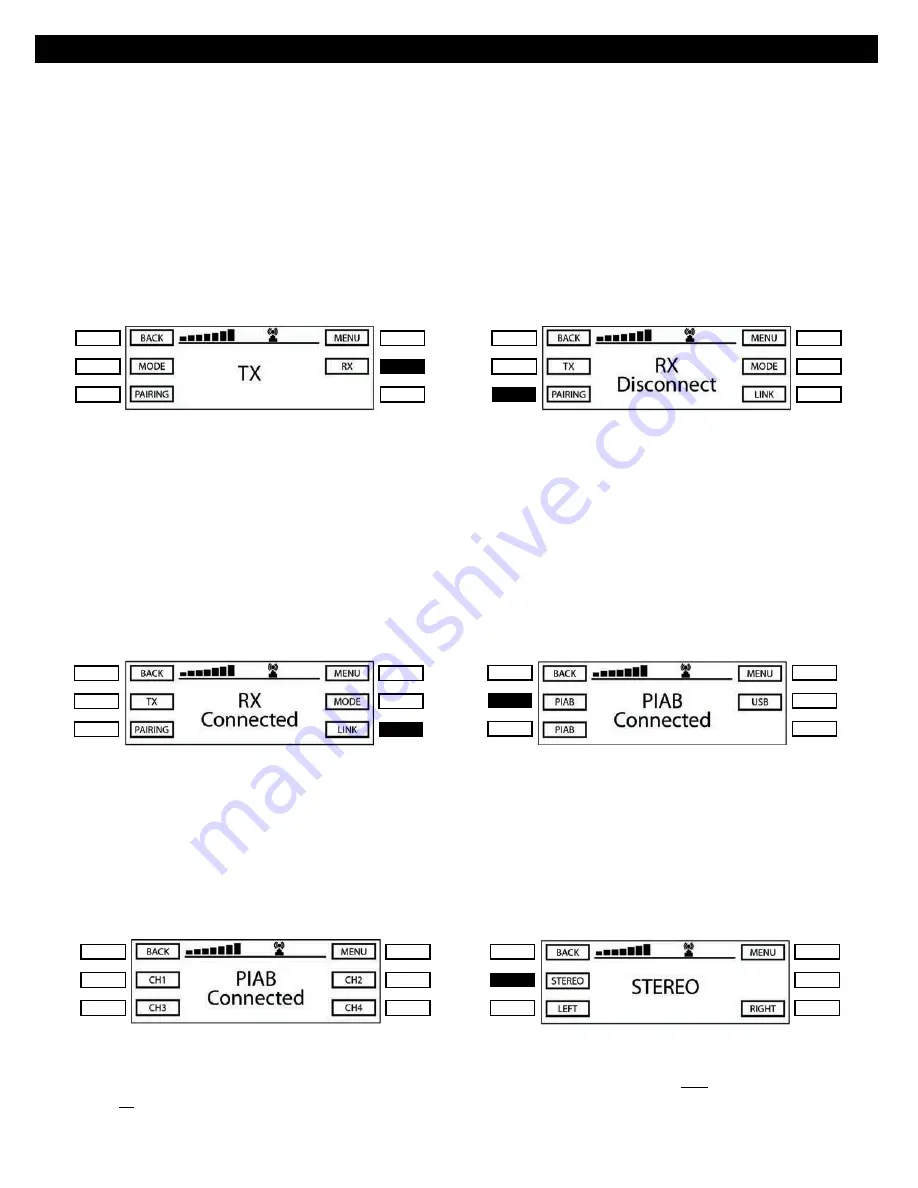
TX


button from the menu. The menu will now display 

TX

 in the center of the display (Figure 5) and will also show the options for 

Mode

 selection (Stereo or Mono). In addition you will see the 

Pairing

 button that will allow you to link to another device and 

the 

RX

 button that will allow you to change your PIAB from transmitting to a receiving mode.  If you plan to receive an audio 

signal from another source such as another PIAB or other KleerNet enabled device then you will select the RX button (Figure 

6) from the menu. The new menu will now display 

RX Disconnect

 in the center of the display (Figure 7) and will also show the 

options for 

Mode

 selection (Stereo or Mono) of the PIAB. In addition you will see the 

Pairing

 button that will allow you to link 

to another device and the

 TX

 button that will allow you to change your PIAB from a receiving to a transmitting mode. Finally 

you will see a Link button that will allow you to select from up to three diff erent transmitting sources. 


      Tri-Band Pairing Menu 


 Tri-Band Pairing Menu


     Figure 6 


 Figure 7

Note:

 Each source must be paired with the PIAB by pressing the 

Pairing

 button on the PIAB (Figure 7) and your device. 

Once the connection has been made you will see the display change to 

RX Connected

 (Figure 8). If you have previously 

linked your PIAB to another device you should not be required to link again. In the event that the link has been lost or 

erased then follow the steps above to link again.

The next step in the receiving mode is to link your PIAB with one of the transmitting sources available to you. From the 

Tri-Band pairing menu select the 

Link

 button (Figure 8), once selected your display will change to the Tri-Band link menu 

(Figure 9). 


Start-Up Menu  


                Tri-Band Pairing Menu


     Figure 8 


 Figure 9

After Selecting one of the three sources (Figure 9) the display will change to the selected Link menu (Figure 10). From this 

menu you will be able to select between channels 1, 2, 3 and 4. After selecting the desired channel your PIAB will be ready 

to receive the audio signal source from that channel. To listen to another channel simply select a diff erent channel from 

the Link Menu. 

Note:

 if the transmitting source is only broadcasting one channel the above option will not be necessary. 

Also if there is no signal source detected the PIAB will not change menus.


Start-Up Menu  


                Tri-Band Pairing Menu


     Figure 10 


 Figure 10B

If you are using multiple PIAB’s you have the option of setting each unit to play in Stereo (Left 

and

 Right Channel) or in 

Mono (Left 

or

 Right Channel). The PIAB will always play in Stereo unless you select Mono in the Audio Mode Menu. From 

the Tri-Band Pairing Menu’s (Figures 6 or 7) you can select the 

Mode

 Button that will take you to the Audio Mode Menu 

11.

Содержание P910B

Страница 1: ......

Страница 2: ......

Страница 3: ...rty responsible for compliance could void the user s authority to operate this equipment Proper connections must be used for connection to a host computer and or peripherals in order to meet FCC emiss...

Страница 4: ......

Страница 5: ...Turning On the PIAB 9 Start Up and Tool Menus 9 Back and Menu Buttons 9 Using the Source Menus of the PIAB Bluetooth Audio Source 10 Wireless Tri Band Source 10 12 FM Source 12 13 Auxiliary USB Sourc...

Страница 6: ...s FM Radio with RDS Listen to your favorite FM stations RDS tuner displays the artist name and song on your display when the station is broadcasting in RDS External FM antenna and memory pre sets Auxi...

Страница 7: ......

Страница 8: ......

Страница 9: ......

Страница 10: ......

Страница 11: ......

Страница 12: ...on on the PIAB Figure 7 and your device Once the connection has been made you will see the display change to RX Connected Figure 8 If you have previously linked your PIAB to another device you should...

Страница 13: ...pressing the scan up or scan down buttons Figure 14 In order to automatically change stations again press the scan button once more FM Tuning Menu FM Tuning Menu Figure 13 Figure 14 Storing and Re cal...

Страница 14: ......

Страница 15: ...ke menu you can access the Karaoke functions of the PIAB The first thing you will have to do is to select KARAOKE from the menu Figure 31 Once selected you are ready to choose between the different so...

Страница 16: ...eadphone jack that you can use when private listening is required Simply plug your favorite SOUL Headphones into the headphone jack Figure 34 and the internal speakers of the PIAB will be disabled Not...

Страница 17: ...hearing we have preset the start up volume level of the PIAB This will prevent any sudden high output level that could cause damage or injury You do have the option to change the pre set volume level...

Страница 18: ...ss the button the button display will change to either ON or OFF but will not change the actual menu you are in After turning the light on your next step is to select the color of the perimeter light...

Страница 19: ...next set of EQ presets Once you have reached the final preset menu and press more again it will take you back to the first EQ preset menu Start Up Menu Tool Menu Figure 44 Figure 45 EQ Preset Menu 1...

Страница 20: ......

Страница 21: ......

Страница 22: ...B volume has been muted Press the power button once to unmute Check your media device for volume level and mute LCD Display is Hard to See Go to page 17 of your manual under Light Tool Menu and locate...

Страница 23: ...RNAL CAUSES IMPROPER INSTALLATION OR UNAUTHORIZED REPAIR THIS WARRANTY ONLY APPLIES TO NONCOMMERCIAL USE OF THIS PROD UCT AND IS NOT TRANSFERABLE OR ASSIGNABLE THIS WARRANTY IS LIMITED EXCLUSIVE AND I...

Страница 24: ...tion under all conditions of normal operation as specified in the user manual This equipment should be installed and operated with a minimum distance 20cm between the radiator and your body IC NOTICE...

Страница 25: ...2013 SOUL Electronics 1025 Greenwood Blvd Lake Mary FL 32746 All trademarks are the property of their respective owners MADE IN CHINA Rev 04 18 2013...

Отзывы: