background image

Backing up and restoring content..................................................42

Downloading applications..........................................................45

Downloading applications from Google Play................................ 45
Downloading applications from other sources..............................45

Internet and networks................................................................ 46

Browsing the web...........................................................................46
Internet and MMS settings ............................................................ 46
Wi-Fi.................................................................................................47
Sharing your mobile data connection............................................49
Controlling data usage.................................................................... 51
Selecting a SIM card for data traffic................................................ 51
Selecting mobile networks............................................................. 52

Synchronising data on your device.............................................53

Synchronising with online accounts...............................................53
Synchronising with Microsoft Exchange ActiveSync......................53

Basic settings.............................................................................. 55

Accessing settings.......................................................................... 55
Volume settings.............................................................................. 55
Do not disturb mode...................................................................... 56
Screen settings................................................................................57
Screen pinning................................................................................ 57
Application settings........................................................................58
Resetting your applications............................................................59
Language settings..........................................................................60
Date and time................................................................................. 60
Enhancing the sound output......................................................... 60
Multiple user accounts.................................................................... 61

Typing text...................................................................................63

On-screen keyboards......................................................................63
Editing text......................................................................................64

Calling..........................................................................................65

Making calls.................................................................................... 65
Receiving calls.................................................................................66
Forwarding calls.............................................................................. 67
Blocking a number..........................................................................68

Contacts.......................................................................................69

Adding and editing contacts..........................................................69
Grouping contacts.......................................................................... 70
Transferring contacts...................................................................... 70
Backing up contacts........................................................................ 71

3

Содержание Xperia SM12

Страница 1: ...User guide Xperia SM12 Hxxx Hxxx Hxxx Hxxx Hxxx ...

Страница 2: ...ber s of your device 15 Finding locking or erasing a lost device 16 Using location services 16 Learning the basics 18 Using the touchscreen 18 Turning the screen on or off 20 Smart backlight control 20 Home screen 20 Application screen 23 Shortcuts for easy actions 24 Navigating applications 24 Widgets 26 Shortcuts and folders 27 Background and themes 28 Taking a screenshot 28 Notifications 28 Ico...

Страница 3: ...Synchronising with online accounts 53 Synchronising with Microsoft Exchange ActiveSync 53 Basic settings 55 Accessing settings 55 Volume settings 55 Do not disturb mode 56 Screen settings 57 Screen pinning 57 Application settings 58 Resetting your applications 59 Language settings 60 Date and time 60 Enhancing the sound output 60 Multiple user accounts 61 Typing text 63 On screen keyboards 63 Edit...

Страница 4: ...2 Additional camera settings 92 Photos and videos in Album 94 Viewing photos and videos 94 Album home screen menu 95 Sharing and managing photos and videos 96 Hiding photos and videos 97 Connectivity 98 Mirroring the screen of your device wirelessly on a TV 98 Connecting your device to USB accessories 98 Near Field Communication NFC 98 Bluetooth wireless technology 100 Smart apps and features that...

Страница 5: ...Mono audio 109 Switch Access 109 Support and legal 110 Support application 110 Restarting resetting and repairing 110 Warranty SAR and usage guidelines 111 Legal information 111 5 ...

Страница 6: ...ice model number is displayed under Model Limitations to services and features Some of the services and features described in this User guide may not be supported in all countries or regions or by all networks or service providers The GSM International Emergency Number can always be used in all countries regions networks and by all service providers provided that the device is connected to the mob...

Страница 7: ...Overview 7 This is an internet version of this publication Print only for private use ...

Страница 8: ...rds Single SIM devices allow you to use one SIM card and a memory card The nano SIM card and the memory card have separate slots Make sure you don t confuse the two For information on how to check if your device is Single SIM or Dual SIM see Finding the IMEI number s of your device on page 15 To prevent data loss make sure you turn off your device or unmount the memory card before you drag out the...

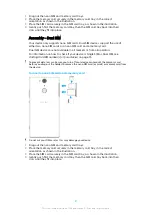
Страница 9: ...eck if your device is Single SIM or Dual SIM see Finding the IMEI number s of your device on page 15 To prevent data loss make sure you turn off your device or unmount the memory card before you drag out the holder to remove the nano SIM card or cards or memory card from the device To insert a nano SIM card and a memory card Do not cut your SIM card as this may damage your device 1 Drag out the na...

Страница 10: ...The use of third party screen protection accessories may prevent your device from working correctly by covering sensors lenses speakers or microphones and can invalidate the warranty Starting your device for the first time It is recommended that you charge the battery for at least 30 minutes before starting up your device for the first time You can still use your device while it is charging For mo...

Страница 11: ...ourself as the authorised user after a software repair using Xperia Companion Remotely find lock or clear a lost or stolen device using the Find my device services For more information about Android and Google go to http support google com It is crucial to remember your Google account user name and password since in some situations you may need it to identify yourself for security reasons If you f...

Страница 12: ...on by default SIM card lock Lock your SIM cards with a PIN to protect your subscription against misuse The PIN is required every time you restart your device IMEI number Keep a copy of the IMEI number If your device is stolen some network providers can use this number to stop the device from accessing the network in your country or region Dual SIM devices have two IMEI numbers Backup Back up the c...

Страница 13: ...th you The Smart Lock feature is available in most markets countries or regions Go to http www support google com and search smart lock for more information about the Smart Lock feature To enable Smart Lock 1 Set a pattern PIN or password as a screen lock if you have not already done so 2 Find and tap Settings Lock screen security Trust agents 3 Tap the Smart Lock Google slider to enable the funct...

Страница 14: ...3 Tap the slider beside Lock SIM card to enable 4 Enter the SIM card PIN and tap OK The SIM card lock is now active and you will be prompted to enter your PIN every time you restart your device To change the SIM card PIN 1 Find and tap Settings Lock screen security SIM card lock 2 Dual SIM users select a SIM card 3 Tap Change SIM PIN 4 Enter the old SIM card PIN and tap OK 5 Enter the new SIM card...

Страница 15: ...etwork for example LTE Finding the IMEI number s of your device Your device has one or two unique identification numbers that are referred to as IMEI or Product ID You should keep a copy of this You may require it if your device is stolen or when contacting support Dual SIM devices only Your device has two IMEI numbers one for each SIM card slot To view your IMEI number s using the dialpad 1 Find ...

Страница 16: ...ystem GPS information to determine your approximate location If you re not within a clear line of sight to GPS satellites your device can determine your location using the Wi Fi function And if you re not within range of a network your device can determine your location using your mobile network In order to use your device to find out where you are you need to enable location services You may incu...

Страница 17: ...17 This is an internet version of this publication Print only for private use ...

Страница 18: ... touchscreen Tapping Open or select an item Mark or unmark a checkbox or option Enter text using the on screen keyboard Touching and holding Move an item 18 This is an internet version of this publication Print only for private use ...

Страница 19: ... and out Pinch in and out on web pages photos and maps and when you re taking photos or shooting videos Swiping Scroll up or down a list Scroll left or right for example between Home screen panes Swipe left or right to reveal more options 19 This is an internet version of this publication Print only for private use ...

Страница 20: ... an option Smart backlight control The smart backlight control keeps the screen on as long as the device is held in your hand Once you put down the device the screen turns off according to your sleep setting To enable or disable the Smart backlight control function 1 Find and tap Settings Display Smart backlight control 2 Tap the slider to enable or disable the function Home screen The Home screen...

Страница 21: ...Dots Represents the number of Home screen panes To go to the Home screen Press To browse the Home screen Home screen panes You can add new panes to your Home screen up to a maximum of twenty panes and delete panes You can also set the pane that you want to use as the main Home screen pane 21 This is an internet version of this publication Print only for private use ...

Страница 22: ... screen 1 Touch and hold an empty area on your Home screen until the device vibrates 2 Flick left or right to browse to the pane that you want to delete then tap on the top right corner of the pane Home screen settings To disable or uninstall an application from the Home screen Disabling a pre installed app deletes all data but the app can be enabled again from Settings Apps notifications Only dow...

Страница 23: ...tap Search applications 2 Enter the name of the application that you want to search for You can also search for applications by swiping right from the Application screen To arrange applications on the Application screen 1 When the Application screen is open tap 2 Tap Sort apps then select an option To add an application shortcut to the Home screen 1 On the Application screen touch and hold an appl...

Страница 24: ...nly disabled if the app supports this If you disable a pre installed app you can enable it again under Settings Apps notifications App info 1 Touch and hold the application you want to uninstall or disable 2 Tap OK to delete an app or DISABLE to disable an app If an icon is not shown tap for more options Navigating applications You can navigate between applications using the navigation keys and th...

Страница 25: ...ly used applications Tap and then tap CLEAR ALL To open a menu in an application While using an application tap or A menu is not available in all applications Split screen mode Split screen mode enables you to view two applications at once for example if you want to view your email inbox and a web browser at the same time 1 Application 1 2 Split screen border Drag to resize windows 3 Application 2...

Страница 26: ... accordingly 2 To move the screen upwards or downwards drag the horizontal stripes at the edge of the resized screen 3 To resize the screen drag the three diagonal stripes at the edge of the resized screen To return to full screen mode tap Widgets Widgets are small applications that you can use directly on your Home screen They also function as shortcuts For example the Weather widget allows you t...

Страница 27: ...lect an application The selected application gets added to the Home screen To move an item on the Home screen Touch and hold the item until the device vibrates then drag the item to the new location To remove an item from the Home screen Touch and hold the item until the device vibrates then drag the item to Remove from home screen on the top of the screen To create a folder on the Home screen Tou...

Страница 28: ...wallpaper for that screen and tap SELECT APPLY You can also use a photo as your wallpaper Instead of selecting a wallpaper from the options shown tap Photos Choose a photo and tap SELECT To set a theme 1 Touch and hold an empty area on your Home screen until the device vibrates 2 Tap Themes 3 Choose an option To use an existing theme select the theme then tap APPLY THEME To download a new theme ta...

Страница 29: ...ages in the Notification panel To dismiss a notification from the Notification panel Swipe the notification left or right Not all notifications can be dismissed To snooze a notification drag the notification slowly to the side and tap Notifications can be snoozed for 15 30 minutes or 1 or 2 hours To expand a notification on the Notification panel Tap to expand and view more information about the n...

Страница 30: ...fications to display on the lock screen 1 Find and tap Settings Apps notifications Notifications 2 Tap On the lock screen 3 Select an option You can keep notifications on the lock screen until you swipe to dismiss them To enable this feature tap the Keep notifications on lock screen slider under Notifications Setting the notification level for an app Allow notification dot Show notification dots A...

Страница 31: ...oading HSPA data Mobile data is disabled A Wi Fi connection is enabled and data is being transmitted A Wi Fi connection is enabled but there is no internet connection This icon also appears when you are trying to connect to a secured Wi Fi network After a successful login the cross mark disappears If Google is blocked in your area the cross mark may appear even when the device is connected to a Wi...

Страница 32: ... message Downloading data Uploading data Mobile data is disabled Perform a basic setup of your device A software update is available System updates are available Downloading system updates Tap to install the downloaded system updates STAMINA mode is activated Ultra STAMINA mode is activated Battery Care is activated Screenshot captured Video chat with friends using the Duo application A song is pl...

Страница 33: ...Contacts application to manage phone numbers email addresses and other contact information Use the Files application to access your downloaded applications documents and pictures Browse and listen to FM radio stations Use the Google Docs application to create edit and collaborate with others on documents Use Google Drive application to save your documents and files for easy access from any device ...

Страница 34: ... Store and more Optimise settings to suit your own requirements Use the Google Sheets application to create edit and collaborate with others on spreadsheets Use the Sketch application to create and explore images then share them with your friends Use Google Slides to create edit and collaborate with others on presentations Use the Support application to access user support on your device For examp...

Страница 35: ...d to the charging During this time the screen may remain completely dark not showing the charging icon It can take up to 4 hours for a completely drained battery to be fully charged Your device has an embedded rechargeable battery that can only be replaced by an authorised Sony repair centre Never try to open or take apart the device yourself Doing so can cause damage and void your warranty A wall...

Страница 36: ...one calls and SMS are not affected System updates may change the power saving features available on your device To review and reduce your battery consumption 1 Find and tap Settings Battery to view the estimated remaining battery percentage and battery time 2 Tap Advanced to view a list of applications and features that have consumed battery power since the last charging cycle 3 Tap an item to get...

Страница 37: ...mance animation and screen brightness image enhancement background app data syncing vibration except for incoming calls streaming and GPS while the screen is off appears in the status bar If you are sharing a device with multiple users you may need to log in as the owner that is the primary user to activate or deactivate STAMINA mode To activate or deactivate STAMINA mode 1 Find and tap Settings B...

Страница 38: ...not available for wireless download You then need to use the Xperia Companion software on a PC or on an Apple Mac computer to update your device Before updating your device consider the following Ensure you have sufficient storage capacity before attempting to update If you are using a device with multiple users you must log in as the owner that is the primary user to update the device System and ...

Страница 39: ...ction mode on the device is set to Transfer files 3 Open Xperia Companion if it is not automatically launched 4 Make sure that the computer can access the internet 5 Computer If a new software update is detected a popup window appears Follow the on screen instructions to run the relevant software updates If you don t have the Xperia Companion software installed on the relevant computer connect you...

Страница 40: ...ection mode You can use the Transfer files connection mode for managing files and updating device software This USB mode is used with Microsoft Windows computers Charging is enabled by default You can also use your device as a Supply power and charge the other connected device Make sure that the other device supports USB charging Using the Use device as MIDI mode your device can function as a MIDI...

Страница 41: ...emory card inserted select Storage Internal shared storage FREE UP SPACE When you clear the cache memory you don t lose any important information or settings To transfer media files to the memory card 1 Make sure you have a memory card inserted into your device 2 Find and tap Settings Storage Transfer data to SD card 3 Mark the files that you want to transfer to the memory card 4 Tap Transfer To s...

Страница 42: ... detects your device Make sure to select Transfer files mode on your device 3 Click Backup on the Xperia Companion main screen 4 Follow the on screen instructions to back up data from your device If you do not have Xperia Companion installed you are requested to install it when you connect your device to the computer To restore your data using a computer 1 Unlock the screen of your device and conn...

Страница 43: ... completed according to the default settings 7 To save your settings tap To back up content manually 1 If you are backing up content to a USB storage device make sure the storage device is connected to your device using a USB host adapter If you are backing up to an SD card make sure the SD card is properly inserted into your device If you are backing up content to an online account make sure you ...

Страница 44: ...w apps you install get deleted during any subsequent restore procedure Backing up data with the Google Backup restore application Using the Google Backup restore application you can back up data to a Google server You can also turn on the automatic restore function to restore application data and settings when you reinstall an application With this application you can back up the following types o...

Страница 45: ... trust You can view the permissions granted to a downloaded application by tapping the application under Settings Apps notifications App info Downloading applications from other sources When your device is set to allow downloads from sources other than Google Play you can download applications directly from other websites by following the relevant download instructions Installing applications of u...

Страница 46: ...g of STAMINA mode is activated to save power all mobile data traffic gets paused when the screen is off If this causes connection problems try excluding some applications and services from being paused or deactivate STAMINA mode temporarily If you are sharing a device with multiple users only the owner that is the primary user can download internet and messaging settings from the Settings menu but...

Страница 47: ...1 Find and tap Settings Network Internet Wi Fi 2 Tap the slider to enable or disable Wi Fi It may take a few seconds before Wi Fi is enabled To connect to a Wi Fi network 1 Find and tap Settings Network Internet Wi Fi 2 Tap the slider to turn on Wi Fi All available Wi Fi networks are displayed 3 Tap a Wi Fi network to connect to it For secured networks enter the relevant password is displayed in t...

Страница 48: ...notifications 1 Make sure that Wi Fi turned on for your device 2 Find and tap Settings Network Internet Wi Fi 3 Scroll down and tap Wi Fi preferences Tap the Open network notification slider to enable or disable To view detailed information about a connected Wi Fi network 1 Find and tap Settings Network Internet Wi Fi 2 Tap the Wi Fi network that you are currently connected to Detailed network inf...

Страница 49: ...s Network Internet Wi Fi 2 Turn on Wi Fi if it is not already on 3 Tap Wi Fi preferences Advanced WPS PIN Entry 4 On the WPS supported device enter the PIN that appears on your device Sharing your mobile data connection You can share your mobile data connection with other devices in several ways USB tethering share your mobile data connection with a single computer using a USB cable Portable Wi Fi...

Страница 50: ... slider again to disable the function The Bluetooth tethering function is turned off every time you turn off your device or turn off the Bluetooth function To use your device as a portable Wi Fi hotspot 1 Find and tap Settings Network Internet Tethering portable hotspot 2 Tap Portable hotspot settings Configure hotspot 3 Enter the Network name information 4 To select a security type tap the Securi...

Страница 51: ...he warning level tap the slider beside Set data warning 4 Tap Data warning enter the desired data limit and tap SET You receive a warning notification when the amount of data traffic reaches the level you set To set a mobile data limit 1 Make sure that mobile data traffic is turned on 2 Find and tap Settings Network Internet Data usage 3 Tap Billing cycle and tap the slider beside Set data limit t...

Страница 52: ...et your device to use a particular mobile network mode for example WCDMA or GSM If you are using a Dual SIM device this applies to each SIM card Different status icons are displayed in the status bar depending on the type or mode of network that you are connected to Refer to Status icons on page 31 to see what the different status icons look like To select a network mode 1 Find and tap Settings Ne...

Страница 53: ...s directly on your device After setup you can find your information in the Email Calendar and Contacts applications If you have set up a Microsoft Exchange ActiveSync EAS account on your Xperia device the EAS security settings may limit the lock screen type to only a PIN or password This occurs when your network administrator specifies a lock screen type for all EAS accounts for enterprise securit...

Страница 54: ... 1 Find and tap Settings Users accounts 2 Select the EAS account that you want to remove 3 Tap Remove account 4 Tap Remove account again to confirm 54 This is an internet version of this publication Print only for private use ...

Страница 55: ...n tap 2 Touch and hold an icon then move it to the desired position To turn on the Torch 1 Drag the status bar downwards using two fingers 2 Tap Volume settings You can adjust the ringtone volume for incoming calls and notifications as well as for music and video playback To adjust the ringtone volume with the volume key Press the volume key up or down To adjust the media playing volume with the v...

Страница 56: ...e status bar fully downwards to access the Quick settings panel 2 Tap to turn on Do not disturb 3 For more options tap the setting name below and select a setting You can also set a time limit as desired 4 Tap DONE To quickly shift between Do not disturb Vibrate Sound mode 1 Press the volume key up or down until or appears 2 Tap or to quickly shift between Vibrate Sound mode To activate Do not dis...

Страница 57: ...s when viewing them on your device For example use Super vivid mode to make colours appear more vibrant on screen Screen rotation Set the screen to rotate automatically when the device is turned or set it to stay in portrait view Screen saver Set up a screen saver that displays colours or a photo slideshow when your device is charging or the screen is idle If your device has multiple users each us...

Страница 58: ...or each app either from the Settings menu or from the Permission confirm dialog Permission requirements depend on the app s design Allowing or denying permissions You can choose whether to allow or deny permissions when the dialog is shown If you have used another Android version previously most apps will have already been granted the necessary permissions To allow a permission To allow a permissi...

Страница 59: ...cations You can reset an application or clear application data if your application stops responding or causes issues with your device To reset application preferences 1 Find and tap Settings Apps notifications 2 Tap App info Reset app preferences then tap Reset apps Resetting application preferences does not delete any application data from your device To clear application data 1 Find and tap Sett...

Страница 60: ...Set time 4 Select the relevant values for the hour and minute 5 Tap OK To set the time zone 1 Find and tap Settings Date time 2 Disable the Automatic time zone function by tapping the slider 3 Tap Select time zone 4 Select an option Enhancing the sound output You can enhance the sound of your device by manually enabling individual sound settings such as Equaliser and Surround sound You can enable ...

Страница 61: ...pers and general settings They also get separate access to applications and memory storage for files such as music and photos You can add up to seven regular user accounts on your device To add a regular user account 1 Make sure you are logged in as the owner that is the user who set up the device for the first time 2 Find and tap Settings Users accounts Users Add user 3 Tap OK The new account is ...

Страница 62: ...ers drag the status bar downwards using two fingers then tap 2 Tap the icon representing the user account that you want to switch to The lock screen for that user account appears When you switch to the guest account tap Start again if you want to wipe the previous session or tap Yes continue to continue the previous session Settings for multiple user accounts There are three different types of set...

Страница 63: ... Delete For more information about SwiftKey go to https swiftkey com To display the on screen keyboard to enter text Tap a text entry field To use the on screen keyboard in landscape orientation When the on screen keyboard is displayed turn the device sideways You may need to adjust the settings in some applications to enable landscape orientation To enter text character by character 1 To enter a ...

Страница 64: ... can select cut copy and paste text as you write You can access the editing options by double tapping the entered text The editing options then become available via an application bar Application bar The following actions are available on the selected text Cut Copy Paste Share Select all The Paste option only appears when you have text saved on the clipboard To select text 1 Double tap a word to h...

Страница 65: ...lete 3 Dialpad 4 Call button To open the dialpad 1 Find and tap 2 If the dialpad does not appear tap To dial a phone number 1 Find and tap 2 If the call log appears tap to display the dialpad 3 Enter the phone number and tap 4 Dual SIM users select a SIM card if prompted To make a call using smart dial 1 Find and tap 2 If the call log appears tap to display the dialpad 3 Use the dialpad to enter l...

Страница 66: ...tification that is in a minimised window that floats at the top of whatever screen is open For Dual SIM devices SIM1 or SIM2 indicates which SIM card the call is for When the notification arrives you can choose to answer the call and open the phone application screen or you can reject the call and stay on the current screen To answer a call when the screen is inactive When a call comes in swipe up...

Страница 67: ...ge used to reject a call 1 Find and tap 2 Tap Settings 3 Dual SIM users tap Calling accounts and select a SIM card Single SIM users tap Calls 4 Tap Reject call with message 5 Tap the message that you want to edit then make the necessary changes 6 Tap OK Forwarding calls You can direct calls to a different recipient for example to another phone number or another device If you are using a Dual SIM d...

Страница 68: ... you and from sending you messages Select from stored numbers or type in a number yourself To block a stored number 1 Find and tap 2 Touch and hold the number you want to block 3 Tap Block number then tap BLOCK Calls and texts from this number are blocked To block a number by typing the number 1 Find and tap 2 Tap Settings Call Blocking Add a number 3 Enter the phone number you want to block then ...

Страница 69: ... add a plus sign and the country code before a contact s phone number you do not have to edit the number again when you make calls from abroad To edit a contact 1 Find and tap 2 Tap the contact that you want to edit then tap 3 Edit the desired information 4 When you are finished tap SAVE Some synchronisation services do not allow you to edit contact details To add or remove a contact picture 1 Fin...

Страница 70: ...re your contacts 4 Type a Label name then tap OK To delete a group label 1 Find and tap 2 Tap then tap the label you want to delete 3 Tap then tap Delete label Transferring contacts There are several ways to transfer contacts to your new device You can sync contacts from an online account or import contacts directly from another device If you sync the contacts in your old device with an online acc...

Страница 71: ...ion turned on and that your device is set to visible 2 When you are notified of an incoming file to your device drag the status bar downwards and tap the notification to accept the file transfer 3 Tap Accept to start the file transfer 4 Drag the status bar downwards When the transfer is complete tap the notification 5 Tap the received file and select where to store your contacts To import contacts...

Страница 72: ...n tap Export 6 Select an option then tap OK To export all contacts to internal storage 1 Find and tap 2 Tap Settings Export to SD card or internal storage vcf file 3 Tap Show internal storage 4 Tap then tap your device s model number beside 5 Select a destination folder or simply tap SAVE 72 This is an internet version of this publication Print only for private use ...

Страница 73: ...ending on the operator and the language you use The maximum size of a multimedia message which includes the size of added media files is also operator dependent Contact your network operator for more information Messaging overview 1 Go back to the list of conversations 2 Call the message sender 3 View more options 4 Sent and received messages 5 Send a completed message 6 Add attachments 73 This is...

Страница 74: ...Find and tap 2 Tap the conversation containing the desired message 3 Dual SIM users tap to select the SIM card you wish to use 4 Touch and hold the desired message then tap 5 Select a recent contact from the list or tap NEW MESSAGE and enter the recipient s name or phone number then select from the suggestions that appear If the recipient is not listed as a contact enter the recipient s number man...

Страница 75: ...e the Duo application To use the video chat application find and tap Setting up email Use the email application on your device to send and receive email messages through your email accounts You can have one or several email accounts at the same time including corporate Microsoft Exchange ActiveSync accounts To set up an email account 1 Find and tap 2 Follow the instructions that appear on the scre...

Страница 76: ...upport sonymobile com global en xperia companion The Music application may not support all music file formats Listening to music Use the Music application to listen to your favourite music and audio books Music player overview 1 Minimise the full screen player 2 Search all songs saved to your device 3 View the play queue 4 View menu options 5 Album art if available 6 Add or remove a song as a favo...

Страница 77: ...r the content you wish to use To find song related information online While a song is playing in the Music application tap the album art in the music player screen and then tap More about this Online resources related to the song can include videos on YouTube song lyrics and artist information on Wikipedia To edit music information and download album art 1 While a song is playing in the Music appl...

Страница 78: ...s favourites You must connect a wired headset or headphones to your device before you can use the radio This is because the headset or headphones act as an antenna After one of these devices is connected you can then switch the audio to the speaker if desired FM radio overview 1 Favourites list 2 Radio on off button 3 View menu options 4 Tuned frequency 5 Save or remove a channel as a favourite 6 ...

Страница 79: ... Drag the frequency band left or right Alternatively tap the arrows on either side of the band to jump to the next clear radio signal To start a new search for radio channels 1 When the radio is open tap 2 Tap Search for channels The radio scans the whole frequency band and marks all available channels To switch the radio sound to the speaker 1 When the radio is open press 2 Tap Play in speaker To...

Страница 80: ...se the self timer when you need extra time to prepare or to avoid blurred photos Check your device s memory status often High resolution photos and videos consume more memory Read more about Xperia Camera Photography To launch the camera Press the camera key fully down swipe from the lock screen or tap from the Application screen Capturing modes Your camera is equipped with four capturing modes Tw...

Страница 81: ...cord a video 1 When using the camera swipe the screen to select 2 Press the camera key or tap the shutter button to start or stop recording The maximum recording time is 6 hours To launch the camera and take a photo at the same time 1 When using the camera tap then tap More Quick launch Launch and capture 2 Close the settings menu and exit the camera The setting is saved for all capturing modes 3 ...

Страница 82: ...he shutter button to take a photo A series of beeps marks the countdown until the photo is taken When using the front camera tap to set the Self timer Shutter button The shutter button is used differently depending on the capturing mode and activated features Shutter button overview Take a photo Record a video Resume recording Pause a video Stop recording a video Slow motion Self timer is activate...

Страница 83: ...ust before sunrise and at sunset Natural light from a window is also good For higher quality photos in low light you need to keep the camera steady You can place the camera on a solid surface and use the self timer Even if light conditions are poor try to take photos with and without the flash Sometimes the quality is better without the flash To use the flash 1 When using the camera tap the flash ...

Страница 84: ...4 Press the camera key or tap the shutter button to take a photo This setting is only available in Manual mode Shutter speed Shutter speed refers to how long the shutter is open and the camera sensor is exposed to light A fast shutter speed helps to freeze motion while a slow shutter speed can create an effect called motion blur where moving objects appear blurred along their line of motion The sh...

Страница 85: ...deo slider to enable the function 3 Close the settings menu The setting is saved 4 Press the camera key or tap the shutter button to take a photo This setting is only available in Manual and Video modes White balance In Superior auto and Video modes white balance adjustments are automatic You can adjust the white balance manually in Manual mode To adjust the white balance 1 When using the camera t...

Страница 86: ...at the face is neither too dark nor too bright Centre Determines the centre of the image and sets the exposure based on the brightness of the object Spot Adjusts the exposure for a very small part of the object Touch Allows you to touch the screen to determine the object or area where exposure should be optimised Setting the right focus The camera automatically sets the focus and detects faces in ...

Страница 87: ...to fit more into your shot Taking photos and videos of people Consider the camera orientation Use portrait for close up photos to fill the frame Use landscape for close up group photos or to capture an object in the background Place the camera on a solid surface and use the self timer to prevent blurred photos To focus on another face Before taking a photo or recording a video tap one of the frame...

Страница 88: ...and steady the frame Capturing moving objects Try not to follow the object Instead find a position where the object has to pass in front of you Consider changing the exposure to a faster shutter speed or a higher ISO to freeze motion To track an object 1 When using the main camera tap 2 Tap More and tap the Object tracking slider to enable 3 Close the settings menu The setting is saved 4 Select an...

Страница 89: ...ng the camera swipe the screen to select 2 Tap and select a scene 3 Press the camera key or tap the shutter button to take a photo or record a video Panorama Use the Panorama app to take wide angle and panoramic photos To take a panoramic photo 1 When using the camera swipe the screen to select 2 Tap 3 Press the camera key or tap the shutter button 4 Move the camera slowly and steadily in the dire...

Страница 90: ...in thumbnail view 4 Scroll through the thumbnails and select the photo that you want to save then tap Resolution and memory The number of photos and videos you can store depends on the resolution or MP megapixel value used and video length High resolution photos and videos take up more memory so keep in mind that a lower resolution can be suitable for everyday use Check the memory status from time...

Страница 91: ...tos that you want to view on widescreen displays Video resolutions HD refers to High Definition while fps refers to Frames Per Second A higher fps rate provides a smoother video at the cost of a larger file size The aspect ratio is the relationship between the width and the height where the width is the first number Main camera Full HD 30 fps 1920 1080 16 9 Full HD format with 30 fps and 16 9 aspe...

Страница 92: ...t of your camera 1 Make sure you are connected to the internet When using the camera tap 2 Tap More 3 Tap Help and select Camera Front camera Flash or Camera button 4 Follow the instructions that appear on your screen Additional camera settings Geotagging You can save your photos and videos with the location where they were taken this is called geotagging The option to geotag your photos and video...

Страница 93: ... with the front camera a preview appears in the lower right corner of the screen for three seconds before it is saved Off No preview appears The photo is saved directly Different ways to use the volume key You can change the way you use the volume key To change how the volume key is used 1 When using the camera tap 2 Tap More Use Volume key as and select an option The setting is saved Volume key s...

Страница 94: ...To view photos and videos 1 Find and tap Album 2 Tap a photo or video that you want to view If prompted tap 3 Flick left to view the next photo or video Flick right to view the previous photo or video The Album application may not support all file formats You can set the screen to rotate automatically when your device is turned sideways To enable or disable this feature find and tap Settings Displ...

Страница 95: ...up or down Album home screen menu From the Album home screen menu you can browse your photo albums including photos and videos taken using special effects as well as content that you have shared online via services such as Picasa and Facebook Once you are logged in to such platforms you can manage content and view online images From the Album application you can also add geotags to photos perform ...

Страница 96: ...and tap the photo or video that you want to share 2 Tap the screen to display the toolbars then tap 3 Tap the application that you want to use to share the photo then follow the steps to send it To use a photo as a contact picture 1 When you are viewing a photo tap the screen to display the toolbars then tap Use as contact photo 2 Select a contact then edit the photo as desired 3 Tap SAVE To use a...

Страница 97: ...creen to display the toolbars then tap 3 Tap Hide OK To view your hidden photos and videos 1 In Album tap then tap Hidden 2 Tap a photo or video to view it 3 Flick left to view the next photo or video Flick right to view the previous photo or video To unhide a photo or video 1 In Album tap then tap Hidden 2 Tap a photo or video that you want to unhide 3 Tap the screen to display the toolbars then ...

Страница 98: ...een mirroring by tapping the notification in the status bar of your device Drag the status bar downwards and tap Disconnect then tap OK Connecting your device to USB accessories You can use a USB Type C host adapter to connect your device to USB accessories such as USB mass storage devices game controllers USB keyboards and USB mice If the USB accessory has a USB Type C connector a USB Type C host...

Страница 99: ... the receiving device and displayed on its screen To share a music file with another device using NFC 1 Make sure that both your device and the receiving device have the NFC function turned on and that both screens are active and unlocked 2 To open the Music application find and tap 3 Select a music category and browse to the track you want to share 4 Tap the track to play it You can then tap to p...

Страница 100: ...eive additional information such as a web address For example it can scan embedded tags on a poster on a billboard advertisement or beside a product in a retail store To scan an NFC tag 1 Make sure that your device has the NFC function turned on and that the screen is active and unlocked 2 Place your device over the tag so that the NFC detection area touches it Your device scans the tag and displa...

Страница 101: ...t time you connect to a previously paired Bluetooth device Some Bluetooth devices for example most Bluetooth headsets require you to both pair and connect with the other device You can pair your device with several Bluetooth devices but you can only connect to one Bluetooth profile at the same time To pair your device with another Bluetooth device 1 Make sure that the device you want to pair with ...

Страница 102: ...pted 9 Accept the incoming item on the receiving device To receive items using Bluetooth 1 Make sure that the Bluetooth function is on and is visible to other Bluetooth devices 2 The sending device now starts sending data to your device 3 If prompted enter the same passcode on both devices or confirm the suggested passcode 4 When you are notified of an incoming file to your device drag the status ...

Страница 103: ...e to pay for goods without reaching for your real wallet and manage all payment services in one place When making a payment remember to turn on the NFC function before you touch your device to a card reader For more information about NFC see Near Field Communication NFC on page 98 Mobile payment services may not be available in your region For Dual SIM devices NFC initiated payments are only suppo...

Страница 104: ...ation for a more accurate experience To activate Commute actions 1 Find and tap Settings Assist Xperia Actions 2 Tap Commute 3 Tap the time interval Select the time interval you want to edit or tap to add a new time interval Select the desired days and time then tap DONE 4 Tap then tap and mark the checkboxes as desired 5 Tap Save 6 Tap the sliders to enable or disable the functions You can also a...

Страница 105: ...tus bar 1 Access settings select a view type and the calendars that you want to view 2 Access an overview of the current month 3 Return to the current date 4 Access other options 5 Scroll up or down to browse the calendar 6 Add a calendar entry To learn more about Calendar When the Calendar application is open tap then find and tap Help feedback Clock You can set one or several alarms and use any ...

Страница 106: ...sounds tap SNOOZE To turn off an alarm when it sounds Drag the slider to turn off the alarm To turn off a snoozed alarm you can drag down the status bar to open the Notification panel and then tap Dismiss To edit an existing alarm 1 Find and tap Clock then tap for the alarm that you want to edit 2 Tap Edit time and select the desired values then tap OK 3 Tap MORE SETTINGS to customize your alarm 4...

Страница 107: ...slider for Volume increase 3 Tap SAVE To set a recurring alarm 1 Find and tap Clock then tap for the alarm that you want to edit 2 Tap the Repeat checkbox 3 Mark the relevant days as desired To select the alarm type for an alarm 1 Find and tap Clock then tap for the alarm that you want to edit 2 Tap MORE SETTINGS Alarm type then select an option 3 Tap SAVE To set the side keys behaviour 1 Find and...

Страница 108: ... size by tapping the scale Display size You can use the Display size setting to increase or decrease all elements on your screen not just text To set Display size 1 Find and tap Settings Accessibility 2 Tap Display size and then set the desired display size by tapping the scale Colour correction The Colour correction setting adjusts how colours are displayed on the screen for users who are colour ...

Страница 109: ...nd right audio channels get played back simultaneously when playing audio Using Mono instead of Stereo playback is most useful for users with certain types of hearing loss or for safety reasons for example when you need to listen to your surroundings To enable or disable Mono audio 1 Find and tap Settings Accessibility 2 Tap the slider beside Mono audio to enable or disable this function Switch Ac...

Страница 110: ...r device fails to turn on or you want to reset your device s software you can use Xperia Companion to repair your device For more information on using Xperia Companion see Xperia Companion on page 39 If you are sharing a device with multiple users you may need to log in as the owner that is the primary user to reset your device to its original factory settings To restart your device Your device ma...

Страница 111: ...y settings you may need to enter them in order to restart the device after a software repair If your device seems to have frozen restarts repeatedly or doesn t start at all after you ve updated the Xperia software or after you ve performed a software repair or a factory data reset try forcing the device to shut down then try turning it back on If the problem still exists force the device to shut d...

Страница 112: ...uality of any additional content or any other third party content Under no circumstances will Sony be liable in any way for your improper use of additional content or other third party content This product is licensed under the MPEG 4 visual and AVC patent portfolio licences for the personal and non commercial use of a consumer for i encoding video in compliance with the MPEG 4 visual standard MPE...

Отзывы: