background image

14

GB

2

Press HOME, then touch the Android Auto 
icon.

The Android Auto interface will be displayed full-
screen on the display of the unit. Touch and 
control the applications.

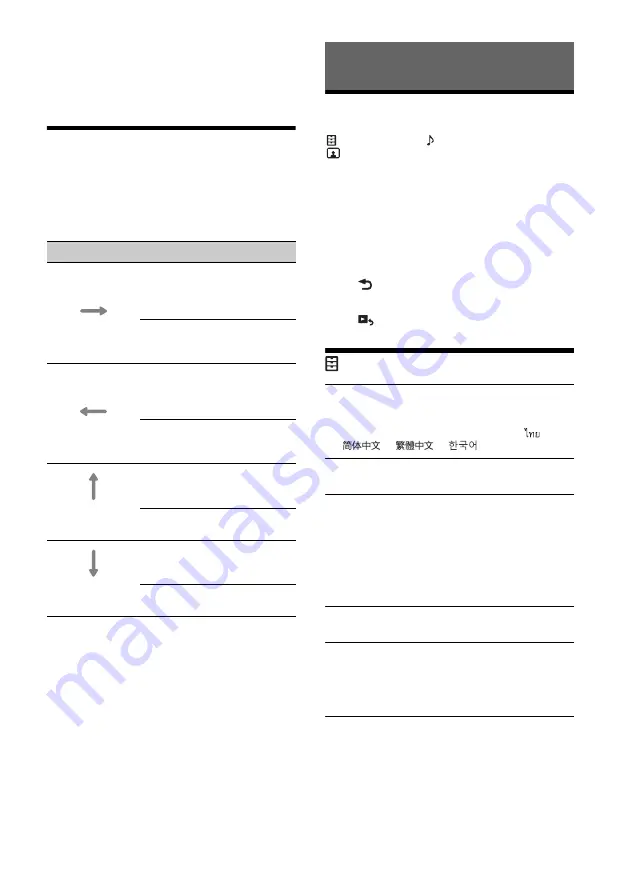
Using Gesture Command

You can perform frequently-used operations by 
swiping your finger on the reception/playback 
display.

Note

The gesture commands explained below are not available 
on the screens of Apple CarPlay and Android Auto.

Basic Setting Operation

You can set items in the following setup categories:

 General Settings, 

 Sound Settings, 

 Visual Settings

1

Press HOME, then touch [Settings].

2

Touch one of the setup category icons.

The items that can be set differ depending on 
the source and settings.

3

Move the scrollbar up and down to select 
the desired item.

To return to the previous display

Touch .

To switch to the playback screen

Touch .

General Settings

Language

Selects the display language: [English], 
[Español], [Français], [Deutsch], [Italiano], 
[Nederlands], [Português], [Русский], [

], 

[

], [

], [

].

Demo

Activates the demonstration: [OFF], [ON].

Date/Time

Date Format

Selects the format: [DD/MM/YY], [MM/DD/YY], 
[YY/MM/DD].

Time Format

Selects the format: [12-hour], [24-hour].

Set Date/Time

Sets the date and clock time manually.

Beep

Activates the operation sound: [OFF], [ON].

Dimmer

Dims the display: [OFF], [Auto], [ON].
([Auto] is available only when the illumination 
control lead is connected and works when the 
head light is turned on.)

Dimmer Level

Adjusts the brightness level when the dimmer is 
activated: –5 to +5.

Do this

To

Swipe left to right

Radio reception:


seek forward stations.
(The same as pressing and 
holding 

.)

Video/audio playback:


skip forward a file/track.
(The same as 

.)

Swipe right to left

Radio reception:


seek backward stations.
(The same as pressing and 
holding 

.)

Video/audio playback:


skip backward a file/track.
(The same as 

.)

Swipe upwards

Radio reception:


receive stored stations (go 
forward).

USB video/USB audio playback: 

move to the next folder.

Swipe downwards

Radio reception:


receive stored stations (go 
backward).

USB video/USB audio playback: 

move to the previous folder.

Settings

Содержание XAV-AX205DB

Страница 1: ...ge 27 Para cancelar la pantalla de demostración Demostración consulte la página 17 Para la conexión instalación consulte la página 30 Per annullare la dimostrazione Dimostrazione vedere a pagina 17 Per l installazione e i collegamenti consultare pagina 30 Operating Instructions GB Manual de instrucciones ES Istruzioni per l uso IT ...

Страница 2: ...mpliance in Europe should be sent to the manufacturer s authorized representative Sony Belgium bijkantoor van Sony Europe Limited Da Vincilaan 7 D1 1935 Zaventem Belgium Disposal of waste batteries and electrical and electronic equipment applicable in the European Union and other countries with separate collection systems This symbol on the product the battery or on the packaging indicates that th...

Страница 3: ...as well as user programmed function which cannot guarantee connection under all conditions Therefore do not rely solely upon any electronic device for essential communications such as medical emergencies On BLUETOOTH communication Microwaves emitting from a BLUETOOTH device may affect the operation of electronic medical devices Turn off this unit and other BLUETOOTH devices in the following locati...

Страница 4: ...OTH Device 11 Searching and Playing Tracks 11 Other Settings During Playback 12 Handsfree Calling Receiving a Call 12 Making a Call 12 Available Operations During a Call 13 Useful Functions Apple CarPlay 13 Android Auto 13 Using Gesture Command 14 Settings Basic Setting Operation 14 General Settings 14 Sound Settings 15 Visual Settings 16 Additional Information Updating the Firmware 17 Precautions...

Страница 5: ...volume control dial disc eject Receptor for the remote commander Volume control dial Rotate to adjust the volume when the sound is output OPTION Press to open the OPTION screen page 6 VOICE Press and hold to activate the voice command function for Apple CarPlay and Android Auto Display touch panel Disc slot previous next Move to the previous next item Press and hold to fast reverse fast forward Re...

Страница 6: ...itor off Turn off the monitor When the monitor is turned off touch any part of the display to turn it back on Screen displays Lights up when the sound is attenuated Lights up when AF Alternative Frequencies is available Lights up when the current traffic information TA Traffic Announcement is available Lights up when a DAB announcement is available Indicates the signal strength status of the DAB t...

Страница 7: ... of this unit otherwise a loud sound may result When connecting a BLUETOOTH device for the first time mutual registration called pairing is required Pairing enables this unit and other devices to recognize each other 1 Place the BLUETOOTH device within 1 m 3 ft of this unit 2 Press HOME then touch Settings 3 Touch 4 Touch Bluetooth Connection then set the signal to ON The BLUETOOTH signal is turne...

Страница 8: ...onal cameras to the CAMERA IN terminals you can display pictures from the cameras For details see Connection Installation page 27 To display pictures from the cameras Press HOME touch Camera then touch 1 2 or Rear Listening to the Radio To listen to the radio press HOME then touch Tuner Reception controls indications Current band Change the band FM or AM Current frequency program service name RDS ...

Страница 9: ...ncements will automatically interrupt the currently selected source ListeningtotheDAB DAB Radio To listen to the DAB DAB radio press HOME then touch DAB Tips Set Antenna Power to ON default or OFF depending on the type of DAB antenna aerial not supplied page 10 When DAB is selected for the first time after performing the factory reset the auto tune starts automatically Allow the auto tune to finis...

Страница 10: ...ion name PTY type of the station etc Antenna Power Supplies power to the DAB antenna aerial input terminal ON OFF Playing a Disc Depending on the disc type some operations may be different or restricted 1 Insert the disc label side up Playback starts automatically If a DVD menu appears Touch the desired item in the DVD menu You can also use the menu control panel which can be displayed by touching...

Страница 11: ...ess HOME then touch USB Playback starts To remove the device Turn the unit off or turn the ignition switch to the ACC off position then remove the USB device Playing a BLUETOOTH Device You can play contents on a connected device that supports BLUETOOTH A2DP Advanced Audio Distribution Profile 1 Make a BLUETOOTH connection with the audio device page 8 2 Press HOME then touch BT Audio 3 Operate the ...

Страница 12: ...inal size Captions Enlarges the picture horizontally while fitting captions in the screen DVD Audio Level Adjust the audio output level between 8 and 8 for a DVD recorded in Dolby Digital format to balance the volume level between discs Available only when DVD is played To use a cellular phone connect it with this unit For details see Preparing a BLUETOOTH Device page 7 Note The handsfree calling ...

Страница 13: ...iOS 7 1 or later is required Update to the latest iOS version before use Apple CarPlay can be used on iPhone 5 or later For details on compatible models refer to the compatibility list on the support site on the back cover For details about Apple CarPlay refer to the manual supplied with your iPhone or visit the website of Apple CarPlay Since the GPS on your iPhone is used place your iPhone where ...

Страница 14: ... Deutsch Italiano Nederlands Português Русский Demo Activates the demonstration OFF ON Date Time Date Format Selects the format DD MM YY MM DD YY YY MM DD Time Format Selects the format 12 hour 24 hour Set Date Time Sets the date and clock time manually Beep Activates the operation sound OFF ON Dimmer Dims the display OFF Auto ON Auto is available only when the illumination control lead is connect...

Страница 15: ...ontrol cannot be used even though some functions have already been registered Use the buttons on the unit If an error occurs while registering all the registered information is cleared Restart registration from the beginning This function may not be available on some vehicles For details on the compatibility of your vehicle visit the support site on the back cover Bluetooth Connection Activates th...

Страница 16: ...or the soundtrack English Chinese German French Italian Spanish Portuguese Dutch Danish Swedish Finnish Norwegian Russian Other Available only when no source is selected DVD Subtitle Language Selects the default subtitle language for DVD English Chinese German French Italian Spanish Portuguese Dutch Danish Swedish Finnish Norwegian Russian Other Available only when no source is selected Output Col...

Страница 17: ...ovement of the car Notice on license This product contains software that Sony uses under a licensing agreement with the owner of its copyright We are obligated to announce the contents of the agreement to customers under requirement by the owner of copyright for the software For details on software licenses see page 15 Notice on GNU GPL LGPL applied software This product contains software that is ...

Страница 18: ...tection technologies do not conform to the Compact Disc CD standard therefore these discs may not be playable by this unit Discs that this unit CANNOT play Discs with labels stickers or sticky tape or paper attached Doing so may cause a malfunction or may ruin the disc Discs with non standard shapes e g heart square star Attempting to do so may damage the unit 8 cm 3 1 4 in discs WMA wma 1 2 Bit r...

Страница 19: ...Operating Instructions consult your nearest Sony dealer Specifications Monitor section Display type Wide LCD color monitor Dimensions 6 4 in System TFT active matrix Number of pixels 1 152 000 pixels 800 3 RGB 480 Color system PAL NTSC SECAM PAL M automatic select for CAMERA IN terminal Tuner section DAB DAB Tuning range 174 928 MHz 239 200 MHz Antenna aerial terminal External antenna aerial conne...

Страница 20: ...bject to change without notice Region code The region system is used to protect software copyrights The region code is located on the bottom of the unit and only DVDs labeled with an identical region code can be played on this unit DVDs labeled can also be played If you try to play any other DVD the message Disc playback prohibited by region code will appear on the monitor screen Depending on the ...

Отзывы: