background image

13

GB

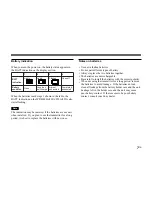
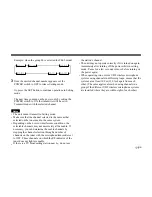
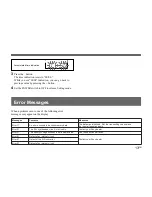
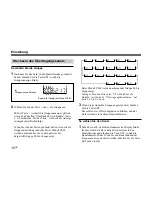
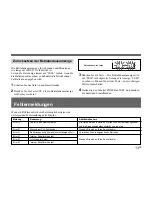
Accumulated time indication

3

Press the – button.
The time indication resets to “00:00.”
While you see “00:00” indication, you can go back to
previous value by pressing the + button.

4

Set the POWER switch to OFF to release Setting mode.

Error Messages

When a problem occurs, one of the following error
messages may appear on the display.

s

e

g

a

s

s

e

M

s

t

n

e

t

n

o

C

s

e

r

u

s

a

e

M

1

1

r

o

r

r

E

.

a

t

a

d

y

r

o

m

e

m

p

u

k

c

a

b

n

i

d

e

r

r

u

c

c

o

r

o

r

r

e

n

A

d

n

a

l

e

n

n

a

h

c

g

n

i

t

t

i

m

s

n

a

r

t

e

h

t

t

e

S

.

d

e

z

il

a

i

t

i

n

i

s

a

w

a

t

a

d

e

h

T

.

n

i

a

g

a

n

o

i

t

a

u

n

e

t

t

a

t

u

p

n

i

e

h

t

1

2

r

o

r

r

E

.

e

l

b

u

o

r

t

n

i

s

i

t

i

u

c

r

i

c

d

e

z

i

s

e

h

t

n

y

s

L

L

P

e

h

T

.

r

e

l

a

e

d

y

n

o

S

r

u

o

y

t

c

a

t

n

o

C

1

3

r

o

r

r

E

.

e

u

l

a

v

e

l

b

a

w

o

ll

a

e

h

t

s

d

e

e

c

x

e

e

g

a

t

l

o

v

y

r

e

t

t

a

b

e

h

T

.

s

e

i

r

e

t

t

a

b

d

e

i

f

i

c

e

p

s

e

h

t

e

s

U

1

4

r

o

r

r

E

t

i

u

c

r

i

c

l

a

n

r

e

t

n

i

n

a

f

o

t

c

e

f

e

D

.

r

e

l

a

e

d

y

n

o

S

r

u

o

y

t

c

a

t

n

o

C

1

5

r

o

r

r

E

r

e

t

r

e

v

n

o

c

D

/

A

e

h

t

f

o

t

c

e

f

e

D

1

6

r

o

r

r

E

t

i

u

c

r

i

c

l

a

n

r

e

t

n

i

n

a

f

o

t

c

e

f

e

D

Содержание WRT-822A

Страница 1: ...2A UHF Synthesized Transmitter Operating Instructions Bedienungsanleitung Manual de instrucciones Wireless Channel Lists Übertragungskanallisten Listas de canales inalámbricos page Seite página L 1 1999 by Sony Corporation CE62 CE69 ...

Страница 2: ......

Страница 3: ...ace the unit on or near heat sources such as lighting equipment power amplifiers or in a place subject to direct sunlight or excessive moisture In such places the external finish or internal parts of the unit may be damaged If the unit is used in a very humid or dusty place or in a place subject to an active gas clean its surface as well as the connectors with a dry soft cloth soon after use Lengt...

Страница 4: ...In building a UHF wireless microphone system be sure to combine a microphone transmitter and a tuner having the same TV channel number CE62 model A 14 MHz frequency band is assigned to the WRT 822A CE62 model permitting it to operate on any of 111 carrier frequencies in 125 kHz steps of Sony original channel plan or 561 carrier frequencies in 25 kHz steps of German User Groups in the range of TV c...

Страница 5: ... safely replace batteries of the transmitter When the WRR 800A 801A 805A 850A receives the information the LED and the LCD on the panel start flashing Operation powered by easily available batteries The built in high efficiency DC DC converter allows stable operation for about 8 hours continuously with two LR6 size AA alkaline batteries LCD for coordinated operation control The built in CPU contro...

Страница 6: ...er microphone The transmitter is compatible with Sony lavalier microphones including the ECM 77BC RF carrier with tone signal The unit transmits the RF carrier accompanied by a tone signal enabling the tuner with a tone squelch circuit to take out only the target audio signal received Wide dynamic range and low noise The compander compressor expander system enables transmission over a wide dynamic...

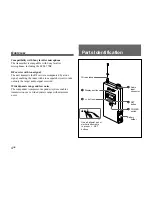
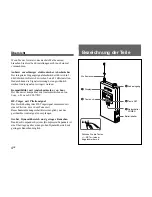
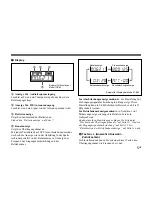
Страница 7: ...for CE62 model Attenuation indication Accumulated time indication Display example for CE62 model Frequency indication A B C D In Attenuation indication mode it displays the input attenuation setting in dB which can be changed in a range of 0 to 21 dB in 3 dB steps In Accumulated time indication mode it displays the accumulated time of battery use in one minute increments For adjustments see Changi...

Страница 8: ... attenuation or resetting the time of use indication in Setting mode see Settings on page 9 5 POWER switch Turns the power of the transmitter ON or OFF When you set this switch to ON without holding any other button the transmitter is set to normal Transmit mode and transmits the signal of the selected channel When you set this switch to ON while holding the SET button down Setting mode is initiat...

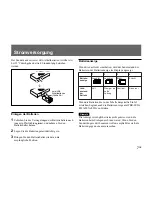
Страница 9: ...ypes of battery Always replace the two batteries together The batteries are not rechargeable Be careful to install the batteries with the correct polarity When not using the transmitter for a long period remove the batteries to avoid leakage If the batteries do leak clean all leakage from the battery holder case and the unit Leakage left in the holder case and the unit may cause poor battery conta...

Страница 10: ...ch pair of transmitters For details of operation with two or more channels refer to the Operating Instructions for the WRR 800A 801A 805A 820A 840A 850A 855A 860A Ensure that the tuners set to channels not being used are either turned off or set to the minimum output level When powering the transmitter on or off to keep the noise to a minimum set the audio output level from the tuner or mixer to a...

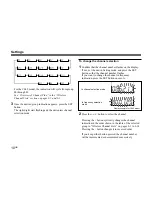
Страница 11: ...e the transmitter was previously turned OFF flashes on the display section Each time you press the SET button the setting items are cyclically switched as shown below Changing the Transmitting Channel To change the group selection 1 After setting the unit in Setting mode press the SET button so that the group indication flashes 2 Press the or button to select the group Pressing the button cyclical...

Страница 12: ...ble of the selected group in Wireless Channel Lists on pages L 1 to L 14 Pressing the button changes it in reversed order If you keep either button pressed the channel number will be incremented or decremented successively Display example for CE62 model Settings In channel selection mode In frequency selection mode For the CE69 model the indication will cycle from group 00 through H See Overview o...

Страница 13: ...y you can determine the usable channels by stepping the channel selection through a number of channels on the tuner with the microphone transmitter set to OFF Those channels on which the RF indicator of the tuner does not light are usable If there is a TV broadcasting station near by do not use the station s channel The unit may not operate correctly if it is turned on again immediately after turn...

Страница 14: ...n to continue operations in Setting mode The next time you turn on the power only by setting the POWER switch to ON the transmitter will be set to Transmit mode with the selected attenuation setting Changing in Transmit mode You can also change the input attenuation level during transmission 1 If the attenuation level is not displayed press the SET button until the attenuation level indication app...

Страница 15: ...r e n A d n a l e n n a h c g n i t t i m s n a r t e h t t e S d e z i l a i t i n i s a w a t a d e h T n i a g a n o i t a u n e t t a t u p n i e h t 1 2 r o r r E e l b u o r t n i s i t i u c r i c d e z i s e h t n y s L L P e h T r e l a e d y n o S r u o y t c a t n o C 1 3 r o r r E e u l a v e l b a w o l l a e h t s d e e c x e e g a t l o v y r e t t a b e h T s e i r e t t a b d e i ...

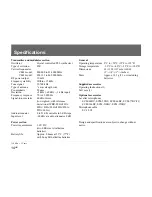
Страница 16: ...o attenuator 0 to 21 dB variable in 3 dB steps Input level 60 dBv at audio attenuator 0 dB Power section Power requirements 3 0 V DC two LR6 size AA alkaline batteries Battery life Approx 8 hours at 25 C 77 F with Sony LR6 alkaline batteries General Operating temperature 0 C to 50 C 32 F to 122 F Storage temperature 30 C to 60 C 22 F to 140 F Dimensions 63 103 17 mm w h d 21 2 41 8 11 16 inches Ma...

Страница 17: ...n Tuch Die Lebensdauer des Geräts kann sich verkürzen wenn Sie das Gerät längere Zeit an solchen Orten benutzen oder es anschließend nicht reinigen Verwenden Sie zum Reinigen des Geräts auf keinen Fall organische Lösungsmittel wie Verdünner oder Benzin Diese könnten die Oberfläche des Geräts angreifen Das Gerät wurde werkseitig präzise eingestellt Nehmen Sie an den Bauteilen keine Änderungen vor u...

Страница 18: ...ny Kanalgruppen Modell CE69 auf Seite L 13 Gruppen für allgem Verwendung in Großbritannien auf Seite L 14 Der Sender WRT 822A ist für ein schnurloses Mikrofonsystem mit Frequenz Synthesizer im 800 MHz UHF Band für vielfältige Einsatzzwecke konzipiert Weitere Systemkomponenten sind das schnurlose UHF Synthesizer Mikrofon WRT 800A 810A 830A 867A der UHF Synthesizer Sender WRT 822A 860A die UHF Anten...

Страница 19: ...d an den WRR 800A 801A 805A 850A gesendet so daß ausreichend Zeit bleibt die Batterien des Senders auszutauschen Wenn die Informationen am WRR 800A 801A 805A 850A eingehen beginnen die LED und die LCD Anzeige am Bedienfeld zu blinken Betrieb mit überall erhältlichen Batterien Dank des integrierten DC DC Wandlers mit hohem Wirkungsgrad kann der Sender mit zwei LR6 Alkalibatterien Größe AA durchgehe...

Страница 20: ...krofon von Sony Der Sender ist kompatibel mit Ansteckmikrofonen von Sony z B dem ECM 77BC HF Träger mit Pilottonsignal Das Gerät überträgt das HF Trägersignal zusammen mit einem Pilotton der es dem Tuner mit Rauschunterdrückungsschaltkreis ermöglicht nur das gewünschte Audiosignal zu empfangen Großer Dynamikbereich und geringes Rauschen Dank des Kompander Systems Kompressor Expander ist eine Übert...

Страница 21: ...der Abbildung in der Spalte rechts dargestellt von der Kanalanzeige zur Anzeige der Frequenz der Eingangsabschwächung und der Betriebsdauer Im Abschwächungsanzeigemodus wird die Einstellung für die Eingangssignalabschwächung in dB angezeigt Diese Einstellung kann in 3 dB Schritten im Bereich von 0 bis 21 dB geändert werden Im Betriebsdaueranzeigemodus wird in Schritten von 1 Minute angezeigt wie l...

Страница 22: ...ite 5 dargestellt Im Einstellmodus wählen Sie mit dieser Taste die einzustellende Option aus Um in den Einstellmodus zu wechseln halten Sie diese Taste gedrückt und stellen den Schalter POWER auf ON Wie Sie den Übertragungskanal oder die Eingangssignalabschwächung einstellen oder im Einstellmodus die Betriebsdaueranzeige zurücksetzen erfahren Sie unter Einstellung auf Seite 9 5 Netzschalter POWER ...

Страница 23: ...uszutauschen zwei LR6 Alkalibatterien Größe AA Der Sender kann mit zwei LR6 Alkalibatterien Größe AA bei 25 C durchgehend etwa 8 Stunden lang betrieben werden Stromversorgung Einlegen der Batterien 1 Schieben Sie die Verriegelungen des Batteriehalters nach innen in Pfeilrichtung b B und nehmen Sie den Batteriehalter heraus 2 Legen Sie die Batterien polaritätsrichtig ein 3 Bringen Sie den Batterieh...

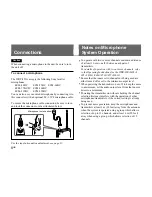
Страница 24: ...tteriefach bzw im Gerät zurückbleibt kann sich der Batteriekontakt verschlechtern Wenden Sie sich bei schlechtem Batteriekontakt an Ihren Sony Händler Anschlüsse Vorsicht Schalten Sie das Gerät aus bevor Sie ein Mikrofon daran anschließen So schließen Sie ein Mikrofon an An den WRT 822A können Sie folgende Ansteckmikrofone von Sony anschließen ECM 44BC ECM 55BC ECM 66BC ECM 77BC FC ECM 166BC ECM 3...

Страница 25: ...r einschalten ohne zuvor die Kanalwahl zu überprüfen kann der Betrieb anderer Mikrofone Sender mit derselben Einstellung gestört werden Zum Vermeiden von Störrauschen halten Sie Mikrofone und Sender mindestens 3 m von den Antennen entfernt wenn das System mit einer Gruppe betrieben wird bei der bis zu 11 Kanäle ausgewählt werden können Achten Sie auf eine Entfernung von mindestens 6 m bei einer Gr...

Страница 26: ...dargestellt Gruppe 00 bis 63 angezeigt Einstellung Beispiel für Display bei Modell CE62 Im Gruppenauswahlmodus Beim Modell CE69 werden nacheinander Gruppe 00 bis H angezeigt Schlagen Sie dazu bitte unter Überblick über die Kanäle im Abschnitt Übertragungskanallisten auf Seite L 1 bis L 2 nach 3 Wenn die gewünschte Gruppe angezeigt wird drücken Sie die Taste SET Die rechten vier Ziffern beginnen zu...

Страница 27: ... der geeigneten Kanäle nacheinander mehrere Kanäle am Tuner ein während das Mikrofon der Sender auf OFF gestellt sind Geeignet sind die Kanäle bei denen die HF Anzeige am Tuner nicht leuchtet Befindet sich in der Nähe eine Fernsehsendeanstalt verwenden Sie nicht den Kanal dieser Sendeanstalt Das Gerät arbeitet möglicherweise nicht korrekt wenn es nach dem Ausschalten im Einstellmodus unmittelbar w...

Страница 28: ...zeige für den Abschwächungspegel im Display erscheint 3 Wählen Sie mit der Taste oder den Abschwächungspegel aus Wenn Sie eine der Tasten gedrückt halten wird der Pegel schnell erhöht oder verringert 4 Wenn der gewünschte Pegel erscheint stellen Sie den Schalter POWER auf OFF und beenden damit den Einstellmodus Oder drücken Sie die Taste SET um im Einstellmodus fortzufahren Wenn Sie das Gerät das ...

Страница 29: ...nnen Sie mit der Taste zum vorherigen Wert zurückschalten 4 Stellen Sie den Schalter POWER auf OFF und beenden Sie damit den Einstellmodus Wenn ein Problem auftritt erscheint möglicherweise eine der folgenden Fehlermeldungen im Display Fehlermeldungen Meldung Bedeutung Abhilfemaßnahme Error 11 Fehler in den Speicherdaten Die Daten wurden initialisiert Stellen Sie den Übertragungskanal und die Eing...

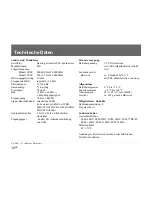
Страница 30: ...die dem technischen Fortschritt dienen bleiben vorbehalten Technische Daten Sender und Modulator Oszillator Quartz gesteuerter PLL Synthesizer Modulationsart F3E Trägerfrequenzen Modell CE62 800 000 bis 814 000 MHz Modell CE69 854 125 bis 862 000 MHz HF Ausgangsleistung 10 mW Frequenzstabilität innerhalb 15 kHz Pilottonsignal 32 768 kHz Antennentyp λ 4 Leitung Preemphase 50 µSek Hub 5 kHz 60 dBv 1...

Страница 31: ...ndiciones o sin limpiarla después de utilizarla en tales situaciones puede acortar su longevidad Para limpiar la unidad nunca utilice solventes orgánicos como diluyentes o bencina ya que pueden dañar el acabado La unidad ha sido ajustada con precisión en fábrica No debe tocar o tratar de reparar sus componentes internos ES Precauciones 1 Descripción general 2 Banda de canales de transmisión 2 Cara...

Страница 32: ...or Para componer un sistema de micrófono inalámbrico de UHF cerciórese de combinar un micrófono transmisor y un sintonizador que posean el mismo número de canal de TV El modelo CE62 Se asigna una banda de frecuencias de 14 MHz al modelo WRT 822A CE62 lo cual le permite funcionar con cualquiera de las 111 frecuencias portadoras en incrementos de 125 kHz del plan original de canales de Sony o las 56...

Страница 33: ...a remota en el sintonizador Este transmisor posee la capacidad de transmitir información sobre el estado de la pila al WRR 800A 801A 805A 850A para ofrecerle un aviso anticipado del agotamiento de la pila La información se envía al WRR 800A 801A 805A 850A aproximadamente una hora antes del agotamiento de las pilas del transmisor para que éstas puedan sustituirse de forma segura Cuando el WRR 800A ...

Страница 34: ...dor de nivel de entrada incorporado podrá ajustarse dentro de un margen de 0 a 21 dB en incrementos de 3 dB Esto reducirá la distorsión de la señal cuando se reciba una señal de entrada de audio excesivamente intensa Compatibilidad con el micrófono tipo corbata de Sony El transmisor es compatible con los micrófonos de tipo corbata de Sony incluido el ECM 77BC Portadora de RF con señal de tono La u...

Страница 35: ...odelo CE62 Indicación de atenuación Indicación de tiempo acumulado de utilización Ejemplo del visualizador del modelo CE62 Indicación de frecuencia A B C D En el modo de indicación de atenuación muestra el ajuste de atenuación de entrada en dB que podrá cambiarse dentro de un margen de 0 a 21 dB en incrementos de 3 dB En el modo de indicación del tiempo acumulado de utilización muestra el tiempo a...

Страница 36: ... tal como se muestra en la página 5 En el modo de ajustes esta tecla permite seleccionar el elemento que se desee ajustar Para activar el modo de ajuste ponga el interruptor POWER en ON manteniendo pulsada esta tecla Para ajustar el canal de transmisión y la atenuación de entrada o restaurar la indicación de tiempo de utilización en el modo de ajustes consulte Ajustes en la página 9 5 Interruptor ...

Страница 37: ...os de pilas Siempre sustituya ambas pilas a la vez Las pilas no son recargables Dos pilas alcalinas LR6 AA Fuente de alimentación El transmisor puede funcionar con dos pilas alcalinas tipo LR6 AA de forma continua durante aproximadamente 8 horas a 25 C 77 F Instalación de las pilas 1 Deslice hacia dentro los enganches de cierre del portapilas en el sentido de la flecha b B para extraer el portapil...

Страница 38: ... de alimentación Conexiones Precaución Al conectar un micrófono a la unidad asegúrese de apagar ésta Para conectar un micrófono El WRT 822A acepta los siguientes micrófonos tipo corbata de Sony ECM 44BC ECM 55BC ECM 66BC ECM 77BC FC ECM 166BC ECM 310BC ECM 350BC También puede utilizar un micrófono con cable conectándolo a este conector con un cable de micrófono EC 1 5CF opcional Para asegurar la c...

Страница 39: ...comprobar primero la selección de canales puede producir interferencias con la operación de otros micrófonos transmisores si la selección actual ya se está utilizando Para evitar que se genere ruido mantenga los micrófonos y transmisores separados de las antenas al menos 3 m 10 pies cuando el sistema funcione mediante el empleo de un grupo que permita la selección de hasta 11 canales y 6 m 20 pies...

Страница 40: ...ET para que parpadee el número de canal Ajustes Cambio del canal de transmisión Para cambiar la selección de grupo 1 Después de entrar en el modo de ajuste pulse la tecla SET para que parpadee la indicación de grupo 2 Pulse la tecla o para seleccionar el grupo Al pulsar la tecla la indicación de grupo cambiará cíclicamente en el orden mostrado en las tablas de Descripción general del plan de canal...

Страница 41: ...n con el canal seleccionado Notas La unidad no puede transmitir en el modo de ajuste Asegúrese de que el canal seleccionado sea el mismo que se haya seleccionado en el sintonizador utilizado en el mismo sistema Según las condiciones de ruido o interferencias es posible que los canales seleccionables no estén utilizables Si es necesario puede determinar cuáles son los canales utilizables pasando po...

Страница 42: ...ecla o para seleccionar el nivel de atenuación Si mantiene pulsada cualquiera de estas teclas el nivel aumentará o disminuirá de forma sucesiva 4 Una vez que aparezca el nivel que desee ponga el interruptor POWER en OFF para desactivar el modo de ajuste O bien pulse la tecla SET para continuar con las operaciones en el modo de ajuste La próxima vez que conecte la alimentación poniendo el interrupt...

Страница 43: ...o con su proveedor Sony Error 61 Defecto de un circuito interno Mensajes de error Restaure la indicación a 00 00 siempre que sustituya las pilas para que pueda mostrar el tiempo de funcionamiento de éstas 1 Ponga la unidad en el modo de ajuste 2 Pulse la tecla SET hasta que aparezca en el visualizador la indicación de tiempo acumulado de utilización 3 Pulse la tecla La indicación de tiempo vuelve ...

Страница 44: ...enuador de audio 0 a 21 dB variable en intervalos de 3 dB Nivel de entrada 60 dBv con el atenuador de audio a 0 dB Sección de alimentación Requisitos de alimentación 3 0 V CC dos pilas alcalinas de tipo LR6 AA Duración de las pilas Aprox 8 horas a 25 C 77 F con pilas alcalinas Sony LR6 Generales Temperatura de funcionamiento 0 C a 50 C 32 F a 122 F Temperatura de almacenamiento 30 C a 60 C 22 F a ...

Страница 45: ... 02 03 04 oder 13 auszuwählen Bei diesen Gruppen erzielen Sie eine außerordentliche Leistung ohne gegenseitige Interferenzen durch andere schnurlose Mikrofonsender von Sony in der ausgewählten Gruppe vorausgesetzt die empfohlenen Betriebsbedingungen werden eingehalten Bei den übrigen Gruppen gelten die Frequenzbestimmungen in verschiedenen Ländern und ein interferenzfreier Betrieb kann nicht immer...

Страница 46: ...11 241 320 Model Modell Modelo CE62 User group Benutzer gruppe Grupo de usuarios Sony German 3 Deutsch 3 Alemán 3 Group indication Gruppen anzeige Indicación de grupo 00 01 02 03 04 13 62A 62B 62C 62D 62E 63A 63B 63C 63D 63E 62 63 Frequency grid Frequenz raster ID de frecuencia 125 kHz Sony Sony original channel groups Sony Kanalgruppen Grupos de canales originales de Sony German German User Group...

Страница 47: ...enz MHz Frecuencia 62 17 62 18 62 19 62 20 62 21 62 22 62 23 62 24 62 25 62 26 62 27 62 28 62 29 62 30 62 31 62 32 62 33 62 34 62 35 62 36 62 37 62 38 62 39 62 40 62 41 62 42 62 43 62 44 62 45 62 46 62 47 62 48 62 49 62 50 62 51 62 52 62 53 62 54 62 55 62 56 62 57 62 58 62 59 62 60 62 61 62 62 62 63 800 125 800 250 800 375 800 500 800 625 800 750 800 875 801 000 801 125 801 250 801 375 801 500 801...

Страница 48: ...3 39 63 40 63 41 63 42 63 43 63 44 63 45 63 46 63 47 63 48 63 49 63 50 63 51 63 52 63 53 63 54 63 55 63 56 63 57 63 58 63 59 63 60 63 61 63 62 63 63 806 000 806 125 806 250 806 375 806 500 806 625 806 750 806 875 807 000 807 125 807 250 807 375 807 500 807 625 807 750 807 875 808 000 808 125 808 250 808 375 808 500 808 625 808 750 808 875 809 000 809 125 809 250 809 375 809 500 809 625 809 750 809...

Страница 49: ...quenz MHz Frecuencia 62 20 800 500 62 22 800 750 62 25 801 125 62 29 801 625 62 35 802 375 62 47 803 875 63 06 806 750 63 27 809 375 63 43 811 375 63 60 813 500 Group 01 Gruppe 01 Grupo 01 8 channel group 8 Kanal Gruppe Grupo de 8 canales Group 02 Gruppe 02 Grupo 02 9 channel group 9 Kanal Gruppe Grupo de 9 canales Group 04 Gruppe 04 Grupo 04 10 channel group 10 Kanal Gruppe Grupo de 10 canales Gr...

Страница 50: ...entre canales 25 kHz GP CH indication example GP CH Anzeige Beispiel Indicación GP CH ejemplo 62A 04 Group 62A Gruppe 62A Grupo 62A 7 channel group 7 Kanal Gruppe Grupo de 7 canales Group 62B Gruppe 62B Grupo 62B 8 channel group 8 Kanal Gruppe Grupo de 8 canales WL Channel WL Kanal Canal WL Frequency Frequenz MHz Frecuencia 62 A04 800 325 62 A05 800 900 62 A06 801 725 62 A07 802 825 62 A08 803 350...

Страница 51: ...zeige Beispiel Indicación GP CH ejemplo 62E 02 WL Channel WL Kanal Canal WL Frequency Frequenz MHz Frecuencia Group 62E Gruppe 62E Grupo 62E 10 channel group 10 Kanal Gruppe Grupo de 10 canales 62 E02 800 525 62 E03 801 100 62 E04 801 425 62 E05 801 975 62 E06 802 575 62 E07 803 050 62 E08 803 700 62 E09 804 800 62 E10 805 050 62 E11 805 775 WL Channel WL Kanal Canal WL Frequency Frequenz MHz Frec...

Страница 52: ...00 62 081 800 025 62 082 800 050 62 083 800 075 62 084 800 100 62 085 800 125 62 086 800 150 62 087 800 175 62 088 800 200 62 089 800 225 62 090 800 250 62 091 800 275 62 092 800 300 62 093 800 325 62 094 800 350 62 095 800 375 62 096 800 400 62 097 800 425 62 098 800 450 62 099 800 475 62 100 800 500 62 101 800 525 62 102 800 550 62 103 800 575 62 104 800 600 62 105 800 625 62 106 800 650 62 107 ...

Страница 53: ...WL Channel WL Kanal Canal WL Frequency Frequenz MHz Frecuencia WL Channel WL Kanal Canal WL Frequency Frequenz MHz Frecuencia WL Channel WL Kanal Canal WL Frequency Frequenz MHz Frecuencia WL Channel WL Kanal Canal WL Frequency Frequenz MHz Frecuencia 62 256 804 400 62 257 804 425 62 258 804 450 62 259 804 475 62 260 804 500 62 261 804 525 62 262 804 550 62 263 804 575 62 264 804 600 62 265 804 62...

Страница 54: ...87 808 175 63 088 808 200 63 089 808 225 63 090 808 250 63 091 808 275 63 092 808 300 63 093 808 325 63 094 808 350 63 095 808 375 63 096 808 400 63 097 808 425 63 098 808 450 63 099 808 475 63 100 808 500 63 101 808 525 63 102 808 550 63 103 808 575 63 104 808 600 63 105 808 625 63 106 808 650 63 107 808 675 63 108 808 700 63 109 808 725 63 110 808 750 63 111 808 775 63 112 808 800 63 113 808 825...

Страница 55: ...811 500 63 221 811 525 63 222 811 550 63 223 811 575 63 224 811 600 63 225 811 625 63 226 811 650 63 227 811 675 63 228 811 700 63 229 811 725 63 230 811 750 63 231 811 775 63 232 811 800 63 233 811 825 63 234 811 850 63 235 811 875 63 236 811 900 63 237 811 925 63 238 811 950 63 239 811 975 63 240 812 000 63 241 812 025 63 242 812 050 63 243 812 075 63 244 812 100 63 245 812 125 63 246 812 150 63...

Страница 56: ...75 63 284 813 100 63 285 813 125 63 286 813 150 63 287 813 175 63 288 813 200 63 289 813 225 63 290 813 250 63 291 813 275 63 292 813 300 63 293 813 325 63 294 813 350 63 295 813 375 63 296 813 400 63 297 813 425 63 298 813 450 WL Channel WL Kanal Canal WL Frequency Frequenz MHz Frecuencia WL Channel WL Kanal Canal WL Frequency Frequenz MHz Frecuencia WL Channel WL Kanal Canal WL Frequency Frequen...

Страница 57: ...4 250 69 03 854 375 69 04 854 500 69 05 854 625 69 06 854 750 69 07 854 875 69 08 855 000 69 09 855 125 69 10 855 250 69 11 855 375 69 12 855 500 69 13 855 625 69 14 855 750 69 15 855 875 69 16 856 000 69 17 856 125 69 18 856 250 69 19 856 375 69 20 856 500 69 21 856 625 69 22 856 750 69 23 856 875 69 24 857 000 69 25 857 125 69 26 857 250 69 27 857 375 69 28 857 500 69 29 857 625 69 30 857 750 69...

Страница 58: ...p 7 Kanal Gruppe Grupo de 7 canales UG 08 858 200 UG 09 858 650 UG 10 860 400 UG 11 860 900 UG 12 861 200 UG 13 861 550 UG 14 861 750 WL Channel WL Kanal Canal WL Frequency Frequenz MHz Frecuencia Group L Gruppe L Grupo L 7 channel group 7 Kanal Gruppe Grupo de 7 canales UG 01 854 900 UG 02 855 275 UG 03 855 900 UG 04 856 175 UG 05 856 575 UG 06 857 625 UG 07 857 950 WL Channel WL Kanal Canal WL F...

Страница 59: ...Inst A5 1 2A CE 3 866 667 21 1 99 01 ...

Страница 60: ... CE 3 866 667 21 1 99 01 oration Pri ...

Отзывы: