background image

59

ES

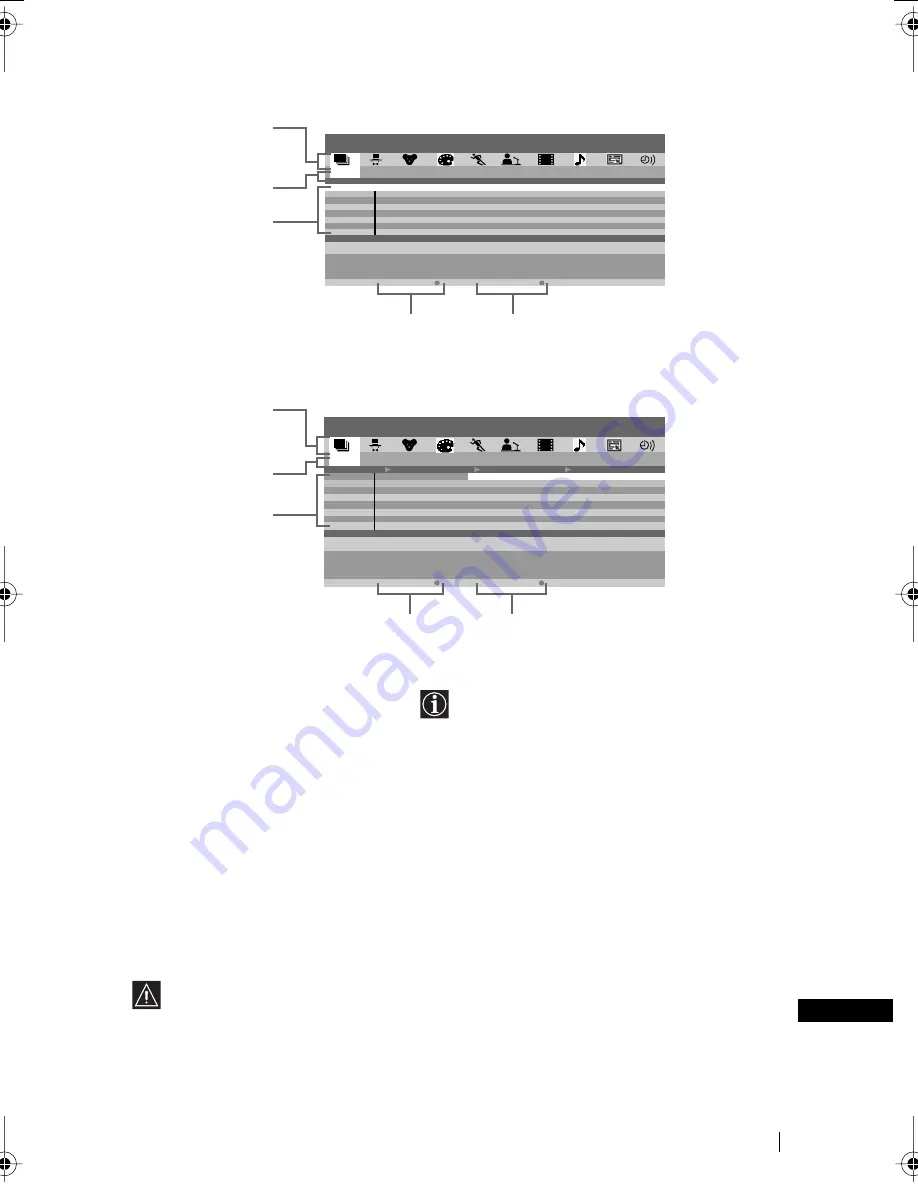
Presentación tipo “Listado de Programas” (fig. 1):

Presentación tipo “Parrilla” (fig. 2):

1

Iconos para diferentes 
temas 

(consulte “Leyenda 

de iconos” en la página 
siguiente)

4

 Grabar 

Esta función solamente está disponible si el 
televisor está conectado a un aparato de vídeo 
que disponga de las funciones  SmartLink   y 
programación mediante temporizador.

Si desea grabar el programa seleccionado, pulse el 

botón rojo en el mando a distancia.

2

Fecha

3

Listado de programas 

5

 Recordar 

Si desea que el televisor le advierta de cuándo se va a 
emitir el programa que ha seleccionado, pulse el botón 
verde en el mando a distancia. A la hora prevista para 
la emisión del programa, aparecerá en la pantalla un 
mensaje recordándole que el programa está a punto de 
ser emitido.

• Las opciones “grabar” y “recordar” se mostrarán en la pantalla del televisor en el 

momento en que se seleccione un programa, pero no aparecerán en el caso de que esté 
viendo el servicio NexTView en un canal de televisión que no tenga su propio servicio 
de NexTView.

• Las opciones “recordar” y “grabar” no estarán disponibles si el programa que usted ha 

seleccionado ya ha comenzado.

4

5

1

2

3

01
L u n

T V 1
T V 2
T V 3
T V 4
T V 5
T V 6
T V 7
T V 8

00 : 30
01 : 30
05 : 30
06 : 30
07 : 30
08 : 30
09 : 30
10 : 30

S o n g s     f r o m     t h e     s h o w s
We a t h e r     f o r e c a s t     i n f o r m a t i
A 1     n e w s     m a g a z i n e
A r t s     s h o w
O c l o c k     n e w s
We a t h e r     f o r e c a s t     i n f o r m a t i
A 1     n e w s     m a g a z i n e
A r t s     s h o w

0 2
Mar

0 3
Mie

0 4
Jue

0 5
Vie

0 6
S a b

07
D o m

      7  : 07  : 01

S o n g s     f r o m     t h e     s h o w s
T V 1     0 0 : 3 0   -  01 : 3 0     Th u r s d a y       0 4
P r o g r a m m e   d e s c r i p t i on

g r a b a r

r e c o r d a r

01

T V 1
T V 2
T V 3
T V 4
T V 5
T V 6
T V 7
T V 8

0 2

0 3

0 4

0 5

0 6

07

      9  : 15  : 0 3

9   :   0 0

    9   :   3 0


10   :   0 0

M a g a z i n e

|   S o n g s   f r o m   t h e   s h o w s

W e a t h e r     F o r e c a s t     |   M i k e ' s   s h o w

E u r o n e w s       |   F a n t a s y   f i l m       |     S t a r   W a r s

H o m e   S h o p p i n g   E u r o p e     |     E u r o   S p o r t s  

N e w s   |   A r t s   s h o w         |     M a g a z i n e

L a r r y   K i n g ' s   l i v e     |     E u r o   S p o r t s  

E u r o   m a g a z i n e                  |     E u r o   S p o r t s

H o m e   S h o p p i n g   E u r o p e     |     E u r o n e w s

S o n g s     f r o m     t h e     s h o w s
T V 1     0 0 : 3 0   -  01 : 3 0     Th u r s d a y       0 4
P r o g r a m m e   d e s c r i p t i on

L u n

Mar

Mie

Jue

Vie

S a b

D o m

g r a b a r

r e c o r d a r

1

2

3

4

5

NexTView

(continúa)

03ESKE42MR1.fm  Page 59  Saturday, October 19, 2002  10:37 AM

Содержание WEGA KE-42MR1

Страница 1: ...4 093 114 11 1 Flat Panel Colour TV KE 42MR1 KE 50MR1 2002 Sony Corporation Operating Instructions Bedienungsanleitung Manual de instrucciones Mode d emploi GB DE ES FR ...

Страница 2: ...riate plug fitted in accordance with the following instructions The wires in this mains lead are coloured in accordance with the following code Blue Neutral Brown Live As the colours of the wires in the mains lead of this apparatus may not correspond with the coloured markings identifying the terminals in your plug proceed as follows The wire which is coloured blue must be connected to the termina...

Страница 3: ...rol 19 Connecting the Display Unit to the Media Receiver Unit 20 Connecting the Aerial and VCR 22 First Time Operation Switching On the TV and Tuning the TV Automatically 23 Menu System Introducing and Using the Menu System 26 Picture Adjustment 26 Sound Adjustment 28 Screen Control 30 Features 33 Set Up 37 Timer 41 Unit Status 44 Memory Stick About a Memory Stick 45 Inserting and Removing a Memor...

Страница 4: ...7 NexTView NexTView 58 Additional Information Connecting Optional Equipment 61 Using Optional Equipment 65 Remote Control Configuration for VCR DVD 66 Specifications 68 Troubleshooting 71 Television Channel Number Guide for United Kingdom 76 ...

Страница 5: ...edical equipment is in use It may cause malfunction of medical instruments For the display unit Installation Installation of the display unit on the wall should be carried out by qualified servicemen Improper installation may render the unit unsafe in the event of an earthquake etc Carrying Carrying the display unit requires two or more people If you carry the display unit in a manner other than t...

Страница 6: ...his unit in a vehicle Bumping of the vehicle may cause the set to fall down and cause injury Do not hang this unit from the ceiling Ships and other vessels Do not install this unit in a ship or vessel If the unit is exposed to seawater it may cause fire or damage the unit Water and moisture Do not use this unit near water for example near a bathtub or shower room Also do not expose to rain It may ...

Страница 7: ... a stable level surface so as not to block the inlets at the bottom of the media receiver unit Media receiver box Top view Never place the media receiver unit in a confined space It may cause overheating and result in fire or damage the unit To ensure reliable operation of the unit leave enough space for ventilation by the exhaust fan 30cm 10cm 10cm 10cm Leave at least this much space 30cm 10cm 10...

Страница 8: ...d result in fire Contact your electrician to have the mains socket changed Wiring Unplug the mains lead when wiring cables Be sure to unplug the mains lead for your safety when hooking up Moisture Do not touch the mains lead with a wet hand If you plug unplug the mains lead with a wet hand it may cause electric shock Cleaning Clean the mains plug regularly If the plug is covered with dust and it p...

Страница 9: ...rsonnel only Moisture and flammable objects Do not let this set get wet Never spill liquid of any kind on the set If any liquid or solid object does fall through do not operate the set It may result in electric shock or damage to the set Have it checked immediately by qualified personnel To prevent fire keep inflammable objects or naked lights e g candles away from the set For the media receiver u...

Страница 10: ...ions Corrosion If you use this set near the seashore salt may corrode metal parts of the unit and cause internal damage or fire It may also shorten the life of the unit Steps should be taken to reduce the humidity and temperature of the area where the set is located Accessories Secure the display unit properly If the display unit is not secured properly it may fall and cause injury Take measures t...

Страница 11: ...structions when disconnecting the display cable If the mains lead or display cable is damaged stop using it and ask your dealer or Sony service centre to exchange it When not in use For environmental and safety reasons it is recommended that the set is switched off when not in use not left in standby mode Disconnect from the mains Cable wiring Take care not to catch your feet on the cables It may ...

Страница 12: ...ull the plug from the mains On volume adjustment Adjust the volume so as not to trouble neighbours Sound carries very easily at night time Therefore closing the windows or using headphones is suggested When using headphones adjust the volume so as to avoid excessive levels as hearing damage may result On image retention If the following images are displayed for an extended period time image retent...

Страница 13: ...as possible Clean the screen with the supplied cleaning cloth or a soft cloth lightly moistened with a mild detergent solution Never use any type of abrasive pad scouring powder or solvent such as alcohol or benzine This type of contact may result in damage to the screen surface On cleaning the cabinet Be sure to unplug the mains lead connected to the media receiver unit from the mains before clea...

Страница 14: ... these mains leads with safety earth if you use the set in the United Kingdom See NOTICE FOR CUSTOMERS IN THE UNITED KINGDOM on page 2 when using the mains leads These mains leads may not be supplied depending on the country Two Mains Leads Type C 5 Use these mains leads with safety earth if you use the set in the Swiss Confederation These mains leads may not be supplied depending on the country D...

Страница 15: ... regarding the timers refer to Timer on page 41 PICTURE OFF indicator Lights up in blue when you press picture off on the remote control to switch off the picture Only the picture is switched off the sound remains unchanged If the TV is connected to a personal computer or video graphic board that is DPMS Display Power Management System compliant the TV will automatically reduce power consumption P...

Страница 16: ...t button TV mode button Input select indicators To watch the picture of connected equipment press repeatedly until the correct input indicator lights up For more details refer to Using Optional Equipment on page 65 TV indicator 1 Input 1 indicator 2 Input 2 indicator 3 Input 3 indicator 4 Input 4 indicator 5 Input 5 indicator 6 Input 6 indicator PC PC indicator MEMORY Memory Stick indicator STICK ...

Страница 17: ...this button to select channels For double digit programme numbers enter the second digit within 2 5 seconds Buttons Description 6 6 6 6 a If the Media Selector is switched to TV Press this button to watch the last channel selected the last channel watched for at least 5 seconds b If the Media Selector is switched to VCR For Sony s VCR double digit programme numbers e g 23 press first and then the ...

Страница 18: ... channel b If the Media Selector is set to VCR or DVD Using these buttons you can control the main functions of your VCR or DVD NexTView For more details refer to NexTView on page 58 ª ª ª ª Selecting Teletext Press this button to switch on Teletext º º º º Media Selector With this remote control you can operate not only this TV but also the main functions of your VCR or DVD Switch on the equipmen...

Страница 19: ...lation GB Inserting Batteries into the Remote Control Make sure you insert the supplied batteries observing the correct polarity Always remember to dispose of used batteries in an environmentally friendly way m ...

Страница 20: ...ed mains lead for the display unit Type C 4 Type BF or Type C 5 see page 14 1 Connect the supplied display interface cable and the supplied mains lead for the display unit to the display unit Do not connect to the mains before all connections are completed BLACK WHITE DISPLAY SIGNAL IN SONY EXCLUSIVE CABLE ONLY AC IN continued ...

Страница 21: ...e installation instructions of your wall mount bracket or stand 4 Connect the supplied display interface cable to the media receiver unit AC IN Power supply input jack of the display unit Mains plug holder supplied Mains lead supplied b Clip on the AC IN jack until you hear clicking a Attach the mains plug holder supplied to the mains lead 1 R D D D 5 5 L G S I Y CTRL S CENTRE SPEAKER IN 180W 6 MA...

Страница 22: ... I Y CTRL S CENTRE SPEAKER IN 180W 6 MAX PB CB PR CR SMARTLINK SMARTLINK AV MOUSE W G W G L G S I R D D D 2 3 4 DISPLAY SIGNAL OUT BLACK WHITE AC IN OUT IN For more details regarding VCR connection refer to Connecting Optional Equipment on page 61 Do not connect to the mains before all connections are complete VCR Connect the supplied coaxial cable Connect the supplied mains lead Type C 4 Type BF ...

Страница 23: ...e display unit and media receiver unit to the mains 100 240V AC 50 60Hz for the display unit 220 240V AC 50 60Hz for the media receiver unit 2 The first time that the TV set is connected it is usually turned on If the TV is off press the Power switch on the media receiver unit to turn on the TV The first time you switch on the TV a Language menu appears automatically on the TV screen 3 Press or on...

Страница 24: ...arching and storing all available broadcast channels for you This procedure could take some minutes Please be patient and do not press any buttons otherwise automatic tuning will not be completed If no channels are found during the auto tuning process a new menu appears automatically on the screen asking you to connect the aerial Please connect the aerial see page 22 and press OK The auto tuning p...

Страница 25: ...nnel TV Broadcast you wish to rearrange then press b Press or to select the new programme number position for your selected channel TV Broadcast then press c Repeat steps B a and B b if you wish to change the order of the other channels 9 Press MENU to turn off the menu OK Programme Sorting Select channel 01 02 03 04 05 06 07 08 09 10 TVE TVE2 TV3 C33 C27 C58 S02 S06 S08 S12 Exit MENU Programme So...

Страница 26: ...ou want to alter press then press or repeatedly to adjust it This menu also allows you to customise the picture quality for the PC GAME and Personal modes based on the programme you are watching Mode Live for enhanced picture contrast and sharpness Standard for a picture with contrast to suit your room s lighting conditions Movie for a finely detailed picture PC GAME for a picture from a personal ...

Страница 27: ...pen the picture NR Noise Reduction Auto Off Low Middle High Select to reduce the noise level NR Noise Reduction cannot be adjusted for an RGB input signal connected to the PC connector a DTV signal connected to the Y PB CB PR CR jacks of 5 and the Memory Stick input DTV is the digital broadcast format in the United States e g digital tuner with RGB signal Dynamic Picture On Off Select to enhance t...

Страница 28: ...nd the double D symbol are trademarks of Dolby Laboratories Confidential unpublished works 1992 1997 Dolby Laboratories All rights reserved Treble Press or to decrease higher frequency sounds Press or to increase higher frequency sounds Bass Press or to decrease lower frequency sounds Press or to increase lower frequency sounds Balance Press or to emphasise the left speaker Press or to emphasise t...

Страница 29: ...s and the TV s speakers select Off i Volume Press or to turn the volume of headphones down Press or to turn the volume from headphones up If you set i Speaker Link to On i Volume cannot be adjusted i Dual Sound Select Dual Sound option of the headphones Mono Stereo For a stereo broadcast select Stereo or Mono Mono A B For a bilingual broadcast select A for sound channel 1 B for sound channel 2 or ...

Страница 30: ...p your preference Even if you have selected On or Off in the Auto Format option you can always modify the format of the screen by pressing repeatedly on the remote control Select Set End OK MENU Mode Contrast Brightness Colour Hue Sharpness NR Dynamic Picture Colour Tone Colour Correction Gamma Correction Reset Live 80 0 0 0 0 Auto On Cool On High Picture Adjustment Select Set End OK MENU Auto For...

Страница 31: ...formation 14 9 Compromise between 4 3 and 16 9 picture size Zoom Wide screen format for letterbox movies Wide For 16 9 broadcast If parts of the top and bottom of the screen are cut off press or to adjust the position of the image on the screen e g to read subtitles Screen Format cannot be adjusted for a HD signal connected to the Y PB CB PR CR jacks of 5 and the Memory Stick input Only 4 3 or Wid...

Страница 32: ... Shift Horizontal Shift can only be adjusted for an RGB input signal connected to the Scart Connector 1 2 or 4 When Screen Format is set to 4 3 or Wide V Size Vertical Size and V Shift Vertical Shift cannot be adjusted for the video input signal from connected equipment Adjust Pixel The Adjust Pixel option allows you to adjust the picture from RGB equipment To do this 1 After selecting the option ...

Страница 33: ...to select the desired output Main Sound of the TV is output through the TV s speakers Centre in When an external amplifier is connected to the TV s CENTRE SPEAKER IN terminals the centre speaker sound from the external amplifier is output through the TV s speakers Off Sound of the TV is not output through the TV s speakers Select Set End OK MENU Mode Contrast Brightness Colour Hue Sharpness NR Dyn...

Страница 34: ...mplifiers remote control to control the volume of the TV s speakers when an external amplifier is connected to the TV s audio output sockets To do this 1 After selecting the option press 2 Press or to select Variable if you wish to use the TV s remote control or Fix if you wish to use the external amplifier s remote control When you connect the AV mouse and install it on the external amplifier you...

Страница 35: ...nishes automatically after 30 minutes If image retention is still present repeat the above To cancel halfway press any buttons except the sound related buttons on the remote AV3 Output AV4 Output The AV3 Output and AV4 Output options allow you to select the source to be output from the Scart connectors 3 and 4 You can record from these Scarts any signal coming from the TV or from external equipmen...

Страница 36: ... connect the DVD recorder to both the Scart connector 4 and Y PB CB PR CR jacks of 5 To do this 1 After selecting the option press 2 Press or to select Auto or Manual Auto The signal from the DVD recorder is input via the Scart 4 Manual The signal from the DVD recorder is input via the Y PB CB PR CR jacks of 5 If the input signal from the DVD recorder is 576p signal format select this Menu Colour ...

Страница 37: ...ing On the TV and Tuning the TV Automatically on page 23 Programme Sorting The Programme Sorting option allows you to change the order in which the channels TV Broadcast appear on the screen To do this 1 After selecting the option press 2 Follow step 8 B of the section Switching On the TV and Tuning the TV Automatically on page 23 Select Set End OK MENU Mode Contrast Brightness Colour Hue Sharpnes...

Страница 38: ...Preset option allows you to designate a name to the external equipment you have connected to this TV To do this 1 After selecting the option press 2 Press or to select the input source you wish to name Then press 3 A label automatically appears in the label column a If you want to use one of the predefined labels CABLE GAME CAM DVD VIDEO or SAT press or to select the desired label b If you want to...

Страница 39: ...d S for cable channels or C for terrestrial channels then press After that press the number buttons to directly enter the channel number of the TV Broadcast If you do not know the channel number press or to search for it When you tune the desired channel press OK 8 Highlight the Confirm option and press OK Then press to select OK and finally press OK to store Repeat all the above steps to tune and...

Страница 40: ...er you want to skip 2 When the programme you want to skip appears on the screen select the Skip option and press 3 Press or to select Yes and press OK 4 Highlight the Confirm option and press OK Then press to select OK and finally press OK to store To cancel this function afterwards select No instead of Yes in the step above E View and record scrambled channels when using a decoder connected to th...

Страница 41: ...ng the TV you can press the button on the remote control to display the time remaining Clock Set The Clock Set option allows you to set the current time The error range of the built in clock is 30 seconds a month To do this 1 After selecting the option press 2 Press or to set the hour then press 3 Press or to set the minute then press 4 Press or to set the day of a week 5 Press OK at the time sign...

Страница 42: ...After the All White function finishes the off timer functions are resumed and the TV automatically enters the standby mode To do this 1 After selecting the option press 2 Highlight Timer and press or to select On then press 3 Press or to select On Time then press 4 Set the time for the TV to turn on itself automatically Press or to set the hour then press Next press or to set the minutes then pres...

Страница 43: ...you to set the TV to change to the standby mode automatically if there is no input signal through the connected equipment To do this 1 After selecting the option press 2 Press or to select On Auto Shutoff cannot be set when the TV receives the TV Broadcast signal ...

Страница 44: ...d for each display unit Box Serial No Serial number allocated for each media receiver unit Select Set End OK MENU Mode Contrast Brightness Colour Hue Sharpness NR Dynamic Picture Colour Tone Colour Correction Gamma Correction Reset Live 80 0 0 0 0 Auto On Cool On High Picture Adjustment Select End MENU Model Name Display Serial No Box Serial No KEñ50MR1 20000001 40000001 Unit Status m ...

Страница 45: ...till image extension jpg JPEG stands for Joint Photographic Experts Group which is the organization that implemented this format DCF stands for Design Rules for Camera file Systems which has specifications established by the Japan Electronic Industry Development Association JEIDA MPEG is one of the technology formats for compressing a moving image extension mpg Unsupported image types Still images...

Страница 46: ...ted data that requires the MagicGate copyright protection technology MagicGate Memory Stick Equipped with the MagicGate copyright protection technology Memory Stick ROM Stores pre recorded read only data You cannot record on Memory Stick ROM or erase the pre recorded data Types of Memory Stick compatible with the device You can use three types of Memory Stick general Memory Stick MagicGate Memory ...

Страница 47: ...nd drop or apply strong shock to Memory Stick Do not disassemble or modify Memory Stick Do not allow the Memory Stick get wet Do not use or keep the Memory Stick in a location that is subject to extremely high temperature such as in a car parked in the sun or on a radiator under direct sunlight high humidity or places with corrosive substance present When you carry or store a Memory Stick put it i...

Страница 48: ...tick may jump out Insert a Memory Stick in the Memory Stick slot as far as it can go with the b mark facing up as illustrated The Memory Stick access lamp flashes Be sure to insert the Memory Stick correctly If the Memory Stick is forced in the wrong way the Memory Stick or the slot may become damaged Insert only Memory Stick into the Memory Stick slot Attempting to insert other objects into the s...

Страница 49: ...Memory Stick again To switch the Memory Stick input you also press repeatedly until Memory Stick indicator on the media receiver unit lights up see page 16 OK PROG MENU TV VIDEO Memory Stick Slide Show Option Select Folder 100MSDCF Memory Stick Home Sel Back Set Enter No 1 1234 Size 1024x768 File SPJP0001 JPG Date 7 15 2002 12 34 Memory Stick Home mark Folder name for the selected folder Index of ...

Страница 50: ...ns Sort Sorts the image file according to the file name or the renewal date in the ascending descending order Filter Filters only the still images Still or the moving images Movie out from the content The Sort Filter functions can be activated only when Digital Camera Mode is set to Off Filter setting information is displayed in Memory Stick Home Memory Stick Displays the type the used capacity an...

Страница 51: ...displayed 1 Insert a Memory Stick that contains the images you want to view 2 Press Memory Stick The Memory Stick Home appears on the screen 3 Press or to highlight Select Folder and then press OK The Select Folder menu appears 4 Press to select the list of folders and press or to select one that you want to view Then press OK An index of thumbnail images of selected folder appears To select the f...

Страница 52: ...current selected folder Press until the next images display or press to select the slider and press An index of thumbnail images appears for every page The index menu of a thumbnail appears You can select any of the following options Press or to select the options and press OK Option Description Full Screen for a still image only Displays the still image on the full screen For more details refer t...

Страница 53: ...s and press OK You cannot rotate or delete the protected image You cannot rotate or delete the images on the Memory Stick if the write protect is set to LOCK If an image has been rotated it remains on the Memory Stick and is displayed this way again the next time Option Description Return Returns to Memory Stick Home Information Displays the information of the selected image file Protect Protects ...

Страница 54: ...Option Description N Play pause Plays back a moving image During playback the button display is changed to the X pause button When the playback is finished playback stops with the first image of the moving image displayed x Stop Stops playback Full Screen Displays a moving image on the full screen and starts playback automatically To return to the Movie Player press or OK The TV automatically disp...

Страница 55: ...If you want to the stop Slide Show do the following to return to Memory Stick Home When you set Advan Slds to Auto Press OK When you set Advan Slds to Manual Press OK to display the index menu then press or to select Return 1 Insert a Memory Stick that contains the images you want to view 2 Press Memory Stick The Memory Stick Home appears on the screen 3 Press or to highlight Select Folder then pr...

Страница 56: ...currently selected folder although Filter is set to Movie in the Option menu No still file No still picture files are contained in the currently selected folder although Filter is set to Still in the Option menu Cannot play Image data of a movie picture file is broken Memory Stick locked The erasure prevention switch on a Memory Stick is set to LOCK Release the lock Memory Stick error The Memory S...

Страница 57: ...eletext is an information service transmitted by most TV stations The index page of the teletext service usually page 100 gives you information on how to use the service To operate teletext use the remote control buttons as indicated below Make sure you use a channel TV Broadcast with a strong signal otherwise teletext errors may occur Fastext service lets you access pages with one push of a butto...

Страница 58: ...the indication NexTView in black is displayed on the screen Then press the on the remote control to watch the Overview interface see fig 2 on next page As soon as you enter the NexTView service the lower left corner of the screen will show the of NexView data available Once you have entered this service the of data will not increase 3 To navigate through NexTView Moving right or left press of Movi...

Страница 59: ...TV4 TV5 TV6 TV7 TV8 00 30 01 30 05 30 06 30 07 30 08 30 09 30 10 30 S o n g s f r o m t h e s h o w s We a t h e r f o re c a s t i n f o r m a t i A 1 n e w s m a g a z i n e A r t s s h o w O c l o ck n e w s We a t h e r f o re c a s t i n f o r m a t i A 1 n e w s m a g a z i n e A r t s s h o w 02 Tu e 03 Wed 04 Th u 05 Fr i 06 Sat 07 Sun 7 07 01 S o n g s f r o m t h e s h o w s T V 1 0 0 3 ...

Страница 60: ...han 8 broadcast channels you can select 8 of them to create a personal list After you have created your personal list the default list can be restored To restore it select Auto by pressing button on the remote control entertainment children remind list Shows you the list with all the programmes maximum 5 programmes that you have selected to be reminded about arts sports news movies music ...

Страница 61: ...of optional equipment to your TV set Connecting cables are not supplied 6 5 4 3 2 1 6 6 6 PC MEMORY STICK PROG PROG MENU PC OK L G S I R D D D 6 5 4 3 2 1 6 6 6 PC PROG PROG MENU PC OK L G S I R D D D MEMORY STICK S VHS Hi8 DVC camcorder i Headphones Personal computer To avoid a noisy picture donotconnect external equipment to connectors E and F at the same time continued ...

Страница 62: ...nt with the TV s remote control connect the CONTROL S IN jack of the equipment to the CONTROL S OUT jack of the TV with the CONTROL S cable 1 R D D D 5 5 L G S I Y CTRL S CENTRE SPEAKER IN 180W 6 MAX PB CB PR CR SMARTLINK SMARTLINK AV MOUSE W G W G L G S I R D D D 2 3 4 DISPLAY SIGNAL OUT BLACK WHITE AC IN 1 2 Compact AV System Amplifier Sub woofer SA WD100 Decoder PlayStation Hi Fi VCR Decoder DV...

Страница 63: ...rder to both the Scart connector 4 and Y PB CB PR CR jacks of 5 Select the Features menu and set AV4 Input Select to Manual page 36 Connecting to external Audio Equipment To listen to the sound from TV on Hi Fi equipment Connect your Hi Fi equipment to the audio output sockets J if you wish to amplify the audio output from TV Next using the menu system select the Features menu and set TV Speakers ...

Страница 64: ...atures menu and set TV Speakers to Centre in When connecting the AV mouse When you connect the AV mouse and install it in an external amplifier you can use the external amplifier s remote control toward the TV for controlling the volume level of the external amplifier Connect the AV mouse to the AV MOUSE IN jack O and install it right above the external amplifier s remote control sensor You can se...

Страница 65: ...or Input Signals 1 or 2 1 or 2 Audio video input signal through the Scart connector H 1 or 2 1 or 2 RGB input signal through the Scart connector H This symbol appears only if an RGB source has been connected 3 or 4 3 or 4 Audio video input signal through the Scart connector I or N 3 3 S Video input signal through the Scart connector I 4 4 RGB input signal through the Scart connector N This symbol ...

Страница 66: ...the TV position code numbers will not be stored 2 Before the green light goes out press and hold the yellow button for approximately 6 seconds until the green light starts flashing 3 Whilst the green light is flashing enter all three digits of the code for your brand see next page using the number buttons on the remote control If your selected code is entered correctly all three green lights will ...

Страница 67: ...358 355 360 361 320 351 KENWOOD 008 HITACHI 327 333 334 LG 015 014 JVC 314 315 322 344 352 353 LOEWE 009 028 023 024 016 003 354 348 349 MATSUI 013 016 LG 332 338 ONKYO 022 LOEWE 358 355 360 361 320 351 PANASONIC 018 027 020 002 MATSUI 356 357 PHILIPS 009 028 023 024 016 003 ORION 328 PIONEER 004 PANASONIC 321 323 SAMSUNG 011 014 PHILIPS 311 312 313 316 317 318 SANYO 007 358 359 SHARP 019 027 SAMS...

Страница 68: ...lay Panel TV system Depending on your country selection B G H D K L I Colour system PAL SECAM NTSC 3 58 4 43 only Video In Aerial 75 ohm external terminal for VHF UHF Channel Coverage VHF E2 E12 UHF E21 E69 CATV S1 S20 HYPER S21 S41 D K R1 R12 R21 R69 L F2 F10 B Q F21 F69 I UHF B21 B69 Rear Terminals 1 21 pin Scart connector CENELEC standard including audio video input RGB input TV audio video out...

Страница 69: ...essories supplied One Remote Control RM 972 Two size AAA batteries R03 type One Display Interface Cable One Coaxial Cable One AV Mouse Two Mains Leads Type C 4 Two Mains Leads Type BF Two Mains Leads Type C 5 Main leads Type BF and Type C 5 may not be supplied depending on the country One Cleaning cloth One Mains plug holder Other features Teletext Fastext TOPtext Sleep Timer Smartlink direct link...

Страница 70: ... 85 53 674 85 061 16 832x624 Mac 16 49 724 74 550 17 852x480 IO_DATA 60 32 000 60 000 18 1024x768 VESA 60 48 363 60 004 19 1024x768 VESA 70 56 476 70 069 20 1024x768 VESA 75 60 023 75 029 21 1024x768 VESA 85 68 677 84 997 22 1152x864 VESA 70 63 99 70 02 23 1152x864 VESA 75 67 500 75 000 24 1152x864 VESA 85 77 49 85 06 25 1152x864 MAC21 68 681 75 061 26 1152x900 SUN LO 61 80 65 95 27 1152x900 SUN H...

Страница 71: ...ken or bent Check if the aerial has reached the end of its serviceable life 3 5 years in normal use 1 2 years at the seaside Dotted lines or stripes Keep the TV away from electrical noise sources such as cars motorcycles or hair dryers No colour on colour programmes Using the menu system select the Picture Adjustment menu and select Reset to return to the factory settings page 27 If you set the Po...

Страница 72: ... on the rear of the media receiver unit Wrong characters appear when viewing teletext Using the menu system enter the Language Country option in the Set Up menu and select the country in which you operate the TV set page 37 For Cyrillic languages we recommend that you select Russia in case your own country does not appear in the list Wrong characters appear when viewing NexTView Using the menu sys...

Страница 73: ...AL message appears on the screen or if the power on standby indicator lights up in yellow Check that the video signal cable is properly connected and all plugs are firmly seated in their sockets Check that the 15 Dsub video input connector s pins are not bent or pushed in Problems caused by the connected computer The computer is in power saving mode Try pressing any key on the computer keyboard Ch...

Страница 74: ...e less than the original This is not a malfunction Picture is ghosting Eliminate the use of video cable extensions and or video switch boxes Check that all plugs are firmly seated in their sockets Picture is not centred or sized properly Using the menu system select the Screen Size Shift option in the Screen Control menu and adjust V Size page 32 Using the menu system select the Screen Size Shift ...

Страница 75: ... switch on the Memory Stick is set to LOCK Release the lock The image file is protected Release the protection in the index Screen The still image files in the JPEG format stored in a Memory Stick cannot be displayed Select Option in the Memory Stick Home and select File Then set Filter to Still or Off page 50 The moving image files in the MPEG1 format stored in a Memory Stick cannot be displayed ...

Страница 76: ... Channel Number Guide for United Kingdom Only the main transmitters are listed Information regarding the regional sub relay channel numbers can be obtained by contacting The BBC Engineering Information Dept Telephone Number 020 7852 5040 ...

Страница 77: ...1 Bedienungsanleitung DE ...

Страница 78: ...2 ...

Страница 79: ...nung 19 Anschluss des Fernsehers mit Plasma Bildschirm an die Empfangseinheit 20 Anschluss der Antenne und des Videorecorders 22 Erstmalige Inbetriebnahme Einschalten und automatische Feinabstimmung des Fernsehers 23 Das Menü System auf dem Bildschirm Einführung in das Menü System auf dem Bildschirm und seine Anwendung 26 Bild Einstellungen 26 Ton Einstellungen 28 Bildschirm Einstellen 30 Funktion...

Страница 80: ...Zusätzliche Information Anschluss von frei wählbaren Zusatzgeräten 61 Anwendung der frei wählbaren Zusatzgeräte 65 Grundeinstellung der Fernbedienung für einen Videorecorder oder ein DVD 66 Technische Daten 68 Störungsbehebung 71 Inhaltsverzeichnis ...

Страница 81: ...eb sind nicht installiert werden Es kann ein fehlerhaftes Funktionieren der ärztlichen Instrumente verursachen Für den Fernseher mit Plasmabildschirm Installation Die Installation des Bildschirms an der Wand muss durch einen qualifizierten Fachmann vorgenommen werden Eine falsche Installation kann für das Gerät im Fall eines Erdbebens usw eine Gefahr darstellen Transport Die Beförderung dieses Fer...

Страница 82: ...ruft Schiff oder Segelboot Installieren Sie dieses Fernsehgerät nicht in einem Schiff oder einem Segelboot Wenn es dem Meerwasser ausgesetzt wird kann dies einen Brand oder Schäden des Fernsehgeräts hervorrufen Wasser und Feuchtigkeit Verwenden Sie dieses Fernsehgerät nicht in der Nähe von Wasser z B in der Nähe einer Badewanne oder einer Dusche Setzen Sie es genau so wenig dem Regen aus Es kann F...

Страница 83: ...ne stabile Fläche dass die Eingangsöffnungen an der Unterseite der Einheit nicht versperrt werden Empfangseinheit Oberansicht Installieren Sie die Empfangseinheit nie in einem zu engen Raum Sie könnte überhitzt werden und in der Folge einen Brand oder Schäden der Einheit verursachen Stellen Sie anhand eines Entlüftungsventilators das korrekte Funktionieren der Einheit sicher 30cm 10cm 10cm 10cm La...

Страница 84: ...ch eine andere besserer Qualität ersetzen Verkabelung Ziehen Sie das Hauptkabel aus der Steckdose wenn Sie Kabel installieren Überprüfen Sie zu Ihrer eigenen Sicherheit dass das Hauptkabel aus der Steckdose gezogen ist wenn Sie Anschlüsse vornehmen Feuchtigkeit Berühren Sie das elektrische Kabel nicht mit feuchten Händen Wenn Sie den Stecker mit feuchten Händen in die Steckdose stecken oder heraus...

Страница 85: ...rnsehgerät Feuchtigkeitausgesetzt wird Verschütten Sie keinerlei Flüssigkeit auf den Fernseher Wenn es aus irgendeinem Grund mit Flüssigkeit überschüttet wird oder irgendein fester Gegenstand hineingesteckt wird schalten Sie es nicht an Es könnte ein elektrischer Schlag erfolgen oder das Gerät beschädigt werden Lassen Sie es sofort durch qualifiziertes technisches Personal überprüfen Halten Sie zu...

Страница 86: ... einen Brand verursachen Hierdurch kann auch die Gebrauchsdauer des Geräts verkürzt werden Wenn das Gerät solchen Bedingungen ausgesetzt ist müssen Sie entsprechende Maßnahmen treffen um die Feuchtigkeit und die Temperatur des Bereichs in dem es aufgestellt ist herabzusetzen Zubehörteile Schützen Sie den Plasma Bildschirm vor einem möglichen Fall Wenn er nicht in angemessener Weise angebracht ist ...

Страница 87: ...Anleitungsanweisungen wenn Sie das Antennenkabel unterbrechen Wenn das Netz oder Antennenkabel beschädigt ist benutzen Sie es nicht und bitten Sie Ihren Händler oder den technischen Kundendienst von Sony um Austausch Nichtgebrauch Aus Umwelt und Sicherheitsgründen wird empfohlen den Fernseher nicht in der Standby Position zu belassen wenn er nicht benutzt werden soll Ziehen Sie das Netzkabel aus d...

Страница 88: ...tigkeit übertragen Wir schlagen deshalb vor dass Sie die Fenster schließen oder Kopfhörer verwenden Bei der Verwendung von Kopfhörern stellen Sie die Lautstärke so ein dass eine übermäßige Lautstärke vermieden wird da diese das Trommelfell schädigen kann Beim Zurückhalten des Bildes Wenn die anschließend aufgeführten Bilder während eines längeren Zeitraums betrachtet werden kann sich auf Grund der...

Страница 89: ...dschirm mit dem mitgelieferten Reinigungstuch oder mit einem weichen Tuch das mit einem leichten Reinigungsmittel befeuchtet wurde Verwenden Sie in keinem Fall einen Topfreiniger zum Scheuern Entfettungspulver oder Lösemittel wie Alkohol oder Benzin Bei Kontakt mit diesen Mitteln kann die Bildschirmoberfläche beschädigt werden Zur Reinigung des Gehäuses Versichern Sie sich dass der Netzstecker der...

Страница 90: ...den Sie diese Stromzuführungskabel mit Erdbuchse bei Betrieb des Geräts im Vereinigten Königreich Siehe NOTICE FOR CUSTOMERS IN THE UNITED KINGDOM auf Seite 2 GB wenn Sie diese Stromzuführungskabel benutzen Je nach Land werden diese Kabel nicht immer mitgeliefert ZweiStromzuführungskabel Typ C 5 Verwenden Sie diese Strozuführungskabel mit Erdbuchse bei Betrieb des Geräts in der Schweiz Je nach Lan...

Страница 91: ... Timer auf der Seite 41 Anzeige BILD WEGFALL Diese leuchtet auf wenn auf der Fernbedienung gedrückt wird um das Bild zu löschen Es wird nur das Bild gelöscht der Ton bleibt weiterhin aktiviert Wenn der Fernseher mit einem Personalcomputer verbunden ist oder an eine graphische Videoanlage mit dem System DPMS Display Power Management System System der Energiebewirtschaftung des Bildschirms angeschlo...

Страница 92: ...igen der Geräteauswahl Zum Betrachten des angeschlossenen Geräts drücken Sie wiederholt die Taste bis die entsprechende Eingangsanzeige aufleuchtet Wenn Sie weitere Information benötigen konsultieren Sie das Kapitel über Anwendung frei wählbarer Anlagen auf der Seite 65 Anzeige Fernsehmodus 1 Anzeige 1 Eingang 1 2 Anzeige 2 Eingang 2 3 Anzeige 3 Eingang 3 4 Anzeige 4 Eingang 4 5 Anzeige 5 Eingang ...

Страница 93: ... Drücken Sie diese Taste um Kanäle auszuwählen Für Kanäle mit zweistelliger Programm Nummer drücken Sie die zweite Zahl innerhalb von 2 5 Sekunden Tasten Beschreibung 6 6 6 6 a Wenn sich der Wähler des Geräts in der Position TV befindet Drücken Sie diese Taste um zum zuletzt ausgewählten Kanal zurückzukehren der mindestens 5 Sekunden lang aktiviert gewesen sein muss b Wenn sich der Wähler des Gerä...

Страница 94: ... fur Videorecorder oder DVD befindet Bei Benützen dieser Tasten können Sie die hauptsächlichen Funktionen Ihres Videorecorders oder DVD aufrufen NexTView Im Kapitel NexTView auf der Seite 58 finden Sie weitere Informationen ª ª ª ª Auswählen des Videotextes Drücken Sie diese Taste um auf Videotext umzustellen º º º º Wähler der Anlage Mit dieser Fernbedienung können Sie nicht nur den Fernseher son...

Страница 95: ...die Fernbedienung Versichern Sie sich dass die mitgelieferten Batterien polaritätsrichtig eingelegt werden Respektieren Sie die Umwelt und werfen Sie die gebrauchten Batterien in die speziell dafür vorgesehenen Behälter m Installation ...

Страница 96: ...rnseher Typ C 4 Typ BF oder Typ C 5 Lesen Sie weitere Einzelheiten auf der Seite 14 1 Schließen Sie das mitgelieferte Antennen Anschlusskabel und das mitgelieferte Stromzuführungskabel an den Fernseher an Stecken Sie den Netzstecker erst dann in die Steckdose wenn alle Verbindungen hergestellt sind BLACK WHITE DISPLAY SIGNAL IN SONY EXCLUSIVE CABLE ONLY AC IN Installation wird fortgesetzt ...

Страница 97: ...nden Anleitungen die dem Wandhalter oder dem Ständer mitgegeben sind 4 Schließen Sie das mitgelieferte Antennenkabel an die Empfangseinheit an WS Zuführung Eingang für die Stromspeisung am Bildschirm Steckerhalter wird mitgeliefert Stromkabel wird mitgeliefert b Klemmen Sie dann den WS Stecker an bis Sie ein Klicken hören a Setzen Sie den mitgelieferten Steckerhalter auf das Stromkabel 1 R D D D 5...

Страница 98: ...D D 2 3 4 DISPLAY SIGNAL OUT BLACK WHITE AC IN OUT IN Lesen Sie für weitere Information hinsichtlich des Anschlusses eines Videorecorders das Kapitel Anschluss frei wählbarer Anlagen auf der Seite 61 Stecken Sie den Netzstecker des Stromkabels erst dann in die Steckdose wenn alle Anschlüsse vorgenommen sind Schließen Sie das mitgelieferte Koaxial Kabel an Schließen Sie das mitgelieferte Stromkabel...

Страница 99: ...ngseinheit in die Steckdose 100 240 V Wechselstrom 50 60 Hz für den Bildschirm und 220 240 V Wechselstrom 50 60 Hz für die Empfangseinheit 2 Beim erstmaligen Anschluss des Fernsehgerätes schaltet sich dieses automatisch ein Falls dies nicht der Fall ist drücken Sie die Einschalt Ausschalttaste an der Vorderseite Ihres Fernsehgerätes um es einzuschalten Beim ersten Mal wenn Sie den Fernseher einsch...

Страница 100: ...rnseher beginnt automatisch die Suche und das Speichern aller verfügbaren Kanäle Fernsehsender Dieser Prozess kann einige Minuten beanspruchen Haben Sie bitte Geduld und drücken Sie keine Taste während dieser Operation in gegenteiligem Falle würde das automatische Abspeichern nicht zu Ende geführt Wenn während des automatischen Abspeicherns kein Kanal gefunden wird erscheint ein neues Menü auf dem...

Страница 101: ... ändern wollen und drücken Sie anschließend b Drücken Sie order um die neue Position der Programm Nummer für den gewählten Kanal Fernsehsender auszuwählen und drücken Sie anschließend c Wiederholen Sie die Schritte B a und B b wenn Sie die Reihenfolge weiterer Kanäle ändern wollen 9 Drücken Sie die Taste MENU um zum normalen Fernseh Bildschirm zurückzukehren OK Programme ordnen Prog wählen 01 02 0...

Страница 102: ...ndern Hierzu gehen Sie wie folgt vor Drücken Sie nach der Wahl der Option die Sie ändern wollen und drücken Sie anschließend wiederholt oder zur Einstellung Dieses Menü erlaubt Ihnen ebenfalls die Bildqualität an die Funktionen PC SPIELE und Anwender anzupassen in Übereinstimmung mit dem Programm das Sie gerade sehen Modus Live zum Betonen des Kontrastes und der Bildschärfe Standard für ein Bild m...

Страница 103: ...el Hoch Wählen Sie die gewünschte Option um das Bildrauschen zu reduzieren das bei schwachen Fernsehsignalen vom Bild verursacht wird DYN NR Reduzierung des Bildrauschens kann durch ein Eingangsignal RGB das an den Stecker PC an ein DTV Signal und die Anschlüsse Y PB CB PR CR 5 oder an den Eingang Memory Stick angeschlossen ist nicht reguliert werden DTV ist das digitale Sendeformat in den Vereini...

Страница 104: ...as Doppel D Symbol sind registrierte Handelsmarken der Dolby Laboratories Nicht veröffentlichte vertrauliche Arbeiten 1992 1997 Dolby Laboratories Alle Rechte sind reserviert Höhen Drücken Sie oder um die hohen Töne abzuschwächen Drücken Sie oder um die hohen Töne zu erhöhen Tiefen Drücken Sie oder um die tiefen Töne abzuschwächen Drücken Sie oder um die tiefen Töne zu erhöhen Balance Drücken Sie ...

Страница 105: ...Drücken Sie oder um die i KH Lautstärke der Kopfhörer zu verringern Drücken Sie oder um die Lautstärke der Kopfhörer zu erhöhen Wenn Sie i KH LS Link auf Ein stellen kann i KH Lautstärke nicht reguliert werden i KH Zweiton Wählen Sie die Option Zweiton der Kopfhörer Mono Stereo Wählen Sie für eine Sendung in Stereotonqualität Stereo oder Mono Mono A B Für eine zweisprachige Sendung wählen Sie A fü...

Страница 106: ...lung beibehalten wollen Trotz der Wahl Ein oder Aus der Option Auto Format können Sie zu jeder Zeit das Bildschirmformat wieder ändern indem Sie wiederholt auf der Fernbedienung drücken Modus Kontrast Helligkeit Farbe Farbton Bildschärfe Dyn NR Dyn Bild Farbtemperatur Farbkorrektur Gamma Korrektur Normwerte Live 80 0 0 0 0 Auto Ein Kalt Ein Hoch Bild Einstellungen Wahl Best Beenden OK MENU Wahl Be...

Страница 107: ...nd 16 9 Zoom Panorama Breitbild für Spielfilme in Breitwandverfahren Cinemascope Wide Für Sendungen in Format 16 9 Wenn am Bildschirm unten und oben Streifen abgeschnitten werden drücken Sie oder um die Bildstellung auf dem Bildschirm zu regulieren z B um Untertitel zu lesen Bildformat kann für ein HD Signal nicht eingestellt werden das an Stecker 5 PB CB PR CR angeschlossen ist und auch nicht für...

Страница 108: ...den wenn ein RGB Eingangssignal angeschlossen ist an den Scart Anschlüssen 1 2 oder 4 Wenn Bildformat für 4 3 oder Wide konfiguriert ist können Höhe senkrechte Größe und V Position senkrechte Verschiebung für das Eingangs Signal des Videorecorders das von einem angeschlossenen externen Gerät ausgeht nicht reguliert werden Pixel einstellen Die Option Pixel einstellen erlaubt Ihnen das Bild von eine...

Страница 109: ... vor 1 Drücken Sie nach Auswahl der Option 2 Drücken Sie oder um den gewünschten Ausgang zu wählen Haupt Der Ton des Fernsehers wird über die Lautsprecher des Fernsehers ausgesendet Eingang Mitte Wenn ein externer Verstärker an die Fernseher Anschlüsse CENTRE SPEAKER IN angeschlossen wird senden die Lautsprecher des Fernsehers den Ton vom Verstärker aus als zentralem Lautsprecher Aus Der Ton des F...

Страница 110: ... Tonausgänge des Fernsehers angeschlossen ist Hierzu gehen Sie wie folgt vor 1 Drücken Sie nach Auswahl der Option 2 Drücken Sie oder um Variabel auszuwählen wenn Sie wünschen die Fernbedienung des Fernsehers zu benützen bzw Fest wenn Sie vorziehen die Fernbedienung des externen Verstärkers zu benützen Wenn Sie die AV Maus Verteler des Infrarotsignals der Fernbedienung anschließen und sie im exter...

Страница 111: ...r speziellen Eigenschaften des Plasma Bildschirms in gewissen Bildschirmbereichen eine Einbrennschattierung Afterimage hervorgerufen werden Schwarze Streifen am oberen und unteren Teil die beim Panorama Breitbild Cinemascope auftreten Schwarze Streifen links und rechts die bei einer Bildquelle im Format 4 3 Format der herkömmlichen Fernsehsendungen auftreten Videofilme mit Spielen Bilder die von e...

Страница 112: ... die Eurobuchse 4 und an die Stecker 5 Y PB CB PR CR anschließens Hierzu gehen Sie wie folgt vor 1 Drücken Sie nach Auswahl der Option 2 Drücken Sie oder um Autom oder Manuell auszuwählen Autom Das Signal der des DVD Gerätes tritt durch die Eurobuchse 4 ein Manuell Das Signal des DVD Geräts tritt über die Stecker 5 Y PB CB PR CRein Wenn das Signal des DVD Geräts das Formatsignal 576p ist wählen Si...

Страница 113: ...s Einschalten und automatische Feinabstimmung des Fernsehers auf der Seite 23 angegeben wird Programme ordnen Die Option Programme ordnen erlaubt Ihnen die Reihenfolge zu ändern in der die Kanäle Fernsehsender auf dem Bildschirm des Fernsehers erscheinen Hierzu gehen Sie wie folgt vor 1 Drücken Sie nach Auswahl der Option 2 Befolgen Sie den Schritt 8 B des Kapitels Einschalten und automatische Fei...

Страница 114: ...senen externen Gerät einen Namen zu verleihen Hierzu gehen Sie wie folgt vor 1 Drücken Sie nach Auswahl der Option 2 Drücken Sie oder um die Eingangsquelle auszuwählen der Sie einen Namen verleihen wollen und drücken Sie anschließend 3 In der Spalte Name wird automatisch ein vorgegebener Namen erscheinen a Wenn Sie einen der 6 vorgegebenen Namen KABEL SPIEL KAMERA DVD VIDEO oder SAT benützen wolle...

Страница 115: ...zugeben Wenn Sie die Kanalnummer nicht kennen drücken Sie oder um sie zu suchen Drücken Sie OK nach der Feinabstimmung des gewünschten Kanals 8 Drücken Sie OK mit der markierten Option Bestätigen Anschließend drücken Sie um OK auszuwählen und abschließend drücken Sie OK zum Speichern Wiederholen Sie alle oben erwähnten Schritte um weitere Kanäle abzustimmen und zu speichern B Einem Kanal einen Nam...

Страница 116: ... das Programm das Sie überspringen wollen auf dem Bildschirm erscheint wählen Sie die Option Auslassen und drücken Sie 3 Drücken Sie oder um Ja auszuwählen und drücken Sie OK 4 Mit der markierten Option Bestätigen drücken Sie OK Anschließend drücken Sie um OK auszuwählen und zum Schluss drücken Sie OK zum Speichern Wenn Sie später diese Funktion löschen wollen wählen Sie Nein anstatt Ja bei Schrit...

Страница 117: ...nbedienung betätigen Uhreinstellen Die Option Uhr einstellen erlaubt Ihnen die richtige Uhrzeit einzustellen Die im Fernseher integrierte Uhr hat einen Fehlerspielraum von 30 Sekunden pro Monat Hierzu gehen Sie wie folgt vor 1 Drücken Sie nach Auswahl der Option 2 Drücken Sie oder um die Stunde einzustellen und drücken Sie anschließend 3 Drücken Sie oder um die Minuten einzustellen und drücken Sie...

Страница 118: ...aftsmodus Standby einschalten soll 7 Drücken Sie oder um Wöchentl Einstell auszuwählen anschließend drücken Sie 8 Drücken Sie oder um den Wochentag auszuwählen den Sie für die Option Ein Aus Timer bestimmen wollen anschließend drücken Sie 9 Drücken Sie oder um Ein auszuwählen anschließend drücken Sie 10 Wiederholen Sie die Schritte 8 und 9 um andere Wochentage festzulegen 11 Drücken Sie oder um Pr...

Страница 119: ...dus Standby umschaltet wenn durch die angeschlossene Anlage kein Eingangssignal gegeben wird Hierzu gehen Sie wie folgt vor 1 Drücken Sie nach Auswahl der Option 2 Drücken Sie oder um Ein auszuwählen Auto Ausschalt kann nicht ausgewählt werden wenn der Fernseher das Signal einer Fernsehsendung empfängt Das Menü System auf dem Bildschirm ...

Страница 120: ...eilt wird Serien Nr Gerät Seriennummer die jeder Empfangseinheit zugeteilt wird Modus Kontrast Helligkeit Farbe Farbton Bildschärfe Dyn NR Dyn Bild Farbtemperatur Farbkorrektur Gamma Korrektur Normwerte Live 80 0 0 0 0 Auto Ein Kalt Ein Hoch Bild Einstellungen Wahl Best Beenden OK MENU Wahl Beenden MENU Modellname Serien Nr Anzeige Serien Nr Gerät KE 50MR1 20000001 40000001 Gerätestatus m Das Menü...

Страница 121: ...n eines stillstehenden Bildes Extension jpg JPEG ist das Initialwort von Joint Photographic Experts Group der Organismus der dieses Format erschuf DCF ist das Initialwort von Design Rules for Camera File Systems das bestimmte Spezifizierungen beinhaltet die von der Japan Electronic Industry Development Association JEIDA festgelegt wurden MPEG ist eines der Technologieformate um ein Bild in Bewegun...

Страница 122: ...ht Recht geschützt sind welche die MagicGate Technologie benötigen MagicGate Memory Stick Ausgerüstet mit der Technologie MagicGate der Copyright Schutzrechte Memory Stick ROM Speichert vorher aufgezeichnete Lese Daten Die zuvor aufgezeichneten Daten im Memory Stick ROM können weder aufgenommen noch gelöscht werden Typen von Memory Stick die mit dem Fernseher kompatibel sind Mit Ihrem Fernseher kö...

Страница 123: ... Bauen Sie das Memory Stick nicht aus und ändern Sie es nicht Verhindern Sie dass das Memory Stick der Feuchtigkeit ausgesetzt wird Verwenden oder bewahren Sie das Memory Stick nicht an Stellen auf an denen es folgendem ausgesetzt ist Extremen Temperaturen wie z B in einem in der Sonne geparktem Autom oder in einem Fahrzeug das längere Zeit in der sengenden Hitze steht Dem direkten Sonnenlicht Ein...

Страница 124: ... Stick wobei die Markierung b nach oben zeigen muss wie anschließend dargestellt wird Die Lampe des Dateizugriffs des Memory Stick flackert Versichern Sie sich das Einführen des Memory Stick in der korrekten Richtung vorzunehmen Wenn das Memory Stick in die falsche Richtung gezwungen wird kann das Memory Stick selbst oder die Slot Öffnung beschädigt werden Stecken Sie das Memory Stick nur in den M...

Страница 125: ...y Stick Zum Anschluss des Eingangs Memory Stick drücken Sie mehrmals bis die Anzeige Memory Stick in der Empfangseinheit aufleuchtet siehe Seite 16 OK PROG MENU TV VIDEO Memory Stick Diaschau Option Verzeichnis wählen 100MSDCF Memory Stick Home Auswählen Zurück Eingeben Enter Nr 1 1234 Grösse 1024x768 Datei SPJP0001 JPG Datum 7 15 2002 12 34 Markierung MS Home Namen der Mappe die ausgewählt wurde ...

Страница 126: ...tieren Teilt das Bilderarchiv in Übereinstimmung mit dem Archivnamen ein oder mit dem Datum der Erneuerung in auf absteigender Reihenfolge Filter Filtert nur die stillstehenden Bilder Still oder die Bilder in Bewegung Film aus dem Inhalt Die Sortieren Filter Funktionen können nur aktiviert werden wenn Digikam Modus auf Aus steht Die Situation der Filter Situation wird im MS Home angezeigt Memory S...

Страница 127: ...en wollen 2 Drücken Sie Memory Stick Das MS Home erscheint auf dem Bildschirm 3 Drücken Sie oder um Verzeichnis wählen auszuwählen und drücken Sie anschließend OK Auf dem Bildschirm erscheint das Menü Verzeichnis wählen 4 Drücken Sie um die Liste der Mappen auszuwählen und anschließend drücken Sie oder um eine der Mappen auszuwählen die Sie sehen wollen Drücken Sie danach OK Es erscheint ein minim...

Страница 128: ...rücken Sie um das Element der Bildreiehenfolge auszuwählen und drücken Sie anschließend Es erscheint ein Verzeichnis von minimisierten daumennagelgroßen Bildern das alle Seiten enthält Auf dem daumennagelgroßen Menü Verzeichnis können Sie jetzt jede beliebige der folgenden Optionen auswählen Drücken Sie oder um die Optionen auszuwählen und drücken Sie anschließend OK Option Beschreibung Volle Größ...

Страница 129: ...ie oder um die Optionen auszuwählen und drücken Sie anschließend OK Ein geschütztes Bild kann nicht gelöscht werden Die Bilder auf dem Memory Stick können weder gedreht noch gelöscht werden wenn der Schalter des Schreibschutzes auf die Position LOCK gestellt wird Das gedrehte Bild bleibt im Memory Stick in dieser Position und wird auf diese Weise das nächste Mal wieder gezeigt Option Beschreibung ...

Страница 130: ...n Bildes Taste Option Beschreibung N Wiedergabe Pause Gibt ein Bild in Bewegung wieder Während des Abspielens wird die Abspieltaste durch die Taste X Pause ausgetauscht Nach Beenden der Wiedergabe hält diese beim ersten Bild der Aufnahme an die wiedergegeben wurde x Stop Stoppt das Abspielen Volle Größe Zeigt ein Bild in Bewegung auf dem gesamten Bildschirm und beginnt automatisch die Wiedergabe Z...

Страница 131: ...ritt vor um zu MS Home zurückzukehren Wenn Sie Advanc Slds auf Auto stellen Drücken Sie OK Wenn Sie Advanc Slds auf Manuell stellen Drücken Sie OK um das Menü Verzeichnis anzuzeigen und drücken Sie dann oder zur Auswahl von Return 1 Führen Sie ein Memory Stick ein das die Bilder enthält die Sie sehen wollen 2 Drücken Sie Memory Stick Auf dem Bildschirm erscheint MS Home 3 Drücken Sie oder um Verze...

Страница 132: ...tein in der augenblicklich ausgewählten Mappe enthalten obwohl Filter auf Movie steht im Menü Option Keine Standbilddatei Es sind keine Dateien stillstehender Bilder in der augenblicklich ausgewählten Mappe enthalten obwohl Filter im Menü Option auf Still steht Wiedergabe nicht möglich Die Bilddaten eines Bildes in Bewegung ist defekt Memory Stick gesperrt Der Schalter zur Verhütung des Löschens i...

Страница 133: ...n Drücken Sie die Taste TOPText Fastext Der Videotext ist ein Informationsdienst der von den meisten Fernsehsendern übertragen wird Die Seite der Inhaltsangabe des Videotextes im Allgemeinen die Seite 100 stellt Informationen zur Verfügung wie dieser Dienst gehandhabt wird Verwenden Sie zur Handhabung des Videotextes die Tasten der Fernbedienung wie auf dieser Seite angegeben wird Stellen Sie sich...

Страница 134: ...schirm in Schwarz die Anzeige NexTView Betätigen Sie daraufhin auf der Fernbedienung die Taste um die Übersicht Gesamtansicht siehe Abb 2 auf der folgenden Seite sehen zu können Sobald Sie den Service NexTView in Betrieb genommen haben wird der Prozentanteil der zur Verfügung stehenden Daten von NexTView in der linken unteren Ecke angezeigt Beachten Sie dass sich nach Einblendung dieser Servicelei...

Страница 135: ...Optionen Aufnehmen und Erinnern werden nicht zur Verfügung stehen wenn das von Ihnen ausgewählte Programm schon begonnen hatte 01 Mo TV1 TV2 TV3 TV4 TV5 TV6 TV7 TV8 00 30 01 30 05 30 06 30 07 30 08 30 09 30 10 30 S o n g s f r o m t h e s h o w s We a t h e r f o re c a s t i n f o r m a t i A 1 n e w s m a g a z i n e A r t s s h o w O c l o ck n e w s We a t h e r f o re c a s t i n f o r m a t ...

Страница 136: ... Ihrer eigenen Liste 8 davon auswählen Nach Zusammenstellung Ihrer eigenen Liste kann die Originalliste jederzeit wieder hergestellt werden Zur Wiederherstellung wählen Sie Auto indem Sie auf der Fernbedienung die Taste drücken Show Spielshow Freizeithobbies Kinder Jugend Erziehung Wissenschaft Erinnerungsliste Diese zeigt die Liste aller Programme höchstens 5 die Sie anhand der Erinnerungsliste a...

Страница 137: ...schließend gezeigt wird Die Verbindungskabel werden nicht mitgeliefert 6 5 4 3 2 1 6 6 6 PC MEMORY STICK PROG PROG MENU PC OK L G S I R D D D 6 5 4 3 2 1 6 6 6 PC PROG PROG MENU PC OK L G S I R D D D MEMORY STICK Videokamera S VHS Hi8 DVC i Kopfhörer Personalcomputer Um Bildrauschen zuverhindern schließen Sie gleichzeitig keineexternen Anlagen an die Buchsens E und F an Zusätzliche Information ...

Страница 138: ... schließen Sie anhand des Kabels CONTROL S die Eingangsbuchse CONTROL S IN der Anlage an die Ausgangsbuchse CONTROL S OUT des Fernsehers an 1 R D D D 5 5 L G S I Y CTRL S CENTRE SPEAKER IN 180W 6 MAX PB CB PR CR SMARTLINK SMARTLINK AV MOUSE W G W G L G S I R D D D 2 3 4 DISPLAY SIGNAL OUT BLACK WHITE AC IN 1 2 Kompaktes AV System Verstärker Sub woofer SA WD100 Dekodierer PlayStation Hi Fi Videorec...

Страница 139: ...Sie den DVD Recorder an die Eurobuchse 4 und die Buchsen Y PB CB PR CR 5 an Wählen Sie das Menü Funktionen und stellen Sie AV4 Eingangswahl auf Manual Seite 36 Anschluss einer externen Audio Anlage Wenn Sie den Ton des Fernsehers über die Lautsprecher Ihrer Hi Fi Musikanlage genießen wollen Wenn Sie den Ton Ihres Fernsehers verstärken wollen schließen Sie Ihre Hi Fi Anlage an den Tonausgang Jan An...

Страница 140: ... auf Eingang Mitte Wenn Sie die AV Maus Verteiler des Infrarotsignals der Fernbedienung anschließen Wenn Sie die AV Maus anschließen und in einem externen Verstärker installieren können Sie die Fernbedienung des Verstärkers verwenden indem Sie ihn auf den Fernseher richten um die Tonstärke des externen Verstärkers zu kontrollieren Schließen Sie die AV Maus an die Eingangsbuchse O von AV MOUSE IN a...

Страница 141: ...ge des gewählten Eingangs Eingangssignale 1 oder 2 1 oder 2 Audio Video Eingangssignal durch die Eurobuchse H 1 oder 2 1 oder 2 Eingangssignal RGB durch die Eurobuchse H Dieses Symbol erscheint nur wenn zuvor eine RGB Quelle angeschlossen wurde 3 oder 4 3 oder 4 Audio Video Eingangssignal durch die Eurobuchse I oder N 3 3 Eingangssignal S Video durch die Eurobuchse I 4 4 Eingangs Signal RGB durch ...

Страница 142: ...r Position TV befindet kann keine Code Nummer gespeichert werden 2 Drücken Sie während des Aufleuchtens des grünen Lichtes die gelbe Taste und halten Sie diese ca 6 Sekunden lang niedergedrückt bis das grüne Licht zu flackern beginnt 3 Geben Sie während das grüne Licht flackert mit Hilfe der Nummerntasten die drei Ziffern des Codes für Ihre Marke siehe die folgdnde Seite ein Wenn der ausgewählte C...

Страница 143: ...06 017 GRUNDIG 358 355 360 361 320 351 KENWOOD 008 HITACHI 327 333 334 LG 015 014 JVC 314 315 322 344 352 353 LOEWE 009 028 023 024 016 003 354 348 349 MATSUI 013 016 LG 332 338 ONKYO 022 LOEWE 358 355 360 361 320 351 PANASONIC 018 027 020 002 MATSUI 356 357 PHILIPS 009 028 023 024 016 003 ORION 328 PIONEER 004 PANASONIC 321 323 SAMSUNG 011 014 PHILIPS 311 312 313 316 317 318 SANYO 007 358 359 SHA...

Страница 144: ...sma Bildschirm TV System Gemäß dem von Ihnen ausgewählten Land B G H D K L I Farb System PAL SECAM NTSC 3 58 4 43 nur Video Eingang Antenne Externer Anschluss von 75 Ohm für VHF UHF Aufnahmebereich der Kanäle VHF E2 E12 UHF E21 E69 CATV S1 S20 HYPER S21 S41 D K R1 R12 R21 R69 L F2 F10 B Q F21 F69 I UHF B21 B69 Anschlüsse auf der Hinterseite 1 21 polige Eurobuches CENELEC Standard einschließlich Au...

Страница 145: ...behör 1 Fernbedienung RM 972 2 Batterien Größe AAA typ R03 1 Bildschirm Anschlusskabel 1 Koaxial Kabel 1 AV Maus 2 Stromzufuhrkabel Typ C 4 2 Stromzufuhrkabel Typ BF 2 Stromzufuhrkabel Typ C 5 Je nach Land werden diese Stromzufuhrkabel Typ BF und Typ C 5 nicht mitgeliefert 1 Reinigungstuch Ein Steckerhalter für das Netzkabel Weitere Merkmale Videotext Fastext TOPtext Timer SmartLink direkte Verbin...

Страница 146: ...7 852x480 IO_DATA 60 32 000 60 000 18 1024x768 VESA 60 48 363 60 004 19 1024x768 VESA 70 56 476 70 069 20 1024x768 VESA 75 60 023 75 029 21 1024x768 VESA 85 68 677 84 997 22 1152x864 VESA 70 63 99 70 02 23 1152x864 VESA 75 67 500 75 000 24 1152x864 VESA 85 77 49 85 06 25 1152x864 MAC21 68 681 75 061 26 1152x900 SUN LO 61 80 65 95 27 1152x900 SUN HI 71 72 76 05 28 1280x960 VESA 60 60 000 60 000 29 ...

Страница 147: ...e und es ertönt Bildrauschen Überprüfen Sie ob die Antenne kaputt oder verbogen ist Überprüfen Sie ob die Antenne schon abgenützt ist 3 5 Jahre unter normalen Gebrauchsbedingungen 1 2 Jahre an der Küste Punktierte Linien oder Bänder Halten Sie den Fernseher fern von Rauschquellen elektrischer Art wie Automobilen Motorrädern oder Haartrocknern Die Sendungen in Farbe werden in Schwarz Weiß gesehen R...

Страница 148: ...rauschen des Bildes zu verringern Seite 27 Verzerrtes Bild bei Programmwechsel oder bei Auswahl des Videotextes Schalten Sie alle an die Eurobuchse am hinteren Teil des Fernsehers angeschlossenen Geräte aus Es erscheinen fehlerhafte Buchstaben beim Betrachten des Videotextes Rufen Sie mit Hilfe des Menü Systems die Option Sprache Land des Menüs Grundeinstellungen auf und wählen Sie das Land in dem...

Страница 149: ... dem nächstgelegenen Kundendienst von Sony in Verbindung Personalcomputer Problem Mögliche Lösungen Kein Bild Wenn auf dem Bildschirm die Nachricht NO INPUT SIGNAL erscheint oder wenn die Anzeige angeschlossen an das Netz Standby in Gelb aufleuchtet Überprüfen Sie dass das Kabel des Videosignals korrekt angeschlossen ist und dass alle Stecker richtig in ihren Steckdosen sitzen Überprüfen Sie dass ...

Страница 150: ...der Seite 68 angegebene Zahlenwert wird das Bild größenmäßig reduziert und seine Qualität kann unter der des Originals liegen Dies ist kein Zeichen für ein fehlerhaftes Funktionieren des Fernsehers Störbild Beseitigen Sie Verlängerungen im Videokabel und oder in den Video Schaltkästen Überprüfen Sie ob alle Stecker bis zum Anschlag in den entsprechenden Steckdosen stecken Das Bild ist nicht richti...

Страница 151: ...entfernen Das Bilderarchiv ist geschützt Geben Sie den Schutz auf dem Bildschirmverzeichnis frei Die Bilderarchive der stillstehenden Bilder in JPEG die in einem Memory Stick gespeichert sind können nicht angezeigt werden Wählen Sie Option im Menü MS Home und wählen Sie anschließend Datei Hiernach stellen Sie Filter auf Still oder auf Aus Seite 50 Die Bilderarchive der Bilder in Bewegung im Format...

Страница 152: ...1 Manual de instrucciones ES ...

Страница 153: ...2 ...

Страница 154: ...asma a la unidad de recepción 20 Conexión de la antena y del aparato de vídeo 22 Primera puesta en marcha Encendido y sintonización automática del televisor 23 Sistema de menús en pantalla Introducción y manejo del sistema de menús 26 Ajuste de la Imagen 26 Ajuste del Sonido 28 Control de pantalla 30 Características 33 Configuración 37 Temporizador 41 Estado unidad Datos del aparato 44 Memory Stic...

Страница 155: ...xTView 58 Información complementaria Conexión de equipos opcionales 61 Manejo de los equipos opcionales 65 Configuración del mando a distancia para un aparato de vídeo o DVD 66 Especificaciones técnicas 68 Solución de problemas 71 Índice ...

Страница 156: ... estén en uso equipos médicos Puede causar un malfuncionamiento de los instrumentos médicos Para la pantalla de plasma Instalación La instalación de la pantalla en la pared debe ser efectuada por un operario cualificado Una instalación incorrecta puede representar un peligro para el aparato en el caso de un temblor de tierra etc Transporte El traslado de esta pantalla de plasma requiere dos o mas ...

Страница 157: ...echo Las sacudidas del vehículo pueden hacerlo caer y causar lesiones Barco o velero No instale este aparato en un barco o velero Si queda expuesto al agua de mar puede producirse fuego o desperfectos en el aparato Agua y humedad No utilice este televisor cerca del agua p ej cerca de una bañera o ducha Tampoco lo exponga a la lluvia Se puede provocar fuego o una descarga eléctrica Para la pantalla...

Страница 158: ...a que no queden bloqueadas las entradas en la parte inferior de la unidad Unidad de recepción Vista superior No instale nunca la unidad de recepción en una espacio reducido Puede sufrir un recalentamiento y como consecuencia producir fuego o daños en la unidad Asegure el funcionamiento correcto de la unidad mediante la ventilación adecuada de un ventilador de extracción 30cm 10cm 10cm 10cm Deje co...

Страница 159: ...electricista para cambiar el enchufe por otro adecuado Cableado Desenchufe el cable de alimentación cuando instale cables Para su propia seguridad asegúrese de desenchufar el cable de alimentación cuando haga conexiones Humedad No toque el cable eléctrico con las manos húmedas Si enchufa o desenchufa el cable de alimentación con la mano húmeda puede recibir una descarga Limpieza Limpie la clavija ...

Страница 160: ...No deje que este aparato reciba humedad No derrame nunca ningún tipo de líquido sobre el aparato Si por alguna circunstancia cae líquido encima o se introduce en él algún objeto sólido no lo ponga en funcionamiento Puede producirse una descarga eléctrica o que resulte averiado el aparato Haga revisarlo inmediatamente por personal técnico cualificado Para prevenir un fuego mantenga lejos del aparat...

Страница 161: ...ón Si utiliza este aparato cerca de la orilla del mar la salinidad puede corroer las partes metálicas y causar daños internos o fuego Puede asimismo acortar la vida útil del aparato Si ha de estar sujeto a alguna de esas condiciones deberá tomar las medidas pertinentes para reducir la humedad y la temperatura del área donde esté emplazado Accesorios Proteja la pantalla de plasma de una posible caí...

Страница 162: ...siempre el cable de alimentación sujetando la clavija Atienda las instrucciones de funcionamiento cuando desconecte el cable de pantalla Si el cable de alimentación o en el cable de pantalla está deteriorado no lo utilice y pida a su proveedor o al servicio técnico de Sony que lo cambie Fuera de uso Por razones medioambientales y de seguridad se recomienda no dejar el aparato en posición stand by ...

Страница 163: ...a los vecinos El sonido se transmite muy fácilmente durante la noche Por lo tanto sugerimos cerrar las ventanas o utilizar auriculares Cuando use auriculares ajuste el volumen de forma que se eviten niveles excesivos ya que estos pueden dañar los tímpanos Para la remanencia de imagen Si se visualizan por un largo período de tiempo las imágenes que se indican a continuación puede producirse una rem...

Страница 164: ...humedecido con una solución de detergente ligero Nunca utilice ningún tipo de estropajo abrasivo polvo desengrasador o disolventes tales como alcohol o gasolina Este tipo de contactos puede dañar la superficie de la pantalla Limpieza de la caja Asegúrese de desenchufar de la red el cable de alimentación conectado a la unidad de recepción antes de proceder a la limpieza Limpie la caja del televisor...

Страница 165: ...a de tierra si usted utiliza este aparato en el Reino Unido Vea NOTA PARA USUARIOS EN EL REINO UNIDO en la página 2 GB para la utilización de estos cables de alimentación Estos cables de alimentaciónpuedenno ser suministrados en función del país de destino Dos cables de alimentación Tipo C 5 Use estos cables de alimentación con toma de tierra si usted utiliza este aparato en Suiza Estos cables de ...

Страница 166: ...a página 41 Indicador de SUPRESIÓN DE IMAGEN Se ilumina al presionar Supresión de imagen en el mando a distancia para suprimir la imagen Solamente se anula la imagen el sonido permanece activado Si el televisor está conectado a un ordenador personal o a un equipo gráfico de vídeo con sistema DPMS Display Power Management System Sistema de gestión de consumo de la pantalla el aparato reducirá autom...

Страница 167: ...modo TV Indicadores del selector de entradas de equipo Para ver la imagen del equipo conectado pulse repetidamente hasta que se ilumine el indicador de entrada correspondiente Para mas detalles consulte el capítulo Utilización de equipos opcionales en la página 65 Indicador de modo TV 1 Indicador 1 Entrada 1 2 Indicador 2 Entrada 2 3 Indicador 3 Entrada 3 4 Indicador 4 Entrada 4 5 Indicador 5 Entr...

Страница 168: ...l visualizador de imagen del Memory Stick en la página 52 5 5 5 5 Selección de canales Pulse este botón para seleccionar canales Para canales con un número de dos dígitos introduzca el segundo dígito dentro de los 2 5 segundos siguientes Botones Descripción 6 6 6 6 a Si el Selector de Equipo está en el modo TV Pulse este botón para visualizar el último canal seleccionado en activo durante al menos...

Страница 169: ...está en la posición VCR vídeo o en DVD Utilizando estos botones usted puede controlar las funciones principales de su aparato de vídeo o de DVD NexTView Encontrará información en el capítulo NexTView en la página 58 ª ª ª ª Para seleccionar el Teletexto Pulse este botón para conmutar el Teletexto º º º º Selector de Equipo Con este mando a distancia puede controlar no sólo el televisor sino tambié...

Страница 170: ... el mando a distancia Asegúrese de colocar las pilas suministradas con las polaridades en la posición correcta Sea respetuoso con el medio ambiente y deposite las pilas usadas en los contenedores dispuestos para este fin m Instalación ...

Страница 171: ...ra el aparato de televisión Tipo C 4 Tipo BF o Tipo C 5 consulte la página 14 1 Conecte al aparato el cable de conexión de pantalla y el cable de alimentación del televisor suministrados No enchufe el cable de alimentación a la red hasta que haya completado todas las conexiones BLACK WHITE DISPLAY SIGNAL IN SONY EXCLUSIVE CABLE ONLY AC IN Instalación continúa ...

Страница 172: ...e se acompañan al soporte de pared o el pedestal 4 Conecte a la unidad de recepción el cable de pantalla suministrado Toma de entrada CA entrada para el suministro eléctrico de la pantalla Capuchón para la clavija de red eléctrica suministrada Cable de alimentación suministrado b Sujételo en la toma de entrada CA hasta que oiga un chasquido a Acople el capuchón para la clavija de red eléctrica sum...

Страница 173: ...B CB PR CR SMARTLINK SMARTLINK AV MOUSE W G W G L G S I R D D D 2 3 4 DISPLAY SIGNAL OUT BLACK WHITE AC IN OUT IN Para mas información relativa a conexión de un aparato de vídeo consulte Conexión de equipos opcionales en la página 61 No enchufe el cable de alimentación a la red hasta que haya completado todas las conexiones Vídeo Conecte el cable coaxial suministrado Conecte el cable de alimentaci...

Страница 174: ... la unidad de recepción 100 240 V CA 50 60 Hz para la pantalla 220 240 V CA 50 60 Hz para la unidad de recepción 2 Cuando se conecta por primera vez el televisor este se enciende automáticamente De no ser así pulse el interruptor de encendido apagado de la parte frontal del televisor para ponerlo en marcha La primera vez que encienda el televisor aparecerá automáticamente en la pantalla el menú La...

Страница 175: ...todos los canales emisoras de televisión disponibles Este proceso puede tardar algunos minutos Por favor sea paciente y no presione ningún botón durante esta operación de lo contrario no se completaría la sintonización automática Si no se encuentra ningún canal durante la sintonización automática aparece un nuevo menú en la pantalla pidiéndole que conecte la antena Conecte la antena vea la página ...

Страница 176: ...n que usted desea cambiar de sitio y a continuación pulse b Pulse o para seleccionar la nueva posición del número de programa para el canal emisora de televisión que ha elegido y a continuación pulse c Repita los pasos B a y B b si desea cambiar el orden de otros canales 9 Pulse el botón MENU para volver a la pantalla normal de televisión OK Ordenación de Programas Seleccione canal 01 02 03 04 05 ...

Страница 177: ...ficar pulse y a continuación pulse repetidamente o para ajustarla Este menú también le permite adaptar la calidad de la imagen para los modos PC JUEGOS y Personal en función del programa que esté usted viendo Modo Directo para realzar el contraste y la nitidez de la imagen Estándar para una imagen con un contraste acorde a las condiciones de iluminación de la habitación Películas para una imagen d...

Страница 178: ...ione la opción que desee para reducir el nivel de ruido que produce la imagen en caso de señales débiles de TV Reductor Ruido no se puede ajustar a través de una entrada de señal RGB conectada al conector PC de una señal DTV conectada a las tomas Y PB CB PR CR 5 ni de la entrada Memory Stick DTV es el formato de emisión digital en los Estados Unidos p ej sintonizador digital con señal RGB Imagen A...

Страница 179: ...es Trabajos confidenciales no publicados 1992 1997 Dolby Laboratories Reservados todos los derechos Agudos Pulse o para aminorar los sonidos agudos Pulse o para incrementar los sonidos agudos Graves Pulse o para aminorar los sonidos graves Pulse o para incrementar los sonidos graves Balance Pulse o para hacer resaltar el altavoz izquierdo Pulse o para hacer resaltar el altavoz derecho Auto Volumen...

Страница 180: ...visor seleccione No i Volumen Pulse o para rebajar el volumen los auriculares Pulse o para aumentar el volumen los auriculares Si posiciona i Conexión altavoz en Sí i Volumen no se puede ajustar i Sonido Dual Seleccione la opción i Sonido Dual de los auriculares Mono Stereo Para una emisión con sonido estereofónico seleccione Stereo o Mono Mono A B Para una emisión bilingüe seleccione A para el ca...

Страница 181: ... haya seleccionado Sí o No en la opción Autoformato en cualquier momento puede modificar el formato de la pantalla pulsando repetidamente en el mando a distancia Modo Contraste Brillo Color Tonalidad Nitidez Reductor Ruido Imagen Avanzada Tono color Corrector Color Corrector gama Preestablecido Directo 80 0 0 0 0 Auto Sí Frío Sí Alto Ajuste de la Imagen Selección Instalación Salir OK MENU Selecció...

Страница 182: ...mprendido entre los formatos 4 3 y 16 9 Zoom Formato de pantalla panorámica para películas en Cinemascope Horizontal Para emisiones en formato 16 9 Si hay partes cortadas abajo y arriba de la pantalla pulse o para ajustar la posición de la imagen en la pantalla p ej para leer subtítulos Form pantalla no se puede ajustar para una señal HD conectada a conectores 5 Y PB CB PR CR ni para la entrada Me...

Страница 183: ... se puede ajustar para la señal de entrada RGB conectada a los Euroconectores 1 2 o 4 Cuando Form pantalla está configurado a 4 3 o Horizontal Tamaño V Tamaño vertical y Desplaz V Desplazamiento vertical no se pueden ajustar para la señal de entrada de vídeo desde un equipo externo conectado Ajuste píxel La opción Ajuste píxel le permite ajustar la imagen desde un equipo con señal RGB Para ello 1 ...

Страница 184: ...al El sonido del televisor se emite a través de los altavoces del televisor Central Cuando se conecta un amplificador externo a las terminales CENTRE SPEAKER IN del televisor los altavoces del televisor emiten el sonido desde el amplificador como altavoz central No El sonido del televisor no se emite a través de sus altavoces Modo Contraste Brillo Color Tonalidad Nitidez Reductor Ruido Imagen Avan...

Страница 185: ...ando está conectado un amplificador externo en las salidas de audio del televisor Para ello 1 Después de seleccionar la opción pulse 2 Pulse o para seleccionar Variable si desea utilizar el mando a distancia del televisor o bien Fijo si prefiere usar el mando a distancia del amplificador externo Cuando usted conecta el distribuidor de la señal de infrarrojos del mando a distancia y lo instala en e...

Страница 186: ...la en blanco Salida AV3 Salida AV4 Las opciones Salida AV3 y Salida AV4 le permiten seleccionar la fuente que debe salir de los Euroconectores 3 y 4 Desde estos Euroconectores podrá grabar cualquier señal procedente del televisor o también desde un equipo externo conectado a los otros Euroconectores Si su aparato de vídeo dispone de SmartLink no es necesario este proceso Para ello 1 Después de sel...

Страница 187: ...l Euroconector 4 y a los conectores 5 Y PB CB PR CR Para ello 1 Después de seleccionar la opción pulse 2 Pulse o para seleccionar Auto o Manual Auto La señal de la grabadora DVD entra a través del Euroconector 4 Manual La señal de la grabadora DVD entra a través de los conectores 5 Y PB CB PR CR Si la señal de la grabadora DVD tiene formato de señal 576p selecciónelo en este modo Colordemenú La op...

Страница 188: ...na 23 Ordenación de Programas La opción Ordenación de Programas le permite cambiar el orden en que los canales emisoras de televisión aparecen en la pantalla del televisor Para ello 1 Después de seleccionar la opción pulse 2 Siga el paso 8 B del capítulo Encendido y sintonización automática del televisor en la página 23 Modo Contraste Brillo Color Tonalidad Nitidez Reductor Ruido Imagen Avanzada T...

Страница 189: ...e asignar un nombre a un equipo externo que haya conectado al televisor Para ello 1 Después de seleccionar la opción pulse 2 Pulse o para seleccionar la fuente de entrada que desea titular a continuación pulse 3 En la columna Nombre aparecerá automáticamente una etiqueta predeterminada a Si quiere utilizar una de las etiquetas predefinidas CABLE JUEGO CAM DVD VIDEO o SAT pulse o para seleccionar l...

Страница 190: ...ulse Después de esto pulse los botones numéricos para introducir directamente el número de canal de la emisora de televisión Si no conoce el número de canal pulse o para buscarlo Una vez que haya sintonizado el canal deseado pulse OK 8 Con la opción Confirmar resaltada pulse OK A continuación pulse para seleccionar OK y finalmente pulse OK para memorizarlo Repita todos los pasos arriba mencionados...

Страница 191: ...aparece en la pantalla el programa que desea omitir seleccione la opción Omitir y pulse 3 Pulse o para seleccionar Sí y pulse OK 4 Con la opción Confirmar resaltada pulse OK A continuación pulse para seleccionar OK y finalmente pulse OK para memorizarlo Si posteriormente desea cancelar esta función seleccione No en lugar de Sí en el paso 3 E Ver y grabar canales codificados cuando se está utilizan...

Страница 192: ...empo restante hasta la desconexión programada pulsando el botón en al mano a distancia Config reloj La opción Config reloj le permite poner el reloj en hora El margen de error del reloj incorporado en el televisor es de 30 segundos al mes Para ello 1 Después de seleccionar la opción pulse 2 Pulse o para fijar la hora y seguidamente pulse 3 Pulse o para fijar los minutos y seguidamente pulse 4 Puls...

Страница 193: ... para seleccionar el día de la semana que usted desea fijar para la opción Tempor act des a continuación pulse 9 Pulse o para seleccionar Sí a continuación pulse 10 Repita los pasos 8 y 9 para configurar otros días de la semana 11 Pulse o para seleccionar Programa a continuación pulse 12 Pulse o para seleccionar los canales emisoras de televisión que quiere mirar en el momento en que se encienda e...

Страница 194: ...do de desconexión temporal standby si no hay señal de entrada a través del equipo conectado Para ello 1 Después de seleccionar la opción pulse 2 Pulse o para seleccionar Sí Apagado auto no puede ser seleccionada cuando el televisor está recibiendo la señal de una emisión de televisión Sistema de menús en pantalla ...

Страница 195: ...e plasma Nº Serie receptor Número de serie que se asigna a cada unidad de recepción Modo Contraste Brillo Color Tonalidad Nitidez Reductor Ruido Imagen Avanzada Tono color Corrector Color Corrector gama Preestablecido Directo 80 0 0 0 0 Auto Sí Frío Sí Alto Ajuste de la Imagen Selección Instalación Salir OK MENU Selección Salir MENU Nombre modelo N Serie pantalla N Serie receptor KE 50MR1 20000001...

Страница 196: ...rmato de tecnología estándar para comprimir una imagen fija extensión jpg JPEG es el acrónimo de Joint Photographic Experts Group la compañía que creó este formato DCF es el acrónimo de Design Rules for Camera file Systems que comprende especificaciones establecidas por la Japan Electronic Industry Development Association JEIDA MPEG es uno de los formatos de tecnología para comprimir una imagen en...

Страница 197: ...uieran la tecnología MagicGate de protección del derecho de reproducción MagicGate Memory Stick Equipado con la tecnología MagicGate de protección del derecho de reproducción Memory Stick ROM Memoriza datos sólo lectura pregrabados En el Memory Stick ROM no se pueden grabar ni borrar los datos pregrabados Tipos de Memory Stick compatibles con el televisor Con su televisor puede utilizar tres tipos...

Страница 198: ...o No arquee ni deje caer ni dé fuertes golpes al Memory Stick No desmonte ni modifique el Memory Stick No deje que el Memory Stick reciba humedad No utilice ni guarde el Memory Stick en un lugar que esté sujeto a Temperaturas extremas como p ej en un coche aparcado al sol o bajo un sol abrasador La luz directa del sol Una alta humedad o donde hayan sustancias corrosivas Cuando lleve consigo un Mem...

Страница 199: ...ory Stick siempre con la marca b boca arriba tal como se ilustra a continuación La lámpara de acceso del Memory Stick centellea Asegúrese de insertar el Memory Stick en la dirección correcta Si el Memory Stick es forzado en la dirección errónea pueden resultar dañados el propio Memory Stick o la ranura de entrada Inserte únicamente el Memory Stick en la ranura del Memory Stick Si intenta insertar ...

Страница 200: ...Para conectar la entrada Memory Stick pulse repetidamente hasta que se ilumine el indicador Memory Stick en la unidad de recepción vea la página 16 OK PROG MENU TV VIDEO Memory Stick Diapos Opción Sel Carpeta 100MSDCF Inicio Memory Stick Sel Volver Pon Enter Num 1 1234 Tamaño 1024x768 Archivo SPJP0001 JPG Fecha 7 15 2002 12 34 Marca Inicio MS Nombre de la carpeta correspondiente a la carpeta selec...

Страница 201: ...el archivo de imágenes de acuerdo con el nombre del archivo o de la fecha de renovación en orden ascendente descendente Filtrar Filtra solamente las imágenes fijas Imagen estática o las imágenes en movimiento Película del contenido Las funciones Ordenar Filtrar solamente se pueden activar cuando Modo cámara digi está situado en No La información de la situación en que se encuentra Filtrar se visua...

Страница 202: ...imágenes que quiere ver 2 Pulse Memory Stick En la pantalla aparece el Inicio MS 3 Pulse o para resaltar Sel Carpeta y a continuación pulse OK En la pantalla aparece el menú Sel Carpeta 4 Pulse para seleccionar la lista de carpetas y seguidamente pulse o para seleccionar una carpeta que quiera ver A continuación pulse OK Aparece un índice de imágenes minimizadas de las que contiene la carpeta sele...

Страница 203: ...s o bien pulse para seleccionar el deslizador y seguidamente pulse Aparece un índice de imágenes minimizadas conteniendo todas las páginas En la pantalla aparece el menú índice minimizado Ahora puede seleccionar cualquiera de las opciones siguientes Pulse o para seleccionar las opciones y a continuación pulse OK Opción Descripción Pant Completa sóloparaunaimagenfija Muestra la imagen fija en panta...

Страница 204: ...ncionan a continuación Pulse o para seleccionar las opciones y a continuación pulse OK No se puede girar o borrar una imagen protegida No se pueden girar o borrar las imágenes en el Memory Stick si se sitúa el interruptor de protección de escritura en la posición LOCK La imagen que ha sido girada permanece así en el Memory Stick y es mostrada de nuevo de esta forma la próxima vez Opción Descripció...

Страница 205: ...cir pausa Reproduce una imagen en movimiento Durante la reproducción el botón de reproducir se cambia por el botón X pausa Cuando finaliza la reproducción ésta se para en la primera imagen de la grabación que se ha visualizado x Paro Detiene la reproducción Pant Completa Muestra una imagen en movimiento en pantalla completa y empieza la reproducción automáticamente Para regresar al Reproductor pel...

Страница 206: ...tener el Diapos Si usted quiere parar el Diapos haga lo siguiente para regresar al Inicio MS Si configura Av diap en Auto Pulse OK Si configura Av diap en Manual Pulse OK para visualizar el menú índice y a continuación pulse o para seleccionar Inicial 1 Inserte un Memory Stick que contenga las imágenes que quiere ver 2 Pulse Memory Stick En la pantalla aparece el Inicio MS 3 Pulse o para resaltar ...

Страница 207: ...n la carpeta que ha seleccionado aunque Filtrar esté configurado en Película en el menú Opción No hay archivos de imagen estática No existe ningún archivo de imágenes fijas en la carpeta que ha seleccionado aunque Filtrar esté configurado en Imagen estática en el menú Opción Imposible reproducir Los datos de imagen de la película están deteriorados Memory Stick bloqueado El conmutador de prevenció...

Страница 208: ... Teletexto es un servicio de información que transmiten la mayoría de las emisoras de televisión La página índice del servicio teletexto por lo general la página 100 proporciona información sobre cómo utilizarlo Para accionar su funcionamiento use los botones del mando a distancia según se indica aquí debajo Asegúrese de que está sintonizando un canal emisora de televisión con una señal fuerte de ...

Страница 209: ...negro en la pantalla En ese momento pulse en el mando a distancia para acceder a la presentación tipo Parrilla ver fig 2 en la página siguiente Tan pronto como acceda al servicio de NexTView en la esquina izquierda inferior de la pantalla se mostrará el de datos NexTView disponibles Tenga en cuenta que una vez que haya accedido a este servicio el de datos no se incrementará 3 Para navegar a través...

Страница 210: ... y grabar no estarán disponibles si el programa que usted ha seleccionado ya ha comenzado 4 5 1 2 3 01 Lun TV1 TV2 TV3 TV4 TV5 TV6 TV7 TV8 00 30 01 30 05 30 06 30 07 30 08 30 09 30 10 30 S o n g s f r o m t h e s h o w s We a t h e r f o re c a s t i n f o r m a t i A 1 n e w s m a g a z i n e A r t s s h o w O c l o ck n e w s We a t h e r f o re c a s t i n f o r m a t i A 1 n e w s m a g a z i ...

Страница 211: ... 8 emisoras diferentes de televisión puede seleccionar 8 de ellas para crear su propia lista Después de haber configurado su lista personal siempre podrá recuperar la lista original Para restaurarla seleccione Auto pulsando el botón en el mando a distancia espectáculos infantil lista recordatoria Muestra una lista con todos los programas un máximo de 5 que haya seleccionado para serle recordados a...

Страница 212: ...gama de equipos opcionales no se suministran los cables de conexión 6 5 4 3 2 1 6 6 6 PC MEMORY STICK PROG PROG MENU PC OK L G S I R D D D Videocámara S VHS Hi8 DVC i Auriculares Ordenador personal Para evitar ruidos de imagen no conecte simultánea mente equipos externos a los conectores E y F 6 5 4 3 2 1 6 6 6 PC PROG PROG MENU PC OK L G S I R D D D MEMORY STICK Información complementaria continú...

Страница 213: ... conector de entrada CONTROL S IN del equipo al conector de salida CONTROL S OUT del televisor con el cable CONTROL S 1 R D D D 5 5 L G S I Y CTRL S CENTRE SPEAKER IN 180W 6 MAX PB CB PR CR SMARTLINK SMARTLINK AV MOUSE W G W G L G S I R D D D 2 3 4 DISPLAY SIGNAL OUT BLACK WHITE AC IN 1 2 Sistema compacto AV Amplificador Sub woofer SA WD100 Descodificador PlayStation Equipo de alta fidelidad Apara...

Страница 214: ...DVD al conector 4 y a los conectores Y PB CB PR CR de 5 Seleccione el menú Características y configure Selección AV4 en Manual página 36 Conexión de un equipo de audio externo Para escuchar el sonido del televisor en un equipo de alta fidelidad Si desea amplificar el sonido de su televisor conecte su equipo de alta fidelidad a la salida de audio J A continuación utilizando el sistema de menús sele...

Страница 215: ...ia Cuando usted conecta el distribuidor de la señal de infrarrojos del mando a distancia y lo instala en un amplificador externo puede usar el mando a distancia del amplificador dirigiéndolo hacia el televisor para controlar el nivel de volumen del amplificador externo Conecte el distribuidor de la señal de infrarrojos del mando a distancia en la entrada O del AV MOUSE IN e instálelo justo encima ...

Страница 216: ... de entrada audio vídeo a través del Euroconector H 1 o 2 1 o 2 Señal de entrada RGB a través del Euroconector H Este símbolo sólo aparece si previamente se ha conectado una fuente RGB 3 o 4 3 o 4 Señal de entrada audio vídeo a través del Euroconector I o N 3 3 Señal de entrada S Video a través del Euroconector I 4 4 Señal de entrada RGB a través del Euroconector N Este símbolo sólo aparece si pre...

Страница 217: ...de equipo está en la posición TV no se memorizara ningún código 2 Antes de que se apague la luz verde pulse el botón amarillo y manténgalo presionado durante unos 6 segundos hasta que la luz verde empiece a centellear 3 Mientras la luz verde está centelleando introduzca los tres dígitos del código de su marca vea la página siguiente mediante los botones numéricos del mando a distancia Si el código...

Страница 218: ... 017 GRUNDIG 358 355 360 361 320 351 KENWOOD 008 HITACHI 327 333 334 LG 015 014 JVC 314 315 322 344 352 353 LOEWE 009 028 023 024 016 003 354 348 349 MATSUI 013 016 LG 332 338 ONKYO 022 LOEWE 358 355 360 361 320 351 PANASONIC 018 027 020 002 MATSUI 356 357 PHILIPS 009 028 023 024 016 003 ORION 328 PIONEER 004 PANASONIC 321 323 SAMSUNG 011 014 PHILIPS 311 312 313 316 317 318 SANYO 007 358 359 SHARP...

Страница 219: ...ma de color PAL SECAM NTSC 3 58 4 43 sólo entrada de vídeo Antena Terminal externo de 75 Ohmios para VHF UHF Cobertura de canales VHF E2 E12 UHF E21 E69 CATV S1 S20 HYPER S21 S41 D K R1 R12 R21 R69 L F2 F10 B Q F21 F69 I UHF B21 B69 Terminales posteriores 1 Euroconector de 21 pins norma CENELEC incluyendo entradas de audio vídeo entrada RGB salidas de audio vídeo de TV 2 Euroconector de 21 pins no...

Страница 220: ...tribuidor de la señal de infrarrojos del mando a distancia 2 cables de alimentación Tipo C 4 2 cables de alimentación Tipo BF 2 cables de alimentación Tipo C 5 Los cables de alimentación Tipo BF y Tipo C 5 pueden no ser suministrados dependiendo del país 1 paño de limpieza Un capuchón para la clavija de red eléctrica Otras características Teletexto Fastext TOPtext Temporizador de desconexión y con...

Страница 221: ... 85 061 16 832x624 Mac 16 49 724 74 550 17 852x480 IO_DATA 60 32 000 60 000 18 1024x768 VESA 60 48 363 60 004 19 1024x768 VESA 70 56 476 70 069 20 1024x768 VESA 75 60 023 75 029 21 1024x768 VESA 85 68 677 84 997 22 1152x864 VESA 70 63 99 70 02 23 1152x864 VESA 75 67 500 75 000 24 1152x864 VESA 85 77 49 85 06 25 1152x864 MAC21 68 681 75 061 26 1152x900 SUN LO 61 80 65 95 27 1152x900 SUN HI 71 72 76...

Страница 222: ...o y la dirección de la antena En la pantalla sólo aparece nieve y hace ruido Compruebe si la antena está rota o curvada Compruebe si la antena está ya inservible 3 5 años de uso en condiciones normales 1 2 años en la costa Líneas de puntos o bandas Mantenga el televisor alejado de fuentes de ruido de origen eléctrico tales como coches motocicletas o secadores para cabello Los programas en color se...

Страница 223: ...nuir el ruido en la imagen página 27 Imagendistorsionadaalcambiar de programas o al seleccionar el teletexto Apague cualquier equipo conectado al Euroconector de la parte posterior de la unidad de recepción Aparecen caracteres erróneos al visionar el teletexto Mediante el sistema de menús entre en la opción Idioma País del menú Configuración y seleccione el país en el que está utilizando el televi...

Страница 224: ...oral del televisor Contacte con el centro de servicio Sony más cercano Ordenador personal Problema Posibles soluciones Ausencia de imagen Si aparece en la pantalla el mensaje NO INPUT SIGNAL o si el indicador encendido desconexión temporal se ilumina en amarillo Compruebe que el cable de la señal de vídeo esté correctamente conectado y que todas las clavijas estén firmemente asentadas en sus enchu...

Страница 225: ...icas en la página 68 la imagen queda reducida de tamaño y su calidad puede ser inferior a la del original Esto no es un malfuncionamiento del aparato Imagen con espectro Elimine el uso de extensiones en el cable del vídeo y o en las cajas de distribución del vídeo Compruebe que todas las clavijas estén firmemente asentadas en sus conectores La imagen no está correctamente centrada o dimensionada M...

Страница 226: ...rotección de escritura cancelando LOCK El archivo de imágenes está protegido Libere la protección en la pantalla índice No se pueden visualizar los archivos de imagen fija en formato JPEG memorizados en un Memory Stick Seleccione Opción en el menú Inicio MS y seguidamente seleccione Archivo Después de hacer esto configure Filtrar en Imágen estática o en No página 50 No se pueden visualizar los arc...

Страница 227: ...1 Mode d emploi FR ...

Страница 228: ...2 ...

Страница 229: ...éléviseur à écran plasma à l unité de réception 20 Branchement de l antenne et du magnétoscope 22 Première mise en service Mise sous tension et mémorisation automatique des chaînes du téléviseur 23 Système des menus Introduction au Système des menus et son utilisation 26 Contrôle de l image 26 Contrôle du son 28 Commande écran 30 Fonctions 33 Réglage 37 Temporisation 41 Statut téléviseur Coordonné...

Страница 230: ...tions complémentaires Connexion des équipements en option 61 Utilisation des équipements en option 65 Configuration de la télécommande pour un magnétoscope ou un DVD 66 Spécifications 68 Dépannage 71 Les principaux émetteurs français 76 Table des matières ...

Страница 231: ...tilisés des équipements médicaux Cela pourrait entraîner un mauvais fonctionnement des instruments médicaux Pour l écran plasma Installation L installation de l écran sur le mur doit être effectuée par un personnel qualifié Une installation incorrecte peutêtredangereusepour l appareil en cas de tremblement de terre etc Transport L écran plasma doit être transporté par deux personnes ou plus Faute ...

Страница 232: ...Les secousses du véhicule pourraient le faire tomber et provoquer des blessures Bateau ou voilier N installez pas l appareil sur un bateau ni sur un voilier S il est exposé à recevoir de l eau de mer un incendie peut se déclarer ou l appareil peut être endommagé Eau et humidité N utilisez pas ce téléviseur près d une source d eau par ex près d une baignoire ou d une douche Et ne l exposez pas non ...

Страница 233: ...s entrées de la partie inférieure de l unité ne soient pas bloquées Unité de réception Vue d en haut N installez jamais l unité de réception dans un espace réduit Il peut se produire une surchauffe qui pourrait provoquer un incendie ou endommager l unité Assurez le bon fonctionnement de l unité en lui apportant la ventilation adéquate par un ventilateur d extraction 30cm 10cm 10cm 10cm Laissez au ...

Страница 234: ...lacer cette prise par une prise plus adéquate Câblage Débranchez le câble secteur lorsque vous installez des câbles Pour votre propre sécurité assurez vous que le câble secteur est débranché lorsque vous réaliserez des connexions Humidité Ne touchez pas le câble électrique avec les mains humides Si vous branchez ou débranchez le câble secteur avec les mains humides vous risquez de recevoir une déc...

Страница 235: ...tez pas que cet appareil soit exposé à l humidité Ne renversez jamais aucun liquide sur cet appareil Si pour une raison quelconque il reçoit un liquide ou qu un objet solide est introduit dans l appareil ne le faites pas fonctionner Il pourrait se produire une décharge électrique ou l appareil pourrait être endommagé Faites le vérifier immédiatement par le service après vente Pour ne pas risquer u...

Страница 236: ... appareil au bord de la mer la salinité peut faire rouiller les parties métalliques et causer des dégâts internes ou provoquer un incendie Elle peut aussi raccourcir la durée de vie utile de l appareil Si l appareil doit être soumis à l une de ces conditions il convient de prendre des mesures qui réduiront l humidité et la température du lieu dans lequel il est placé Accessoires Protégez l écran p...

Страница 237: ...la fiche d alimentation Suivez les instructions de fonctionnement lorsque vous débranchez le câble d antenne ou câble optique Si le câble secteur ou le câble d antenne ou câble optique est détérioré ne l utilisez pas et demandez à votre fournisseur ou au service technique Sony de le changer Hors d usage Pour des raisons environnementales et de sécurité il est recommandé de ne pas laisser le télévi...

Страница 238: ...déconnecter totalement l appareil retirez la prise de courant Réglage du volume Maintenez un volume sonore qui ne gêne pas vos voisins Le son se transmet très facilement pendant la nuit nous vous conseillons donc de fermer les fenêtres ou d utiliser un casque Si vous utilisez un casque réglez le volume de façon à éviter un volume sonore excessif qui pourrait abîmer les tympans Marquage Compte tenu...

Страница 239: ...midifié d une solution d un détergent léger N utilisez aucun type d éponge abrasive de dégraissant pour la poussière ni de solvant comme l alcool ou l essence Ce type de contact peut endommager la surface de l écran Nettoyage du boîtier Assurez vous que le câble secteur connecté à l unité de réception est bien débranché avant de procéder au nettoyage Nettoyez le boîtier du téléviseur avec le chiff...

Страница 240: ...ur avec prise de terre que dans le Royaume Uni Pour utiliser ces câbles secteur se reporter à NOTICE POUR LES USAGERS DU ROYAUME UNI page 2 GB Suivant le pays il se peut que ces câbles secteur ne soient pas fournis Deux câbles CA Type C 5 N utilisez ces câbles secteur avec prise de terre qu en Suisse Suivant le pays il se peut que ce câble secteur ne soit pas fourni N ôtez pas les noyaux de ferrit...

Страница 241: ... 41 Voyant de SUPPRESSION DE L IMAGE Il s éclaire lorsqu on appuie sur la touche suppression de l image de la télécommande pour supprimer l image Seule l image est supprimée le son reste Si le téléviseur est connecté à un ordinateur personnel ou à l équipement graphique d un magnétoscope à système DPMS Display Power Management System Système de gestion de consommation de l image l appareil réduira...

Страница 242: ... plusieurs reprises sur la touche jusqu à ce que le voyant d entrée correspondant s éclaire Pour de plus amples détails consultez le chapitre Utilisation des équipements en option page 65 Voyant de mode TV 1 Voyant de connecteur d entrée 1 2 Voyant de connecteur d entrée 2 3 Voyant de connecteur d entrée 3 4 Voyant de connecteur d entrée 4 5 Voyant de connecteur d entrée 5 6 Voyant de connecteur d...

Страница 243: ...des chaînes Appuyez sur cette touche pour sélectionner les chaînes Pour des numéros de chaîne à deux chiffres introduisez le second chiffre en moins de 2 5 secondes Touches Description 6 6 6 6 a Si le Sélecteur Appareil est sur la position TV Appuyez sur cette touche pour visualiser la dernière chaîne sélectionnée active pendant 5 secondes au moins b Si le Sélecteur Appareil est sur la position VC...

Страница 244: ...sélectionnée b Si le Sélecteur Appareil est sur la position VCR magnétoscope ou DVD Utilisez ces touches pour contrôler les principales fonctions du magnétoscope ou du DVD NexTView Reportez vous au chapitre NexTView page 58 ª ª ª ª Sélection du Télétexte Appuyez sur cette touche pour activer le Télétexte º º º º Sélecteur Appareil Avec cette télécommande vous pouvez non seulement contrôler le télé...

Страница 245: ...19 FR Insertion des piles dans la télécommande Vérifiez que les piles sont correctement placées Respectez l environnement déposez les piles usagées dans les conteneurs prévus à cet effet m Installation ...

Страница 246: ...e télévision Type C 4 Type BF ou Type C 5 reportez vous à la page 14 1 Connectez à l appareil le câble de connexion écran et le câble secteur fournis pour le téléviseur Ne branchez pas le câble secteur au réseau avant d avoir réalisé toutes les connexions BLACK WHITE DISPLAY SIGNAL IN SONY EXCLUSIVE CABLE ONLY AC IN Installation Voir page suivante SVP ...

Страница 247: ...ont jointes au support mural ou au pied 4 Connectez le câble de connexion fourni à l unité de réception Prise CA prise électrique de l écran Capuchon de sûreté de la fiche de courant fourni Câble d alimentation fourni b Enfoncez le dans la prise CA en serrant jusqu à ce que vous entendiez un claquement a Réunissez le capuchon de sûreté de la fiche de courant fourni au câble d alimentation 1 R D D ...

Страница 248: ... G W G L G S I R D D D 2 3 4 DISPLAY SIGNAL OUT BLACK WHITE AC IN OUT IN Pour toute information complémentaire concernant la connexion d un magnétoscope consultez Connexion des équipements en option page 61 Ne branchez le câble secteur au réseau qu après avoir complété toutes les connexions Connectez le câble coaxial fourni Connectez le câble secteur fourni Câble coaxial C 4 Câble coaxial BF ou Câ...

Страница 249: ...au réseau 100 240 VCA 50 60 Hz pourl écran 220 240 VCA 50 Hz pour l unité de réception 2 Lorsque vous connectez le téléviseur pour la première fois celui ci s allume automatiquement Si ce n était pas le cas appuyez sur la touche marche arrêt située sur la partie frontale de votre téléviseur pour l allumer La première fois que vous allumerez le téléviseur le menu Language Langue apparaîtra automati...

Страница 250: ...our sélectionner Oui 7 La recherche et la mémorisation automatique de toutes les chaînes émetteurs TV disponibles commencent Ce processus peut demander quelques minutes Soyez patient et n appuyez sur aucune touche tant que durera le processus de mémorisation Sinon le processus ne serait pas complet Si le téléviseur n a trouvé aucune chaîne pendant la mémorisation automatique vous verrez apparaître...

Страница 251: ...touche ou pour sélectionner le numéro de la chaîne et le canal émetteur TV que vous désirez changer de place et appuyez ensuite sur la touche b Appuyez sur la touche ou pour sélectionner le nouveau numéro de chaîne sous lequel vous désirez mémoriser le canal émetteur TV que vous avez choisi et appuyez ensuite sur la touche c Reprenez B a et B b si vous désirez réorganiser d autres chaînes de télév...

Страница 252: ...avoir sélectionné l option que vous désirez modifier appuyez sur la touche puis appuyez à plusieurs reprises sur la touche ou pour modifier le réglage Ce menu vous permet aussi de modifier la qualité de l image des modes PC Jeu et Personnel en fonction du type de chaîne que vous êtes en train de regarder Mode Studio pour régler le contraste et la netteté de l image Standard pour une image adaptée ...

Страница 253: ...la touche ou pour raviver l image Réduc de bruit Auto Arrêt Basse Moyenne Haute Sélectionnez l option désirée pour réduire le niveau de bruit produit par l image en cas de signaux TV faibles Réduc de bruit ne peut être adapté sur des appareils connectés à l entrée de signal RVB branchée au connecteur PC d un signal DTV branché aux prises Y PB CB PR CR 5 ni au connecteur d entrée Memory Stick DTV e...

Страница 254: ...ciales de Dolby Laboratories Travaux confidentiels non publiés 1992 1997 Dolby Laboratories Tous droits réservés Aigus Appuyez sur la touche ou pour adoucir les suraigus Appuyez sur la touche ou pour accentuer les aigus Graves Appuyez sur la touche ou pour adoucir les graves Appuyez sur la touche ou pour accentuer les sons graves Balance Appuyez sur la touche ou pour favoriser le haut parleur gauc...

Страница 255: ...lectionnez Arrêt Volume i Appuyez sur la touche ou pour baisser le son du casque Appuyez sur la touche ou pour augmenter le son du casque Si vous réglez Liaison avec i sur Oui Volume i ne peut être réglé Son i stéréo Sélectionnez l option Son i stéréo du casque Mono Stereo Pour une émission stéréo sélectionnez Stéréo ou Mono Mono A B Pour une émission bilingue sélectionnez A pour le canal son 1 B ...

Страница 256: ... vous ayez sélectionné Oui ou Arrêt sur l option Auto 16 9 il vous est possible à tout moment de modifier le format de l écran en appuyant à plusieurs reprises sur la touche de la télécommande Sél Régl Quitter OK MENU Mode Contraste Luminosité Couleurs Teinte Netteté Réduc de bruit Image dynamique Ton couleur Correct couleur Correction Gamma R à Z Studio 80 0 0 0 0 Auto Oui Froid Oui Haute Contrôl...

Страница 257: ...Compromis entre les formats 4 3 et 16 9 Zoom Format de grand écran pour films en Cinémascope Plein Pour les émissions diffusées en 16 9 Si les parties inférieure et supérieure de l image sont tronquées appuyez sur la touche ou pour régler la position de l image sur l écran pour lire les sous titres p ex Format écran ne peut pas être réglé pour un signal HD branché sur connecteurs 5 Y PB CB PR CR n...

Страница 258: ... 5 Y PB CB PR CR ni pour l entrée Memory Stick Centrage hor Déplacement horizontal peut être réglé uniquement avec une source de signal RVB connecté sur une des entrées Peritel 1 2 ou 4 Lorsque Format écran est configuré à 4 3 ou Plein Taille vert Format vertical et Centrage vert Déplacement vertical ne peuvent pas être réglés pour appareil externe connecté Réglage des pixels L option Réglage des ...

Страница 259: ... sur la touche 2 Appuyez sur la touche ou pour sélectionner le signal de sortie désiré Principal Le son du téléviseur passe par les haut parleurs du téléviseur Entrée centrale Lorsqu on connecte un ampli externe aux terminaux CENTRE SPEAKER IN du téléviseur les haut parleurs du téléviseur émettent le son de l ampli qui devient le haut parleur central Arrêt Le son du téléviseur ne passe pas par ses...

Страница 260: ...n des haut parleurs du téléviseur lorsqu un ampli externe est connecté aux sorties audio du téléviseur Pour cela 1 Après avoir sélectionné l option appuyez sur la touche 2 Appuyez sur la touche ou pour sélectionner Variable si vous désirez utiliser la télécommande du téléviseur ou bien Fixe si vous préférez utiliser la télécommande de l ampli externe Lorsque vous connectez la souris AV et que vous...

Страница 261: ...atiquement au bout de 30 minutes Si le marquage de l écran dure répétez les étapes ci dessus mentionnées Pour mettre volontairement fin à ce processus appuyez sur l une des touches de la télécommande à l exception des touches du son Sortie AV3 Sortie AV4 Les options Sortie AV3 et Sortie AV4 vous permettent de sélectionner la source qui doit sortir des connecteurs Péritels 3 et 4 A partir de ces co...

Страница 262: ...au connecteur Péritel 4 et aux connecteurs 5 Y PB CB PR CR Pour cela 1 Après avoir sélectionné l option appuyez sur la touche 2 Appuyez sur la touche ou pour sélectionner Auto ou Manuel Auto Le signal du magnétoscope DVD entre par le connecteur Péritel 4 Manuel Le signal du magnétoscope DVD entre par les connecteurs 5 Y PB CB PR CR Si le signal du magnétoscope DVD a un format 576p sélectionnez le ...

Страница 263: ...Mise sous tension et mémorisation automatique des chaînes du téléviseur étapes 6 et 7 page 23 Ordre des chaînes L option Ordre des chaînes vous permet de modifier l ordre d apparition des chaînes émetteurs TV sur l écran Pour cela 1 Après avoir sélectionné l option appuyez sur la touche 2 Procédez comme il vous est indiqué au chapitre Mise sous tension et mémorisation automatique des chaînes du té...

Страница 264: ... connecté à ce téléviseur Pour cela 1 Après avoir sélectionné l option appuyez sur la touche 2 Appuyez sur la touche ou pour sélectionner l entrée à laquelle vous désirez donner un nom puis appuyez sur la touche 3 Dans la colonne Nom un nom prédéterminé apparaîtra automatiquement a Si vous désirez utiliser l une des noms prédéterminées Câble Jeu Cam DVD Vidéo ou SAT appuyez sur la touche ou pour s...

Страница 265: ...ite sur la touche Après cela appuyez sur les touches numériques pour introduire directement le numéro du canal de l émetteur TV Si vous ne le connaissez pas appuyez sur la touche ou pour le chercher Lorsque vous avez mémorisé le canal recherché appuyez sur la touche OK 8 L option Confirmer étant mise en valeur appuyez sur la touche OK Puis appuyez sur la touche pour sélectionner OK et finalement a...

Страница 266: ...omettre est affichée sur l écran sélectionnez l option Saut et appuyez sur la touche 3 Appuyez sur la touche ou pour sélectionner Oui et appuyez sur la touche OK 4 L option Confirmer étant mise en valeur appuyez sur la touche OK Appuyez ensuite sur la touche pour sélectionner OK et appuyez enfin sur la touche OK pour la mémoriser Si vous désirez plus tard annuler cette fonction sélectionnez Non au...

Страница 267: ...L option Régl horloge vous permet de mettre l horloge à l heure La marge d erreur de l horloge incorporée au téléviseur est de 30 secondes par mois Pour cela 1 Après avoir sélectionné l option appuyez sur la touche 2 Appuyez sur la touche ou pour déterminer l heure puis appuyez sur la touche 3 Appuyez sur la touche ou pour déterminer les minutes puis appuyez sur la touche 4 Appuyez sur la touche o...

Страница 268: ... en mode veille standby 7 Appuyez sur la touche ou pour sélectionner Réglage hebdo appuyez ensuite sur la touche 8 Appuyez sur la touche ou pour sélectionner le jour de la semaine que vous fixez pour l option Minuterie O N appuyez ensuite sur la touche 9 Appuyez sur la touche ou pour sélectionner Oui appuyez ensuite sur la touche 10 Reprenez les étapes 8 et 9 pour configurer d autres jours de la s...

Страница 269: ...en mode veille standby faute de signal d entrée de l appareil connecté Pour cela 1 Après avoir sélectionné l option appuyez sur la touche 2 Appuyez sur la touche ou pour sélectionner Oui Arrêt auto ne peut pas être sélectionné lorsque le téléviseur reçoit un signal d une émission de télévision Système des menus ...

Страница 270: ...igné à chaque téléviseur Nº série tuner Numéro de série assigné à chaque unité de réception Sél Régl Quitter OK MENU Mode Contraste Luminosité Couleurs Teinte Netteté Réduc de bruit Image dynamique Ton couleur Correct couleur Correction Gamma R à Z Studio 80 0 0 0 0 Auto Oui Froid Oui Haute Contrôle de l image Sél Quitter MENU Nom modèle N série écran N série tuner KE 50MR1 20000001 40000001 Statu...

Страница 271: ... technologie standard pour comprimer une image fixe extension jpg JPEG est l acronyme de Joint Photographic Experts Group la société qui a créé ce format DCF est l acronyme de Design Rules for Camera file Systems qui comprend des spécifications établies par la Japan Electronic Industry Development Association JEIDA MPEG est l un des formats de technologie de compression d une image animée extensio...

Страница 272: ... de reproduction MagicGate Memory Stick Equipé avec la technologie MagicGate de protection du droit de reproduction Memory Stick ROM Mémorise des données lecture seule pré enregistrées Dans le Memory Stick ROM les données pré enregistrées ne peuvent être ni enregistrées ni effacées Types de Memory Stick compatibles avec le téléviseur Avec votre téléviseur vous pouvez utiliser trois types de Memory...

Страница 273: ...mber le Memory Stick et ne lui donnez pas de coups violents Ne démontez ni ne modifiez le Memory Stick Ne permettez pas que le Memory Stick se trouve exposé à l humidité N utilisez ni ne conservez le Memory Stick dans un lieu sujet à des températures extrêmes comme par ex dans une voiture garée au soleil ou sous un soleil brûlant la lumière directe du soleil une forte humidité ou une exposition à ...

Страница 274: ...he Memory Stick toujours la marque b vers le haut comme vous le montre l illustration ci dessous La lampe d accès du Memory Stick clignote Assurez vous de bien insérer le Memory Stick dans le bon sens Si le Memory Stick est forcé dans le sens contraire le Memory Stick lui même ou l encoche d entrée peuvent être abîmés N insérez que le Memory Stick dans l encoche du Memory Stick Si vous tentez d in...

Страница 275: ...r la touche Memory Stick Pour connecter l entrée Memory Stick appuyez à plusieurs reprises sur la touche jusqu à ce que le voyant Memory Stick de l unité de réception s allume voir page 16 OK PROG MENU TV VIDEO Memory Stick Diaporama Option Sél dossier 100MSDCF Origine Memory Stick Sél Préc Régl Enter n 1 1234 Taille 1024x768 Fichier SPJP0001 JPG Date 7 15 2002 12 34 Marque Origine Memory Stick No...

Страница 276: ...es suivant le nom du fichier ou la dernière date d enregistrement dans l ordre ascendant descendant Filtre Ne filtre que les images fixes Image fixe ou les images en mouvement Cinéma sans tenir compte du contenu Les fonctions Trier Filtre ne peuvent être activées que lorsque Mode photo num est placé sur Arrêt L information de la situation dans laquelle se trouve Filtre est visualisée sur Origine M...

Страница 277: ...Memory Stick sont affichées sur l écran 3 Appuyez sur la touche ou pour mettre en valeur Sél dossier et appuyez ensuite sur la touche OK Le menu Sél dossier est affiché sur l écran 4 Appuyez sur la touche pour sélectionner la liste des dossiers et appuyez ensuite sur la touche ou pour sélectionner le dossier que vous désirez voir Puis appuyez sur la touche OK Un index d images minimisées est affic...

Страница 278: ...it visualisé ou bien appuyez sur la touche pour sélectionner le curseur et appuyez ensuite sur la touche Un index d images minimisés s inscrit sur l écran contenant toutes les pages Sur l écran s incrit le menu index minimisé Vous pouvez maintenant sélectionner l une ou l autre des options suivantes Appuyez sur la touche ou pour sélectionner les options et appuyez ensuite sur la touche OK Option D...

Страница 279: ...e sur la touche OK Une image protégée ne peut être ni retournée ni effacée Si l interrupteur de protection de l écriture est sur la position LOCK on ne peut ni retourner ni effacer les images du Memory Stick L image qui a été retournée est conservée ainsi dans le Memory Stick et est présentée à nouveau ainsi à la prochaine ouverture Option Description Retour Retourne au menu d origine du Memory St...

Страница 280: ... N Reproduire pause Reproduit une image animée Pendant la reproduction le bouton de reproduction change pour le bouton X pause Lorsque la reproduction s achève elle s arrête à la première image de l enregistrement que l on vient de visualiser x Arrêt Arrête la reproduction Écrancomplet Montre une image animée sur plein écran et commence automatiquement la reproduction Pour revenir au Lecteur vidéo...

Страница 281: ...e OK Si vous configurez Diapo avan en Manuel Appuyez sur la touche OK pour visualiser le menu index et appuyez ensuite sur ou pour sélectionner Retour 1 Insérez un Memory Stick contenant les images que vous désirez voir 2 Appuyez sur la touche Memory Stick Le contenu du Memory Stick apparaît sur l écran 3 Appuyez sur la touche ou pour mettre en valeur Sél dossier et appuyez ensuite sur la touche O...

Страница 282: ...ssier que vous avez sélectionné bien que Filtre soit configuré en Cinéma dans le menu Option Pas de fichier d image fixe Il n existe aucun fichier images fixes dans le dossier que vous avez sélectioné bien que Filtre soit configuré en Image fixe dans le menu Option Lecture impossible Erreur irrécupérable sur les données d image du film Memory Stick verrouillé Le commutateur de sécurité contre l ef...

Страница 283: ...mation soit à nouveau cachée Quitter le service Télétexte Appuyez sur la touche Fastext Le télétexte est un service d information que diffuse la plupart des chaînes télévisées La page du sommaire du service de télétexte en général la page 100 explique comment utiliser ce service Pour évoluer à l intérieur du télétexte utilisez les touches de la télécommande comme indiqué ci dessous Vérifiez que vo...

Страница 284: ...w s affiche en noir Appuyez alors sur la touche de la télécommande pour voir l écran Vision d ensemble voir la fig 2 page suivante Au moment où vous entrez dans le service NexTView le des données disponibles de NexTView s affichera dans le coin gauche inférieur Après être rentré dans ce service le des données n augmentera pas 3 Pour naviguer sur NexTView Appuyez sur la touche ou pour vous déplacer...

Страница 285: ...ne chaîne de télévision qui ne dispose pas de son propre service NexTView Les options Enregistrer et Rappeler ne seront pas disponibles si le programme que vous avez sélectionné est déjà commencé 01 Lun TV1 TV2 TV3 TV4 TV5 TV6 TV7 TV8 00 30 01 30 05 30 06 30 07 30 08 30 09 30 10 30 S o n g s f r o m t h e s h o w s We a t h e r f o re c a s t i n f o r m a t i A 1 n e w s m a g a z i n e A r t s s...

Страница 286: ...e 8 chaînes de télévision vous pouvez en choisir 8 pour créer votre propre liste Après avoir configuré votre liste personnelle vous pouvez toujours revenir à la liste originale Pour cela il suffit de sélectionner Auto en appuyant sur la touche de la télécommande spectacles programmes pour enfants liste de rappel Présente la liste de tous les programmes 5 au maximum que vous avez choisis pour le ra...

Страница 287: ...ts optionnels les câbles de connexion ne sont pas fournis 6 5 4 3 2 1 6 6 6 PC MEMORY STICK PROG PROG MENU PC OK L G S I R D D D 6 5 4 3 2 1 6 6 6 PC PROG PROG MENU PC OK L G S I R D D D MEMORY STICK Caméscope S VHS Hi8 DVC i Casque Ordinateur personnel Pour éviter les bruits sur image ne connectez pas simultanément des équipements externes aux connecteurs E et F Informations complémentaires Voir ...

Страница 288: ...ectez le connecteur d entrée CONTROL S IN de l appareil au connecteur de sortie CONTROL S OUT du téléviseur avec le câble CONTROL S 1 R D D D 5 5 L G S I Y CTRL S CENTRE SPEAKER IN 180W 6 MAX PB CB PR CR SMARTLINK SMARTLINK AV MOUSE W G W G L G S I R D D D 2 3 4 DISPLAY SIGNAL OUT BLACK WHITE AC IN 1 2 Amplificateur Home Cinema Sub woofer SA WD100 Décodeur PlayStation Equipement hi fi Magnétoscope...

Страница 289: ... connecteur 4 et aux connecteurs Y PB CB PR CR de 5 Sélectionnez le menu Fonctions et configurez Sélect entrée AV4 de Manuel page 36 Connexion avec un appareil audio externe Pour écouter le son du téléviseur sur une chaîne Hi Fi Si vous désirez que le son du téléviseur soit amplifié connectez votre Hi fi sur la sortie audio J Sélectionnez le menu Fonctions sur le Système des Menus et configurez Ha...

Страница 290: ...ions et configurez Haut parleur en Entrée centrale Lorsque vous connectez la souris AV Lorsque vous connectez la souris AV et que vous l installez sur un ampli externe vous pouvez utiliser la télécommande de l ampli pour contrôler le volume du son de l ampli externe en la dirigeant vers le téléviseur Connectez la souris AV sur l entrée O du AV MOUSE IN et installez la juste au dessus du senseur de...

Страница 291: ...ntrée sélectionnée Signaux d entrée 1 ou 2 1 ou 2 Signal d entrée audio vidéo par le connecteur Péritel H 1 ou 2 1 ou 2 Signal d entrée RVB par le connecteur Péritel H Ce symbole n apparaît que si une entrée RVB est connectée 3 ou 4 3 ou 4 Signal d entrée audio vidéo par le connecteur Péritel I ou N 3 3 Signal d entrée S Video par le connecteur Péritel I 4 4 Signal d entrée RVB par le connecteur P...

Страница 292: ...pareil est sur la position TV vous ne pourrez entrer aucun code en mémoire 2 Avant que le voyant vert ne s éteigne appuyez sur la touche jaune pendant environ 6 secondes jusqu à ce que le voyant vert commence à clignoter 3 Pendant que le voyant vert clignote utilisez les touches numériques de la télécommande pour introduire le code à trois chiffres qui correspond à l appareil reportez vous à la pa...

Страница 293: ...VC 006 017 GRUNDIG 358 355 360 361 320 351 KENWOOD 008 HITACHI 327 333 334 LG 015 014 JVC 314 315 322 344 352 353 LOEWE 009 028 023 024 016 003 354 348 349 MATSUI 013 016 LG 332 338 ONKYO 022 LOEWE 358 355 360 361 320 351 PANASONIC 018 027 020 002 MATSUI 356 357 PHILIPS 009 028 023 024 016 003 ORION 328 PIONEER 004 PANASONIC 321 323 SAMSUNG 011 014 PHILIPS 311 312 313 316 317 318 SANYO 007 358 359...

Страница 294: ...G H D K L I Standard couleur PAL SECAM NTSC 3 58 4 43 entrée vidéo seulement Antenne Terminal externe de 75 Ohms pour VHF UHF Couverture de canaux VHF E2 E12 UHF E21 E69 CATV S1 S20 HYPER S21 S41 D K R1 R12 R21 R69 L F2 F10 B Q F21 F69 I UHF B21 B69 Connecteurs arrière 1 Connecteur Péritel de 21 broches norme CENELEC y compris entrée audio vidéo entrée RVB sorties audio vidéo TV 2 Connecteur Périt...

Страница 295: ...on 2 x 15 W Accessoires fournis 1 télécommande RM 972 2 piles taille AAA type R03 1 câble de connexion pour l écran 1 câble coaxial 1 souris AV 2 câbles secteur type C 4 2 câbles secteur type BF 2 câbles secteur type C 5 Les câbles secteur de type BF et C 5 peuvent ne pas être fournis suivant le pays 1 chiffon de nettoyage Un capuchon de protection pour la fiche de courant Divers Télétexte Fastext...

Страница 296: ...724 74 550 17 852x480 IO_DATA 60 32 000 60 000 18 1024x768 VESA 60 48 363 60 004 19 1024x768 VESA 70 56 476 70 069 20 1024x768 VESA 75 60 023 75 029 21 1024x768 VESA 85 68 677 84 997 22 1152x864 VESA 70 63 99 70 02 23 1152x864 VESA 75 67 500 75 000 24 1152x864 VESA 85 77 49 85 06 25 1152x864 MAC21 68 681 75 061 26 1152x900 SUN LO 61 80 65 95 27 1152x900 SUN HI 71 72 76 05 28 1280x960 VESA 60 60 00...

Страница 297: ...s d usage 3 5 ans d utilisation dans des conditions normales 1 2 ans sur la côte Lignes de points ou bandes Eloignez le téléviseur des sources de bruits d origine électrique telles que voitures motos ou sèche cheveux Pas de couleur programmes couleur en noir et blanc Par le système de menus entrez dans le menu Réglage de l image et sélectionnez R à Z pour revenir aux réglages d usine page 27 Si vo...

Страница 298: ...quel fonctionne le téléviseur page 37 Pour les langues cyrilliques il est conseillé de sélectionner la Russie si le pays proprement dit ne figure pas sur la liste Caractères erronés en regardant NexTView Par le système des menus entrez dans l option Langue Pays du menu Réglage et sélectionnez le pays d où est émis le NexTView page 37 Pas de son Son mais bruits Image de bonne qualité mais pas de so...

Страница 299: ...du signal vidéo est correctement branché et que toutes les fiches électriques branchées n ont pas de jeu dans les prises Vérifiez que les contacts du connecteur 15 Dsub de l entrée vidéo ne sont pas tordus ou enfoncés Problèmes causés par l ordinateur connecté L ordinateur est probablement en mode économie d énergie Vérifiez le en tapant sur n importe quelle touche de l ordinateur Vérifiez que l o...

Страница 300: ...duit et sa qualité peut être inférieure à l original Ceci n indique en rien un mauvais fonctionnement de l appareil Image à spectre Eliminez les extensions du câble du magnétoscope et ou des boîtiers de distribution du magnétoscope Vérifiez que toutes les fiches bipolaires sont fermement plantées dans les prises L image n est pas bien centrée ou dimensionnée Par le système des menus sélectionnez l...

Страница 301: ...ez la protection d écriture en fermant LOCK Le fichier images est protégé Libérez la protection de l écran index On ne peut pas voir les fichiers images fixe en format JPEG qui sont mémorisés sur un Memory Stick Sélectionnez Option du menu Origine Memory Stick et sélectionnez ensuite Fichier Après avoir fait cela placez Filtre sur Image fixe ou sur Arrêt page 50 Il est impossible de voir les fichi...

Страница 302: ...rullemail 48 51 54 04 CAEN Mont Pincon CHU 22 25 28 09 38 60 26 CANNES Vallarius 63 27 CARCASSONE Pic de Nore 64 58 61 03V 28 CHAMBERY Mont du Chat 29 58 23 08 29 CHAMONIX Aiguille du Midi 25 28 22 30 CHAMPAGNOLLE Le Bulay 58 61 64 31 CHARTES Montlandon 55 50 63 09 47 32 CHAUMONT Chalindray 52 49 55 33 CHERBOURG Olgosville 65 59 62 06 ou 08 35 34 CLERMONT FERRAND Puy de Côme ROYAT 22 28 25 05 58 6...

Страница 303: ...34 37 95 PRIVAS Crète Blandine 64 58 61 96 QUIMPER 29 37 31 06 97 REIMS Charleville 29 23 26 36 98 REIMS Hutvillers 43 46 40 09 63 99 RENNES Saint Pern 39 45 42 07 34 31 100 ROUEN Grande Couronne 23 33 26 07 59 62 101 SAINT ETTIENNE Croix de Guizay 35 30 33 38 65 62 102 SAINT ETTIENNE Pilat 46 40 43 10 103 SAINT FLOUR Vabres 52 49 55 104 SAINT GINGOLPH Montpélerin 39 41 63 105 SAINT MALO 53V 45 42...

Страница 304: ...78 Les principaux émetteurs français Informations complémentaires Répartition Européenne des normes et standards ...

Страница 305: ...http www world sony com Sony España S A Printed in Spain IMPRESO EN ESPAÑA Dep Leg B 42013 2002 BENGAR Granollers ...

Отзывы: