background image

NW-ZX505/ZX507

22

Sony CONFIDENTIAL

For Authorized Servicer

VARIOUS  INITIALIZATION  METHOD

It can perform the various initialization from the settings menu of 
the WALKMAN main unit. Refer to the following, please execute 
the appropriate initialization.

•  Various initialization item

Reset Wi-Fi 
& Bluetooth

This will reset all network settings, including fol-
lowing.
(Registration information of Bluetooth audio 
device is not reset)
• Wi-Fi
• Bluetooth

Reset 
application 
preferences

This will reset all preferences for following.
(You will not lose any application data)
• Disabled applications
• Disabled application noti

fi

 cations

• Default applications for actions
• Background data restrictions for applications
• Any permission restrictions

Erase all 
data (fac-
tory reset)

This will erase all data from this walkman’s inter-
nal storage, including following.
• Google account
• System and application data and settings
• Downloaded applications
• Music
• Photos
• Other user data

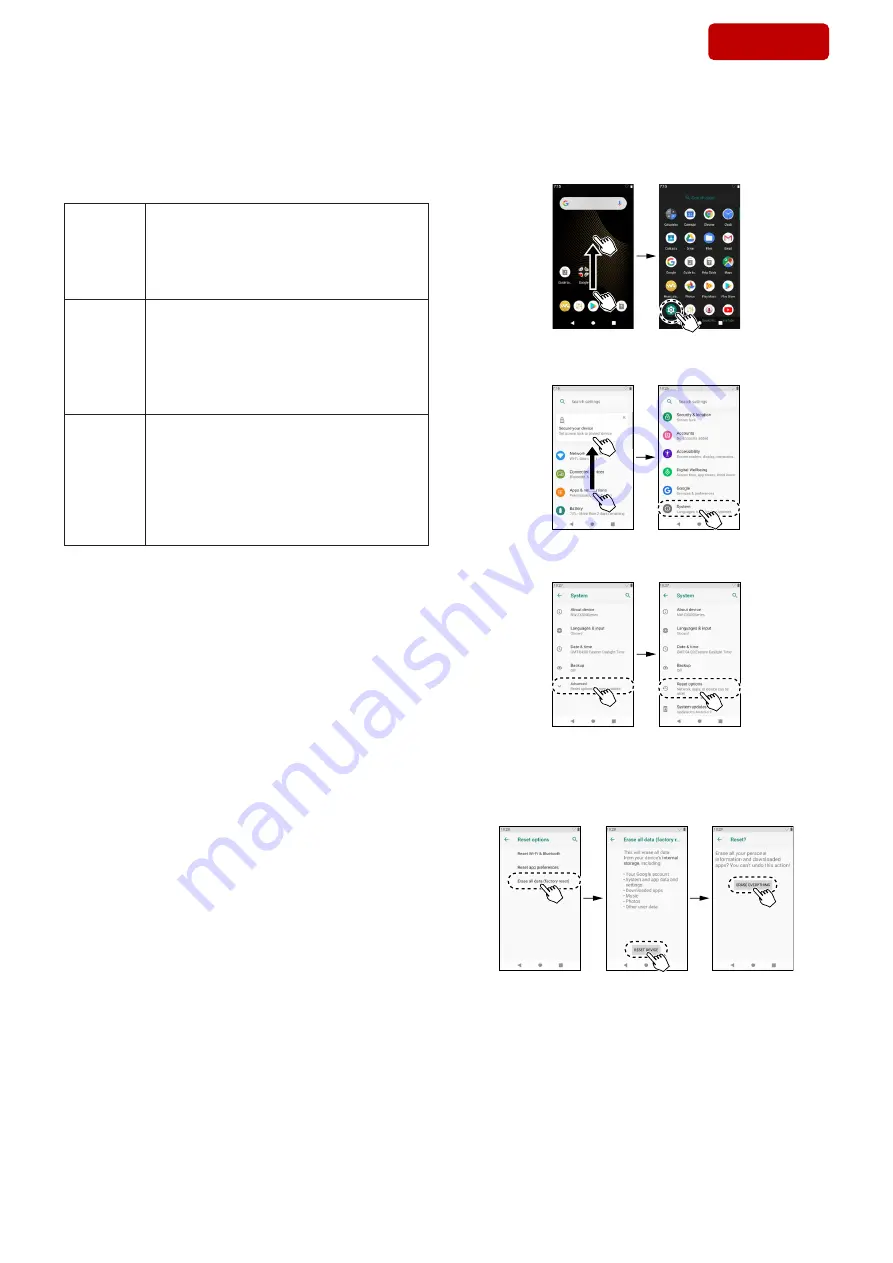
Initialization procedure:

1.  Swipe up on the home screen to display the list of applications, 

and touch [Settings].

Home screen

2.  Swipe up on the setting screen and touch [System].

3. Touch 

[Advanced] 

t

 [Reset options].

4.  Various reset items are displayed. Select the item you want to 

execute.

 (The 

fi

 gure below shows an example when “Erase all data (fac-

tory reset)” is selected.)

SYS SET

2019/12/13 00:24:41 (GMT+09:00)

Содержание WALKMAN NW-ZX505

Страница 1: ... prior written permission of the author Notwithstanding foregoing it is permitted to copy and distribute this information to the Permitted users 5 Please notify immediately any leakage loss theft misappropriation or other misuse of this information by e mail to the following address somk gcs tissnexim adm jp sony com 6 In addition to the above the terms and conditions of the Service agreement shal...

Страница 2: ... HD AAC NFC Active type for reader and writer Sensor Accelerometer Microphone Monaural Headphone Out Stereo mini jack Frequency response 20 Hz 40 000 Hz Headphone Out Balanced standard jack Frequency response 20 Hz 40 000 Hz General Power Source Built in battery Built in Rechargeable lithium ion Battery Charging and Power supply USB power from a computer via a USB Charging Time USB charging Approx...

Страница 3: ...n the battery faster than the above values Maximum recordable number of songs NW ZX505 16 GB MP3 128 kbps Approx 1 700 songs AAC 256 kbps Approx 800 songs FLAC 44 1 kHz 16 bit Approx 150 songs FLAC 96 kHz 24 bit Approx 40 songs FLAC 192 kHz 24 bit Approx 20 songs DSD 2 8224 MHz 1 bit Approx 30 songs NW ZX507 64 GB MP3 128 kbps Approx 13 000 songs AAC 256 kbps Approx 6 600 songs FLAC 44 1 kHz 16 bi...

Страница 4: ...trademarks or registered trademarks of Microsoft Corporation in the United States and or other countries Apple Mac and iTunes are trademarks of Apple Inc registered in the U S and other countries The Bluetooth word mark and logos are registered trademarks owned by Bluetooth SIG Inc and any use of such marks by Sony Corporation is under license Other trademarks and trade names are those of their re...

Страница 5: ... battery wire ABOUT INSULATING OF THE EDLC ASSY When OFC wire of the EDLC assy is removed from board insulate the end of OFC wire by wrap of a tape etc to prevent short circuited of the OFC wire part of EDLC assy Wrap by the tape etc and insulate the end of battery wire OFC wire EDLC assy NOTE OF DISPOSE THE BUILT IN LITHIUM ION STOR AGE BATTERY When dispose of the built in lithium ion storage bat...

Страница 6: ...DENTIFICATION To identify the model name or destination of the main unit check the label on the rear side of the main unit or check the engraved model number label on the bottom side Note 1 NW ZX507 US CND has no label on the back side of the main unit Note 2 Content on the model number label may be changed in the midway of production Note 3 Use the notation in in the figure below when setting the...

Страница 7: ... work IMPORTANT NOTE OF REPLACING THE MAIN BOARD above of replacing the MAIN board USB Type C cable or USB Type C cable Outlet 2 2 Screen display at start up When the WALKMAN main unit is charged state the unit will auto matically start up in test mode Note 1 If you hold down the 1 button for about 5 seconds without charg ing the unit will start up in test mode but be sure to charge state it If th...

Страница 8: ...al settings such as destination and main unit body color 4 1 Others mode menu display Each setting is made in the Others mode item in the test mode menu Note 1 Test mode menus other than Others are not used in each initial setting Note 2 Never use items not specified in Other mode If an item that is not specified by mistake is entered switch the HOLD switch in the order of OFF t ON to return to th...

Страница 9: ...age 8 to enter the Others mode menu state 1 Press the or button on the Others mode menu screen select Set destination and press the u button Diagnosis APP ver X XX XX Others RTC check Set destination Sound pressure FW version check NAND check Bundle HP check Color variation EU Vol regulation Console ON OFF Printk ON OFF Safety standard 40th anniversary Key and IV U Boot password Diagnosis APP ver ...

Страница 10: ... the test mode menu after setting the destination refer to 4 1 Others mode menu display on page 8 to switch to the Others mode menu screen 1 Press the or button on the Others mode menu screen select Color variation and press the u button Diagnosis APP ver X XX XX Others RTC check Set destination Sound pressure FW version check NAND check Bundle HP check Color variation EU Vol regulation Console ON...

Страница 11: ...GPS NFC Read Write G Sensor USB Touch screen Key SD card NVP Security Others Reboot Shutdown Log Others mode menu screen Test mode menu screen OFF r ON ON r OFF r ON HOLD switch or ON OFF This completes the main unit body color setting Perform 5 Pre Installed Content Setting while keeping the test mode menu screen is displayed 5 Pre Installed Content Setting Write pre installed content to the WALK...

Страница 12: ..._wallpaper png Important_ Information pdf 5 3 PC configuration setting for executing the pre in stalled content setting It is necessary to set the operation configuration in advance to the using PC to execute the Pre installed content setting Note 1 If you are using a PC that has already been set up with a PC opera tion configuration do not need to perform this work Go to 5 4 Perform pre installed...

Страница 13: ...d under the message in step 2 enter y and press Enter input 4 Check that message in the figure below is displayed under the message in step 3 enter y and press Enter input 5 Click the Next button on the Device Driver Installation Wiz ard screen click 6 If the screen to check permission of installation is displayed click the Install button Note 2 Depending on the state of the PC this process is not...

Страница 14: ...led content setting Write the pre installed content on the WALKMAN main unit Used tool folder name Pre installed content NW ZX500_Contents_WW Except CH NW ZX500_Contents_CN CH Pre installed content setting tool NWA100ZX500_TransferTool_x xx Note 1 When checking the destination of this unit refer to MODEL IDENTIFICATION on page 6 Note 2 x xx of tool name indicates the version Be sure to use the lat...

Страница 15: ...ng 6 Factory Setting Firmware Writing Write the firmware to set the WALKMAN main unit to the product state IMPORTANT NOTE Be sure to perform each test mode and each initial setting are complete before factory setting firmware writing When factory setting firmware writing is started each test mode and each initial setting cannot be performed 6 1 Advance preparation a Windows PC OS Windows 10 or lat...

Страница 16: ...Press the or button on the Reboot screen select Fast Boot and press the u button Diagnosis APP ver X XX XX Reboot Reboot FastBoot Diagnosis APP ver X XX XX Reboot Reboot FastBoot Reboot RBT FSBT command WAIT Reboot Reboot screen button Move up button Move down Select FastBoot Reboot screen u button Decision FastBoot screen 3 On the FastBoot screen press the or button to switch WAIT to OK and then ...

Страница 17: ...C Users xxxx Desktop xxxx _ 12 When writing is completed the Walkman main unit restarts automatically check that the following display appears on the Walkman main unit screen and close the PowerShell window on the PC Hi there ENGLISH START Vision Settings 13 Disconnect the WALKMAN main unit from the PC USB Type C cable 14 Press and hold the 1 button on the WALKMAN main unit then touch Power off fr...

Страница 18: ... y USB C Procedure Note 1 If the model information check tool does not work properly restart the computer and start again from step 1 1 Connect the WALKMAN main unit to a PC by the USB Type C cable The power supply of the WALKMAN is automatically turned on USB Type C cable 2 Check that the WALKMAN is recognized by the MTP connec tion 3 The Use USB for screen will be displayed on the WALKMAN main u...

Страница 19: ...e not equipped with a noise canceling function or Bluetooth function that support balanced con nection Connecting to the line input terminal of other equipment may cause a malfunction 7 4 Check the output of the headphone jack stereo mini Connect headphones with a stereo mini plug to the headphone jack stereo mini and check that sound is output correctly 7 5 Check the NFC connection Refer to NFC C...

Страница 20: ... connection check Note 5 If the YES t PAIR CONNECT is touched and connection completed touch N mark of the WALKMAN and N mark of the Bluetooth audio device once again and Bluetooth connection is disconnected Then performed the Erase all data factory reset page 22 from the Settings menu of the WALKMAN please delete the registered information of Bluetooth audio device What to do if you can not conne...

Страница 21: ...n check again pop up menu is displayed See Footnote 2 Note 2 Be careful not to slip out of place the terminal connection Replace a new NFC antenna NFC connection checking is complete Yes Replace a new KEY FPC NFC connection checking is complete Yes Replace the MAIN board as a result of perform the NFC connection check pop up menu is displayed NFC connection checking is completion Yes No Replace th...

Страница 22: ...cations Disabled application notifications Default applications for actions Background data restrictions for applications Any permission restrictions Erase all data fac tory reset This will erase all data from this walkman s inter nal storage including following Google account System and application data and settings Downloaded applications Music Photos Other user data Initialization procedure 1 S...

Страница 23: ...matic diagram printed wiring board and electrical parts list have not described in this service manual JIG When disassembling or assembling this unit prepare the following jig Detouch Supporter It is used to peeling adhesive sheet fixing the lithium ion storage battery Confirm with each service headquarters for the obtaining method of this jig tape tesa ASC Tool for disassembling Use it according ...

Страница 24: ...HEN REUSING THE LITHIUM ION STORAGE BATTERY Page 34 2 9 LITHIUM ION STORAGE BATTERY 2 Page 32 2 10 LITHIUM ION STORAGE BATTERY 3 BATTERY SHEET Page 33 2 12 HP SE ASSY STEREO MINI SUPPORT BATTERY ASSY 1 Page 35 2 13 HP SE ASSY STEREO MINI SUPPORT BATTERY ASSY 2 JACK RING S STEREO MINI SIDE JACK HOOK S STEREO MINI SIDE Page 36 2 14 HP SE ASSY STEREO MINI SUPPORT BATTERY ASSY 3 Page 37 2 15 MAIN BOAR...

Страница 25: ...n installing the rear cover assy align the two bosses and two holes 4 rear cover assy 2 Peel off the adhesive sheet rear cover from the corner at the bottom side and lift up the rear cover assy 3 Peel off the rear cover assy carefully taking care not to damage it 1 Remove the card lid assy in the direction of the arrow Note 1 Take care not to lose or damage it as it will be detached from this unit...

Страница 26: ... panel spring B rear panel spring C rear panel spring D Preparation 1 Preparing a clip Preparation 2 Protecting the edges of the cabinet with protection sheets 2 Hold the prepared clip as shown below 1 Prepare a clip diameter 0 8 mm and bend it to the shape as shown below Prepare the protection sheets and affix them to four places on the cabinet assy 3 Insert the prepared clip into the rear panel ...

Страница 27: ...n the direction of the arrow qa rear panel block rear panel block front side bottom side top side front side cabinet block rear panel spring rear panel spring rear panel spring rear panel spring 5 Lift the rear panel block in the direction of the arrow and insert a tool for disassembling etc into the gap 8 Move the tool for disassembling etc to the center 1 Align the top sides of the rear panel bl...

Страница 28: ...ide bottom side rear panel block NFC antenna FPC 4 NFC antenna Note 1 When installing the NFC antenna align the two holes of NFC antenna and two holes of rear panel block NFC antenna FPC rear panel block top side Turn over bottom side top side hole hole hole hole hole 1 Peel the NFC antenna FPC off of the rear panel block 2 Peel the NFC antenna off of the rear panel block 3 Draw the NFC antenna FP...

Страница 29: ...de 1 spacer rear 3 insulation sheet rear 3DVWLQJ SRVLWLRQ RI WKH LQVXODWLRQ VKHHW UHDU 4 claw 5 Lift up the EDLC assy in the direction of the arrow 4 claw 6 claw 6 claw 7 Remove the support rear top block in the direction of the arrow 9 support rear top block 8 Draw the EDLC assy out of the support rear top block hole hole top side insulation sheet rear SYS SET 2019 12 13 00 24 41 GMT 09 00 ...

Страница 30: ...e Note 3 Remove the solder of the wire white See Note 1 sheet wire detector 4 EDLC assy Note When wire of the EDLC assy is removed from MAIN board insulate the end of wire by wrap of a tape etc to prevent short circuited of the wire part of the EDLC assy top side 5 Remove the solder of the wire black 6 Remove the solder of the wire white EDLC board block OFC wire EDLC OFC wire EDLC SYS SET 2019 12...

Страница 31: ...attery support battery assy MAIN board 1 Press the battery sheet to the side of the battery support 3 Soldering the battery wire red 5 Soldering the battery wire white 4 Soldering the battery wire black lower black upper white HP BTL detect wire 6 Push the HP BTL detect wire in the direction of the arrow 7 sheet wire detector OK NG HP BTL detect wire HP BTL detect wire Note 2 Arrange the HP BTL de...

Страница 32: ...n is important 5 Use the Detouch Supporter as a support point and wind the adhesive sheet battery slowly and carefully Note 6 Take care so that the adhesive sheet battery does not tear midway If the adhesive sheet battery is torn midway and remains under the lithium ion storage battery the adhesive sheet cannot be peeled off exclusively Note 5 As you slowly wind the adhesive sheet battery so that ...

Страница 33: ...t installed to lithium ion storage battery needs to be replaced 4 battery sheet QVWDOODWLRQ SRVLWLRQ RI WKH EDWWHU DVV 0 5 mm guide line right side top side Note 1 In case of the lithium ion storage battery are damaged during the process of peeling the adhesive sheet such as scratches or exterior swelled etc on the lithium ion storage battery the lithium ion storage battery cannot be reused In tha...

Страница 34: ...hesive sheet battery up to the opposite side and affix 6 Fold the battery sheet on both sides and affix lithium ion storage battery reuse battery sheet reuse guide line guide line guide line center guide line center battery assy qa Installing the battery assy QVWDOODWLRQ SRVLWLRQ RI WKH EDWWHU DVV 0 5 mm guide line right side top side Attach in order from 1 to qa guide line guide line guide line 1...

Страница 35: ...lder of the HP OFC wire SE R white black marking 4 sheet strap 4 sheet strap Attach in order from 1 to 7 1 Soldering the HP OFC wire SE RG black silver marking RZ WR LQVWDOO WKH 3 2 ZLUH VWHUHR PLQL top side HP SE assy MAIN board 2 Soldering the HP OFC wire SE R white black marking 4 sheet strap 4 sheet strap 5 Soldering the HP OFC wire SE LG black 6 Soldering the OFC wire EDLC white 3 6 DVV VWHUH...

Страница 36: ...op view RZ WR LQVWDOO WKH MDFN KRRN 6 jack hook S 3 Lock the three claws 3 Rotate the jack hook S counter clockwise to remove the lock 2 Rotate the jack hook S clockwise 1 Align the jack hook S with the hole shape of the cabinet and install tweezers etc 2 jack ring S assy 4 jack hook S 1 Insert the clip etc into the hole from the inner side of the cabinet and then push the jack ring S assy upward ...

Страница 37: ...W RI WKH NQRE 2 VZLWFK 8 battery support block Note 2 When installing the battery support block align the switch and knob HOLD switch bottom side 1 rear panel spacer See Fig B 3 three screws M1 4 L 4 0 mm top side QQHU YLHZ rear panel spacer guide line LJ QVWDOODWLRQ SRVLWLRQ RI WKH UHDU SDQHO VSDFHU guide line top side QQHU YLHZ rear panel spacer guide line LJ QVWDOODWLRQ SRVLWLRQ RI WKH UHDU SDQ...

Страница 38: ...OFC wire BTL RP white L 26 0 mm 3 7 DVV EDODQFH VWDQGDUG 3 2 ZLUH FRQQHFWLRQ FRPSOHWH HP OFC wire BTL RN right side black silver marking HP OFC wire BTL LN left side black HP OFC wire BTL RP right side white L 26 0 mm HP OFC wire BTL LP left side white L 21 0 mm BTL HP detect connector red black 2 BTL HP detect connector See Fig D Note Never pull the wire portion 7 LCD FPC connector LJ LJ 7RS YLHZ...

Страница 39: ...out of the hole 9 Draw the USB connector out of the hole 5 Lift up the MAIN board in the direction of the arrow Note 2 When installing the MAIN board align the hole and boss board positioning boss See Fig E board positioning boss board positioning hole See Fig E Fig E board positioning hole MAIN board conductor side top side USB connector top side Note about installing the MAIN board When installi...

Страница 40: ...f the cabinet block 5 support front top 4 adhesive sheet pin button 4 adhesive sheet pin button top side cabinet block block bass Align the total nine holes QVWDOODWLRQ SRVLWLRQ RI WKH EORFN EDVV QVWDOODWLRQ SRVLWLRQ RI WKH VXSSRUW IURQW WRS EORFN top side cabinet block Align the boss and hole support front top block Align the boss and hole 3DVWLQJ SRVLWLRQ RI WKH DGKHVLYH VKHHW SLQ EXWWRQ URQW YL...

Страница 41: ...n the direction of the arrow 5 jack hook B 4 Remove the jack hook B in the direction of the arrow hole hole 9 cabinet assy See Note 1 8 USB escutcheon Note 1 When the cabinet assy is replaced with a new part the serial number is changed 1 Push HP BTL assy RZ WR LQVWDOO WKH 3 7 DVV 2 Push Note 2 When installing the HP BTL assy align the screw hole USB escutcheon 7 Remove the USB escutcheon in the d...

Страница 42: ...USB Touch screen Key SD card NVP Security Others Reboot Shutdown Log SONY logo display Starting screen Start up screen 3 TEST MODE SHUTDOWN METHOD To turn off the power in the test mode state perform the following operation When the power is turned on after turning off the power it will start again in the test mode state Note 1 The WALKMAN main unit cannot be turned off by pressing the 1 button Pr...

Страница 43: ...heck DeepSleep check Charge check Battery voltage Battery status Thermistor check 5 1 1 Power supply voltage check Voltage check It can be check the power supply voltage in the state where all power supply lines are starting Note It is necessary to disassemble the WALKMAN main unit and in the state possible to check the board Procedure 1 Press the or button to select the Power and press the u or b...

Страница 44: ...KMAN main unit and in the state possible to check the board Procedure 1 Press the or button to select the Power and press the u or button to enter the minor item 2 Press the or button to select the DeepSleep check 3 Press the u button enter the state of the deep sleep Screen display is turned off 4 In step 3 state check the measuring the consumption current in standby Continued on upper right 5 Sl...

Страница 45: ...F t ON or ON t OFF t ON to return to minor item selection screen 5 2 2 S N check S N check It can be output the Sampling rate 44 1 kHz Frequency 0 kHz L R ch Bit rate 16 bit audio signal for the S N check Procedure 1 Press the or button to select the Audio and press the u or button to enter the minor item 2 Press the or button to select the S N check 3 Press the u button the audio signal output sc...

Страница 46: ...F t ON or ON t OFF t ON to return to minor item selection screen 5 2 6 CH separation R ch check Separation R check It can be output the Sampling rate 44 1 kHz Frequency 1 kHz R ch Bit rate 16 bit audio signal for the separation R ch check Procedure 1 Press the or button to select the Audio and press the u or button to enter the minor item 2 Press the or button to select the Separation R check 3 Pr...

Страница 47: ...rn to minor item selection screen 5 2 18 HP BTL gain setting HP BTL gain Note Not used in this unit 5 2 19 HP SE gain setting HP SE gain Note Not used in this unit 5 2 20 Headphone check HP check Note Not used for the servicing 5 2 21 LPA check LPA check Note Not used for the servicing 5 2 8 Normalizer check Normalizer Note Not used for the servicing 5 2 9 Sound pressure regulation level check Sou...

Страница 48: ...ghtness changes in the following order brightness 120 default y brightness 180 y brightness 240 y brightness 1 y brightness 60 y brightness 120 6 Switch the HOLD switch in the order of OFF t ON or ON t OFF t ON to return to minor item selection screen 5 3 2 Arbitrary picture display Show picture Note Not used for the servicing 5 2 22 Microphone check D MIC check The microphone signal can be output...

Страница 49: ...lay MAC address 3 Press the u button the MAC address is displayed Displayed characters values in the following figure are exam ple WiFi WIF DMAC command MAC address 12 34 56 78 90 ab Screen display 4 Switch the HOLD switch in the order of OFF t ON or ON t OFF t ON to return to minor item selection screen 5 7 4 Access point information display Display AP information Note Not used for the servicing ...

Страница 50: ...he WALKMAN main unit it may not be received correctly In that case check in a place where there are no obstacles GPS GPS GNSS command Detect GNSS info Detect date 2019 9 13 02 14 01 ID 006 009 023 028 071 Total 5 Page 1 1 SNR 31 27 34 37 14 ELV 47 0 0 20 10 AZI 310 0 0 202 29 Screen display 5 If the number of GPS satellites received in step 4 exceeds one screen press the or button to switch the sc...

Страница 51: ...play NFC test tools NFC RTAG command 70 100 Detect tag test oooooooooo oooooooooo oooooooooo oooooooooo oooooooooo oooooooxxx xxxxxxxxxx xxxxxxxxxx xxxxxxxooo oooooooooo 4 Detection is updated every 100 milliseconds If detect the NFC tag to be displayed O If not detect the NFC tag to be displayed X Note Detection history will be displayed up to 100 5 Switch the HOLD switch in the order of OFF t ON...

Страница 52: ...return to minor item selection screen 5 10 2 Self test execution Execute the Self test It can be execute a self test of the acceleration sensor Procedure 1 Press the or button to select the G Sensor and press the u or button to enter the minor item 2 Press the or button to select the Execute the Self test 3 Press the u button the self test screen is displayed Displayed characters values in the fol...

Страница 53: ...values Status released or pressed Screen display 5 Press the button and erase the touch locus 6 Switch the HOLD switch in the order of OFF t ON or ON t OFF t ON to return to minor item selection screen 5 12 2 Cross check Cross check It can be displayed the black line of touch locus of touch panel and change the line dot Procedure 1 Press the or button to select the Touch screen and press the u or ...

Страница 54: ... in the screen corresponding to the pressed key button is selected every time the each key button of the WALKMAN main unit is pressed 1 u Slide HOLD switch in the direction of on 5 When all of the keys are checked Key push OK is displayed Screen display Key push KEY PUSH command LEFT PLAY RIGHT HOLD POWER Key push OK VOL VOL 6 Slide the HOLD switch from ON t OFF return to minor item selection scre...

Страница 55: ...ert balanced connection headphones and press the u but ton check that inserted is displayed Next remove balanced connection headphones and press the u button check that removed is displayed Connection status KEY CSTS command Type BTL inserted Screen display When inserted headphones inserted r When removed headphones removed Continued on upper right 6 Press the or button to select the SE HP 3P 7 In...

Страница 56: ...eck FW version check It can be check the firmware version model name series name serial number Procedure 1 Press the or button to select the Others and press the u or button to enter the minor item 2 Press the or button to select the FW version check 3 Press the u button the firmware version model name series name serial number are displayed Displayed characters values in the following figure are ...

Страница 57: ...Note Not used for the servicing 5 17 12 40th anniversary model setting 40th anniversary Note Not used in this unit 5 17 13 Key and IV check Key and IV Note Not used for the servicing 5 17 14 U Boot password check U Boot password Note Not used for the servicing 5 18 Reboot Reboot Screen display Diagnosis APP ver X XX XX Reboot Reboot FastBoot 5 18 1 Reboot Reboot Note Not used for the servicing 5 1...

Страница 58: ...er NW ZX507 US CND 3 X50008941 SVX REAR COVER CN 507 ASSY Including Adhesive sheet rear cover SS label NW ZX507 CH 3 X50008991 SVX REAR COVER CEW ASSY Including Adhesive sheet rear cover SS label NW ZX507 AEP UK 3 X50009001 SVX REAR COVER EE ASSY Including Adhesive sheet rear cover SS label NW ZX507 RU 3 X50009011 SVX REAR COVER E ASSY Including Adhesive sheet rear cover SS label NW ZX507 E AUS 3 ...

Страница 59: ...ied not supplied not supplied not supplied not supplied not supplied not supplied not supplied not supplied not supplied not supplied not supplied not supplied 51 51 52 52 51 325413601 SCREW B1 4 L 4 0 mm 52 457390731 SCREW NDS EL M1 4 L 5 0 mm NFC1 100279311 NFC ANTENNA Ref No Part No Description Remark Ref No Part No Description Remark Ver 1 1 SYS SET 2019 12 13 00 24 41 GMT 09 00 ...

Страница 60: ... Ref No BAT1 is removed from MAIN board insulate the end of wire by wrap of a tape etc to prevent short circuited of the wire part of the battery assy Note 3 When the battery assy Ref No BAT1 is replaced refer to CHECKING THE NEW LITHIUM ION STORAGE BAT TERY FOR BEFORE USE AND NOTES ON HANDLING on page 5 Note 4 When disposing of the battery assy Ref No BAT1 refer to NOTE OF DISPOSE THE BUILT IN LI...

Страница 61: ... 4 L 3 0 mm 153 500553402 SHEET WLAN SUPPRESSION 154 469680001 SCREW STEP 155 459394901 SHEET WIRE DETECTOR 156 453368121 SHEET STRAP 157 325413601 SCREW B1 4 L 4 0 mm 158 930100234 MAIN BOARD COMPLETE SV Including HP OFC wire Sheet Jack cushion SD cover Washer Protection sheet S NW ZX505 See Note 158 930100235 MAIN BOARD COMPLETE SV Including HP OFC wire Sheet Jack cushion SD cover Washer Protect...

Страница 62: ...NW ZX507 AEP UK See Note CAB1 930100223 SVX CABINET B ASSY CN 16G Including LCD BT WIFI GPS antenna Jack ring B Cushion Button Button hinge Knob Strap holder Knob base Antenna spring Light guide Lid escutcheon Adhesive sheet for Black NW ZX505 CH See Note CAB1 930100224 SVX CABINET S ASSY UC Including LCD BT WIFI GPS antenna Jack ring B Cushion Button Button hinge Knob Strap holder Knob base Anten...

Страница 63: ...NESE NW ZX505 CH NW ZX507 CH 500602811 MANUAL INSTRUCTION ENGLISH FRENCH GERMAN SPANISH DUTCH ITALIAN PORTUGUESE GREEK NW ZX507 AEP UK 500602821 MANUAL INSTRUCTION POLISH CZECH HUNGARIAN BULGARIAN SLOVAK SLOVENIAN ROMANIAN NW ZX507 AEP UK 500602831 MANUAL INSTRUCTION ENGLISH FRENCH NW ZX507 US CND 500602841 MANUAL INSTRUCTION ENGLISH RUSSIAN ARABIC TRADITIONAL CHINESE SIMPLIFIED CHINESE KOREAN NW ...

Страница 64: ...ervicer Ver Date Description of Revision 1 0 2019 10 New 1 1 2019 12 Addition of RU model NW ZX507 Change of Part for SCREW Ref No 51 Change of Part No and part composition position for SUPPRESSION SHEET WLAN Ref No 153 SMR 19020 SYS SET 2019 12 13 00 24 41 GMT 09 00 ...

Отзывы: