background image

Controlling Power Management

61

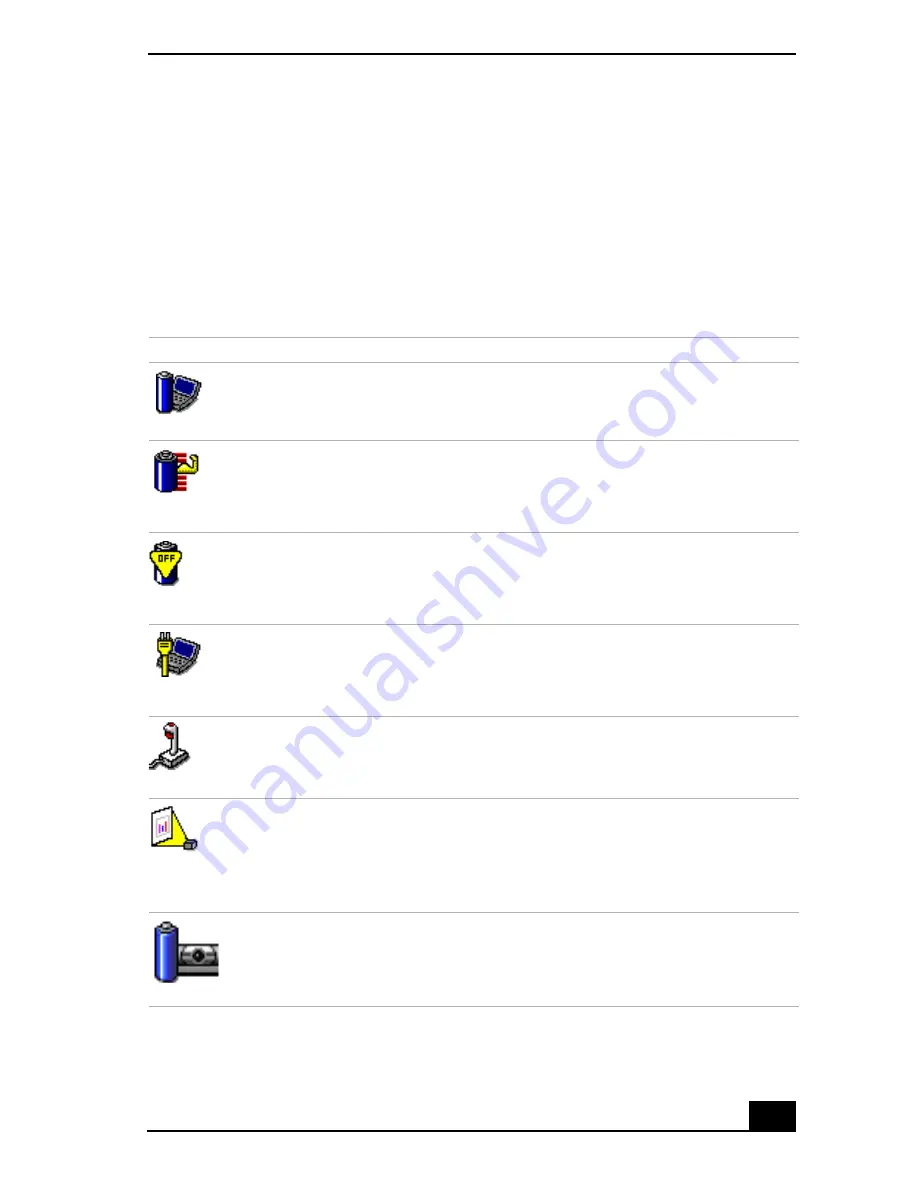
Power Management Profiles

The PowerPanel utility provides several predefined power management profiles. 
Each profile consists of a group of power management settings that are designed 
to meet specific power management goals— ranging from maximum power 
management to no power management. You can change the settings for any of the 
predefined profiles (except for the Disable Power Management profile), or you 
can create your own profile to suit your portable computing needs. The 
predefined profiles are:

Icon

Description

Maximum Performance

Provides the best system performance while still conserving power.

Maximum Battery Life

Provides power saving features to give you maximum battery life and good 
performance. It slows the notebook and puts it into Standby mode after a 
specified time period.

Disable Power Management 

Turns off all power management features such as Standby and Hibernate 
modes.
You can not change the settings of this profile.

AC Power 

The power management state when AC power is in use. Similar to the 
Power Management Off setting. Power Management automatically loads 
the AC profile unless you disable this feature.

Games

Disables the display and the Hard Disk Standby timer.

Presentation

Keeps the display on at all times while it conserves power. This option is 
ideal for slide show presentations. You can establish settings for LCD 
(Video) Standby, Hard Disk Standby, and Standby to optimize power 
management for your system.

Camera

Optimizes performance and power requirements for camera usage.

Содержание VAIO PCG-SR27

Страница 1: ...LINK Network Connection 22 Windows Me 22 Windows 2000 22 The Jog Dial Control 23 Using the Jog Dial Control 23 Launcher Mode 24 Guide Mode 24 Using the Jog Dial Control with Sony Software 25 Using the Jog Dial Control with Other Software 25 VAIO Action Setup 26 Using Memory Stick Media 26 Types of Memory Stick Media 26 Handling and Storing Memory Stick Media 27 Inserting a Memory Stick Media 28 Re...

Страница 2: ...Up Your Ethernet Connection 38 Connecting Peripheral Devices 41 Connecting a Floppy Disk Drive Optional 41 To Disconnect a Floppy Disk Drive When the Notebook is On 43 To Carry a Floppy Disk Drive 44 Connecting an i LINK Device 45 DVgate Applications 46 Hard Drive Partition 47 To Defragment a Partition 47 Connecting a Universal Serial Bus USB Device 48 To Connect a USB Device 48 Connecting an Exte...

Страница 3: ...attery Power 63 Displaying Battery Information 63 To Activate Battery Information Toolbar 63 Battery Icon Descriptions 64 Displaying Detailed Battery Information 65 Changing the Window Design of Sony Software 65 Selecting the Display Mode 66 Using the Dual Display Function Windows Me only 68 Selecting Dual Display Mode 68 Setting the Colors and Resolution for Each Display 69 Customizing the Virtua...

Страница 4: ... CD 89 Transferring Songs Check in Check out 91 Additional Features 93 Notes on Performing the System Restore Function of System Tools on Windows Millennium Edition 94 Notes on Using Portable Players 94 PictureGear 95 Managing Your Pictures 95 Creating a Photo Album 95 Using Panorama Maker 96 Making Still Images and Panoramic from MPEG 96 Application Driver and System Recovery CDs 97 Using Your Re...

Страница 5: ...omatic Updates 111 Troubleshooting 117 Troubleshooting Your Notebook 117 Troubleshooting the LCD Screen 121 Troubleshooting the Mouse and Touchpad 122 Troubleshooting Drives PC Cards and Peripheral Devices 123 Troubleshooting Software 125 Troubleshooting the Modem 126 Troubleshooting Audio 127 Troubleshooting the Printer 128 Index 131 ...

Страница 6: ...Change to Current Document Title 6 ...

Страница 7: ...ar to that of a typewriter the keyboard has additional keys that perform specific computer related tasks Keyboard Escape Key Function Keys Print Screen Key Shift Key Fn Key Windows Key Alt Key Applications Key Numeric Keypad Area Navigation Keys Correction Keys Backspace Key Ctrl Key Fn Key ...

Страница 8: ...tions in your documents Function keys The 12 function keys along the top of the keyboard are used to perform designated tasks For example in many applications F1 is the Help key The task associated with each function key may vary from one application to the next Escape key The Esc Escape key is used to cancel commands Print Screen key The Print Screen key takes an electronic snapshot of the screen...

Страница 9: ... Fn Key in Combination with Other Keys Applications key The Applications key displays a shortcut menu of context sensitive choices pressing this key is the equivalent of clicking the right mouse button Indicators Functions Power Light is green when the notebook is powered on flashes amber when the notebook is in Standby mode and turns off when the notebook is in Hibernate mode or is powered off Ba...

Страница 10: ... in the numeric keypad are active The character keys in the keypad area are active Caps Lock The letters appear in uppercase as you type The Shift key lowers the case of typed letters when Caps Lock is on Letters appear in lower case as you type unless you hold down the Shift key Scroll Lock The screen scrolls differently Exactly how it scrolls depends on the specific application It has no effect ...

Страница 11: ...ndow to find a file or folder This is the equivalent of selecting Find then Files or Folders from the Start menu Ctrl F Displays the Windows Find Computer window where you can locate other computers This is the equivalent of selecting Find then Computer from the Start menu M Minimizes all displayed windows Shift M Returns all minimized windows to their previous size R Displays the Run window This ...

Страница 12: ...ecrease light intensity press Fn F5 then or Fn F7 Switch to the external display Toggles through the LCD external display and both LCD and external display Fn F12 Hibernate Puts the system in Hibernate mode which is the lowest level of power consumption When you execute this command the states of the system and the peripheral devices are written to the hard disk and the system power is turned off ...

Страница 13: ...can point to select drag and scroll objects on the screen using the built in touchpad Touchpad Actions Descriptions Point Slide one finger on the touchpad to place the pointer on an item or object Click Press the left button once Double click Press the left button twice Right button Left button Touchpad Pointer ...

Страница 14: ...ive choices Drag Slide one finger while pressing the left button Scroll Move your finger along the right edge of the touchpad to scroll vertically Move your finger along the bottom edge to scroll horizontally The scroll function is available only with applications that support a touchpad scroll feature See Mouse Properties for information on touchpad features such as clicking both buttons simultan...

Страница 15: ...card slot protector from the PC card slot See Using PC Cards for details 2 Remove the PC card from the bottom side of the CD drive 3 Insert the PC card into the PC card slot with the SONY logo facing up See Using PC Cards on page 18 for details You can connect the optical drive while the notebook is on unless you plan to use the System Recovery CDs Turn off your notebook before using the System Re...

Страница 16: ...the disc in the tray with the label side facing up Push the disc onto the hub until the disc clicks into place Inserting the PC Card A protective cover is attached to the lens of the CD ROM drive at the factory Before using the CD ROM drive remove this protective cover Using the CD ROM Drive Eject Button ...

Страница 17: ...shes while your notebook is reading data from the disc To Remove the Drive Remove the PC card from the notebook See Using PC Cards on page 18 for details Notes on CD Media Do not touch the surface of the disc Do not drop or bend the disc Inserting a Disc The Flashing BUSY Indicator Disc Busy Indicator ...

Страница 18: ...f the disc from the center out Wipe off any remaining moisture with a dry soft cloth Using PC Cards Your notebook includes a PC card slot PC cards allow you to connect portable external devices such as a CD ROM drive To Insert a PC Card The PC card slot can accommodate one Type I or Type II PC card This slot is compatible with 16 bit card and Card Bus ZV Zoomed Video port is not available Some PC ...

Страница 19: ...Using PC Cards 19 1 Insert the PC card in the PC card slot with front label facing up Eject Button Eject Button ...

Страница 20: ... orientation Do not carry your notebook while the head of the PC card such as a wireless LAN card is out of the slot Pressure or shock may damage the connector pins If you alternate between normal power operation and the Standby or Hibernate power management modes while the card is inserted a device connected to your system may not be recognized In such case reboot your system See the manual that ...

Страница 21: ...K 4 The message PC Card can now be safely removed from the system appears Click OK 5 Close the Unplug or Eject Hardware window 6 Pull the PC card release button up and press it in towards the notebook 7 Gently grasp the card and pull it out 8 Insert the PC card slot protector into the empty slot If you do not perform the following procedure for removing the PC card from the your notebook while the...

Страница 22: ...book to edit copy or delete files on the other notebook You can also print from a printer attached to either notebook See Smart Connect online help for more information i LINK is a trademark of Sony used only to designate that a product contains an IEEE 1394 connection The i LINK connection may vary depending on the software applications oper ating system and i LINK compatible devices All products...

Страница 23: ...er or document from a predefined list by rotating and pressing the Jog Dial control In addition when you press the Jog Dial control you can turn on your notebook automatically and start the selected application or document The Jog Dial control window always appears in the display It is either in the launcher mode or in the guide mode If you have previously purchased a VAIO computer or notebook tha...

Страница 24: ... Dial control to select the item you want then press the Jog Dial control The window switches to the guide mode and shows the Jog Dial s function 2 Turn or press the Jog Dial control to use the desired function 3 To select another item switch to the launcher mode and repeat from step 1 Guide Mode The Jog Dial control window is in the guide mode when software is in use and the software window is ac...

Страница 25: ...m the following functions Some software does not support these functions Action Description Maximize or Minimize Window Press the Jog Dial control button to maximize the size of the active window Press again to minimize or return to normal window size Finish Window Press the Jog Dial control button to close the active application Scroll Press the Jog Dial control button to begin scrolling within t...

Страница 26: ...settings using VAIO Action Setup right click the Jog Dial control icon or in the task tray and click Help Topics Using Memory Stick Media This new compact portable and versatile recording medium has a data capacity exceeding that of a floppy disk The media is specially designed for exchanging and sharing digital data with compatible products Because it is removable the media can be used for extern...

Страница 27: ...playback Handling and Storing Memory Stick Media Follow these guidelines when handling and storing Memory Stick media Do not touch the contacts on a Memory Stick media with your fingers or any metal object Use only the labels provided with a Memory Stick media Do not attach other labels to it Handle the media carefully Avoid dropping bending or subjecting it to shock or vibration Do not attempt to...

Страница 28: ...a slot on the left side of the notebook until it clicks into place When the Memory Stick media is properly in place Sony VisualFlow will automatically launch to display the contents of the Memory Stick To confirm that the Memory Stick media is inserted correctly check the Removable Disk S drive Inserting a Memory Stick Media Hold the Memory Stick media with the arrow pointing toward the slot To av...

Страница 29: ...ntents of the Memory Stick media Removing a Memory Stick Media 1 Ensure that the Memory Stick media indicator light is off 2 Push in the Memory Stick media eject button If you cannot find the Removable Disk S icon take the following steps Double click the System icon in Control Panel Device Manager appears If you cannot find the icon that you are looking for click Display all the options of the Co...

Страница 30: ...es like a Sony digital video camera recorder or digital still camera Insert the media into the Memory Stick media slot and save your movie or still image as data files to the Memory Stick media Use Sony s PictureGear software preinstalled with your notebook to move the files to a Memory Stick media Removing a Memory Stick Media Large image files require more time to load to a Memory Stick media Ej...

Страница 31: ...ia is designed with a write protect tab to protect valuable data from accidental erasure or overwriting Move the tab to the right or left to set or release write protection Using a Compatible Device Write protect off Data can be saved on the Memory Stick media Write protect on Data can be read from but not saved on the Memory Stick media Using the Write protect Tab LOCK LOCK LOCK Back of Memory St...

Страница 32: ...tage of power management settings to conserve battery life In addition to the normal operating mode which allows you to turn off specific devices your notebook has two distinct power saving modes Standby and Hibernate When using battery power you should be aware that the notebook automatically enters Hibernate mode when the remaining battery charge drops to approximately 10 regardless of the power...

Страница 33: ... mode To activate Hibernate mode press the key combination Fn F12 To return to normal mode Turn on the notebook by sliding the power switch forward The notebook returns to its previous state Time to return to normal mode Standby requires less time than Hibernate Power consumption Standby uses more power than Hibernate Windows 2000 Professional the Save to Disk Manager message appears then the note...

Страница 34: ...ng this time After one hour turn the power off and then on again To charge the internal backup battery fully keep the AC adapter connected for more than 24 hours after turning the power on You can use your notebook while charging the battery The operating system may become unstable if a lower power state such as Hibernate is initiated and then changed before the operating system completely enters ...

Страница 35: ...es or Phone and Modem Options dialog box 6 Open the modular jack cover Connecting to the Telephone Line You need to connect a phone line to take advantage of online services the Internet and Sony Customer Support The internal fax modem can only be connected to a subscriber telephone line Do not connect it to a PBX Private Branch Exchange Connecting to the PBX may cause a major system malfunction C...

Страница 36: ... notebook and that the modular jack clicks into place 3 Plug the other end into the wall jack Opening the Phone Line Jack Cover Plugging the Phone Line into Phone Line Jack Your notebook does not work with party lines cannot be connected to a coin operated telephone and may not work with multiple phone lines Some of these connections might result in excess electrical current and could cause a malf...

Страница 37: ...gth to less than 30 seconds which however may prevent a connection from being established due to some delays caused by the telephone switch It is advised to set the length to 30 seconds or more If your Internet service provider supports V 90 or 56K communications of up to 53 Kbps are available This may vary depending on the telephone line condition If you use a splitter to branch the telephone lin...

Страница 38: ...a network PC card For more information on using PC cards see Using PC Cards on page 18 of the User Guide Consult the network administrator to find out about the accessory settings required to access the network Setting Up Your Ethernet Connection To connect to the network Windows Me 1 Right click My Network Places and select Properties 2 Click the Identification tab and type in the notebook name w...

Страница 39: ...t to the network To set network components Windows Me 1 Right click My Network Places and select Properties 2 Click the Configuration tab This will give you access to a listing of installed network components If you do not see the component you desire click Add and follow the on screen installation instructions To set network components Windows 2000 1 Right click My Network Places and select Prope...

Страница 40: ...VAIO Notebook User Guide 40 ...

Страница 41: ...sal Serial Bus USB Device Connecting an External Display Recording from a Microphone or Audio Equipment Expanding Your Notebook Capabilities Connecting a Floppy Disk Drive Optional You can connect a Sony floppy disk drive PCGA UFD5 to the USB connector on your notebook as described below You do not need to shut down your notebook to connect or disconnect a floppy disk drive Before removing the flo...

Страница 42: ...ebook The VAIO logo on the disk drive should be facing up To Insert a Floppy Disk 1 Hold the floppy disk with the label side facing up 2 Gently push the floppy disk into the drive until it clicks into place Connecting a Floppy Disk Drive Inserting Floppy Disk Floppy Disk Drive Optional Attached USB Cable USB Connector Floppy Disk Floppy Disk Drive ...

Страница 43: ...isconnect a Floppy Disk Drive When the Notebook is On 1 Double click in the task tray 2 The Unplug or Eject Hardware dialog box appears 3 Select the Y E Data USB Floppy by clicking on it 4 Click Stop 5 Confirm the correct device is selected in the Stop a hardware device dialog box by clicking on Y E Data USB Floppy 6 The message The Y E DATA USB Floppy device can now be safely removed from the sys...

Страница 44: ...VAIO Notebook User Guide 44 To Carry a Floppy Disk Drive Fold the floppy disk cable into the compartment on the side of the floppy disk drive Carrying a Floppy Disk Drive ...

Страница 45: ...y images from it to your notebook via a Memory Stick media Copy images to the Memory Stick media and insert the media into the Memory Stick slot on your notebook See Using Memory Stick Media for more details on Memory Stick i LINK is a trademark of Sony used only to designate that a product contains an IEEE 1394 connection The i LINK connection may vary depending on the software applications oper ...

Страница 46: ... video camera your digital video camera recorder may need to be connected differently Only Sony digital video cameras and connectors labeled DV In Out or i LINK are i LINK compatible See the manual that came with your digital video camera recorder for more information on installation and use The i LINK connector does not supply power to external devices If the external device requires power from t...

Страница 47: ...ebook has been formatted with two partitions C and D DVgate Motion saves files to the D partition This prevents large video captures from consuming the available space on your C partition To maintain optimum performance of DVgate Motion you should defragment your D partition regularly See the DVgate Motion online help for more information To Defragment a Partition 1 Click the Start button in the W...

Страница 48: ...B cable in the notebook USB connector and the other end in the USB device You must use a USB cable optional to connect a printer to your notebook You can use the optional Sony USB mouse PCGA UMS1 series or the optional Sony floppy disk drive PCGA UFD5 with this notebook Plug the USB device into the USB port You do not need to turn off your notebook See the manual that came with your USB device for...

Страница 49: ... adapter supplied into the notebook VGA adaptor connector and plug the other end into the appropriate end of the display cable optional 3 Plug the other end of the optional display cable into the external display connector Ensure that one end of the power cord of the display is plugged into the display and the other end is plugged into an AC outlet Connecting a Monitor External Display Power Cord ...

Страница 50: ...ay adapter connector and unplug it from the notebook See the manual that came with your monitor for more information on installation and use Connecting a Projector See the manual that came with your projector for more information on installation and use Projector Audio Cable Optional VGA Adapter Supplied RGB Signal Cable Power Cord Monitor To To Headphone Connector To RGB In To Audio In ...

Страница 51: ...Microphone Line in connector is for both MIC IN monaural and LINE IN stereo Switching the connector functionality To switch the Microphone Line in m connector for use with a microphone or an audio device 1 Double click on the task tray located in the lower right corner of the Desktop window The Volume Control window appears 2 From the Options menu click Properties The Properties window appears 3 I...

Страница 52: ...just the sound device volume for playing or recording To adjust the volume when playing double click in the task tray located in the bottom right corner of the Desktop window The Volume Control window displays To adjust the sound of other devices from the Option menu click Properties In the Volume Adjust window select Playback and click the check box of the item you want to display in Control Clic...

Страница 53: ...ns of the Control Panel 3 Select the Synthesizer tab 4 Select the desired effect and then click OK To adjust the sound volume when recording double click in the task tray located in the lower right corner of the Desktop window 1 From the Options menu select Properties 2 In the Volume Adjust window select Recording and then click OK The Recording Control window appears Microphone1 Adjust the intern...

Страница 54: ...o List prioritize them and assign them due dates Synchronize your data with the software on your notebook to back up your data Track expenses when you are out of the office then transfer the data to your notebook Exchange data with your notebook The Wireless LAN Access Point The Wireless LAN Access Point which is also called the Access Point is designed for building a wireless LAN Local Area Netwo...

Страница 55: ... LAN environment The Wireless LAN PC Card can be used with or without the Access Point With the Access Point you can build a wireless LAN between computers that are equipped with the Wireless LAN PC Card and gain access to the Internet Without the Access Point you can achieve direct communication Peer to Peer mode between computers For information on available Sony products go to http www sonystyl...

Страница 56: ...VAIO Notebook User Guide 56 ...

Страница 57: ...Customizing Your VAIO Notebook 57 Customizing Your VAIO Notebook ...

Страница 58: ...lso refer to Sony Notebook Setup Help for more detailed information Displaying the Sony Notebook Setup Screen To display the Sony Notebook Setup screen 1 Click the Start button on the Windows taskbar 2 Point to VAIO and click Sony Notebook Setup 3 Select the tab for the item you want to change See Sony Notebook Setup Tabs 4 After you finish click OK Sony Notebook Setup Dialog Box ...

Страница 59: ...icates the performance level of the CPU Tab Description About This Computer Display system information including memory capacity serial number and BIOS version Printer Select printer port mode settings Initial Setting Change the volume of the sounds that play while the operating system is loading Select the order of drives and devices from which you want to load the operating system Touchpad When ...

Страница 60: ...omizing Power Management Settings You can customize power management settings such as the system timer and the brightness of the screen To customize a setting 1 Click the current profile icon on the Power Management toolbar 2 Select Edit Create Profiles from the menu 3 Click a profile whose setting you want to change from the list in the left panel 4 Double click an item whose setting you want to ...

Страница 61: ...er saving features to give you maximum battery life and good performance It slows the notebook and puts it into Standby mode after a specified time period Disable Power Management Turns off all power management features such as Standby and Hibernate modes You can not change the settings of this profile AC Power The power management state when AC power is in use Similar to the Power Management Off ...

Страница 62: ...h longer timeouts on the hard disk and display screen You can also establish settings for LCD Video Standby Hard Disk Standby and Standby to optimize power management for your system Spreadsheet Optimizes performance and power requirements for spreadsheet applications Communications Extends battery life by initiating a quick display timeout The Internal modem remains powered You can also establish...

Страница 63: ...ars on the taskbar Icon Description Standby Puts the system into Standby mode a power management state that saves the state of the system and peripheral devices in memory RAM Power consumption reduces to a minimum and the system remains on To return the system to the active state press any key or the power button on your notebook Hibernate Provides for the lowest level of power consumption The sys...

Страница 64: ...he lower right side of the screen Percentage indicator Displays the percentage of the remaining battery capacity Time indicator Displays estimated time hours minutes remaining before the battery fully drains also referred to as the time to empty Battery Icon Descriptions Battery Information Toolbar Battery Icon Battery Status Charging Fully charged Discharging No battery ...

Страница 65: ...ze the Battery Information toolbar to suit your portable computing needs including modifications to the alarm settings Refer to PowerPanel Help for more information Changing the Window Design of Sony Software To change the window design of Sony software 1 Click the Start button point to Settings and then point to Control Panel 2 Click UI Design Selector 3 Click or and select the desired design 4 C...

Страница 66: ...s connected to an external display When you connect an external display you can switch the display mode between your notebook s LCD display and the external monitor 1 Click the Start button point to Settings and then point to Control Panel 2 Click the Display icon The Display Properties window appears 3 Click the Settings tab and then click the Advanced button The S3 Inc Savage IX Display Driver P...

Страница 67: ...o display the notebook LCD screen and an external display or projector at the same time depending on the types of computer displays and projectors you are using The CRT option is disabled if an external computer monitor is not connected to the external monitor connector Turn on the notebook after you turn on the peripheral devices ...

Страница 68: ...one display and onto the other This allows you to drag objects such as an open application window or a toolbar from one display to the other This configuration of a single desktop distributed across separate displays is referred to as a virtual desktop Selecting Dual Display Mode 1 Click the Start button on the Windows taskbar 2 Point to Settings Control Panel 3 Click the Display icon The Display ...

Страница 69: ...Click OK or Apply Click OK to confirm your changes Customizing the Virtual Desktop You can customize Dual Display mode by changing the position of the two displays that form the virtual desktop In the Display Properties screen drag the icons of Monitor 1 or Monitor 2 to a new position that is relative to the other The two display icons must be connected to create a virtual desktop Click OK to appl...

Страница 70: ...Change to Current Document Title 70 ...

Страница 71: ...c equipment Disconnect the system from its power source and from any telecommunications links networks or modems before you open the system or follow any of the procedures described below Failure to do so may result in personal injury or equipment damage Electrostatic discharge ESD can damage disk drives and other components Perform the procedures described below only at an ESD workstation If such...

Страница 72: ...For Models with 128 MB Memory To Install a Memory Module 1 Turn off the notebook and all peripheral devices 2 Disconnect the power cord and all cables from the notebook and then remove the batteries The interior of the notebook becomes extremely hot during operation Wait at least one hour for the notebook to cool down before you remove the screws 3 Use a precision Phillips screwdriver that matches...

Страница 73: ...odule from its package touch a metal part of the notebook to discharge any static electricity accumulated on your body Remove the module from its protective package 6 Install the memory module by holding the module edge connector pointing down with the notch on the right and then insert it diagonally into an empty slot Location of Screws To avoid damaging the notebook do not remove or loosen any o...

Страница 74: ...original position by aligning it with the notch on the keyboard and then setting it on the keyboard Handle the palm rest gently to avoid breaking the attached cable A Memory Module Installing a Memory Module Do not touch any part of the motherboard or the other components inside the notebook Notch Edge Connector Empty Slot ...

Страница 75: ...se the Phillips screwdriver to tighten all six screws at the locations shown below To Remove a Memory Module 1 Perform steps 1 through 3 of To Install a Memory Module 2 Touch a metal object such as the connector panel on the back of your notebook to discharge static electricity Aligning the Palm Rest Notch on Keyboard ...

Страница 76: ...n on the notebook 2 Click the Start button point to VAIO and then click Sony Notebook Setup 3 Click the About This Notebook tab Check the System Memory displayed in the left panel to confirm that the correct memory amount is displayed If the memory amount on the display is not correct shut down the system turn off the notebook and repeat the installation procedures Removing a Memory Module ...

Страница 77: ...Confirming Added Memory Capacity 77 Sony Notebook Setup Dialog Box ...

Страница 78: ...VAIO Notebook User Guide 78 ...

Страница 79: ...e fidelity of documents created on all major computer platforms America Online America Online America Online is a popular Internet online service Stay in touch with family and friends with easy to use e mail manage your personal finances get the latest news and sports scores and chat with thousands of others who share your interests Adobe Photoshop Elements Windows Me only Adobe Systems Inc Adobe ...

Страница 80: ...ectronics Inc Connect a digital video camera recorder to the i LINK connector and capture your own video clips and still images You can edit the clips from your video add others and combine clips into new movie segments You can also save your images in a variety of popular file formats If your VAIO Notebook does not come with Adobe Premiere pre installed and you subsequently purchase that software...

Страница 81: ...world It embraces HTML as a first class file format and extends this software s ease of use to the Web and e mail Word 2002 also extends that ease of use to international users making it simple to create multilingual documents MovieShaker Sony Electronics Inc Sony s original MovieShaker software creates personal movies that have transitions background music and text Just import your video clips an...

Страница 82: ...e of the worlds most widely used personal music management systems Using RealJukebox you can capture the contents of a music CD manage and playback your music and view various music related information via the Internet This Custom RealJukebox for Sony allows seamless check out capabilities to a wide range of Sony personal audio devices and offers convenient links to Sony product and music service ...

Страница 83: ...ges the settings for your notebook s Jog Dial functions and i LINK interface VAIO Support Agent Sony Electronics Inc VAIO Support Agent provides immediate interactive on line support VisualFlow Sony Electronics Inc VisualFlow is a state of the art Sony multimedia browser designed specifically for Memory Stick media It displays any still picture movie or sound files stored in a Memory Stick media i...

Страница 84: ... still images pictures and music files and then saved in a format most computers can play Importing Images and Sound Clips 1 Click File Import or DV Import 2 Find the file you want to add 3 Select the file 4 Click Open The file is added to the Clip tray Main Window Importing files over 75 seconds in length may cause MovieShaker software to stop responding Clip tray Working Panel Product tray Editi...

Страница 85: ...ker tray 3 Click A thirty second scene is automatically generated and saved to the Product tray 4 To preview switch the scene from the Product Tray to the Work Panel and press play Shaker Tray Scenes created with Shaker begin with black frame and after processing are placed in the first available slot on the Product tray Limit the number of scenes placed on the Product tray to 10 or less MovieShak...

Страница 86: ...ing Panel 2 Select the Effects tab from the Editing tray 3 Drag and drop the Effect you want to add from the Effects tray to the Effects palette on the Working Panel 4 See help for instructions on adjusting effect duration and replaying clips scenes Working Panel To preview an Effect click on the clip in the Working panel monitor Your clip displays with the new effect on the Effect tray monitor So...

Страница 87: ... digital audio files By downloading digital audio files from EMD services the downloaded and imported data can then be played on your notebook or transferred to external devices media while maintaining the copyright information of the contents OpenMG Jukebox 2 0 converts your existing MP3 and WAV format audio files into OpenMG format WAV format audio files are converted into ATRAC3 format or chang...

Страница 88: ...r more information regarding CDDB registration click the Help button 2 After registering with CDDB the Set OpenMG Jukebox as the Application for playing Audio CD dialog box appears If you wish to set OpenMG Jukebox as the default application for playing audio CDs select the appropriate checkbox Click OK to close the dialog box The OpenMG Jukebox window appears To protect your personal data Sony us...

Страница 89: ...Tree view 2 Screen Tabs Change the operational sheet view according to function 6 Drop down list Displays the playlists audio files etc of the current screen tab 3 Player control buttons Control playback play stop pause etc 7 Tutorial tab Opens and closes the Tutorial screen 4 File Tree view Displays the folders on your notebook 8 URL drop down list Displays URL address information if available Cl...

Страница 90: ...ect the desired tracks 5 Click Rec to Jukebox Recording begins When the recording is finished the new playlist appears in the File Tree view of the Playlist screen tab When you record from an audio CD on your CD ROM drive for the first time the CD Drive Optimization dialog box appears Click Start to verify your optical drive After the verification is performed recording begins CD tab screen To nam...

Страница 91: ...with your product These instructions are for the Check in Check out 1 step mode for information on 2 step mode see Changing the check in check out settings in the OpenMG Jukebox Help menu Check out 1 Connect the external device media to your notebook 2 Click the Check in Out tab to display the Check in Out screen Your notebook recognizes the connected external device media and lists the informatio...

Страница 92: ... in from the song list of the external device media To check in more than one song at a time hold down the Ctrl key and click the songs to be selected 4 Click In or drag and drop the song s to the Playlist view If you want to check in all of the songs in the external device media click In All Check in begins For more information regarding the use of OpenMG Jukebox 2 0 read the OpenMG Help file To ...

Страница 93: ...the Playlist of OpenMG Jukebox Manage imported songs on the Playlist By registering imported songs to the Playlist of OpenMG Jukebox additional features are made available other than playback You can create a list of songs categorized by genre or artist display the created list on a Playlist and manage these songs in a hierarchical structure by using Playlist folders You can also edit songs so tha...

Страница 94: ...performing the System Restore function restore your music files by using OpenMG Backup Tool This will help to ensure the reliability of playback For details on using OpenMG Jukebox Backup Tool refer to the online help for OpenMG Jukebox Notes on Using Portable Players If you have purchased a Portable Player such as NW MS7 or NW E3 do not install the version of OpenMG Jukebox that came with the Por...

Страница 95: ...ter a name for the collection and then click Okay 3 Click the Folder tab and browse to locate your pictures 4 Select the pictures you want to have in a collection 5 Select Add File to collection 6 Select Collection Folder 7 Click Okay Creating a Photo Album 1 Select the pictures you want to use to make an album 2 From the Utilities menu select Album Maker 3 Choose the type of Album you want and cl...

Страница 96: ...you want to use 3 From the Utilities menu select Panorama Maker 4 Select the correct lens and click Okay If 35mm lens is selected the prompt does not appear to select a different lens click the lens icon 5 Click the panoramic icon near the bottom of the window 6 Click Full Stitch Making Still Images and Panoramic from MPEG 1 Select the MPEG file 2 From the Movie Sound menu select Scene break down ...

Страница 97: ... erased Use it to restore the hard disk of the VAIO Notebook you purchased This CD restores your notebook to its original state so user data and applications will be lost Using Your Recovery CDs Using the Application Recovery CD s The Application Recovery CD s allows you to reinstall individual applications if they become corrupted or are accidentally erased Reinstalling an individual software tit...

Страница 98: ...VAIO Support Agent uses a vault feature on the Driver Recovery CD s to repair software applications To Use the Driver Recovery CD s 1 Turn on your notebook If your notebook is already on close all applications 2 When the Windows desktop appears insert the Driver Recovery CD in the optical drive Use My Computer or Windows Explorer to view the contents of the Driver Recovery CD Select the appropriat...

Страница 99: ...k of the notebook you purchased The System Recovery utility gives you Full Restore with Format that is it formats the hard disk drive then restores all the original software To use the System Recovery CD s 1 Insert the Sony System Recovery CD in the optical drive 2 Shut down your notebook as described in Shutting Down Your Notebook 3 Wait four seconds then turn on your notebook 4 Click OK to signi...

Страница 100: ...ation changes and exit now appears 7 Check that Yes is selected then press the Enter key The notebook restarts from the Recovery CD Recovering Microsoft Word 2002 If you recover your operating system using the System Recovery CD Microsoft Word 2002 will not be recovered Use the supplied Word 2002 CD ROM to recover this application Your system may include one or two System Recovery CDs If you have ...

Страница 101: ...F 6 AM 5 PM PT Web site http www aol com phone 800 827 3338 hours 7 days a week 24 hours a day Web site http www compuserve com phone 800 848 8990 Web site http www netscape com phone 888 4SONYPC 888 476 6972 Support from 1 888 4SONYPC is free of charge for 90 days after the original date of purchase hours 7 days a week 24 hours a day Web site http www symantec com techsupp phone 800 927 3991 900 ...

Страница 102: ... com phone 510 440 9901 fax 510 440 1270 e mail techsupport arcsoft com hours M F 8 30 AM 5 30 PM PT Web site http www intuit com support phone 1 900 555 4932 Live Phone Support and is 1 95 per minute 1 800 644 3193 Automated telephone support hours Live phone support hours M F 5 AM 5 PM PT Web site http service real com rjoptions html For answers to software and how to use RealJukebox questions h...

Страница 103: ...ent runs scheduled protections of your applications network settings and other important software settings When your software is protected you can use VAIO Support Agent to repair software problems by restoring your software to any of the previously protected states 4 Sony PC Support Provides instant access to information on commonly encountered problems Enter a description of your problem and the...

Страница 104: ...oblems Quick Fix Wizard Common Solutions and Support Central This section briefly describes these three features and the automatic update capability of the VAIO Support Agent Using the Quick Fix Wizard The VAIO Support Agent records and maintains a history of the VAIO Support Agent protected applications by taking a snapshot of the application at regular timed intervals and storing it for future u...

Страница 105: ...my software option 4 Select the software you wish to repair from the drop down list 5 Next select a date time from the drop down list that corresponds to the last time when the software worked properly 6 Click Next to continue Follow the instructions on the screen To view a list of software applications protected by VAIO Support Agent click on the Pick the software drop down list Quick Fix Wizard ...

Страница 106: ... Solutions dialog box appears 2 Double click on the desired category to expand and view available SupportActions VAIO Support Local Server c program files support com provides a list of SupportActions available on your notebook s hard disk drive VAIO Support Local Server http sdcglobal4 sel sony com provides a list of SupportActions available from the Internet Common Solutions dialog box 1st level...

Страница 107: ...al feature uses Internet resources to help you fix your software Support Central searches the Internet for answers to your questions additional information from knowledge base systems and the latest software updates for your protected software Support Central also lets you contact live support agents for additional help 1 Connect to the Internet 2 From the VAIO Support Agent main window click Supp...

Страница 108: ...k User Guide 108 3 Click Enter Portal to begin using Support Central First time users will be asked to register with Support Central You must have Internet access to use Support Central Support Central Welcome page ...

Страница 109: ...ation information so you are only required to register once If you log on to your notebook with a different user name or have recovered your system using the System Recovery CDs Support Central may require you to register again Support Central Registration page ...

Страница 110: ...urrent Issues page displays enabling you to continue working on your open issues or to close them if you are finished Support Central has a tracking feature that stores your current issues enabling you to return and work on them later Support Central Current Issues page ...

Страница 111: ...O Support Agent is dormant as a background process Every 24 hours the Agent self activates to contact the Sony Support Server to check for new updates or fixes needed for your system This updating action only occurs while you are connected to the Internet and when more than 24 hours has passed since the last update Support Central Support Wizard page You must be connected to the Internet to use Su...

Страница 112: ...or your permission to retrieve updates Give the Agent your permission to contact the Sony Support Server for any updates or fixes that are available specifically for your notebook The Agent automatically retrieves updates without further prompting Deny the Agent your permission to contact the Sony Support Server for any updates or fixes The Agent discontinues any update retrieval and does not prom...

Страница 113: ...link You should always check the ambulance icon in the task tray after the system checks for updates If the icon is blinking double click the ambulance icon to view the update VAIO Support Agent Properties To control the VAIO Support Agent automatic update feature follow these steps 1 In the VAIO Support Agent main screen select Tools then select Properties The VAIO Support Agent Properties dialog...

Страница 114: ...VAIO Notebook User Guide 114 3 Click OK VAIO Support Agent Properties window ...

Страница 115: ......

Страница 116: ...VAIO Notebook User Guide 116 ...

Страница 117: ...e and that it is turned on Check that the power indicator on the front panel of the notebook indicates that the power is on Check that the battery packs are inserted properly and that they are charged Make sure there is no diskette in the floppy disk drive Confirm that the power cord and all cables are connected firmly as described in To Connect a USB Device on page 48 If you plugged the notebook ...

Страница 118: ... message Save Configuration changes and exit now appears 7 Select Yes then press Enter The notebook restarts My notebook starts but the message Operating system not found appears and Windows does not start Make sure there is no diskette in the floppy disk drive non bootable If a non bootable diskette is in the drive follow these steps 1 Turn off the notebook and then remove the diskette 2 Restart ...

Страница 119: ... the Shut Down command on the Windows Start menu Using other methods including those listed here may result in loss of unsaved data Try restarting the notebook On the Windows taskbar click the Start button click Shut Down and then click Restart If you cannot restart as described in the preceding step you can restart the notebook by pressing Ctrl Alt Delete If the previous step does not work press ...

Страница 120: ...and restart your notebook My system enters System Idle mode when System Suspend mode has been selected If you are connecting an optical disc drive with a PC card disconnect it by stopping the PC card Use the Sony Notebook Setup utility to disable devices that you are not currently using See Removing a PC card for more information Make sure the PC Card is compatible with your notebook s Windows ope...

Страница 121: ...ey are charged The notebook may be in LCD Video Standby mode Press any key to activate the screen The display mode may be set to external display mode Press and hold the Fn key while pressing F7 several times My LCD screen continues to show the previous screen Windows Me only Press the Windows key and D key twice to refresh the screen The image on my connected external display is not centered or s...

Страница 122: ...your touchpad is interpreting a single tap as a double click adjust the button assignments as follows 1 Click Start point to Control Panel then double click on the Mouse icon The Mouse Properties dialog box appears 2 Change the button assignments in the Mouse Properties dialog box One of the buttons is assigned to the double click action The pointer does not move while using the touchpad or mouse ...

Страница 123: ...sn t appear even though it is connected Click Start point to Settings point to Control panel then click System The System Properties dialog box appears Click the Device Manager tab Double click Floppy Disk Controller then click Standard Floppy Disk Controller Click Delete The Confirmation window will appear Verify that Delete From All Settings is selected and press OK Click Update in the System Pr...

Страница 124: ...drive and cause the drive to malfunction Moisture condensation may have occurred Leave the notebook idle for at least 1 hour with the notebook turned on My optical drive tray does not open Make sure the notebook is turned on Press the Eject button on the optical drive If the Eject button does not work open the tray by inserting a thin pen tip in the hole to the right of the Eject button I cannot u...

Страница 125: ...the devices you are not currently using Troubleshooting Software My software program stops responding or crashes Contact the software publisher or designated provider for technical support See Software Support Information When I click an application icon the message You must insert the application CD into your optical drive appears and the software does not start Some titles require specific files...

Страница 126: ...ompatible with the notebook s modem All preinstalled Sony programs are compatible My modem connection is slow Your notebook is equipped with a 56K V 90 compatible modem Many factors may influence modem connection speed including telephone line noise or compatibility with telephone equipment such as fax machines or other modems If you think your modem is not connecting properly to other PC based mo...

Страница 127: ...d by batteries verify that the battery packs are inserted properly and that they are charged If you are using an application that has its own volume control verify that the volume is turned up Check the volume controls in Windows If you connect external speakers 1 Verify that the speakers are properly connected and the volume is turned up 2 If the speakers have a mute button make sure the button i...

Страница 128: ...p Your connected printer may not function after the notebook resumes from a power saving mode If this occurs proceed as follows to reset the printer connection Windows Me Only 1 Right click My Computer icon on the desktop and select Properties 2 Click the Device Manager tab 3 Select Refresh then click OK The printer should function properly Windows 2000 Only 1 Click My Computer icon on the desktop...

Страница 129: ......

Страница 130: ......

Страница 131: ...very CD 97 Applications key 9 B Basic Advanced tab 59 battery packs charge status icons 64 brightness adjusting 12 built in speaker 12 volume 12 buttons Start 58 C cameras digital video recorder 45 canceling commands 8 Caps Lock indicator light 10 CD ROM discs cleaning 18 handling 18 inserting 16 CD ROM drive connecting 18 ...

Страница 132: ...es 36 digital video camera recorder 45 floppy disk drive 41 multiple phone lines 36 party phone lines 36 phone line 34 connectors USB 41 correction keys 8 Ctrl key 8 customizing your computer 57 D digital video camera recorder 45 display mode 66 Driver Recovery CD 98 drives 15 CD ROM 15 floppy disk 41 DV In Out 45 DVgate 47 E Eject button 43 ejecting floppy disk 43 Escape key 8 ...

Страница 133: ...nnecting 43 troubleshooting 123 function keys 9 G Getting Help 103 Guide Mode 24 H handling CD ROM discs 18 Floppy disk 44 hard drive indicator light 10 Hard Drive Partition 47 hardware online support 103 Help Getting 103 Hibernate mode 12 33 I i LINK 45 IEEE1394 45 indicator lights Caps Lock 10 hard drive 10 Num Lock 10 ...

Страница 134: ...oubleshooting 121 M MagicGate 26 27 Maximum Battery Life power setting 61 Maximum Performance power setting 61 mega bass switch 12 memory adding 71 Memory Stick media 26 microphone troubleshooting 127 modem troubleshooting 126 monitor switching among 12 mouse troubleshooting 122 mouse help 14 MovieShaker instructions 84 multiple phone lines 36 N navigation keys 8 ...

Страница 135: ...36 PictureGear 95 power management settings 59 Power Management Off power setting 61 Power On Initial Setting tab 59 Password tab 59 power saving modes 32 Hibernate 12 33 Standby 12 33 power setting AC Profile 61 Maximum Battery Life 61 Maximum Performance 61 Power Management Off 61 Video Standby 63 PowerPanel activating 60 customizing toolbar 61 63 Print Screen key 8 ...

Страница 136: ...10 setting up your PC support 103 setup screen About This Computer tab 59 Basic Advanced tab 59 displaying 58 Power On Password tab 59 setup tabs 59 Shift key 9 Sony Fax on Demand service 103 Sony Notebook Setup screen 58 speakers troubleshooting 127 Standby mode 12 33 Start button 58 switching display 12 monitor 12 T touchpad 13 troubleshooting startup 117 ...

Страница 137: ... U USB connector 41 48 USB device 48 Using the Jog Dial Control 25 V VAIO Support Agent 104 VAIO Action Setup 26 video camera recorder 45 virtual desktop 68 W Windows 119 Explorer 11 Find window 11 Help 11 key 9 ...

Отзывы: