background image

O

per

at

ion

Making Full-Size Image Printouts

27

2

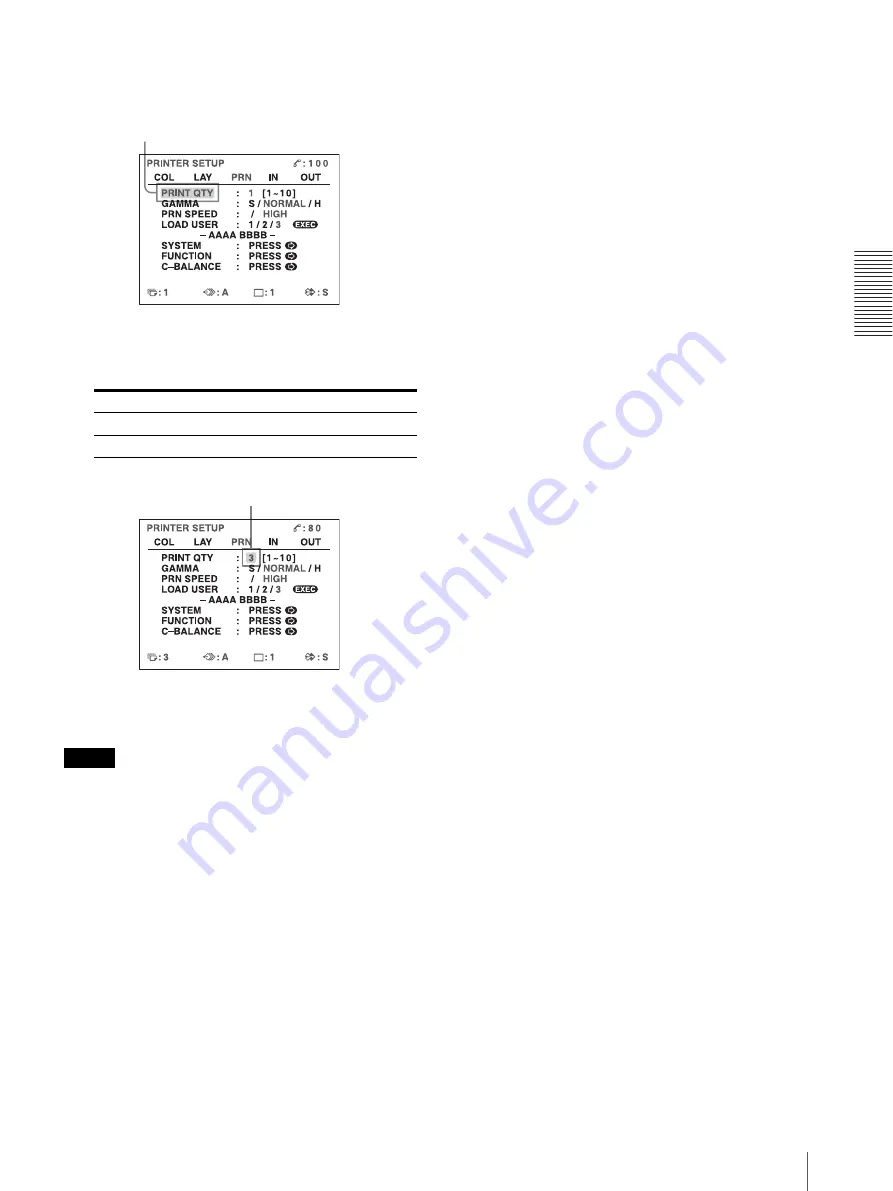
Select PRINT QTY by pressing the 

F

 or 

f

 button.

3

Select the desired number of copies by pressing the 

G

 or 

g

 button.

4

Press the MENU button.
The normal screen appears.

Note

Do not leave more than 10 sheets of printouts on the 
paper tray. Doing so may cause a paper jam. Even if 
fewer than 10 sheets of printouts have been accumulated 
on the paper tray, the printer may stop printing for 
various reasons and the message “REMOVE PRINTS” 
appears. In such a case, remove printouts accumulated 
on the paper tray. The printer will start to print 
remaining copies automatically.

If the paper runs out during printing

The printer stops the printing operation.
Load the paper into the paper tray and press the PRINT 
button. 
However, the printout quantity is reset to the original 
quantity requested before printing was stopped. 
For example, if the printout quantity is set to 5, and the 
paper runs out when three copies are printed, the 

printout quantity is reset to 5. If you want to print only 
the remaining copies, set the printout quantity to 2 after 
loading the paper. (See “Inserting the Paper Tray/
Loading Paper” on page 17
.)

When you want to

Button

Increase the quantity.

g

Decrease the quantity.

G

Highlight PRINT QTY in green by pressing the 

F


or 

f

 button.

Display the desired number of copies by 
pressing the 

G

 or 

g

 button.

Содержание UP55MD

Страница 1: ...2 638 113 34 1 Color Video Printer 2005 Sony Corporation UP 55MD Instructions for Use ...

Страница 2: ...ions not expressly approved in this manual could void your authority to operate this equipment All interface cables used to connect peripherals must be shielded in order to comply with the limits for a digital device pursuant to Subpart B of Part 15 of FCC Rules For the State of California USA only Perchlorate Material special handling may apply See www dtsc ca gov hazardouswaste perchlorate Perch...

Страница 3: ... cables other than those specified with the exception of replacement parts sold by Sony Corporation may result in increased emissions or decreased immunity of the UP 55MD Warning If the UP 55MD should be used adjacent to or stacked with other equipment it should be observed to verify normal operation in the configuration in which it will be used Guidance and manufacturer s declaration electromagne...

Страница 4: ...mode 2 kV common mode 1 kV differential mode 2 kV common mode Mains power quality should be that of a typical commercial or hospital environment Voltage dips short interruptions and voltage variations on power supply input lines IEC 61000 4 11 5 UT 95 dip in UT for 0 5 cycle 40 UT 60 dip in UT for 5 cycles 70 UT 30 dip in UT for 25 cycles 5 UT 95 dip in UT for 5 sec 5 UT 95 dip in UT for 0 5 cycle...

Страница 5: ...transmitters as determined by an electromagnetic site survey a should be less than the compliance level in each frequency range b Interference may occur in the vicinity of equipment marked with following symbol NOTE 1 At 80 MHz and 800 MHz the higher frequency range applies NOTE 2 These guidelines may not apply in all situations Electromagnetic propagation is affected by absorption and reflection ...

Страница 6: ...e addresses provided in the separate service or guarantee documents For the customers in Taiwan only Recommended separation distances between portable and mobile RF communications equipment and the UP 55MD The UP 55MD is intended for use in an electromagnetic environment in which radiated RF disturbances are controlled The customer or the user of the UP 55MD can help prevent electromagnetic interf...

Страница 7: ...ory 41 Erasing the Screen Display on the Video Monitor 43 Storing Image Data on a USB Flash Memory Device 44 Storing Image Data on a USB Flash Memory Device 44 Selecting the Printer Operation When the USB Flash Memory Device Becomes Full 45 Making Printouts with File Names 46 Adjustment Functions That Can be Set on Menus 47 Menu Tree 48 Basic Menu Operations 49 Adjusting the Color and Picture Qual...

Страница 8: ...r in the USB flash memory in the JPEG Joint Photographic Experts Group format You can see the image data captured using a personal computer Location and Function of Parts and Controls For details refer to the pages given in parentheses Front Panel A PRINT indicator Lights while the printer is printing B ALARM indicator 67 Lights in orange when the ink ribbon or paper is exhausted the paper jams or...

Страница 9: ...n the type is switched in the following sequence 1 2 4 8 1 The setting of MULTI PIX on the LAYOUT SETUP menu changes linked with the press of this button L PRINT QTY quantity button 26 Press this button to set the number of copies on the regular screen You can set any number up to 10 When you press this button the currently selected number is displayed for a few seconds The setting of PRINT QTY on...

Страница 10: ...h 12 INPUT connector Used to connect the video equipment with RGB YCbCr output connectors 75Ω ON OFF switch Normally set this switch to ON Set it to OFF if the input signal should drop when you connect additional equipment to the video equipment H S VIDEO IN S VIDEO OUT S video signal input S video signal output connectors 12 13 S VIDEO IN connector Used to connect to the video equipment with Y C ...

Страница 11: ...screen E Printer operation mode display section Indicates the printer operation mode type of printouts such as multiple reduced images A Type of printout Indicates the type of printout When SEPARATE image with white borders is set to ON on the LAYOUT SETUP menu the borders are displayed on the screen B Position of the cursor Indicates the position where the cursor is currently placed and where an ...

Страница 12: ... illustrate how to make the input output and remote control connections Use this as a guide when connecting the cables required to transmit signals to and from the equipment to be used for printing Notes Turn off the power of each device before attempting to make any connections Connect the AC power cord last Connecting Video Equipment Connect the video equipment providing the video images to be p...

Страница 13: ...tem turn the power off once then change the setting Then turn the power on again If you change the setting with the power on this mode will not be switched c When YCbCr signal is input it is not necessary to connect to the SYNC connector r 75 ohm coaxial cable with BNC connectors 75 ohm termination switch a Dip switch b to RGB YCbCr input connectors c to composite video input connector 75 ohm coax...

Страница 14: ... to load the ink ribbon cartridge in the printer When you use the printer for the first time start the operation to load the ink ribbon cartridge from step 4 Notes When you use the printer for the first time the thermal head may be out of position Before attempting to load the ink ribbon cartridge turn on the power under the condition where the front door is closed so that the thermal head is plac...

Страница 15: ... step 1 again 3 Detach the spent ink ribbon from the ink ribbon holder 4 Load the new ink ribbon into the ink ribbon holder 1 Holding the ink ribbon firmly remove the gear cover Pushing the ink ribbon spool that takes up the ink ribbon in the direction of the arrow remove the spool from the side with the gray gear Pushing the ink ribbon spool that sends the ink ribbon in the direction of the arrow...

Страница 16: ...on cartridge cannot be inserted In such a case close the front door and turn the power off then back on again Insert the ink ribbon cartridge again 2 Press the other side of the ink ribbon until you hear it click into place 1 Press the white gear of the ink ribbon Match the color of the gear of the ink ribbon spool and the color of the ink ribbon holder 1 Press the gray gear of the ink ribbon 2 Pr...

Страница 17: ...h as paper jams See Ink Ribbon and Paper on page 65 When a blank sheet of paper is ejected and the message RIBBON END appears the ink ribbon has been exhausted Replace the paper together with the ink ribbon Do not use the ejected blank paper Be careful when removing and inserting the paper tray If you are not careful you may drop the printer 1 Push the paper tray to remove it 2 Place the paper in ...

Страница 18: ... the paper eject stopper To keep ejected printouts on the paper tray pull the paper eject stopper on the paper tray out until it clicks Note Do not leave more than 10 sheets of ejected printouts Doing so may cause a paper jam When storing the paper Avoid storing the paper in a location subject to high temperatures high humidity excessive dust direct sunlight Use the original package for storing un...

Страница 19: ...he input signal 1 Select INPUT FORM by pressing the f button 1 2 5 2 4 5 2 3 Highlight IN in green by pressing the F f G or g button then the INPUT SETUP menu appears Highlight INPUT SEL in green by pressing the F or f button Source signal of the image to be printed Video monitor and printer window display the selected input signal is spelled out Signal from video equipment connected to the VIDEO ...

Страница 20: ...o set the correct date and time Note The factory installed battery is for monitoring If date and time display lags the battery may be drained Please contact your Sony service facility or your Sony dealer 1 Turn on the video monitor and the printer 2 Press the MENU button and display the LAYOUT SETUP menu by pressing the F f G or g button 3 Select CLOCK ADJUST by pressing the F or f button Signal i...

Страница 21: ...red year by pressing the G or g button 3 Highlight MONTH by pressing the f button 4 Set MONTH by repeating step 2 5 Set from DAY to SECOND by repeating steps 1 and 2 HOUR is a 24 hour display 5 Highlight START by pressing the f button 6 Press the EXEC button The internal clock starts 7 Press the MENU button The normal screen appears Press the G or g button until the desired year appears Switch STA...

Страница 22: ...play the source image on the video monitor This operation is done using the controls of the video equipment acting as the source 3 Press the CAPTURE button at the instant the image you want to print appears on the screen The image is captured into memory The memory image is displayed on the screen Which image appears after this the source image or the memory image depends on the setting made with ...

Страница 23: ...aper jam Even if fewer than 10 sheets of printouts have been accumulated on the paper tray the printer may stop printing for various reasons and the message REMOVE PRINTS appears In such a case remove printouts accumulated on the paper tray The printer will start to print automatically You can not change the printer application mode or settings using the WINDOW SETUP menu during printing To stop p...

Страница 24: ... Color on page 53 When you load a new ink ribbon and paper the color balance may change due to differences caused by the new pair of ink ribbon and paper in the new printing pack It is recommended that you adjust the color balance each time you load a new ink ribbon and paper Adjusting the Color Balance on page 57 When storing your printouts Avoid storing the printout in a location subject to high...

Страница 25: ...t number by using the menu 1 Press the MENU button and display the PRINTER SETUP menu by pressing the F f G or g button 2 Select LOAD USER by pressing the F or f button 3 Select the desired user number by pressing the G or g button The user name of the selected user set number appears 4 Press the EXEC button The printer functions according to the settings selected in step 3 Highlight the desired u...

Страница 26: ...PRINT QTY button 1 Press the PRINT QTY button The following screen appears If you do not perform any operation after you press the PRINT QTY button the currently set number of copies appears for a few seconds after which it disappears 2 Press the PRINT QTY button until the desired number appears while the screen shown in step 1 is displayed Repeatedly pressing the PRINT QTY button increases the nu...

Страница 27: ... print remaining copies automatically If the paper runs out during printing The printer stops the printing operation Load the paper into the paper tray and press the PRINT button However the printout quantity is reset to the original quantity requested before printing was stopped For example if the printout quantity is set to 5 and the paper runs out when three copies are printed the printout quan...

Страница 28: ...instant the image you want to print appears on the screen 3 Press the PRINT button The image captured in step 2 is queued The image is printed as soon as all previous printing jobs have been completed Note Another image cannot be stored in a memory page in which an image has already been queued for printing memory page indication blinks In such a case the PLEASE WAIT PRINTING MEMORY message also a...

Страница 29: ...frame mode and the other is called field mode Frame mode An image is captured in a memory area Printouts with high resolution can be obtained Field mode A memory area is divided into two and images can be captured in each In this way a quickly moving subject can be printed with less blurring Printout of a full size image Printout of two reduced images Printout of four reduced images Printout of ei...

Страница 30: ...duced images selected and on the memory mode 2 1 4 1 3 Highlight LAY in green by pressing the G or g button then the LAYOUT SETUP menu appears Highlight MEMORY in green by pressing the F or f button Mode Contents FRAME We recommend that whenever possible you print in this mode FIELD Select this mode to reduce blurring when you print a quickly moving image Usable memory page Type of reduced images ...

Страница 31: ...ake a printout with multiple reduced images A printout having multiple reduced images is made using the procedure below Determining the number of reduced images See below Selecting the memory page See page 31 Selecting the number of reduced images to be captured in memory The following two methods are available to select the number of reduced images Using the MULTI PICTURE button Using the menu To...

Страница 32: ... PICTURE button the type of reduced image printout changes in the following sequence 1 2 4 8 1 The screen is reset to the regular screen after a few seconds To select the type of reduced images to be captured in the memory using the menu 1 Display the LAYOUT SETUP menu according to the operations of step 1 described in Selecting the memory mode on page 30 2 Select MULTI PIX by pressing the F or f ...

Страница 33: ... the F or f button 5 Select which image appears on the video monitor after the image is captured by pressing the G or g button 6 Press the MENU button The regular screen appears To return to the PRINTER SETUP menu In step 6 position the cursor at PRN SETUP and press the g button The PRINTER SETUP menu appears again 2 4 5 3 6 Highlight FUNCTION in green by pressing the F or f button When Setting Th...

Страница 34: ... CAPTURE button at the instant the image you want to print appears on the screen The image is captured in the location indicated by the green blinking star on the video monitor screen or the position number displayed on the printer window display in step 1 The green blinking star referred to as the cursor on the video monitor moves to the next position and the number on the printer window display ...

Страница 35: ...red image Skip images that you want to keep by pressing the F f G or g button 5 Press the PRINT button The four reduced images are printed on one sheet of paper Whether white borders are attached depends on the setting of SEPARATE in the LAYOUT SETUP menu See page 35 If the printout is blurred When you make a printout of a full image or two or four reduced images captured in memory in FRAME mode t...

Страница 36: ... each item of the CAPTION menu is given below When you want to Setting Print the images without white borders OFF Print the images with white borders ON a Switch the desired setting to green by pressing the G or g button Character display area The cursor lit in green indicates the position where a character can be entered The entered characters are displayed here Symbols and words can be used to e...

Страница 37: ...arrow corresponding to the direction in which you want to move the green cursor in the character display area by pressing the F f G or g button 2 Press the EXEC button Each time you press the EXEC button the cursor moves one position in the designated direction Display in the CAPTION menu Function INS Inserts one character without erasing the highlighted character DEL Deletes a highlighted charact...

Страница 38: ... green by pressing the F f G or g button on the video monitor Or display SHIFT or shift on the printer window display When characters are displayed in capital letters in the character entry area shift is displayed in the printer window display When displayed in small letters SHIFT is displayed 2 Press the EXEC button Capital letters are changed to small letters or small letters are changed to capi...

Страница 39: ...character with a new one 1 Position the green cursor at the character to be replaced by performing the operations explained in step 4 2 Overwrite the invalid character with the correct character by performing the operations explained in steps 5 and 6 The previously entered character is replaced with the new one To add characters midway 1 Position the cursor at the position where a character is to ...

Страница 40: ...30 2 Select DATE PRINT by pressing the F or f button 3 Decide whether or not printouts will be printed with a date by pressing G or g button a To make printouts with the correct date see the following To make printouts with the correct date 4 Press the MENU button The normal screen appears Note The date is printed on the bottom right of the printout If the date and any printed comments overlap the...

Страница 41: ...tions according to the setting until the function setting is changed To return to the regular screen Press the MENU button Deleting Images Stored in Memory Note You cannot restore images once they have been deleted Deleting images in all memory pages simultaneously Before deleting images in all memory pages Set CLEAR to ALL in the FUNCTION SETUP menu Press the CLEAR button All images captured in t...

Страница 42: ...y page selected in step 2 is deleted Deleting a certain reduced image Before deleting images Set CLEAR to PART in the FUNCTION SETUP menu 1 Press the SOURCE MEMORY button when the source image is displayed on the video monitor screen The image captured in memory is displayed on the screen 2 Select the memory page from which the reduced image is to be deleted by pressing the MEMORY PAGE button 3 Se...

Страница 43: ... OFF While the screen which appears in step 1 is displayed press the DISPLAY button repeatedly until the color of OFF turns green on the video monitor or until OFF is displayed in capital letters in the printer window display Each time you press the DISPLAY button the setting changes in the following sequence ON t OFF t ON To display characters on the video monitor Select ON To perform the setting...

Страница 44: ... 20 Storing Image Data on a USB Flash Memory Device Note Be sure not to use a USB flash memory device other than a USB flash memory device manufactured by Sony Corporation 1 Turn on the power of the monitor and printer 2 Insert the USB flash memory device into the USB host port The access lamp lights When it goes off you can start to store image data in the USB flash memory 3 Press the CAPTURE but...

Страница 45: ...m is FAT 12 16 and 32 When your USB flash memory device has a lock function unlock it before using it Do not use a USB flash memory device with two or more drives When printing reduced images All reduced images printed are stored as separate image data files Notes The size of the JPEG file depends on the image data and the type of input signal The size of the image data of RGB signals is larger th...

Страница 46: ... a Caption on page 36 1 Display the LAYOUT SETUP menu according to the operation described in step 1 in Selecting the memory mode on page 30 2 Select FILE NAME by pressing the F or f button 3 Decide whether or not printouts will be printed with file names by pressing the G or g button 4 Press the MENU button The normal screen appears File names printed Note When the message USB MEMORY FULL SET NEW...

Страница 47: ...ntity 26 Adjusting the tone of the printout 56 Selecting the print speed 24 SYSTEM SETUP Adjusting the brightness of the printer window display 62 Setting the baud rate for computer communication 62 Selecting whether or not the operation and error tones sound 62 Compensating for the level of the input signal 52 Registering user settings 62 USER NAME Editing the user name 62 FUNCTION SETUP Selectin...

Страница 48: ... PRINTER SETUP menu CAPTION menu SYSTEM SETUP menu INPUT SETUP menu USER NAME menu OUTPUT SETUP menu FUNCTION SETUP menu COLOR BALANCE menu Normal screen Press the MENU button For reference pages of each menu see the table on Functions That Can be Set on Menus on page 47 CLOCK ADJUST menu ...

Страница 49: ...or to the top line by pressing the F or f button 2 Display the desired menu by pressing the G or g button Example To display the PRINTER SETUP menu EXEC button 1 2 3 4 The menu currently displayed on the screen is lit in green The name of the menu currently displayed appears in capital letters The cursor is not positioned on the top line Highlight PRN in green by pressing the G or g button then th...

Страница 50: ...TER SETUP menu When is displayed at the selection is displayed when changing the selection is ineffective The following table lists the case where the selection is ineffective Highlight PRN SPEED in green by pressing the F or f button Press the F or f button until PRN SPEED appears Selected item Item can not to be changed when is displayed at the selection 1 is selected for MULTI PIX on the LAYOUT...

Страница 51: ...menu To display the SYSTEM SETUP sub menu Select SYSTEM by pressing the F or f button then press the g button The SYSTEM SETUP menu appears To return from the sub menu Select the menu on the top line then press the g button The current setting value The setting value increases every time you press g button The setting value decreases every time you press the G button The current setting value High...

Страница 52: ...onitor compensate for the level of the input signal using the IRE item in the SYSTEM SETUP menu The selected IRE is displayed in three digits Notes Do not compensate for the input signal too much Doing so results in the whole of the printout becoming dark To have the adjustment result reflected in the printout you need to capture a new image Matching the Video Monitor Color to the Printer Color To...

Страница 53: ... monitor as follows 6 Display the OUTPUT SETUP menu again 7 Adjust the monitor while comparing the printout with the image on the monitor Adjusting the Printout Color You can adjust the printout quality by adjusting the color intensity printout contrast and sharpness and tone GAMMA of the printout Adjusting the color intensity contrast and sharpness You can store up to three types of settings and ...

Страница 54: ...riginally set value on page 55 3 Adjust the printout color To adjust the color intensity RED GREEN BLUE The RED GREEN and BLUE color component settings are divided into 15 steps from 7 to 7 indicated by a value and graph The center of the graph 0 corresponds to the standard setting COLOR ADJUST menu Menu Adjustment item When you want to Buttonto be pressed Adjustment direction on the menu CYN RED ...

Страница 55: ...LOAD COLOR number to another LOAD COLOR number 1 Select the source LOAD COLOR number for which the settings to be copied are stored on the COLOR ADJUST menu 2 Select the target SAVE COLOR number to which data is to be copied 3 Press the EXEC button Settings stored for the LOAD COLOR number selected in step 1 are copied to the SAVE COLOR number selected in step 2 To recall the LOAD COLOR number in ...

Страница 56: ...horizontally or vertically 1 Display the WINDOW SETUP menu from the LAYOUT SETUP menu 2 Perform adjustments according to the printout obtained by using the V START V WIDTH H START and H WIDTH items When a horizontal black line is produced on the printout To eliminate a horizontal black line produced at the top Adjust the top position of the image to be printed using the V START item Note It is alr...

Страница 57: ...settings position the cursor at either H START or H WIDTH and then press the G and g buttons simultaneously To check the adjustment result Print to check that no black frame appears on the printout that the image is not partially cut and that no black line appears Fitting the Printout to the Paper 1 Display the WINDOW SETUP menu from the LAYOUT SETUP menu 2 Select RESIZE TO FIT Adjusting the Color...

Страница 58: ...position of the source image to be used for adjusting the color balance To decide the position of the source image move the highlighted area by pressing the F f G or g button while holding down the DISPLAY button 3 Press the CAPTURE button The image captured in memory appears 4 Select TEST PRINT by pressing the F or f button then press the EXEC button Nine identical images of the position selected...

Страница 59: ... selected in step 5 To readjust the color balance When the desired color balance cannot be obtained in step 5 readjust the color balance You can also perform fine adjustment following the same operation procedures 1 Display the values of BAL X and BAL Y of the image which is the most appropriate among nine images In this case you can perform either fine adjustment or a rough adjustment by changing...

Страница 60: ...ter Using the menu you can assign the desired functions to the remote control unit connected to the REMOTE 2 connector In addition the printer can be remotely controlled by a pulse signal input to REMOTE 2 See page 66 Also you can control the printer using a personal computer 1 Display the FUNCTION SETUP menu from the PRINTER SETUP menu 2 Select the desired RM 2 FUNC item then assign a function If...

Страница 61: ...whenever you press the switch of the remote control unit CAP SRC CAPTURE SOURCE When the memory image is displayed the source image appears when you press the switch When the source image is displayed the image is captured in memory when you press the switch of the remote control unit However the memory page is not changed The previously captured image is replaced with the new one CAP S PAGE b CAP...

Страница 62: ...e PRINTER SETUP menu 2 Select the BAUDRATE item then select the desired baud rate by pressing the G or g button Displaying the Remaining Amount of the Ink Ribbon You can always display the remaining amount on the video monitor Note Use the ribbon remaining display as a criterion 1 Display the OUTPUT SETUP menu 2 Select the RBN REMAIN item then select whether or not the type of ink ribbon and the r...

Страница 63: ...o this registered data unless you recall another user set Also if you modify the settings the modified data remains effective until another user set is recalled even if you turn off the power To make another user set Perform all required settings and adjustments using the menus then register them with another user set number To recall the user set and print Select the desired user set by using the...

Страница 64: ... left in a room with a heater that tends to produce large amounts of moisture condensation may form inside the printer In such cases the printer will probably not work properly and may even develop a fault if you persist in using it If condensation forms turn off the power and leave the printer to stand for at least one hour If the printing pack is subjected to wide or sudden changes in temperatur...

Страница 65: ...ating humidity 20 to 80 no condensation allowed Operating pressure 700 hPa to 1 060 hPa Storage and transport temperature 20 C to 60 C 4 F to 140 F Storage and transport humidity 20 to 90 no condensation allowed Storage and transport pressure 700 hPa to 1 060 hPa Dimensions Approx 280 125 398 mm w h d 11 1 8 5 15 3 4 inches excluding the projection parts Mass Approx 9 kg 19 lb 13 oz Printing syste...

Страница 66: ...month Supplied accessories Paper tray 1 Ink ribbon holder 1 Before Using this Printer 1 Instructions for Use 1 CD ROM 1 Service Contact List 1 Optional accessories UPC 55 Color Printing Pack Medical Specifications Protection against electric shock Class I Protection against harmful ingress of water Ordinary Degree of safety in the presence of a flammable anesthetic mixture with air or with oxygen ...

Страница 67: ...AY REMOVE PAPER TRAY The paper jams around the paper tray tRemove the paper tray and pull out any jammed paper See page 70 RIBBON END RIBBON END The ink ribbon has been exhausted tReplace the old one with a new ink ribbon See page 14 The ink ribbon cannot be reused In this case if the white paper is ejected Discard this paper CLOSE FRONT DOOR CLOSE FRONT DOOR The front door is open tClose the fron...

Страница 68: ...NY KEY HIT ANY KEY This message appears when the remote control unit is used in CAP STOP CAPTURE STOP mode and when the printer stops capturing images once images have been captured to all memory pages to the last point of the last memory page tPress any button Printer operation is enabled after this INPUT MISMATCH INPUT MISMATCH The TV system of the signal input from the source equipment VTR vide...

Страница 69: ...ISPLAY setting to ON by pressing the DISPLAY button See page 43 No message appears on the printer window display The contrast of the printer display window is not set correctly tAdjust the brightness of the printer window display using the LCD CNTR item on the SYSTEM SETUP menu See page 62 The printer does not print An error message appears on the display tPerform the steps described in Error Warn...

Страница 70: ...aper even if you perform the operation in step 2 remove the jammed paper according to instructions described in the following If you can not remove the jammed paper yet 3 Load the paper into the paper tray correctly Notes Do not reuse the jammed paper Discard that paper Use only paper recommended in this manual 4 Re insert the removed paper tray If you can not remove the jammed paper yet Proceed a...

Страница 71: ...te using the screw removed in step 4 To turn on the power When you turn on the power for first time after you have turned off the power with the message SAVING IMAGES displayed proceed as follows 1 Press the POWER switch When using the printer again Confirm the following before using the printer again Confirm that any connecting cables and the AC power cord are securely connected Reset the paper t...

Страница 72: ...ETUP menu 2 Select STORE IMAGE by pressing the F or f button 3 Select STORE by pressing the G or g button 4 Press the EXEC button The message SAVING IMAGES appears When this message disappears the normal screen appears Go to the next operation Note In this case image data and menu settings stored in the Memory Stick are overwritten Loading all of the image data and menu settings from the on board ...

Страница 73: ...on and function of parts and controls front panel 8 monitor display 10 rear panel 10 M Memory mode field mode 29 frame mode 29 selecting 30 Memory page about the memory page 30 selecting 31 Memory Stick loading all of the image data and menu settings 72 notes 72 storing allof the image data and menu settings 72 Menu basic menu operation 49 CAPTION menu 36 COLOR ADJUST menu 54 COLOR BALANCE menu 57...

Страница 74: ...apabilities 66 Remote control unit using as a wired unit 14 using as a wireless unit 14 S Setting up the printer on the menu adjusting the brightness of the printer window display 62 assigning the function to the remote control unit 60 displaying the remaining amount of the ink ribbon 62 functions that can be set on menu 47 selecting whether the operation tone and error tones sound 62 setting the ...

Страница 75: ...Sony Corporation ...

Отзывы: