background image

12

Operation

PUSH

Front

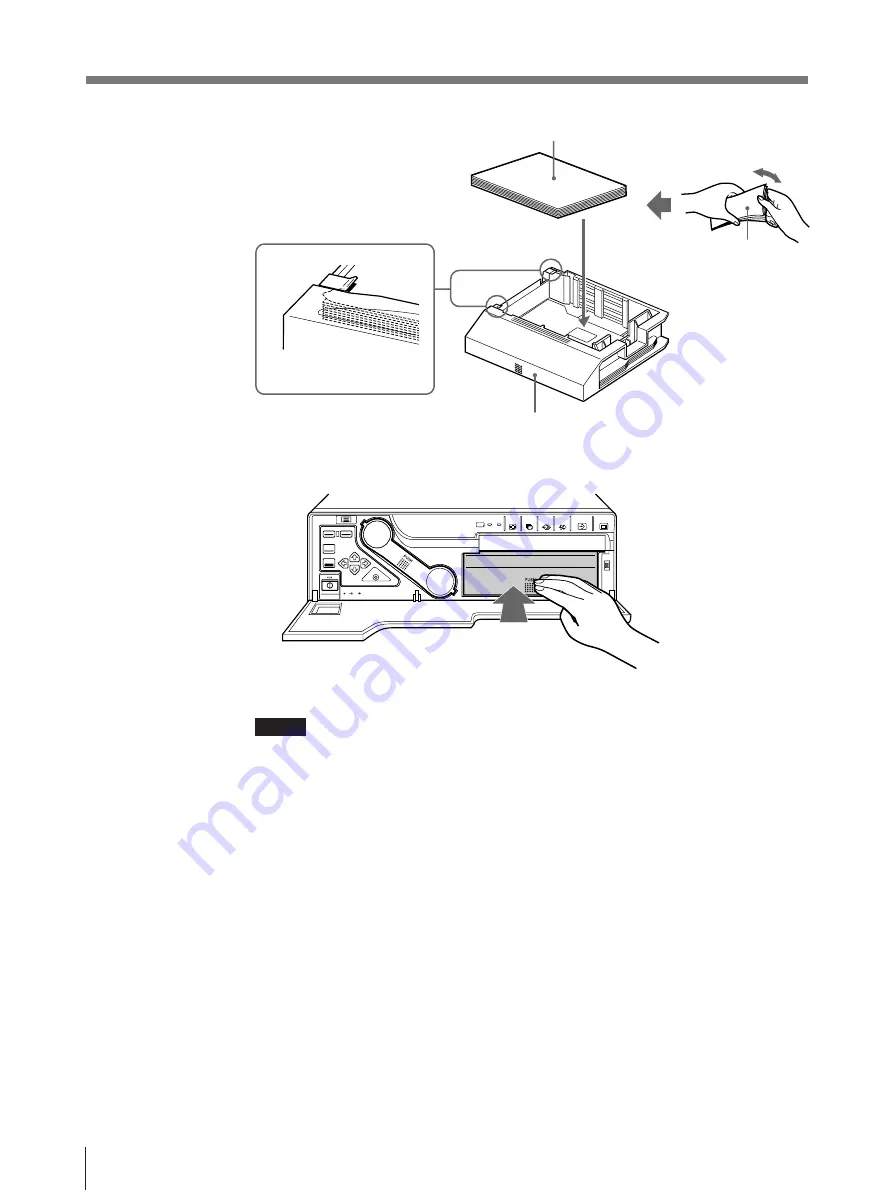
Place the paper in the paper tray
with the printing surface facing up

Set the paper securely under
the tab.

Riffle the paper

4

Slide the paper tray back into the printer until it clicks into place.

5

Close the front panel.

Notes

When handling the paper

Do not touch the printing surface. Dust or finger prints are likely to cause
unsatisfactory printing or malfunction of the head. Hold the paper by the printing
surface protection sheet.

When storing the paper

• Avoid storing the paper in a location subject to:

— high temperatures
— high humidity
— excessive dust
— direct sunlight

• Use the original package for storing unused paper.

Printing surface

Before Printing (continued)

Содержание UP-2100

Страница 1: ...ly and retain it for future reference Mode d emploi Page 90 Avant la mise en service de cet appareil prière de lire attentivement ce mode d emploi que l on conservera pour toute référence ultérieure 3 860 610 11 1 1997 by Sony Corporation UP 2100 UP 2100SD Color Video Printer UP 2100 2100SD ...

Страница 2: ...f the FCC Rules These limits are designed to provide reasonable protection agaist harmful interference when the equipment is operated in a commercial environment This equipment generates uses and can radiate radio frequency energy and if not installed and used in accordance with the instruction manual may cause harmful interference to radio communications Operation of this equipment in a residenti...

Страница 3: ...ode 23 About the Memory 25 Making a Printout of Multiple Different Reduced Images 29 Making Printouts of Identical Images 38 Making Printouts With a Caption 39 Entering a Caption 40 Deleting the Images Stored to Memory Pages 45 Setting the Function of the CLEAR Button 45 Deleting Images 47 Continue to next page m Installation and Adjustment Supplied Accessories 49 Assembly 50 Ink Ribbon Cartridge ...

Страница 4: ...r Automatic Printing Capabilities 65 Erasing the Screen Display 69 Selecting Whether the Operation and Error Tones Sound 71 Others Precautions 73 Safety 73 Installation 73 Cleaning 74 Specifications 75 Error Warning Messages 77 If the paper jams 79 Troubleshooting 81 Location and Function of Parts and Controls 82 Front 82 Sub Panel 84 Rear 85 Monitor Display 86 Index 88 Installation and Adjustment...

Страница 5: ...he use of the printer s remote control unit not supplied Others Notes the precautions to be observed when using the printer lists errors warnings and their handling and explains troubleshooting Also provided is information on the locations and functions of parts and controls and the on screen messages and menus used to operate the printer Should you encounter any unfamiliar terms or items while re...

Страница 6: ...peration by using the buttons and setup the printer interactively by picking from displayed menus Printouts that can be made with the printer Printout of a full size image page 15 Printout of two reduced images Capturing the center of the screen page 29 Printout of four reduced images page 29 Printout of 16 reduced images page 29 Printout of identical images page 38 In addition to the above printo...

Страница 7: ...tion Remote control unit not supplied Allows you to operate the printer remotely Foot switch not supplied Allows you to operate the printer remotely Video monitor Displays the images received from the video source source image and the image to be printed memory source Also displays the printer menus and messages When the printer power switch is set to off you can view the image of the video source...

Страница 8: ...repeat them during routine printing Perform them only when absolutely necessary Loading an Ink Ribbon Cartridge To make printouts an ink ribbon cartridge and paper which are compaticble must be loaded If the printer detects an incompatible combination an error message appears Use the ink ribbon cartridge and print paper supplied to check if the video printer functions properly Notes Use only ink r...

Страница 9: ...ile press the ink ribbon cartridge In this case the image in memory will be lost 3 Remove any slack from the ink ribbon If the ribbon is left slack it may be damaged when inserted 4 Insert the ink ribbon cartridge firmly until it stops When the ink ribbon cartridge cannot be inserted Turn the power off then back on gain Then insert the ink ribbon cartridge 5 Close the front panel Wind the spool un...

Страница 10: ...e or place it in a dusty location Finger prints or dust on the ink ribbon will result in imperfect printing or malfunction of the head When storing ink ribbon cartridge Avoid placing the ink ribbon cartridge in a location subject to high temperatures high humidity excessive dust direct sunlight Store a partially used ink ribbon cartridge in its original packaging If your ink ribbon should tear Rep...

Страница 11: ...el by pulling the front panel top towards you 2 Push the part marked with PUSH on the paper tray The paper tray pops out 3 Place the paper in the paper tray Notes When adding paper to a partly full tray be careful that the total number of sheets does not exceed the limit If you exceed this limit paper jams may occur The limit is the amount of paper coutained in one printing pack For detailed infor...

Страница 12: ...el Notes When handling the paper Do not touch the printing surface Dust or finger prints are likely to cause unsatisfactory printing or malfunction of the head Hold the paper by the printing surface protection sheet When storing the paper Avoid storing the paper in a location subject to high temperatures high humidity excessive dust direct sunlight Use the original package for storing unused paper...

Страница 13: ...lect another source 1 Turn on the video monitor and the printer The right screen appears 2 Press the MENU button The screen previously opened appears 3 Select IN by pressing the ı or button By switching IN to green with the ı or button INPUT SETUP appears Video monitor screen 2 6 4 1 3 5 Continue to next page m Q 1 A 1 S I NPUT SE T UP COLOR n n n GA I N I NPUT SE L P I X L AY PR N I N OUT HUE COL...

Страница 14: ... out Signal from video equipment connected to the VIDEO INPUT connector V n VIDEO Signal from video equipment connected to the S VIDEO INPUT connector SV n S VIDEO Position the cursor to INPUT SEL by pressing the or button 6 Press the MENU button The regular screen appears Before Printing continued I NPUT SE T UP COLOR n n n GA I N I NPUT SE L P I X L AY PR N I N OUT HUE COLOR OF FSET Q 1 A 1 S 0 ...

Страница 15: ...y are correctly loaded see pages 8 11 and 50 Select the input signal to be used to make a printout see page 13 Set the printer to store one full size image into memory see page 29 Select the appropriate memory page see page 28 1 Turn on the video monitor and the printer 2 Start the video source This operation is done using the controls of the video equipment acting as the source 1 3 4 STOP button ...

Страница 16: ...ge when the memory image is displayed on the screen press the SOURCE MEMORY button 2 Press the CAPTURE button at the instant the image you want to print appears The previous image is replaced with the new one 4 Press the PRINT button It takes about 60 seconds to make a printout The printout pops out from the paper tray Making Full Size Printouts continued Blinks while printing During color printin...

Страница 17: ...y pressing the DISPLAY OFF button The screen message disappears To disply a screen message press the DISPLAY OFF buton again If a black line appears on the printout Sometimes a black line appears on the printout although it does not appear on the video monitor This black line can be eliminated from the printout see Changing the Printout Size Printout Area page 62 If the image quality of printouts ...

Страница 18: ...rt printing or while printing You can change the designated number of copies any time during printing Setting the printout quantity on the menu 1 5 3 2 4 1 Press the menu botton The menu previously opened appears 2 Select PRN by pressing the ı or button The PRINTER SETUP menu arrears By switching PRN to green by pressing the ı or button PRINTER SETUP appears Making Full Size Printouts continued PR...

Страница 19: ...ty of copies 5 Press the MENU button The regular screen appears Position the cursor to PRINT QTY by pressing the or button PR I NTER SE T UP COLOR n n n P I X L AY PR N I N OUT Q 1 A 1 1 S 1 1 9 SYSTEM PRE SS P R I NT QT Y GAMMA D NORMA L L F UNCT I ON PRE SS PR I NTER SE T UP COLOR n n n P I X L AY PR N I N OUT Q9 A 1 S 9 1 9 SYSTEM PRE SS P R I NT QT Y GAMMA D NORMA L L F UNCT I ON PRE SS ...

Страница 20: ...QTY button until the desired number appears Repeatedly pressing the PRINT QTY button increases the quantity up to 9 and stops To decrease the number of copies When decreasing the number of copies you have to change the number on the menu If the paper runs out during printing Load the paper into the paper tray and press the PRINT button The printer prints the remaining copies 1 2 The currently set ...

Страница 21: ...E button at the instant the image you want to print appears on the screen Note If you press the CAPTURE button to caputwe the image into memory page whose image is being printed PRINTING MEMORY appears and the image cannot be captured 3 Press the PRINT button The image captured in step 2 is queued The image is printed as soon as all previous printing jobs have been completed Memory page whose imag...

Страница 22: ...ory can be made Printout of a full size image Printout of two reduced images a Capturing the center of the screen Printout of four reduced images Printout of 16 reduced images Printout of identical images b a In 2H print mode the image in the center of the screen is captured in memory 2H of MULTI PIX The range to be captured Printout Video monitor ABC123 ABC 123 ABC DEF DEF DEF DEF ABC123 ABC 123 ...

Страница 23: ...he MENU button The menu previouly opened appears 2 Select PRN by pressing the ı or button The PRINTER SETUP menu apperas By switching PRN to green by pressing the ı or button PRINTER SETUP appears 1 9 3 5 7 2 6 4 8 Continue to next page m 3 Select SYSTEM by pressing the or button Position the cursor to SYSTEM by pressing the or button PR I NTER SE T UP COLOR n n n P I X L AY PR N I N OUT Q 1 A 1 S...

Страница 24: ... images DUPLICATE Printouts of a full size imagea four identical reduced images and 16 identical reduced images Making Variations of Printouts continued 4 Press the button The SYSTEM SETUP menu appears Position the cursor to APPLI by pressing the or button 5 Select APPLI by pressing the or button SYST EM SE T UP COLOR n n n PRN SE TUP Q 1 A 1 S PRESS B EE P OFF ON A PP L I ST ANDARD SYST EM SE T U...

Страница 25: ...de A memory is divided into two and images can be captured in each A memory in which an image is captured is called memory page in this manual The number of usable memory pages depends on the type of the selected reduced images and memory mode Reduced image Memory mode Number of memory pages 1 2H 4 16 Frame 1 A 1 2H Field 2 A1 A2 When you select four reduced image mode or 16 reduced image mode the...

Страница 26: ...ory page only when 1 or 2H is selected in STANDARD mode 1 Press the MENU button The menu just before opened appears 2 Select LAY by pressing the ı or button Making Variations of Printouts continued 3 L AYOUT SE T UP COLOR n n n P I X L AY PR N I N OUT Q 1 A 1 S WI NDOW PRE SS MEMORY MUL T I P I X 1 2H 4 16 SEP ARATE OF F ON CAPT I ON PRE SS F RAME F I EL D ...

Страница 27: ... button The regular screen appears Position the cursor to MEMORY by pressing the or button Switch the desired memory mode to green by pressing the ı or button L AYOUT SE T UP COLOR n n n P I X L AY PR N I N OUT Q 1 A 1 1 S WI NDOW PRE SS MEMORY MUL T I P I X 1 2H 4 16 SEP ARATE OF F ON CAPT I ON PRE SS F RAME F I EL D L AYOUT SE T UP COLOR n n n P I X L AY PR N I N OUT Q 1 A 1 S WI NDOW PRE SS MEM...

Страница 28: ...PAGE button Note The memory page whose image is being printed is blinking on the video monitor screen Even if you select this blinking page you cannot capture the image in this page Making Variations of Printouts continued Q 1 A2 1 S Select the desired memory page by pressing the MEMORY PAGE button ...

Страница 29: ...age Selecting the image on the video monitor after capturing the image page 33 Setting the printer application mode to STANDARD page 23 Selecting the number of reduced images to be captured in memory 1 Press the MENU button The menu just before opened appears 2 Select LAY by pressing the ı or button By switching LAY to green by pressing the ı or button LAYOUT SETUP appears 1 7 3 5 2 4 6 Continue t...

Страница 30: ...step 5 To make a printout without white borders go to step 7 Number of reduced images 1 Full size image 2 Two reduced images around the center of the screen 4 Four reduced images 16 16 reduced images Making Variations of Printouts continued L AYOUT SE T UP COLOR n n n P I X L AY PR N I N OUT Q 1 A 1 S WI NDOW PRE SS MEMORY MUL T I P I X 1 2H 4 16 SEP ARATE OF F ON CAPT I ON PRE SS F RAME F I EL D ...

Страница 31: ...touts without white borders OFF Printouts with white borders ON 7 Press the MENU button The regular screen appears Position the cursor to SEPARATE by pressing the or button Switch the desired mode to green by pressing the ı or button L AYOUT SE T UP COLOR n n n P I X L AY PR N I N OUT Q 1 A 2H S WI NDOW PRE SS MEMORY MUL T I P I X 1 2H 4 16 SEP ARATE OF F ON CAPT I ON PRE SS F RAME F I EL D L AYOU...

Страница 32: ...he regular screen after a few seconds 2 Press the MULTI PICTURE button until the desired type of reduced image printout appears Repeatedly pressing the MULTI PICTURE button switches the type of reduced image printout For detailed information on the type of reduced image printout see Selecting the number of reduced images to be captured in memory page 29 The currently selected type of reduced image...

Страница 33: ...y switching PRN to green by pressing the ı or button PRINTER SETUP appears 1 7 2 6 3 5 4 Position the cursor to FUNCTION by pressing the or button Continue to next page m 3 Select FUNCTION by pressing the or button PR I NTER SE T UP COLOR n n n P I X L AY PR N I N OUT Q 1 A 1 S 1 1 9 SYSTEM PRE SS P R I NT QT Y GAMMA D NORMA L L F UNCT I ON PRE SS PR I NTER SE T UP COLOR n n n P I X L AY PR N I N ...

Страница 34: ... printer captures the image then after a few seconds the source memory appears whenever you press the CAPTURE button Setting OFF ON 7 Press the MENU button The regular screen appears To return to the PRINTER SETUP menu In step 9 position the cursor to PRN SETUP and press the button The PRINTER SETUP menu appears again Making Variations of Printouts continued FUNCT I ON SET UP COLOR n n n Q 1 A 1 S...

Страница 35: ...dimageandwhethertoputthewhitebordersa see page 29 Select the appropriate memory page see page 28 Select which image will appear after the image has been stored into memory the memory image or source image see page 33 a When the type of four reduced images or 16 reduced images is selected the frame mode is automatically selected 1 Start the video source This operation is done using the controls oft...

Страница 36: ...s 2 and 3 until you have captured four images when the memory image remains on the video monitor screen Repeat step 2 until you have captured four images when the source image appears on the video monitor screen To replace a captured image Example When you want to change the image stored to the third position 1 Select the third position where there is the image which you want to replace by pressin...

Страница 37: ... the same 1 Displaythefull sizeimagestoredinmemory Followsteps1to3of MakingFull Size Printouts on page 15 2 Set the multiple reduced image type to 4 without white borders See Selecting the number of reduced images to be captured in memory on page 29 3 Capture the image to be inserted 1 Selectthepositionwhereareducedimage is to be inserted by pressing the ı or button 2 Press the CAPTURE button at t...

Страница 38: ...video source Thisoperationisdoneusingthecontrolsofthevideoequipmentactingasthesource 2 Press the CAPTURE button at the instant the image you want to print appears on the screen To replace a stored image 1 Whenthememoryimageremainsonthevideomonitorscreen presstheSOURCE MEMORY button to display the source image 2 Press the CAPTURE button at the instant the image you want to print appears The previou...

Страница 39: ...this highlighted character is to be entered Symbols and words can be used to enter a caption Monitor display INS DEL SP OFF ON EXIT SHIFTa Function Inserts one character without easing the highlighted character Deletes a highlighted character and characters back by one Puts one space at the position of the highlighted character as erasing that character One space is left Selects to print without a...

Страница 40: ...enu or regular screen the entered characters are cleared During printing you cannot enter or edit caption in the CAPTION menu 1 Press the MENU button The menu just before opened appears 2 Select LAY by pressing the ı or button By switching LAY to green by pressing the ı or button LAYOUT SETUP appears 1 3 4 6 9 2 7 5 10 L AYOUT SE T UP COL OR n n n WI NDOW PRE SS MEMORY P I X L AY PR N I N OUT MUL ...

Страница 41: ...er display area by pressing the ı or button 2 Press the EXEC button Each time you press the EXEC button the cursor moves one position in the designated direction The cursor moves to this position Example Move the cursor to the left by two 2 Press the EXEC button twice 1 Highlight the ı button green Position the cursor to CAPTION by pressing the or button The cursor is curenily positioned here Cont...

Страница 42: ...utton is pressed 7 Press the EXEC button The character selected in step 6 appears at the point where the green cursor is positioned in the character display area after which the cursor moves to the next position The cursor moves to this position When you enter the wrong character 1 Select ı by pressing the ı or button then press the EXEC button The cursor moves back by one and the character entere...

Страница 43: ...operations explained in step 5 2 Overwrite the invalid character with the correct character by performing the operations explained in steps 6 and 7 The previously entered character is replaced with the new one To add characters midway 1 Position the cursor to the position where a character is to be added by performing the operations explained in step 5 Example To Add a character between A and B 2 ...

Страница 44: ...h a caption 3 Press the EXEC button 4 Select EXIT by pressing the ı or button 5 Press the EXEC button After this all printouts are made with a caption To make a printout without a caption Select OFF in step 2 Switch ON to green by pressing the ı or button Making Printouts With a Caption continued A BCDE F GH I J KL MN OPQRSTUVWXY Z 0123456789 CAPT I ON OF F 1 1 Display the CAPTION menu For details...

Страница 45: ...button The menu just before opened appears 2 Select PRN by pressing the ı or button 2 6 1 3 5 7 4 8 By switching PRN to green by pressing the ı or button PRINTER SETUP appears Position the cursor to FUNCTION by pressing the or button 3 Select FUNCTION by pressing the or button Continue to next page m PR I NTER SE T UP COLOR n n n P I X L AY PR N I N OUT Q 1 A 1 S 1 1 9 SYSTEM PRE SS P R I NT QT Y ...

Страница 46: ...ton by pressing the ı or button Switch the desired function to green by pressing the ı or button Function of the CLEAR button Settings To deactivate the CLEAR button OFF To delete images of all memory pages ALL To delete images of a single memory page PAGE FUNCT I ON SE T UP COLOR n n n P RN SE T UP Q 1 A 1 S C L E AR PRE SS A UTO L I VE OF F ON I MMED CAP RM 2 F UNC OF F ON PR I NT A L L FUNCT I ...

Страница 47: ... the video monitor press the CLEAR button once so that the memory image will be displayed Deleting images in all memory pages simultaneously Before deleting images in all memory pages Set CLEAR to ALL on the FUNCTION SETUP menu Note You cannot restore images once they have been deleted Press the CLEAR button All images stored in the printer are cleared CLEAR button ...

Страница 48: ...when the source image is displayed on the video monitor screen The image stored in memory is displayed on the screen 2 Select the memory page from which images are to be deleted by pressing the MEMORY PAGE button 3 Press the CLEAR button The image in the memory page selected in the step 2 is deleted Deleting the Images Stored to Memory Pages continued 3 2 ...

Страница 49: ...rom your package Paper cover 1 Notes Retain the original carton and packing materials in case you have to transport the unit in the future Remove the ink ribbon cartridge and paper tray when transporting the printer PUSH AC power cord 1 Color printing pack a 1 Warranty card 1 Operating Instructions 1 Paper tray 1 a Use the ink ribbon cartridge and paper for operation check ...

Страница 50: ...page 11 Printer Ink Ribbon Cartridge and Paper Both paper and an ink ribbon cartridge are necessary for printing Use the ink ribbon with the paper contained in the same package UPC 2010 Color Printing Pack Contains color ink ribbon cartridge and paper Color ink ribbon cartridge 1 roll A 6 4 1 4 5 3 4 inches size paper 200 sheets Note You cannot use the self laminating color printing pack and self ...

Страница 51: ...me name as the one on the printer Inserting batteries Install the batteries in the remote control unit before using it 1 Remove the battery compartment cover 2 Insert the two R6 size AA 1 5 V batteries Note the polarity Be careful to insert the batteries correctly 3 Replace the cover Battery life The battery life depends on how much you use the remote control unit Install fresh batteries as soon a...

Страница 52: ...ies the range of the remote control unit is about 3 meters Using the RM 91 FS 20 36 The operation of the RM 91 Remote Control Unit not supplied and FS 20 Foot Switch not supplied can be controlled remotely by sending a pulse signal to the REMOTE 2 connector in addition to the remote operation setting on the FUNCTION SETUP menu FS 36 not supplied has three switches that have different functions For...

Страница 53: ...ce before attempting to make any connections Connect the AC power cord last Making Connections for Storing Video Images Connect the video equipment providing the video images to be printed Connect the video equipment which will be used in actual printing using the following diagram as a guide to AC IN to wall outlet 75 ohm coaxial cable with BNC connectors UP 2100 2100SD to VIDEO INPUT Video equip...

Страница 54: ... correctly even if the printer color is correctly adjusted Check the color adjustment of the video monitor The printer outputs either of the following two kinds of video signals according to the printer setting described below EE E to E Signals are output to the monitor after being processed by the printer s circuitry THRU THROUGH Signals are output to the printer as is Use the THROUGH signal to c...

Страница 55: ...Control Unit not supplied RM 91 Remote Control Unit not supplied or the FS 20 36 Foot Switch not supplied to REMOTE 1 to REMOTE 2 RM 5500 not supplied to AC IN to wall outlet AC power cord supplied UP 2100 2100SD RM 91a not supplied a Either FS 20 or FS 36 can be also connected to REMOTE 2 INPUT S VIDEO VIDEO AC IN 1 2 REMOTE OUTPUT S VIDEO VIDEO ...

Страница 56: ...ing the tone of printout Selecting whether the operation and error tones sound Selecting the application mode printer operation mode Selecting the image which appears after storing the image into memory source image or memory image Selecting the timing of the pulse signal input to the REMOTE 2 connector Selecting operation mode for automatic printing capabilities of remote commanders connected to ...

Страница 57: ...nu Note You cannot adjust an image once it has been stored in memory Restore an image after adjustment 1 When the memory image is displayed on the screen press the SOURCE MEMORY button The image from the video source appears 2 Press the MENU button then select INPUT SETUP menu by pressing the ı or button 2 1 3 Continue to next page m Switch IN to green by pressing the ı or button INPUT SETUP menu ...

Страница 58: ...eakens The contrast weakens Becomes darker 4 Press the MENU button The regular screen appears When the printout or monitor image appears blackish or whitish Adjust the input signal to the optimum level for printing Menu adjustment item AGC Automatic Gain Control Selection ON OFF When selecting Normal when the proper signal is input When the printout or monitor image appears blackish or whitish 1 P...

Страница 59: ...ust the printout quality by adjusting sharpness and tone GAMMA of the printout Adjusting the sharpness You can adjust printout sharpness 4 1 2 3 Continue to next page m 2 Select SHARPNESS by pressing the or button Position the cursor to SHARPNESS by pressing the or button PICTURE AD J UST COLOR n n n P I X L AY PR N I N OUT Q 1 A 1 S S HARPNESS 1 8 5 PICTURE AD J UST COLOR n n n P I X L AY PR N I ...

Страница 60: ...he tone so that the details in the white or black part is clearly printed Setting Up the Printer continued The number and the corresponding sharpness increase every time you press the button The number and the corresponding sharpness decrease every time you press the ı button 3 Select the desired sharperss by pressing the ı or button You can set the sharpness to any of 8 steps from 1 to 8 A settin...

Страница 61: ...a printout of a normal image NORMAL To make a printout of an image where there are a lot of black or LIGHTER dark colored areas 2 Select GAMMA by pressing the or button Position the cursor to GAMMA by pressing the or button PR I NTE R SE T UP COLOR n n n P I X L AY PR N I N OUT Q 1 A 1 S 1 1 9 SYSTEM PRE SS P R I NT QT Y GAMMA D NORMA L L F UNCT I ON PRE SS PR I NTE R SE T UP COLOR n n n P I X L A...

Страница 62: ...eo source or play back different video software In such a case you can adjust the printout area by moving the screen either horizontally or vertically When a black frame appears around the printout even after the printout area has been shifted narrow the printout size because the image has been overscanned beyond the range of the regular screen 1 2 3 4 5 6 1 Press the MENU button then select LAYOU...

Страница 63: ...inted or the image is partially cut Adjust the printout size by using the H WIDTH and V WIDTH items from the menu Adjustment item H WIDTH V WIDTH Button to be used button ı button button ı button Adjustment result Widened at the right edge Narrowed with the left edge remaining fixed Enlarged downwards Vertical sized reduced with the top edge remaining fixed Adjusting the printout size horizontally...

Страница 64: ...shifts down with the size remaining as is When the black line is at the right or left edge When the black line is at the top or bottom To clear the adjusted value Press the MENU button from the WINDOW SETUP menu The adjusted values are cleared and the values are reset to the original ones Note When a black line still appears even after adjusting H START or V START change the printout size 5 Select...

Страница 65: ...rol page 55 Using the menu you can assign desired functions to the remote control unit connected to the REMOTE 2 connector In addition to the above the printer can be remotely controlled by a pulse signal input to REMOTE 2 see pages 76 1 Press the MENU button then select PRINTER SETUP menu by pressing the ı or button 2 3 4 5 6 7 8 1 Switch PRN to green by pressing the ı or button PRINTER SETUP men...

Страница 66: ...utton Position the cursor to IMMED CAP by pressing the or button FUNCT I ON SE T UP COLOR n n n PRESS PRN SE TU P A UTO L I VE OF F ON Q 1 A 1 S I MMED CA P OF F ON RM2 F UNC PR I NT CL EAR ALL FUNCT I ON SE T UP COLOR n n n PRESS PRN SE TU P A UTO L I VE OF F ON Q 1 A 1 S I MMED CA P OF F ON RM2 F UNC PR I NT CL EAR ALL FUNCT I ON SE T UP COLOR n n n P I X L AY PR N I N OUT Q 1 A 1 S 1 1 9 SYSTEM...

Страница 67: ...e on the video monitor when sending the timing pulse to the printer The printer operation is only to capture the image when receiving the pulse b For detailed information on the timing pulse to REMOTE 2 connector see page 76 Timing Selection To capture the image just after the CAPTURE command is received a ON To capture the image with the timing pulse input to REMOTE 2 connector b OFF 5 Select the...

Страница 68: ... replacing that previously stored with a new one Capturing images to a memory page Once images have been captured to all the memory pages the printer stops storing images and the message HIT ANY KEY appears The pointer green returns to its former position whenever you press the switch The pointer green moves to the next position whenever you press the switch Stopping printing whenever you press th...

Страница 69: ...3 4 1 Press the MENU button then select OUTPUT SETUP menu by pressing the ı or button Switch OUT to green by pressing the ı or button OUTPUT SETUP menu appears 2 Select DISPLAY by pressing the or button Position the cursor to DISPLAY by pressing the or button Continue to next page m OUTPUT SE T UP COLOR n n n Q 1 A 1 S D I S PL AY SOURCE OFF ON P I X L AY PR N I N OUT THRU EE OUTPUT SE T UP COLOR ...

Страница 70: ...isplay When the MENU screen arrears While the DISPLAY OFF button on the sub panel is held down the screen display disappears even if DISPLAY OFF is set to ON Upon releasing the DISPLAY OFF button the screen display appears again When the regular screen arrears The screen messages switches on the and off whenever you press the DISPLAY OFF button regardless of the menu setting on the OUTPUT SETUP me...

Страница 71: ...en select PRINTER SETUP menu by pressing the ı or button Switch PRN to green by pressing the ı or button PRINTER SETUP menu appears 2 Select SYSTEM by pressing the or button Position the cursor to SYSTEM by pressing the or button Continue to next page m P R I NT SE T UP COLOR n n n P I X L AY PR N I N OUT Q 1 A 1 S 1 1 9 SYSTEM PRE SS P R I NT QT Y GAMMA D NORMA L L F UNCT I ON PRE SS PR I NTER SE...

Страница 72: ... pressing the ı or button 6 Select PRN SETUP by pressing the or button then press the button The adjusted values are stored The PRINTER SETUP menu appears 7 Press the MENU button The regular screen appears When selecting Selection To disable the tones OFF To sound the tones ON PRN SE TUP Q 1 A 1 S PRESS B EE P OFF ON A PP L I ST ANDARD SYSTE M S ETUP COL OR n n n PRN SE TUP Q 1 A 1 S PRESS B EE P ...

Страница 73: ...t extremely high or low temperatures Do not use other electronic equipment near the unit The unit will not work properly in strong electromagnetic fields Do not place a heavy object such as a monitor on the printer Condensation If the printer is subject to wide and sudden changes in temperature such as when it is moved from a cold room to a warm room or when it is left in a room with a heater that...

Страница 74: ...e cabinet On transportation Do not transport the printer with the supplied accessories Doing so may cause malfunction Cleaning Clean the cabinet panel and controls with a soft dry cloth or a soft cloth lightly moistened with a mild detergent solution Do not use any type of solvent such as alcohol or benzine which may damage the finish Precautions continued ...

Страница 75: ...urst 75 ohms terminated sync negative VIDEO NTSC composite video signal BNC connector 1 1 Vp p 75 ohms terminated sync negative AC IN for power input Output connectors S VIDEO Separate luminance Y and chrominance C signals 4 pin mini DIN 1 Y 1 Vp p C 0 29 Vp p color burst 75 ohms terminated sync negative VIDEO NTSC composite video signal BNC connector 1 1 Vp p 75 ohms terminated sync negative Cont...

Страница 76: ...ards Unit msec msec V MAX 10 5 Captured image Remote control pulse signal Specifications continued Using the automatic printing capabilities REMOTE 2 If you send the remote control pulse signals illustrated through the REMOTE 2 connector the printer is remotely controlled according to the remote control setting see page 65 Turn on the power of the printer and display the source image on the monito...

Страница 77: ...Sony service facility or your Sony dealer to clear error status The paper has jammed inside the printer n Check the position where paper has jammed and remove any jammed paper from the printer page 79 The ink ribbon cartridge is defective n Replace the defective ink ribbon cartridge with the new one page 8 The ink ribbon has torn n Repair the tear page 10 The ink ribbon cartridge that can not be u...

Страница 78: ...er operation is enabled after this The TV system of the signal input from the source equipment VTR video camera and so on is not compatible with the TV system of your printer n Check the signal of TV system and input the correct one The signal other than the video signal such as audio signal and similar is input n Input the correct video signal Printing is queued for the selected memory page n Ret...

Страница 79: ...outs have been ejected to the paper cover and have accumulated on the paper cover remove them If not go to the next step 3 Turn off the power of the printer 4 Remove the paper tray When you can see paper inside the printer go to step 5 When you cannot see paper go to step 8 5 Slowly pull the paper into the paper tray Note Never attempt to pull a jammed paper down up backwards or forwards the paper...

Страница 80: ...ont panel 10Turn on the power of the printer When the message does not appear you can use the printer as normal However the image captured to memory have been cleared Capture the image to memory again If the same message appears again the printer must not be operated Turn off the power immediately and contact your Sony service facility 7 Load the paper into the paper tray correctly Do not reuse th...

Страница 81: ... SOURCE MEMORY button to display the image stored in memory If an image appears the monitor is working correctly n Select another input signal by using the INPUT SETUP menu see page 13 Or set the connected video equipment to playback mode if it is currently set to another mode such as stop mode If an image captured in memory appears when the SOURCE MEMORY button is pressed SOURCE on the OUTPUT SET...

Страница 82: ...he paper jams or another problem occurs 6 MULTI PICTURE button 32 37 Press this button to select the desired printout type When you press this button the currently selected printout type lights green for two or three seconds Each time you press this button the type lights green in the order 7 PRINT QTY quantity button 20 Press this button to set the number of copies You can set any number up to 9 ...

Страница 83: ... 38 Press to make a printout Paper ejection slot The printout is ejected here Front door Pull the top on the front door toward you to open it Opening the front panel reveals the sub panel buttons ink ribbon cartridge paper tray and paper cover a Sub panel keys For details see Sub Panel b Ink ribbon cartridge 8 50 Insert the ink ribbon cartridge c Paper cover 49 50 Paper is ejected onto this cover ...

Страница 84: ... similar regardless of setting of the item of DISPLAY on the OUTPUT SETUP menu 3 MENU button Press this button to display or clear the menus on the screen and printer window displays 4 CLEAR button 47 48 Press this button to clear the images captured in the memory pages Which images that can be cleared with the CLEAR button depends on the setting made with the FUNCTION SETUP menu 5 Cursor keys Use...

Страница 85: ...3 Used to connect the video equipment supplying the source image 4 OUTPUT connectors 54 Used to connect the video monitor Connector S VIDEO VIDEO Connectable equipment Video equipment with Y C separated output connector Video equipment with composite video signal output connector Connector S VIDEO VIDEO Connectable equipment Video equipment with Y C separated input connector Video equipment with c...

Страница 86: ...en M Memory The image stored in memory is displayed on the screen 4 Printer operation mode display section 5 Memory page display section Indicates the currently selected memory page While the image in the memory page is being printed the memory page indication blinks The memory page whose memory image is queued to be printed lights in green 6 Q print quantity display Indicates the number of copies...

Страница 87: ...L AYOUT SE T UP COLOR n n n Q 1 A 1 S WI NDOW PRE SS MEMORY MUL T I P I X 1 2H 4 16 SEP ARATE OF F ON CAPT I ON PRE SS F RAME F I EL D PR I NTER SE T UP COLOR n n n PI X L A Y PRN I N OUT Q 1 A 1 S 1 1 9 SYSTEM PRE SS P R I NT QT Y GAMMA D NORMA L L F UNCT I ON PRE SS I NPUT SE T UP COLOR n n n GA I N I NPUT SE L PI X L A Y PRN I N OUT HUE COLOR OF FSET Q 1 A 1 S 0 0 2 V I DEO SV A GC OFF ON 0 OUT...

Страница 88: ...isplay 86 rear 85 sub panel 84 Location precautions 74 M N O Memory page selecting the memory page 28 usable memory page 25 Menu CAPTION input screen 39 FUNCTION SETUP menu 34 56 66 67 INPUT SETUP menu 13 57 LAYOUT SETUP menu 26 29 31 OUTPUT SETUP menu 54 69 PICTURE ADJUST menu 59 PRINTER SETUP menu 18 60 SYSTEM SETUP menu 23 71 WINDOW SETUP menu 62 Menu screen tree chart 87 Menu screen display 87...

Страница 89: ...he printout area printout size 62 compensating for the input signal 57 erasing the screen display 69 selecting operation mode for automatic printing capabilities 65 selecting whether to enable the operation and error tones 71 Sharpness 59 Specifications 75 Supplied accessories assembly 50 supplied accessories 49 System configuration 7 System overview 6 SYSTEM SETUP menu 23 71 T to W Troubleshootin...

Страница 90: ... tout risque d incendie ou d électrocution garder cet appareil à l abri de la pluie et de l humidité Pour prévenir tout risque d électrocution ne pas ouvrir le boîtier Confier l entretien de cet appareil exclusivement à un personnel qualifié ...

Страница 91: ...d application 111 A propos de la mémoire 113 Réalisation d un tirage à images multiples différentes en réduction 117 Réalisation de tirages pour photo d identité 126 Réalisation de tirages avec une légende 127 Saisie d une légende 128 Suppression des images enregistrées dans les pages mémoire 133 Sélection de la fonction de la touche CLEAR 133 Suppression d images 135 Introduction Opération à suiv...

Страница 92: ...sion 150 Sélection du mode de fonctionnement pour les impressions automatiques 153 Suppression de l affichage à l écran 157 Sélection de l activation des bips de confirmation et d erreur 159 Précautions 161 Sécurité 161 Installation 161 Entretien 162 Spécifications 163 Messages d erreur avertissement 165 En cas de bourrage du papier 167 Dépannage 169 Emplacement et fonction des composants et des c...

Страница 93: ...ernant les précautions à prendre dans le cadre de l utilisation de l imprimante les listes d erreurs les avertissements et leur traitement ainsi que le guide de dépannage Cette section fournit également des informations sur l emplacement et la fonction des composants et des commandes ainsi que sur les messages et les écrans de menu servant à commander l imprimante Si vous rencontrez des termes ou ...

Страница 94: ... Vous pouvez commander l exploitation de base de l imprimante au moyen des touches et configurer l imprimante interactivement via les menus affichés Impressions réalisables au moyen de cette imprimante Impression pleine page d une image page 103 Impression de deux images en réduction Saisie du centre de l écran page 117 Impression de seize images en réduction page 117 Impression d images identique...

Страница 95: ...nie Ces appareils vous permettent de commander l imprimante à distance Commande au pied non fournie Ces appareils vous permettent de commander l imprimante à distance Moniteur vidéo Affiche les images transmises par la source vidéo image source et l image à imprimer source mémoire Affiche également les menus de l imprimante et les messages Lorsque le commutateur d alimentation de l imprimante est ...

Страница 96: ...rages vous devez installer une cassette à ruban encreur et charger du papier compatibles Si l imprimante détecte une combinaison incompatible un message d erreur apparaît dans la fenêtre d affichage de l imprimante et le fonctionnement est désactivé Utilisez la cassette à ruban encreur et le papier d impression fournis pour vérifier si l imprimante vidéo fonctionne correctement Remarques Utilisez ...

Страница 97: ...ue d être endommagé lors de son insertion 2 Retirez la cassette à ruban encreur en appuyant sur la cartouche elle même La cassette à ruban encreur s éjecte Cette opération n est pas nécessaire la première fois que vous utilisez l imprimante Rembobinez le ruban jusqu à ce que la partie non utilisée arrive à l extrémité droite Remarque N introduisez jamais les doigts dans le compartiment du ruban en...

Страница 98: ...s un endroit poussiéreux La présence de traces de doigts ou de poussières sur le ruban encreur entraîne une impression imparfaite ou un dysfonctionnement de la tête Rangement des rubans encreur Evitez de placer la cassette à ruban encreur dans un endroit soumis à des températures élevées une humidité importante des poussières en excès au rayonnement direct du soleil Rangez les cassettes à ruban en...

Страница 99: ...rs vous 2 Appuyez sur la zone du magasin à papier identifiée par l inscription PUSH Le magasin à papier est éjecté 3 Placez le papier d impression dans le magasin à papier Remarques Si vous ajoutez du papier dans un magasin partiellement chargé veillez à ne pas dépasser la capacité totale du magasin Un chargement excessif du magasin à papier risque d entraîner un bourrage de l imprimante La limite...

Страница 100: ... risquent d entraîner des résultats d impression insatisfaisants ou un dysfonctionnement de la tête d impression Manipulez le papier par la feuille de protection de la surface d impression Rangement du papier d impression Evitez de ranger le papier d impression dans un endroit soumis à des températures élevées une humidité importante des poussières en excès au rayonnement direct du soleil Rangez l...

Страница 101: ...lectionniez une autre source 1 Mettez le moniteur vidéo et l imprimante sous tension L écran droit apparaît 2 Appuyez sur la touche MENU L écran suivant apparaît 3 Sélectionnez IN en appuyant sur la touche ı ou Commutez IN sur le vert en appuyant sur la touche ı ou L indication INPUT SETUP apparaît Ecran du moniteur vidéo 2 6 4 1 3 5 Q 1 A 1 S à suivre m I NPUT SE T UP COLOR n n n GA I N I NPUT SE...

Страница 102: ... est mis en évidence Signal transmis par l appareil vidéo raccordé via le connecteur V n VIDEO VIDEO INPUT Signal transmis par l appareil vidéo raccordé via le connecteur SV n S VIDEO S VIDEO INPUT Positionnez le curseur sur INPUT SEL en appuyant sur la touche ou 6 Appuyez sur la touche MENU L écran normal apparaît Avant l impression suite I NPUT SE T UP COLOR n n n GA I N I NPUT SE L P I X L AY P...

Страница 103: ...t qu ils sont correctement chargés voir pages 96 99 et 138 Sélectionnez le signal d entrée à utiliser pour la réalisation du tirage voir page 101 Réglez l imprimante en vue de l enregistrement d une image pleine page dans la mémoire voir page 117 Sélectionnez la page mémoire appropriée voir page 116 1 Mettez le moniteur vidéo et l imprimante sous tension 2 Démarrez la source vidéo Cette opération ...

Страница 104: ...imée d un mouvement rapide peut s avérer floue à l impression Si cela se produit changez le réglage MEMORY sur FIELD dans le menu CONF LAYOUT Bien que le flou doit avoir été éliminé la qualité d impression ultime sera légèrement altérée Pour changer l image mémoire 1 Pour afficher l image source lorsque l image mémoire est affichée sur l écran appuyez sur la touche SOURCE MEMORY 2 Appuyez sur la t...

Страница 105: ...r la touche PRINT Pour visualiser une image dissimulée par un message sur l écran Vous pouvez supprimer le message affiché sur l écran du moniteur vidéo en appuyant sur la touche DISPLAY OFF Le message disparaît de l écran Pour afficher un message à l écran appuyez de nouveau sur la touche DISPLAY OFF Si une ligne noire apparaît sur le tirage Il arrive qu une ligne noire apparaisse sur le tirage a...

Страница 106: ...de démarrer l impression ou pendant que l impression est en cours Vous pouvez changer le nombre de copies défini à n importe quel moment durant l impression Définition du nombre de tirages dans le menu 1 5 3 2 4 1 Appuyez sur la touche MENU Le dernier menu consulté apparaît 2 Sélectionnez PRN en appuyant sur la touche ı ou Le menu PRINTER SETUP apparaît Commutez PRN sur le vert en appuyant sur la ...

Страница 107: ... Appuyez sur la touche MENU L écran normal apparaît Positionnez le curseur PRINT QTY en appuyant sur la touche ou Nombre de copies PR I NTER SE T UP COLOR n n n P I X L AY PR N I N OUT Q 1 A 1 1 S 1 1 9 SYSTEM PRE SS P R I NT QT Y GAMMA D NORMA L L F UNCT I ON PRE SS PR I NTER SE T UP COLOR n n n P I X L AY PR N I N OUT Q9 A 1 S 9 1 9 SYSTEM PRE SS P R I NT QT Y GAMMA D NORMA L L F UNCT I ON PRE S...

Страница 108: ...la touche PRINT QTY jusqu à ce que le nombre voulu apparaisse Des pressions répétées sur la touche PRINT QTY augmentent le nombre jusqu à 9 où il s arrête Pour diminuer le nombre de copies Pour diminuer le nombre de copies vous devez changer le nombre dans le menu Si la réserve de papier s épuise en cours d impression Chargez le papier d impression dans le magasin et appuyez sur la touche PRINT L ...

Страница 109: ...ez imprimer apparaît à l écran Remarque Si vous appuyez sur la touche CAPTURE pour saisir une image dans la page mémoire dont l image est imprimée le message PRINTING MEMORY apparaît et l image ne peut pas être saisie 3 Appuyez sur la touche PRINT L image saisie à l étape 2 est mise dans la file d attente L image est imprimée dès que tous les travaux d impression précédents ont été réalisés Remarq...

Страница 110: ...ans la mémoire Impression d étiquettes adhésives c a Pour le paramètre de mode d impression 2H l image au centre de l écran est saisie dans la mémoire 2H de MULTI PIX Zone à saisir Impression Impression de seize images en réduction Impression de quatre images en réduction Impression de deux images en réduction a Saisie du centre de l écran Impression d une image pleine page Moniteur vidéo ABC123 A...

Страница 111: ... Appuyez sur la touche MENU Le dernier menu consulté apparaît 2 Sélectionnez PRN en appuyant sur la touche ı ou Le menu PRINTER SETUP apparaît Commutez PRN sur le vert en appuyant sur la touche ı ou L indication PRINTER SETUP apparaît 1 9 3 5 7 2 6 4 8 à suivre m 3 Sélectionnez SYSTEM en appuyant sur la touche ou Positionnez le curseur sur SYSTEM en appuyant sur la touche ou PR I NTER SE T UP COLO...

Страница 112: ...en appuyant sur la touche ou 5 Sélectionnez APPLI en appuyant sur la touche ou SYST EM SE T UP COLOR n n n PRN SE TUP Q 1 A 1 S PRESS B EE P OFF ON A PP L I ST ANDARD SYST EM SE T UP COLOR n n n PRN SE TUP Q 1 A 1 S PRESS B EE P OFF ON A PP L I ST ANDARD SYST EM SE T UP COLOR n n n PRN SE TUP Q 1 A DUP1 S PRESS B EE P OFF ON A PP L I D UPL I CATE a L imprimante imprime en mode champ lorsqu un tira...

Страница 113: ...utilisables dépend du modèle de l imprimante du type d images en réduction sélectionné et du mode de mémoire Image réduite Mode de mémoire Nombre de pages mémoire 1 2H 4 16 Image 1 A 1 2H Champ 2 A1 A2 Lorsque vous sélectionnez le mode de quatre images en réduction ou le mode 16 images en réduction l appareil sélectionne automatiquement le mode d image quel que soit le réglage de MEMORY dans le me...

Страница 114: ... la touche MENU Le dernier menu consulté apparaît 2 Sélectionnez LAY en appuyant sur la touche ı ou Commutez LAY sur le vert en appuyant sur la touche Sélectionnez LAY en appuyant sur la touche ı ou L indication LAYOUT SETUP apparaît 3 1 5 L AYOUT SE T UP COLOR n n n P I X L AY PR N I N OUT Q 1 A 1 S WI NDOW PRE SS MEMORY MUL T I P I X 1 2H 4 16 SEP ARATE OF F ON CAPT I ON PRE SS F RAME F I EL D ...

Страница 115: ...uvement rapide 5 Appuyez sur la touche MENU L écran normal apparaît Positionnez le curseur sur MEMORY en appuyant sur la touche ou Commutez le mode de mémoire voulu sur le vert en appuyant sur la touche ı ou L AYOUT SE T UP COLOR n n n P I X L AY PR N I N OUT Q 1 A 1 S WI NDOW PRE SS MEMORY MUL T I P I X 1 2H 4 16 SEP ARATE OF F ON CAPT I ON PRE SS F RAME F I EL D L AYOUT SE T UP COLOR n n n P I X...

Страница 116: ...ez sur la touche MEMORY PAGE Remarque La page mémoire dont l image se trouve en cours d impression clignote Même si vous sélectionnez cette page clignotante vous ne pouvez pas saisir l image dans cette page Touche MEMORY PAGE Sélectionnez la page mémoire désirée en appuyant sur la touche MEMORY PAGE Q 1 A2 1 S ...

Страница 117: ...nnez l image qui apparaîtra après que l image aura été enregistrée dans la mémoire l image mémoire ou l image source voir page 121 Définissez le mode d application de l imprimante sur STANDARD page 111 Sélection du nombre d images réduites à enregistrer dans la mémoire 1 Appuyez sur la touche MENU Le dernier menu consulté apparaît 2 Sélectionnez LAY en appuyant sur la touche ı ou Commutez LAY sur ...

Страница 118: ... appuyant sur la touche ou Commutez le type d impression d images en réduction voulu sur le vert en appuyant sur la touche ı ou Pour réaliser une impression d images réduites avec des bords blancs passez à l étape 5 Pour réaliser une impression sans bords blancs passez à l étape 7 L AYOUT SE T UP COLOR n n n P I X L AY PR N I N OUT Q 1 A 1 S WI NDOW PRE SS MEMORY MUL T I P I X 1 2H 4 16 SEP ARATE ...

Страница 119: ...ous sélectionnez Réglages Tirages sans bords blancs OFF Tirages avec bords blancs ON 7 Appuyez sur la touche MENU L écran normal apparaît Positionnez le curseur sur SEPARATE en appuyant sur la touche ou Commute le mode voulu sur le vert en appuyant sur la touche ı ou L AYOUT SE T UP COLOR n n n P I X L AY PR N I N OUT Q 1 A 2H S WI NDOW PRE SS MEMORY MUL T I P I X 1 2H 4 16 SEP ARATE OF F ON CAPT ...

Страница 120: ...ur vidéo revient à l écran normal au bout de quelques secondes 2 Appuyez sur la touche MULTI PICTURE jusqu à ce que le type d image multiple voulu apparaisse Plusieurs pressions consécutives sur la touche MULTI PICTURE permettent de commuter le type d impression d images en réduction Pour plus de détails sur le type d impression d images en réduction voir Sélection du nombre d images réduites à en...

Страница 121: ...TUP 1 Appuyez sur la touche MENU Le dernier menu consulté apparaît 2 Sélectionnez PRN en appuyant sur la touche ı ou 3 Sélectionnez FUNCTION en appuyant sur la touche ou 1 7 2 6 3 5 4 Positionnez le curseur sur FUNCTION en appuyant sur la touche ou à suivre m PR I NTER SE T UP COLOR n n n P I X L AY PR N I N OUT Q 1 A 1 S 1 1 9 SYSTEM PRE SS P R I NT QT Y GAMMA D NORMA L L F UNCT I ON PRE SS PR I ...

Страница 122: ...appuyez sur la touche CAPTURE Réglage OFF ON Variantes de tirages suite Positionnez le curseur sur AUTO LIVE en appuyant sur la touche ou Commutez le mode voulu sur le vert en appuyant sur la touche ı ou 7 Appuyez sur la touche MENU L écran normal apparaît Pour revenir au menu PRINTER SETUP A l étape 9 positionnez le curseur sur PRN SETUP et appuyez sur la touche Le menu PRINTER SETUP apparaît à n...

Страница 123: ...mage aura été enregistrée dans la mémoire l image mémoire ou l image source voir page 121 a Si le type d impression à quatre images en réduction ou à seize images en réduction est sélectionné le mode d image est automatiquement sélectionné 1 Démarrez la source vidéo Cette opération est exécutée à l aide des commandes de l appareil vidéo faisant office de source 2 3 5 à suivre m Clignote en vert po...

Страница 124: ...ste sur l écran du moniteur vidéo Répétez l étape 2 jusqu à ce que vous ayez saisi quatre images si l image source apparaît sur l écran du moniteur vidéo Pour remplacer une image enregistrée Exemple Si vous voulez changer l image enregistrée à la troisième position 1 Sélectionnez la troisième position dont vous voulez remplacer l image en appuyant sur la touche ı ou Une pression sur la touche ı ou...

Страница 125: ...age multiple réduite sur 4 sans bords blancs Voir Sélection du nombre d images réduites à enregistrer dans la mémoire à la page 117 3 Mémorisez l image à incruster 1 Sélectionnez la position où une image réduite doit être incrustée en appuyant sur la touche ı ou 2 Appuyez sur la touche CAPTURE au moment où l image que vous voulez incruster apparaît L image est mémorisée à la position sélectionnée ...

Страница 126: ...o Cette opération est exécutée à l aide des commandes de l appareil vidéo faisant office de source 2 Appuyez sur la touche CAPTURE au moment où l image que vous voulez imprimer apparaît à l écran Pour remplacer une image mémorisée 1 Si l image mémoire est toujours sur l écran du moniteur vidéo appuyez sur la touche SOURCE MEMORY pour afficher l image source 2 Appuyez sur la touche CAPTURE au momen...

Страница 127: ...mis en évidence et les caractères situés en arrière reculent d une position Place un espace à la position du caractère mis en évidence de façon à effacer ce caractère et à ne laisser qu un espace Sélectionne l impression sans légende Sélectionne l impression avec légende Retourne du menu CAPTION au menu CONF LAYOUT Sélectionne les lettres capitales ou les minuscules a En mettant SHIFT en évidence ...

Страница 128: ...UP ou à l écran normal les caractères introduits seront perdus En cours d impression vous ne pouvez pas introduire ou modifier de légende dans le menu CAPTION 1 Appuyez sur la touche MENU Le dernier menu consulté apparaît 2 Sélectionnez LAY en appuyant sur la touche ı ou Commutez LAY sur le vert en appuyant sur la touche ı ou L indication LAYOUT SETUP apparaît 1 3 4 6 9 2 7 5 10 L AYOUT SE T UP CO...

Страница 129: ...zone d affichage des caractères en appuyant sur la touche ı ou 2 Appuyez sur la touche EXEC Chaque fois que vous appuyez sur la touche EXEC le curseur se déplace d une position dans le sens sélectionné Le curseur se déplace sur cette position Exemple Déplacez le curseur de deux positions vers la gauche 2 Appuyez deux fois sur la touche EXEC 1 Mettez en évidence en vert la touche ı Positionnez le c...

Страница 130: ...r la touche EXEC 7 Appuyez sur la touche EXEC Le caractère sélectionné à l étape 6 apparaît à l endroit où le curseur vert est positionné dans la zone d affichage des caractères après quoi le curseur se déplace sur la position suivante Le curseur se déplace sur cette position Si vous introduisez un caractère erroné 1 Sélectionnez ı en appuyant sur la touche ı ou et appuyez ensuite sur la touche EX...

Страница 131: ...utant les opérations expliquées à l étape 5 2 Ecrasez le caractère invalide avec le caractère correct en exécutant les opérations expliquées aux étapes 6 et 7 Le caractère précédemment introduit est remplacé par le nouveau caractère Pour ajouter des caractères parmi d autres 1 Positionnez le curseur sur la position où un caractère doit être inséré en exécutant les opérations expliquées à l étape 5...

Страница 132: ...le menu CAPTION Pour plus de détails sur l affichage du menu CAPTION voir les étapes 1 à 4 de la Saisie d une légende 2 Sélectionnez ON en appuyant sur la touche ı ou 3 Appuyez sur la touche EXEC 4 Sélectionnez exit en appuyant sur la touche ı ou 5 Appuyez sur la touche EXEC Au terme de cette procédure tous les tirages sont imprimés avec une légende Pour réaliser un tirage sans légende Sélectionne...

Страница 133: ... 1 Appuyez sur la touche MENU Le dernier menu consulté apparaît 2 Sélectionnez PRN en appuyant sur la touche ı ou 2 6 1 3 5 7 4 8 Commutez PRN sur le vert en appuyant sur la touche ı ou L indication PRINTER SETUP apparaît Positionnez le curseur sur FUNCTION en appuyant sur la touche ou 3 Sélectionnez FUNCTION en appuyant sur la touche ou à suivre m PR I NTER SE T UP COLOR n n n P I X L AY PR N I N...

Страница 134: ...ionnez la fonction de la touche CLEAR en appuyant sur la touche ı ou Commutez la fonction voulue sur le vert en appuyant sur la touche ı ou Fonction de la touche CLEAR Réglages Pour désactiver la touche CLEAR OFF Pour effacer les images de toutes les pages mémoire ALL Pour effacer les images d une seule page mémoire PAGE FUNCT I ON SE T UP COLOR n n n P RN SE T UP Q 1 A 1 S C L E AR PRE SS A UTO L...

Страница 135: ... fois sur la touche CLEAR de façon à ce que l image mémoire soit affichée Suppression simultanée des images de toutes les pages mémoire Avant de supprimer les images de toutes les pages mémoire Réglez CLEAR sur ALL dans le menu FUNCTION SETUP Remarque Vous ne pouvez pas restaurer les images une fois qu elles ont été supprimées Appuyez sur la touche CLEAR Toutes les images mémorisées dans l imprima...

Страница 136: ...e l image source est affichée sur l écran du moniteur vidéo L image enregistrée dans la mémoire est affichée sur l écran 2 Sélectionnez la page mémoire dont les images doivent être effacées en appuyant sur la touche MEMORY PAGE 3 Appuyez sur la touche CLEAR L image dans la page mémoire sélectionnée à l étape 2 est effacée Suppression des images enregistrées dans les pages mémoire suite 3 2 ...

Страница 137: ...gasin à papier 1 Remarques Conservez le carton et les matériaux de conditionnement d origine pour le cas où vous devriez transporter l appareil Retirez la cassette à ruban encreur et le magasin à papier lorsque vous transportez l imprimante PUSH a Utilisez la cassette à ruban encreur et du papier pour en contrôler le bon fonctionnement Cordon d alimentation 1 Jeu d impression couleur a 1 Carte de ...

Страница 138: ...ssions vous avez besoin de papier d impression et d une cassette à ruban encreur Utilisez le ruban encreur et le papier d impression emballés dans le même conditionnement Ensemble pour impression couleur UPC 2010 Contient une cassette à ruban encreur couleur et du papier d impression Cassette à ruban encreur couleur 1 rouleau 200 feuilles de papier format A6 4 1 4 5 3 4 pouces Remarque Vous ne pou...

Страница 139: ...on des piles Introduisez les piles dans la télécommande avant de l utiliser 1 Retirez le couvercle du compartiment à piles 2 Introduisez les deux piles R6 AA de 1 5 V Respectez la polarité Veillez à installer les piles dans le bon sens 3 Replacez le couvercle Autonomie des piles L autonomie des piles dépend de la fréquence d utilisation de la télécommande En règle générale les piles offrent une au...

Страница 140: ... une portée efficace d environ 3 mètres Utilisation de la télécommande RM 91 FS 20 36 non fournie Le fonctionnement de la télécommande RM 91 et de la commande au pied FS 20 peut être contrôlé à distance en envoyant un signal d impulsion au connecteur REMOTE 2 en plus du réglage opérationnel de commande à distance dans le menu FUNCTION SETUP La FS 36 non fourni dispose de trois commutateurs présent...

Страница 141: ...océder à quelque raccordement que ce soit Raccordez le cordon d alimentation en dernier lieu Raccordement pour la mémorisation d images vidéo Raccordez l appareil vidéo transmettant les images vidéo à imprimer Raccordez l appareil vidéo qui sera utilisé pour l impression proprement dite en prenant le diagramme suivant comme guide de référence vers AC IN Câble coaxial de 75 ohms à connecteurs BNC v...

Страница 142: ...es parce que les couleurs du moniteur vidéo ne correspondent pas à celles du tirage Dans pareil cas il est possible que les couleurs du moniteur vidéo ne soient pas ajustées correctement même si les couleurs de l imprimante sont réglées correctement Vérifiez le réglage des couleurs de votre moniteur vidéo L imprimante sort l un des deux types de signaux vidéo suivants en fonction du réglage de l i...

Страница 143: ...rale RM 5500 non fournie UP 2100 2100SD Pour régler la sortie d imprimante sur THRU 1 Appuyez sur la touche MENU puis affichez le menu OUTPUT SETUP en appuyant sur la touche ı ou 2 Sélectionnez SOURCE en appuyant sur la touche ou 3 Sélectionnez THRU en appuyant sur la touche ı ou Pour plus de détails sur les réglages à l aide des menus reportez vous à Configuration de l imprimante à la page 144 a ...

Страница 144: ...s tirages Sélection de l activation des bips de confirmation et d erreur Sélection du mode d application mode de fonctionnement de l imprimante Sélection de l image qui apparaît après l enregistrement de l image dans la mémoire l image source ou l image mémoire Sélection de la synchronisation du signal d impulsion entré via le connecteur REMOTE 2 Sélection du mode de fonctionnement pour l activati...

Страница 145: ...ge après qu elle a été enregistrée dans la mémoire Restaurez une image après réglage 1 Si l image mémoire est affichée sur l écran appuyez sur la touche SOURCE MEMORY L image de la source vidéo apparaît 2 Appuyez sur la touche MENU et sélectionnez ensuite le menu INPUT SETUP en appuyant sur la touche ou 2 1 3 à suivre m Commutez IN sur le vert en appuyant sur la touche ou Le menu INPUT SETUP appar...

Страница 146: ...mée ou affichée sur le moniteur apparaît noirâtre ou blanchâtre 1 Positionnez le curseur sur le paramètre voulu en appuyant sur la touche ou 2 Procédez au réglage en appuyant sur la touche ı ou Configuration de l imprimante suite a Réglez les couleurs de façon à ce que les visages apparaissent naturels Réglage Teinte Intensité des couleurs Contraste Luminosité Paramètre de réglage du menu HUE a CO...

Страница 147: ... tirages en réglant la netteté et la tonalité GAMMA du tirage Réglage de la netteté Vous pouvez régler la netteté des tirages 4 1 2 3 à suivre m Positionnez le curseur sur SHARPNESS en appuyant sur la touche ou PICTURE AD J UST COLOR n n n P I X L AY PR N I N OUT Q 1 A 1 S S HARPNESS 1 8 5 PICTURE AD J UST COLOR n n n P I X L AY PR N I N OUT Q 1 A 1 S S HARPNESS 1 8 5 Commutez PIX sur le vert en a...

Страница 148: ... 5 normaux Pour obtenir des contours Vers la droite vers la nets graduation 8 Configuration de l imprimante suite 3 Sélectionnez la netteté voulue en appuyant sur la touche ı ou Vous pouvez régler la netteté sur l une des 8 graduations allant de 1 à 8 Le réglage sur la graduation 5 correspond à la netteté standard 4 Appuyez sur la touche MENU L écran normal apparaît Réglage de la tonalité des tira...

Страница 149: ...r sélectionner Réglage Pour réaliser un tirage d une image comportant de nombreuses zones blanches DARKER Pour réaliser un tirage d une image normale NORMAL Pour réaliser un tirage d une image comportant de nombreuses zones noires LIGHTER PR I NTE R SE T UP COLOR n n n P I X L AY PR N I N OUT Q 1 A 1 S 1 1 9 SYSTEM PRE SS P R I NT QT Y GAMMA D NORMA L L F UNCT I ON PRE SS PR I NTE R SE T UP COLOR ...

Страница 150: ...ges après avoir raccordé une autre source vidéo ou exploité un autre logiciel vidéo Dans ce cas vous pouvez ajuster la zone d impression en déplaçant l écran horizontalement ou verticalement Si un cadre noir apparaît encore autour du tirage après que vous avez décalé la zone d impression réduisez le format d impression parce que l image a été surbalayée au delà de la plage de l écran normal 1 2 3 ...

Страница 151: ...e noir est imprimé ou si l image est partiellement coupée Ajustez le format d impression à l aide des paramètres H WIDTH et V WIDTH du menu Paramètre de réglage H WIDTH V WIDTH Touche à actionner Touche Touche ı Touche Touche ı Résultat du réglage Agrandi vers le bord droit Réduit avec le bord gauche fixe Agrandi vers le bas Taille verticale réduite avec le bord supérieur fixe Réglage horizontal d...

Страница 152: ...nchangé Si la ligne noire se situe sur le bord gauche ou droit Si la ligne noire se situe dans le haut ou dans le bas Pour annuler la valeur réglée Appuyez sur la touche MENU dans le menu WINDOW SETUP Les valeurs réglées sont annulées et les paramètres sont ramenés aux valeurs de réglage initiales Remarque S il y a toujours une ligne noire après que vous avez réglé H START ou V START changez le fo...

Страница 153: ...a page 143 En vous aidant du menu vous pouvez assigner les fonctions de votre choix à la télécommande raccordée au connecteur REMOTE 2 De plus l imprimante peut être commandée à distance par un signal d impulsion entré via REMOTE 2 voir page 164 1 Appuyez sur la touche MENU et sélectionnez ensuite le menu PRINTER SETUP en appuyant sur la touche ı ou 2 3 4 5 6 7 8 1 Commutez PRN sur le vert en appu...

Страница 154: ...sur la touche ou FUNCT I ON SE T UP COLOR n n n PRESS PRN SE TU P A UTO L I VE OF F ON Q 1 A 1 S I MMED CA P OF F ON RM2 F UNC PR I NT CL EAR ALL FUNCT I ON SE T UP COLOR n n n PRESS PRN SE TU P A UTO L I VE OF F ON Q 1 A 1 S I MMED CA P OF F ON RM2 F UNC PR I NT CL EAR ALL FUNCT I ON SE T UP COLOR n n n P I X L AY PR N I N OUT Q 1 A 1 S 1 1 9 SYSTEM PRE SS P R I NT QT Y GAMMA D NORMA L L F UNCT I...

Страница 155: ...pulsion de synchronisation vers l imprimante Le fonctionnement de l imprimante sert uniquement à saisir l image lors de la réception de l impulsion b Pour plus de détails sur l impulsion de synchronisation transmise via le connecteur REMOTE 2 voir page 164 TSynchronisation Sélection Pour saisir l image juste après la réception de l instruction CAPTUREa ON Pour saisir l image avec l impulsion de sy...

Страница 156: ...ue fois que vous appuyez sur la touche Arrêt de l impression lorsque vous appuyez sur la touche La feuille de papier en cours d impression est éjectée Lorsque l image source est affichée l image est saisie dans la mémoire lorsque vous appuyez sur la touche Lorsque l image mémoire est affichée c est l image source qui apparaît lorsque vous appuyez sur la touche Démarrage de l impression lorsque vou...

Страница 157: ...3 4 1 Appuyez sur la touche MENU et sélectionnez ensuite le menu OUTPUT SETUP en appuyant sur la touche ı ou Commutez OUT sur le vert en appuyant sur la touche ou Le menu OUTPUT SETUP apparaît 2 Sélectionnez DISPLAY en appuyant sur la touche ou Positionnez le curseur sur DISPLAY en appuyant sur la touche ou à suivre m OUTPUT SE T UP COLOR n n n Q 1 A 1 S D I S PL AY SOURCE OFF ON P I X L AY PR N I...

Страница 158: ...soirement l écran du moniteur Lorsque l écran MENU apparaît Tout en maintenant la touche DISPLAY OFF du panneau secondaire enfoncée l affichage disparaît de l écran même si DISPLAY OFF est réglé sur ON Dès que vous relâchez la touche DISPLAY OFF l affichage réapparaît à l écran Lorsque l écran normal apparaît Les messages à l écran s affichent et disparaissent chaque fois que vous appuyez sur la t...

Страница 159: ... la touche MENU et sélectionnez ensuite le menu PRINTER SETUP en appuyant sur la touche ı ou Commutez PRN sur le vert en appuyant sur la touche ou Le menu PRINTER SETUP apparaît 2 Sélectionnez SYSTEM en appuyant sur la touche ou Positionnez le curseur sur SYSTEM en appuyant sur la touche ou à suivre m PR I NTER SE T UP COLOR n n n P I X L AY PR N I N OUT Q 1 A 1 S 1 1 9 SYSTEM PRE SS P R I NT QT Y...

Страница 160: ...ppuyant sur la touche ı ou 6 Sélectionnez PRN SETUP en appuyant sur la touche ou et appuyez ensuite sur la touche Les valeurs réglées sont mémorisées Le menu PRINTER SETUP apparaît 7 Appuyez sur la touche MENU L écran normal apparaît Pour sélectionner Sélectionnez La désactivation des bips OFF L activation des bips ON PRN SE TUP Q 1 A 1 S PRESS B EE P OFF ON A PP L I ST ANDARD SYSTE M S ETUP COL O...

Страница 161: ...les ou métalliques dans le châssis En cas de pénétration d un corps étranger à l intérieur du boîtier l appareil est susceptible de tomber en panne de prendre feu ou de provoquer une électrocution si vous l utilisez L appareil comporte des ouïes de ventilation destinées à éviter toute surchauffe Ne les obstruez pas en installant d autres appareils à côté ou en recouvrant l unité d une étoffe etc S...

Страница 162: ... d impression dans un endroit soumis à des variations de température importantes et brutales Pour entreposer un jeu d impression entamé rangez le dans son emballage d origine et scellez de nouveau celui ci Conservez si possible le jeu d impression scellé dans un lieu frais à l abri de la lumière Avant de réutiliser ce jeu d impression laissez le reposer dans son emballage scellé pendant plusieurs ...

Страница 163: ...ur 0 29 Vcc 75 ohms terminaison sync négative VIDEO signal vidéo composite NTSC Connecteur BNC 1 1 Vcc 75 ohms terminaison sync négative AC IN entrée d alimentation Connecteurs de sortie S VIDEO signaux de luminance Y et de chrominance C séparés miniconnecteur DIN à 4 broches 1 Y 1 Vcc C Impulsion de synchronisation couleur 0 29 Vcc 75 ohms terminaison sync négative VIDEO signal vidéo composite NT...

Страница 164: ...TL Unité msec msec V MAX 10 5 V SYNC 0 1 5 6 7 8 9 Image enregistrée MIN IN BUSY OUT Signal d impulsion de commande à distance VRP tRPE tRPW Notation tRPE tRPW VRP Paramètre Délai dans lequel une impulsion de commande à distance doit être ramenée à zéro Longueur d une impulsion de commande à distance Amplitude d une impulsion de commande à distance TYP MIN 3 100 Remarques Cette valeur est basée su...

Страница 165: ... ou votre revendeur Sony pour remédiez à ce problème Le papier s est coincé à l intérieur de l imprimante n Localisez l endroit où le papier s est coincé et retirez le papier coincé de l imprimante page 167 La cassette à ruban encreur est défectueuse n Remplacez la cassette à ruban encreur défectueuse page 96 Le ruban encreur s est déchiré n Réparez la déchirure page 98 Une cassette à ruban encreu...

Страница 166: ...e Le système de télévision du signal transmis par l appareil source magnétoscope caméra vidéo etc n est pas compatible avec le système de télévision de votre imprimante n Vérifiez le système de télévision du signal et entrez un signal correct Un signal autre qu un signal vidéo par ex un signal audio ou similaire est entré n Entrez un signal vidéo correct La commande d impression est dans la file d...

Страница 167: ...tal 2 Si des tirages ont été éjectés dans le réceptacle à papier et se sont empilés dans le réceptacle à papier retirez les 3 Mettez l imprimante hors tension 4 Retirez le bac d alimentation Si vous voyez du papier à l intérieur de l imprimante passez à l étape 5 Si vous ne voyez pas de papier passez à l étape 8 5 Tirez lentement le papier dans le bac d alimentation Remarque Ne tirez jamais une fe...

Страница 168: ...ez le panneau frontal 10Mettez l imprimante sous tension Si le message ne réapparaît pas vous pouvez à nouveau utiliser l imprimante normalement L image enregistrée dans la mémoire a cependant été effacée Réenregistrez l image dans la mémoire Si le même message réapparaît à nouveau l imprimante ne peut plus être utilisée Mettez la immédiatement hors tension et consultez le service après vente Sony...

Страница 169: ...n à afficher l image enregistrée dans la mémoire Si une image apparaît c est que le moniteur fonctionne correctement n Sélectionnez un autre signal d entrée via le menu INPUT SETUP voir page 101 Ou alors activez l appareil vidéo raccordé en mode de lecture s il se trouve en ce moment dans un autre mode que le mode d arrêt Si une image enregistrée dans la mémoire apparaît lorsque vous appuyez sur l...

Страница 170: ...élécommande 140 Dirigez l avant de la télécommande vers ce capteur 4 Témoin PRINT S allument pendant une impression 5 Témoin ALARM 165 S allume en orange lorsque le ruban encreur ou le papier est épuisé que le papier se coince ou qu un autre problème se produit 6 Témoin MULTI PICTURE 120 125 Appuyez sur cette touche pour sélectionner le type de tirage voulu Lorsque vous appuyez sur cette touche le...

Страница 171: ...ouvez réduire le nombre de copies que via le menu PRINTER SETUP 8 Touche MEMORY PAGE 109 116 136 Appuyez sur cette touche pour sélectionner la page mémoire 9 Touche SOURCE MEMORY 104 124 126 136 Appuyez sur cette touche pour sélectionner le signal à transmettre vers le moniteur L image mémoire et l image source sont commutées chaque fois que vous appuyez sur cette touche º Touche CAPTURE 104 109 1...

Страница 172: ...milaires quel que soit le réglage du paramètre DISPLAY dans le menu OUTPUT SETUP 3 Touche MENU Appuyez sur cette touche pour afficher ou désactiver les menus sur l écran et dans la fenêtre d affichage de l imprimante 4 Touche CLEAR 135 136 Appuyez sur cette touche pour effacer les images enregistrées dans les pages mémoire Les images pouvant être effacées à l aide de la touche CLEAR dépendent du r...

Страница 173: ...raccordement de l appareil vidéo transmettant l image source Connecteur S VIDEO VIDEO Appareils pouvant être raccordés Appareil vidéo à connecteur de sortie Y C séparé Appareil vidéo à connecteur de sortie de signal vidéo composite Connecteur S VIDEO VIDEO 4 Connecteurs OUTPUT 142 Servent au raccordement du moniteur vidéo 5 Connecteur AC IN Sert au raccordement de l imprimante à une prise murale a...

Страница 174: ... une image enregistrée dans la mémoire 4 Section d affichage du mode de fonctionnement de l imprimante 5 Section d affichage de la page mémoire Indique la page mémoire sélectionnée Pendant que l image de la page mémoire est imprimée l indication de la page mémoire clignote La page mémoire dont l image mémoire est placée dans la file d attente d impression est allumée en vert 6 Affichage Q nombre d...

Страница 175: ... OUT Q 1 A 1 S 1 1 9 SYSTEM PRE SS P R I NT QT Y GAMMA D NORMA L L F UNCT I ON PRE SS Q 1 A 1 S PICTURE AD J UST COLOR n n n PI X L A Y PRN I N OUT Q 1 A 1 S S HARPNESS 1 8 5 1 S PI X L A Y PRN I N OUT L AYOUT SE T UP COLOR n n n Q 1 A 1 S WI NDOW PRE SS MEMORY MUL T I P I X 1 2H 4 16 SEP ARATE OF F ON CAPT I ON PRE SS F RAME F I EL D PR I NTER SE T UP COLOR n n n PI X L A Y PRN I N OUT Q 1 A 1 S ...

Страница 176: ...ds blancs 119 réalisation d un tirage avec une incrustation 127 réalisation d un tirage avec une légende 132 réalisation d un tirage d images identiques en réduction pour photos d identité 126 réalisation d un tirage d images multiples différentes en réduction 117 réalisation d un tirage pleine page 102 saisie d un autre image pendant une impression 109 sélection de la page mémoire 116 sélection d...

Страница 177: ...tion d un espace 131 remplacement d un caractère introduit précédemment 131 saisie d une légende 128 si vous avez saisi un mauvais caractère 130 Sélection du signal d entrée 101 Signaux d impulsion 133 Suppression des images enregistrées dans les pages mémoire sélection de la fonction de la touche CLEAR à utiliser pour la suppression d images 135 suppression de toutes les images mémorisées dans l ...

Страница 178: ...178 Autres ...

Страница 179: ...179 Autres ...

Страница 180: ...Sony Corporation Printed in Japan ...

Отзывы: