background image

96

FR

D:\NORM'S JOB\SONY HA\SO120031\STR-DA1800ES_PMRF 
02\4428194122_USFR\FR05ENJ_STR-DA1800ES-CEL.fm

masterpage: Left

STR-DA1800ES
4-428-194-

12

(2)

Bénéficier du champ 
sonore optimal pour la 
scène sélectionnée 


(Sélection d’une scène)

Le champ sonore et la qualité d’image 
optimaux sont sélectionnés automatiquement 
en fonction de la scène sélectionnée sur votre 
téléviseur.
Pour plus d’informations sur cette opération, 
reportez-vous au mode d’emploi du téléviseur.

Remarque

Selon le téléviseur, il est possible que le champ 
sonore ne change pas.

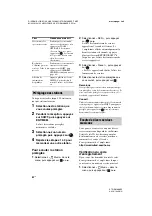
Tableau des correspondances

Utilisation de l’ampli-
tuner à l’aide de la 
télécommande du 
téléviseur 


(Commande Home Cinéma)

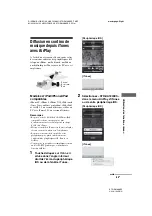
Si un téléviseur compatible avec la fonction 
« Commande Home Cinéma » est raccordé à 
l’ampli-tuner, une icône apparaît pour les 
applications basées sur Internet sur le 
téléviseur raccordé. 
Vous pouvez changer une entrée de l’ampli-
tuner ou changer de champs sonores à l’aide de 
la télécommande de votre téléviseur. Vous 
pouvez également régler le niveau de 
l’enceinte centrale ou du caisson de graves, ou 
ajuster les réglages des fonctions « Sound 
Optimizer » (page 73), « Dual Mono » 


(page 109) ou « A/V Sync » (page 109).

Remarque

Pour utiliser la fonction Commande Home Cinéma, 
votre téléviseur doit être capable d’accéder à un 
service haut débit.

Réglage des scènes sur 


le téléviseur

Champ sonore 

Cinema

HD-D.C.S.

Sports

Sports

Music

Live Concert

Animation

A.F.D. Auto

Photo

A.F.D. Auto

Game

A.F.D. Auto

Graphics

A.F.D. Auto

Содержание STR-DA1800ES

Страница 1: ...28 194 12 2 filename D NORM S JOB SONY HA SO120031 STR DA1800ES_PMRF 02 4428194122_USFR US01COV_STR DA1800ES CEL fm masterpage Right 4 428 194 12 2 Multi Channel AV Receiver STR DA1800ES Operating Instructions US Mode d emploi FR ...

Страница 2: ...s in the space provided below Refer to them whenever you call upon your Sony dealer regarding this product Model No _______________ _____________________________ _________ Serial No ________________ _____________________________ _________ This symbol is intended to alert the user to the presence of uninsulated dangerous voltage within the product s enclosure that may be of sufficient magnitude to ...

Страница 3: ...nufactured for sale in the U S A Other versions may not comply with FCC technical regulations NOTE This equipment has been tested and found to comply with the limits for a Class B digital device pursuant to Part 15 of the FCC Rules These limits are designed to provide reasonable protection against harmful interference in a residential installation This equipment generates uses and can radiate radi...

Страница 4: ...The model number is located at the lower right corner of the front panel The illustrations used in this manual are of the USA model and they may be different from your model Any differences in operation are marked in the manual as USA model only The instructions in this manual describe the operation of the receiver with the supplied remote control You can also use the buttons or knobs on the recei...

Страница 5: ...ited States Microsoft Windows Windows Vista Windows 7 and Windows Media are trademarks or registered trademarks of Microsoft Corporation in the United States and or other countries This product contains technology subject to certain intellectual property rights of Microsoft Use or distribution of this technology outside of this product is prohibited without the appropriate license s from Microsoft...

Страница 6: ...er the name of the Xiph org Foundation nor the names of its contributors may be used to endorse or promote products derived from this software without specific prior written permission THIS SOFTWARE IS PROVIDED BY THE COPYRIGHT HOLDERSANDCONTRIBUTORS AS IS AND ANY EXPRESS OR IMPLIED WARRANTIES INCLUDING BUT NOT LIMITED TO THE IMPLIED WARRANTIES OF MERCHANTABILITY AND FITNESS FOR A PARTICULAR PURPO...

Страница 7: ...ettings of the receiver 48 Guide to on screen display operation 52 Basic Operations Playing an input source equipment 54 Playing an iPod iPhone 56 Playing a USB device 59 Recording using the receiver 61 Tuner Operations Listening to FM AM radio 62 Presetting FM AM radio stations Preset Tuning 64 Enjoying Sound Effects Selecting the sound field 65 Using the Sound Optimizer function 69 Resetting sou...

Страница 8: ...the TV sound from the speakers connected to the receiver via HDMI OUT A jack Audio Return Channel 90 Switching the monitors that output the HDMI video signals 91 Other Operations Switching between digital and analog audio INPUT MODE 91 Using other video audio input jacks Input Assign 92 Using a bi amplifier connection 94 Using multi zone features 95 Adjusting Settings Using the Settings menu 98 Sp...

Страница 9: ...not leave the remote control in an extremely hot or humid place Do not use a new battery with old ones Do not mix manganese batteries and other kinds of batteries Do not expose the remote control sensor to direct sunlight or lighting apparatuses Doing so may cause a malfunction If you do not intend to use the remote control for an extended period of time remove the batteries to avoid possible dama...

Страница 10: ...ashes slowly the software update is in progress page 81 If the indicator flashes in quick succession the software update has error page 120 C INPUT SELECTOR page 55 61 91 D INPUT MODE page 91 E Remote control sensor Receives signals from remote control F Display panel page 11 G DISPLAY page 113 H DIMMER Adjusts the brightness of the display panel in 3 levels I MASTER VOLUME page 55 J VIDEO 2 IN ja...

Страница 11: ...d and the Audio Return Channel ARC signals are detected F PARTY Lights up when PARTY STREAMING function is activated page 78 G Dolby Digital Surround indicator Lights up the respective indicator when the receiver is decoding the corresponding Dolby Digital format signals D D EX D TrueHD Dolby Digital Dolby Digital Surround EX Dolby Digital Plus Dolby TrueHD H NEO 6 Lights up when DTS Neo 6 Cinema ...

Страница 12: ...hen the measurement results of the Auto Calibration function are applied X UPDATE Lights up when a new software is available page 81 Y Dolby Pro Logic indicator Lights up the respective indicator when the receiver performs Dolby Pro Logic processing This matrix surround decoding technology can enhance input signals PL PL II PL IIx PL IIz Dolby Pro Logic Dolby Pro Logic II Dolby Pro Logic IIx Dolby...

Страница 13: ...N jack page 30 B Controls jacks for Sony equipment and other external equipment IR REMOTE IN OUT jacks page 96 TRIGGER OUT jack page 107 Connect to interlock on off of the power supply of other 12V TRIGGER compliant equipment or the amplifier C COMPONENT VIDEO INPUT OUTPUT section Y PB PR IN OUT jacks page 26 30 32 Y PB PR OUT jacks page 96 D NETWORK section LAN port page 40 Wireless LAN antenna p...

Страница 14: ...ment You can also program the remote control to operate non Sony equipment For details see Programming the remote control page 113 RM AAP080 F AUDIO INPUT OUTPUT section AUDIO IN jacks page 26 32 34 37 AUDIO OUT jacks page 24 AUDIO OUT jacks page 96 G VIDEO AUDIO INPUT OUTPUT section page 26 32 34 VIDEO IN OUT jacks AUDIO IN OUT jacks VIDEO OUT jacks page 96 H RS232C port Used for maintenance and ...

Страница 15: ... features Press TV W then press the numeric buttons to select the TV channels 1 Press SHIFT V then press to select the channel entry mode either one or two digit Press TV W then press to select the TV channel entry mode 101 Press SHIFT V then press 10 to select track numbers over 10 ENT MEM1 Press SHIFT V then press ENT MEM to enter the value after selecting a channel disc or track using numeric b...

Страница 16: ...mat is inputted Current input is not HDMI input When GUI is On Zone2 OutB setting is Zone2 Fast View setting is Off Depending on the playback video format this function may not work GUIDE1 Press TV W then press GUIDE to display the on screen program guide SLEEP Press AMP X then press SLEEP to set the receiver to turn off automatically at specified time Each time you press SLEEP the display changes...

Страница 17: ...nu or on screen guide is displayed on the TV screen Press TV W then press RETURN EXIT O to return to the previous menu of Sony TV R Press V v B b to select the menu items then press to enter confirm the selection S DISPLAY1 Views information on the display panel Press TV W then press DISPLAY to display information of TV T AUTO CAL Press SHIFT V then press AUTO CAL to perform Auto Calibration Note ...

Страница 18: ...z z z z z z D Numeric buttons z z z z z z z z z z z z 10 z z z z z z z z z z z ENT MEM z z z z z z zb z z z z z CLEAR za z z zc ze F Color buttons z za z z z H TOOLS OPTIONS z z z z z z z I MENU HOME z z z z z z z z J z z z z z z z z zd z z FOLDER z z z z z zc z ze REPEAT za z zc zd z z SHUFFLE za z zc z m TUNING M TUNING z z z z z z z z z z z N X x z z z z z z z z z z z K PRESET TV CH z z z z z z...

Страница 19: ...ave HDMI jacks Connecting the audio equipment page 37 HDMI COMPONENT VIDEO Y PB CB PR CR VIDEO Analog High quality image Digital Preparing the receiver Connecting the AC power cord mains lead page 41 and Performing initial setup operations clearing all memorized settings page 42 Setting the speakers Select the speaker pattern page 42 then perform Auto Calibration page 44 Note You can check the spe...

Страница 20: ...video signal output the image on the TV screen may appear distorted horizontally or no image can be seen If you are using an image improvement circuitry with your VCR it may impact the video signal conversion It is recommended to turn off this function on your VCR Converted HDMI image output does not support x v Color x v Colour Deep Color Deep Colour 4K and 3D HDMI video signals cannot be convert...

Страница 21: ...correspond to the format For details refer to the operating instructions of the playback equipment b Signals with a sampling frequency of more than 96 kHz are played back at 96 kHz or 88 2 kHz Digital audio formats supported by the receiver Audio format Maximumnumber of channels Connection between the playback equipment and the receiver COAXIAL OPTICAL HDMI Dolby Digital 5 1 a a Dolby Digital EX 6...

Страница 22: ...ceiver The same signals are output from each of the SUBWOOFER jacks 7 1 channel speaker system using surround back speakers You can enjoy high fidelity reproduction of DVD or Blu ray Disc software recorded sound in 6 1 channel or 7 1 channel format 7 1 channel speaker system using front high speakers You can enjoy vertical sound effects e g Pro Logic IIz mode 5 1 channel speaker system To fully en...

Страница 23: ...ng front high speakers You can enjoy vertical sound effects by connecting additional two front high speakers Place the front high speakers at an angle between 25 to 35 at an angle of 20 5 in height 6 1 channel speaker system Place the surround back speaker behind the seating position Tip Since the subwoofer does not emit highly directional signals you can place it wherever you want 20 5 ...

Страница 24: ...12 2 2 Connecting the speakers Before connecting cords be sure to disconnect the AC power cord mains lead AMonaural audio cord not supplied BSpeaker cord not supplied 10 mm 13 32 1 2 3 4 Right Left Right Left Right Center speaker B Left B B Surround speaker B A Surround back Front high Bi amplifier Front B speaker Front A speaker Subwoofer ...

Страница 25: ...he SUBWOOFER jacks Notes on the SPEAKERS SURROUND BACK FRONT HIGH BI AMP FRONT B terminals connection If you connect only one surround back speaker connect it to L of this terminals If you have an additional front speaker system connect them to this terminals Set the SB Assign to Speaker B in the Speaker Settings menu page 43 You can select the front speaker system you want by using the SPEAKERS b...

Страница 26: ... watch the selected input image when you connect the HDMI OUT or MONITOR OUT jack to a TV You can operate this receiver using a GUI Graphical User Interface GUI is only for main zone HDMI out Before connecting cords be sure to disconnect the AC power cord mains lead ARC TV with HDMI jack C Audio Video signals Audio signals Video signals E A or TV without HDMI jack or B D ...

Страница 27: ...to turn off the TV s volume or activate the TV s muting function Notes Connect a TV monitor or a projector to the HDMI OUT or MONITOR OUT jack on the receiver You may not be able to record even if you connect recording equipment Depending on the status of the connection between the TV and the antenna aerial the image on the TV screen may be distorted If this is the case place the antenna aerial fa...

Страница 28: ...s in digital format By connecting Sony BRAVIA Sync compatible equipment using HDMI cables operations can be simplified See BRAVIA Sync Features page 87 If you want to connect several digital equipment but cannot find an unused input See Using other video audio input jacks Input Assign page 92 Converting video signals This receiver is equipped with a function for converting video signals For detail...

Страница 29: ... Before connecting cords be sure to disconnect the AC power cord mains lead AHDMI cable not supplied Sony recommends that you use an HDMI authorized cable or Sony HDMI cable Note This HDMI connection is an example You can connect Blu ray disc player to any HDMI inputs Connecting a Blu ray Disc player Blu ray Disc player with HDMI jack A Audio video signals ...

Страница 30: ...ny HDMI cable BOptical digital cord not supplied CCoaxial digital cord not supplied DComponent video cord not supplied Recommended connection Alternative connection When you connect equipment with an OPTICAL jack set the Input Assign in the Input Option menu page 92 It is not necessary to connect all the cords Connect cords according to the jacks of your equipment Connecting a DVD player C B D Aud...

Страница 31: ... DA1800ES_PMRF 02 4428194122_USFR US04GET_STR DA1800ES CEL fm masterpage Right STR DA1800ES 4 428 194 12 2 Connections Note This HDMI connection is an example When use only HDMI input connection you can connect DVD player to any HDMI inputs ...

Страница 32: ...cable or Sony HDMI cable BOptical digital cord not supplied CAudio cord not supplied DVideo cord not supplied EComponent video cord not supplied Recommended connection Alternative connection It is not necessary to connect all the cords Connect cords according to the jacks of your equipment Connecting a satellite tuner cable TV tuner B Audio video signals Audio signals Satellite tuner Cable TV tune...

Страница 33: ...A1800ES_PMRF 02 4428194122_USFR US04GET_STR DA1800ES CEL fm masterpage Right STR DA1800ES 4 428 194 12 2 Connections Note This HDMI connection is an example When use only HDMI input connection you can connect cable TV tuner to any HDMI inputs ...

Страница 34: ...3 You can also rename the GAME input so that it can be displayed on the receiver s display panel For details see Naming the input Name Input page 55 This HDMI connection is an example You can connect game to any HDMI inputs Before connecting cords be sure to disconnect the AC power cord mains lead AAudio cord not supplied BVideo cord not supplied If you want to record you must make this connection...

Страница 35: ...USFR US04GET_STR DA1800ES CEL fm masterpage Right STR DA1800ES 4 428 194 12 2 Connections AApple Composite AV cable not supplied AAudio video cord not supplied Connecting an iPod iPhone for video contents A iPod iPhone Connecting other equipment Camcorder video game A ...

Страница 36: ...nect 4K compatible TV and video equipment Blu ray Disc player Blu ray Disc recorder etc to the receiver using High Speed HDMI cables and then play back a 4K compatible content HDMI IN 4 IN 6 supports 4K transmission HDMI IN 1 IN 2 IN 3 IN 4 can be shown in preview window Notes on HDMI connections The audio and video signals of HDMI input are not output from the HDMI OUT jack while the GUI menu is ...

Страница 37: ... play Super Audio CD player connect the player to HDMI jack or SA CD CD jack When you play a CD player with OPTICAL or COAXIAL jacks assign input to OPTICAL or COAXIAL No sound is output when playing a Super Audio CD player connected to OPTICAL or COAXIAL jacks Tip All the digital audio jacks are compatible with 32 kHz 44 1 kHz 48 kHz and 96 kHz sampling frequencies It is not necessary to connect ...

Страница 38: ...ntennas aerials be sure to disconnect the AC power cord mains lead Notes To prevent noise pickup keep the AM loop antenna aerial away from the receiver and other equipment Be sure to fully extend the FM wire antenna aerial After connecting the FM wire antenna aerial keep it as horizontal as possible Connecting an iPod iPhone USB device iPod iPhone USB device A FM wire antenna aerial supplied AM lo...

Страница 39: ...ter transmission speeds to enjoy content on your home network We recommend that you use a router equipped with the built in DHCP Dynamic Host Configuration Protocol server This function automatically assigns IP addresses on the LAN Use a wireless LAN router access point if you want to use a wireless LAN connection LAN cable CAT5 For a wired LAN connection only We recommend that you use this type o...

Страница 40: ...e receiver and a server We recommend that you connect the server to the router with a wired connection AFor a wired LAN connection only BFor a wireless LAN connection only Be sure to use a wireless LAN router access point Note An audio playback on a server may occasionally be interrupted when you use a wireless connection Configuration example B A Internet Modem Server LAN cable not supplied Route...

Страница 41: ... not disconnect the AC power cord mains lead while STANDBY is flashing This may cause a malfunction Note When the receiver is in standby mode the ON STANDBY indicator on the front panel lights up in amber To save the power in standby mode Set Ctrl for HDMI page 103 Pass Through page 103 Network Standby page 106 and BT Standby page 107 to OFF and turn off the power for zone 2 If Ctrl for HDMI page ...

Страница 42: ...he receiver 2 Hold down 1 for 5 seconds The CLEARING appears on the display panel for a while then changes to CLEARED Changes or adjustments made to the settings are now reset to the defaults Setting the speakers Select the speaker pattern according to the speaker system which you are using 1 Press MENU The menu is displayed on the TV screen 2 Press V v repeatedly to select Settings then press or ...

Страница 43: ...nt speakers to the SPEAKERS SURROUND BACK FRONT HIGH BI AMP FRONT B terminals using a bi amplifier connection select BI AMP OFF If you connect surround back or front high speakers to the SPEAKERS SURROUND BACK FRONT HIGH BI AMP FRONT B terminals select OFF 6 Press RETURN EXIT O You can select the front speakers you want to drive Be sure to use the buttons on the receiver to perform this operation ...

Страница 44: ... page 22 24 Connect only the supplied optimizer microphone to the AUTO CAL MIC jack Do not connect any other microphones to this jack Set the SB Assign to BI AMP in the Speaker Settings menu if you use bi amplifier connection page 94 Set the SB Assign to Speaker B in the Speaker Settings menu if you use speakers front B connection page 43 Make sure the speaker output is not set to SPK OFF page 43 ...

Страница 45: ...t the optimizer microphone remains at the same height as your ears Confirm active subwoofer setup When a subwoofer is connected turn on the subwoofer and turn up the volume prior to activating the subwoofer Turn the LEVEL to just before the mid point If you connect a subwoofer with a crossover frequency function set the value to maximum If you connect a subwoofer with an auto standby function set ...

Страница 46: ...e setting process Warning Displays warning related to the measurement results See Message list after Auto Calibration measurement page 48 Exit Exits the setting process without saving the measurement results 8 Save the measurement result Select Save in step 7 Notes The A P M Automatic Phase Matching function is activated after you save the measurement result The A P M function does not work in the...

Страница 47: ...r you can change those settings in the Speaker Settings menu Save the measurement results first then try to change the settings To cancel Auto Calibration The Auto Calibration function will be canceled when you perform the following during the measurement process Press 1 Press the input buttons on the remote control or turn the INPUT SELECTOR on the receiver Press MUTING Press SPEAKERS on the rece...

Страница 48: ...ted too far from each other If you do move the devices closer to each other Display and explanation Error Code 31 The SPEAKERS is set to off Set to other speaker settings and perform the Auto Calibration again Error Code 32 Error Code 33 Speakers were not detected or not connected properly None of the front speakers are connected or only one front speaker is connected Either the surround left or s...

Страница 49: ...t from the operating instructions from the person who set up your wireless network or from the information provided by your Internet service provider 1 Press MENU The menu is displayed on the TV screen 2 Press V v repeatedly to select Settings then press or b 3 Press V v repeatedly to select Network then press or b 4 Press V v repeatedly to select Settings then press 5 Press V v repeatedly to sele...

Страница 50: ...time 12Perform the server settings To listen to audio content stored on the server you need to set up your server page 70 Note If your network has not been secured by encryption using the security key the security setting display does not appear in step 8 Tip When checking the network settings see To check the network information page 104 If you cannot find the network name SSID you want manual se...

Страница 51: ...ation in step 6 in Searching for an access point and setting up a wireless network Access Point Scan method page 49 2 Press V v repeatedly to select WPS PIN then press The available SSID access point list appears 3 Press V v repeatedly to select the network name SSID you want then press The PIN code 8 digits of the receiver appears on the TV screen Leave the PIN code displayed until the connection...

Страница 52: ...ress and then press Then enter the value for Port Number The confirmation display appears on the TV screen 4 Press V v repeatedly to select OK then press Connecting appears on the TV screen Complete appears after the network settings are completed To return to the Network Settings menu press Depending on the network environment the network settings may take some time 5 Perform the server settings ...

Страница 53: ...screen Press RETURN EXIT O To exit the menu Press MENU To turn GUI MODE on and off Press GUI MODE GUI ON or GUI OFF appears on the display panel depending on the mode selected Overview of the main menus When you press TOOLS OPTIONS the option menus for the selected main menu are displayed You can select a related function without reselecting the menu 1 Press MENU The menu is displayed on the TV sc...

Страница 54: ...LS OPTIONS while the menu item list is displayed The option menu appears 4 Press V v repeatedly to select the option menu item you want then press or b 5 Press V v repeatedly to select the parameter you want then press To exit the option menu Press RETURN EXIT O Playing an input source equipment 1 Press MENU The menu is displayed on the TV screen 2 Select Input then press or b The menu item list a...

Страница 55: ...to select the equipment you want You can adjust the volume differently using the MASTER VOLUME knob on the receiver or the MASTER VOL button on the remote control To turn the volume up or down quickly Turn the knob quickly Press and hold the button To make fine adjustment Turn the knob slowly Press the button and release it immediately To activate the muting function Press MUTING The muting functi...

Страница 56: ...st software before using it Notes Sony cannot accept responsibility in the event that data recorded to iPod iPhone is lost or damaged when using an iPod iPhone connected to this receiver This product has been designed specifically to work with iPod iPhone and has been certified to meet Apple performance standards Compatible iPod iPhone models iPhone 3GS iPhone 3G iPhone 4S iPod touch 1st generatio...

Страница 57: ...ep 4 in Selecting the iPod iPhone control mode page 57 2 Select iPod iPhone then press 3 Select the content you want from the content list then press The selected content starts playback and the information of music video contents appears on the TV screen Note The video signals from iPod iPhone are up converted on this receiver and then viewed on your TV depending on the status of the video signal...

Страница 58: ...move the iPod iPhone during operation To avoid data corruption or damage to the iPod iPhone turn the receiver off when connecting or removing the iPod iPhone iPod iPhone message list REPEAT SHUFFLE m M x X B b N V v B b RETURN EXIT O MENU SHIFT iPhone CTRL USB Press Operation N Starts play X x Pauses play m M Fast reverses or forwards Goes to the previous next track B b Skips to the previous next ...

Страница 59: ...SB devices Some of these USB devices may not be available for purchase in certain areas When formatting the above models be sure to format using the model itself or the dedicated formatting software for that model When connecting a USB device to the receiver be sure to connect after the display Creating Library or Creating Database on the USB device has disappeared No Music No Video No music or vi...

Страница 60: ...TOOLS OPTIONS on the remote control Repeat Off One All Folder To operate the USB device using the remote control Press USB before you use the following buttons Press SHIFT then press this button Notes on the USB device Do not remove the USB device during operation To avoid data corruption or damage to the USB device turn the receiver off when connecting or removing the USB device Operating the USB...

Страница 61: ...y produce noise or interrupted audio or may not play at all Some time may be needed to start playback when the folder structure is complex the memory capacity is excessive This receiver does not necessarily support all the functions provided in a connected USB device The playback order for the receiver may differ from the playback order of the connected USB device Folders that have no audio files ...

Страница 62: ... signals are being recorded the auto standby function of the receiver may start up and interrupt the recording In this case set the Auto Standby to OFF page 108 Listening to FM AM radio You can listen to FM and AM broadcasts through the built in tuner Before operation be sure you have connected the FM and AM antennas aerials to the receiver page 38 Tip The tuning scale for direct tuning is shown b...

Страница 63: ...xample 1 FM 102 50 MHz Select 1 b 0 b 2 b 5 b 0 Example 2 AM 1 350 kHz Select 1 b 3 b 5 b 0 Press 0 for Mexico model only Tip Adjust the direction of the AM loop antenna aerial for optimum reception upon tuning to an AM station 3 Press If you cannot tune to a station MHz or kHz appears and then the screen returns to the current frequency Make sure you have entered the right frequency If not repeat...

Страница 64: ... follows AM band AM 1 to AM 30 FM band FM 1 to FM 30 1 Select FM or AM from the menu then press or b 2 Select the preset station you want then press Preset numbers from 1 to 30 are available 1 On FM or AM screen select the preset number which you want to name 2 Press TOOLS OPTIONS The option menu appears 3 Select Name Input then press or b 4 Press V v repeatedly to select a character then press b ...

Страница 65: ...istening to a 2 channel stereo sound as multi channel sound Enjoying Sound Effects 2 channel sound mode 2CH mode Effect 2CH ST 2ch Stereo The receiver outputs the sound from the front left right speakers only There is no sound from the subwoofer Standard 2 channel stereo sources completely bypass the sound field processing and multi channel surround formats are downmixed to 2 channels A DIRECT Ana...

Страница 66: ... for watching videos of overdubbed or old movies PLIIx MV PLIIx Movie Performs Dolby Pro Logic IIx Movie mode decoding This setting expands Dolby Pro Logic II Movie or Dolby Digital 5 1 to discrete 7 1 movie channels PLIIz PLIIz Height Performs Dolby Pro Logic IIz mode decoding This setting can expand a source sound from a 5 1 channel to a 7 1 channel to which a vertical equipment is applied and g...

Страница 67: ...Neo 6 Music Performs DTS Neo 6 Music mode decoding A source recorded in 2 channel format is decoded into 7 channels This setting is ideal for normal stereo sources such as CDs When headphones are connected Sound field Effect HP 2CH HP 2CH This mode is selected automatically if you use headphones except A DIRECT Standard 2 channel stereo sources completely bypass the sound field processing and mult...

Страница 68: ...speaker s PLIIz is available only when the speaker pattern is set to a setting with front high speakers The sound fields for music and movie do not work in the following cases DTS HD Master Audio DTS HD High Resolution Audio or Dolby TrueHD with sampling frequency of more than 48 kHz are being received A DIRECT is selected PLII MV PLIIx MV PLII MS PLIIx MS PLIIz NEO6 CIN and NEO6 MUS do not work w...

Страница 69: ...ction is activated The Sound Optimizer is set to on and off as you press SOUND OPTIMIZER Note This function does not work when A DIRECT is being used Lets you lock the settings of the receiver You can only turn this function on or off by performing the following procedure 1 Press 1 to turn off the receiver 2 While holding down MUSIC and SPEAKERS A B A B OFF press 1 to turn on the receiver Resettin...

Страница 70: ... standards Setting up the server To listen to audio content stored on your server with this receiver you need to set up the server in advance The following server devices are compatible with this receiver Sony VAIO Media plus 1 3 1 4 2 0 and 2 1 Sony HDD Network Audio System NAS S500HDE NAS S55HDE Sony Network AV receiver STR DA6400ES TA DA5600ES Microsoft Windows Media Player 12 installed on Wind...

Страница 71: ...hows other than Public Network go to step 6 The Set Network Location window appears 4 Select Home network or Work network according to the environment in which the receiver is used 5 Follow the instructions that appear on the display according to the environment in which the receiver is used When the settings are completed confirm that the item under View your active networks is changed to Home ne...

Страница 72: ... a server see To refresh the server list page 73 This section explains how to set up Windows Media Player 11 installed on Windows Vista XP For details on how to operate Windows Media Player 11 refer to Help for Windows Media Player 11 Windows Media Player 11 is not manufacturer installed on Windows XP Access the Microsoft website download the installer and then install Windows Media Player 11 on y...

Страница 73: ... the server list of the receiver and select this server from the server list For details on selecting a server see To refresh the server list page 73 To refresh the server list When you add a new server to the home network or when you cannot find the server you want on the list refresh the server list 1 While the server list is displayed press TOOLS OPTIONS 2 Select Refresh then press The refreshe...

Страница 74: ... or when the server on the list is not available press TOOLS OPTIONS Select Refresh then press The refreshed server list appears Tip You can also use HOME NETWORK button on the remote control to select the Home Network function directly 4 Select the server which holds the content you want to play back The content list appears on the TV screen Note If the server device supports the Wake on LAN stan...

Страница 75: ...DRM copyright protection If a WMA file cannot be played back on this receiver check the property of that file on your computer to see whether the file is DRM copyrighted Open the folder or volume where the WMA file is stored and right click the file to display the Properties window If there is a License tab the file is DRM copyrighted and cannot be played back on this receiver To operate Home Netw...

Страница 76: ...to register your receiver depending on the service provider For details on registration visit the customer support site of the service provider The following steps explain how to select vTuner as an example of music services offered on the Internet 1 Press MENU The menu is displayed on the TV screen 2 Select Music then press or b 3 Select SEN then press or b The service provider list appears on th...

Страница 77: ...st selected station press RETURN EXIT O repeatedly until the service provider list appears 3 Select Preset then press Preset appears at the top of the service provider list 4 Select the preset station you want then press Note There may be some stations that cannot be preset depending on the service providers If you try to preset such a station Not Available appears on the display Tip Use the numer...

Страница 78: ...eatedly until the service provider list appears 3 Select Registration Code then press The registration code of the receiver appears Using the PARTY STREAMING function Audio contents currently being played back on this receiver can be also played back on all devices corresponding to the PARTY STREAMING function on your home network at the same time If you encountered an interruption when using a wi...

Страница 79: ...th copyright protection may not be streamed 3 Press SHIFT then hold down PARTY until START PARTY appears The receiver starts PARTY streaming as a PARTY host You can also use PARTY on the receiver to start a party To close a PARTY Press SHIFT then hold down PARTY until CLOSE PARTY appears You can also use PARTY on the receiver to close a party The receiver can join a PARTY that has been started by ...

Страница 80: ...2 with iOS 4 2 or later and Mac or PC with iTunes 10 1 or later Notes Refer to Compatible iPod iPhone iPad models on this page for details on the supported versions of iOS or iTunes Update iOS or iTunes to the latest version before using with the receiver Refer to the operating instructions of your device for details on operating iOS devices iTunes or AirPlay You cannot use this receiver as a PART...

Страница 81: ...iver when you set the volume too loud using iOS devices or iTunes For details on the use of iTunes refer to the Help of iTunes The volume level of iOS devices or iTunes may not be able to be linked with the volume level of this receiver Updating the software By downloading the latest version of the software you can take advantage of the newest functions The receiver accesses the Sony server to upd...

Страница 82: ...on the display panel or the ON STANDBY indicator lights off The receiver does not finish the update after 40 minutes and UPDATING keep on flashes on the display panel Unplug the power cord and then plug in the power cord again The receiver will try to update the software If the condition continues contact your nearest Sony dealer To cancel the procedure Select Cancel in step 7 To go back to the pr...

Страница 83: ... The receiver cannot play a service or station due to an unsupported file format or playback restrictions Data Error You tried to play an unplayable file The receiver does not recognize the data on the server Need Software update The service is not available in the current version of the receiver software Visit the website below for more information on the software update http munlimited com home ...

Страница 84: ...tooth wireless technology Bluetooth wireless technology is a short range wireless technology that enables wireless data communication between digital devices Bluetooth wireless technology operates within a range of about 10 meters 33 feet You do not need to use a cable for connection nor is it necessary for the devices to face one another such is the case with infrared technology Bluetooth standar...

Страница 85: ...rmation page 132 Pairing is an operation where Bluetooth devices register with each other beforehand Use the procedure below to pair the receiver with your Bluetooth device Once a pairing operation is performed it does not need to be performed again If pairing is already completed proceed to Playing music of a Bluetooth device page 86 1 Place the Bluetooth device within 1 meter 3 3 feet from this ...

Страница 86: ...her Bluetooth devices repeats steps 1 to 6 To delete all pairing information see Clear History page 107 To cancel pairing operation Hold down BLUETOOTH after step 3 Cancel appears on the TV screen You can operate a Bluetooth device by connecting the receiver and a Bluetooth device using AVRCP Check the following before playing music The Bluetooth function of the Bluetooth device is turned on Pairi...

Страница 87: ...rently applied t Volume level t Input you selected What is BRAVIA Sync The BRAVIA Sync function allows communication between Sony products such as TV Blu ray Disc player DVD player AV amplifier etc that supports the Control for HDMI function By connecting Sony equipment that is compatible with the BRAVIA Sync with an HDMI cable not supplied operation is simplified as follows One Touch Play page 88...

Страница 88: ... the HDMI cable or change the connection perform the steps above When HDMI Zone2 OutB setting menu is Zone2 Control for HDMI will be disabled and Control for HDMI setting menu will be dark out To use Ctrl for HDMI you need to change Zone2 OutB setting to OutB Playing back equipment with one touch operation One Touch Play When you start playback the equipment connected to the receiver via an HDMI c...

Страница 89: ... Control does not function according to your TV setting refer to the operating instructions of the TV When Ctrl for HDMI is set to ON the Audio Out settings in the HDMI Settings menu will set automatically based on the System Audio Control settings page 103 Turning off the receiver with the TV System Power Off When you turn the TV off using the power button on the TV s remote control the receiver ...

Страница 90: ...sing your TV s remote control You can also adjust the level of the center speaker or the subwoofer or adjust the settings of Sound Optimizer page 69 Dual Mono page 103 or A V Sync page 103 Note To use the Home Theatre Control function your TV must be able to access a broadband service Enjoying the TV sound from the speakers connected to the receiver via HDMI OUT A jack Audio Return Channel If the ...

Страница 91: ...en digital and analog audio INPUT MODE When you connect equipment to both digital and analog audio input jacks on the receiver you can fix the audio input mode to either of them or switch from one to the other depending on the type of material you intend to watch 1 Turn INPUT SELECTOR on the receiver to select the input You can also use the input buttons on the remote control 2 Press INPUT MODE re...

Страница 92: ... to select the equipment you connected You can reassign the COMPONENT VIDEO and DIGITAL input jacks to other input if the default settings of the jacks do not correspond to your connected equipment Example When you connect the DVD player to the OPTICAL IN 1 SAT CATV and COMPONENT VIDEO IN 2 SAT CATV jacks Assign the OPTICAL SAT CATV IN jack to DVD Assign the COMPONENT VIDEO SAT CATV IN 2 jacks to ...

Страница 93: ... input Notes When you assign the digital audio input the INPUT MODE setting may change automatically One reassignment is allowed for each input Input name BD DVD GAME SAT CATV VIDEO 1 VIDEO 2 TV SA CD CD Assignable video input jacks COMP 1 a a a a a a a COMP 2 a a a a a a a CVBS a a a NONE a a a a Assignable audio input jacks COAX a a a a a a a OPT 1 a a a a a a a OPT 2 a a a a a a a a ANALOG a a ...

Страница 94: ...eakers to avoid receiver malfunction 1 Press MENU The menu is displayed on the TV screen 2 Select Settings then press or b The Settings menu list appears on the TV screen 3 Select Speaker then press or b 4 Select SP Pattern then press or b 5 Select the appropriate speaker pattern so that there are no surround back speakers and front high speakers then press 6 Select SB Assign then press or b 7 Sel...

Страница 95: ...mple you can enjoy a BD movie in the main zone and enjoy another BD movie in zone 2 When using an IR repeater not supplied you can operate both equipment in the main zone and Sony receiver in zone 2 from zone 2 To operate the receiver from zone 2 You can operate the receiver without pointing the remote control towards the receiver if you connect an IR repeater not supplied to the IR REMOTE jack Us...

Страница 96: ... jack If you want to connect to ZONE 2 OUT using HDMI cable change the Zone2 OutB setting to Zone2 You can connect HDMI OUT B ZONE 2 jack directly to TV in zone 2 without any amplifier receiver but it is recommended to connect via amplifier receiver which should have higher audio capabilities than ordinary television For the audio video capabilities of main zone will be limited by that of zone 2 w...

Страница 97: ...trol at the same time SYSTEM STANDBY When the receiver is in standby mode the ON STANDBY indicator on the front panel lights up in amber if the receiver in zone 2 is turned on Signals from equipment connected to the HDMI input jack component video input jack and analog input jacks are output through the ZONE 2 OUT jacks No signals are output from equipment connected to only the digital input jacks...

Страница 98: ...Example When you select Auto Cal 4 Select the parameter you want then press To return to the previous screen Press RETURN EXIT O To exit the menu Press MENU Settings menu list Adjusting Settings V v B b GUI MODE MENU RETURN EXIT O Settings menu Description Auto Cal Sets the speaker level or distance and makes the measurement automatically page 44 Speaker Sets the speaker position manually page 99 ...

Страница 99: ... right front left right high center surround left right surround back left right subwoofer 1 Select the speaker on the screen for which you want to adjust the level then press 2 Select Lvl then press You can adjust the level from 10 0 dB to 10 0 dB in 0 5 dB intervals Note When one of the sound fields for music is selected no sound is output from the subwoofer if all the speakers are set to Large ...

Страница 100: ...e speaker but prefer not to have bass frequencies output from that speaker set it to Small If the overall sound level is lower than you prefer set all speakers to Large If there is not enough bass you can use the equalizer to boost the bass levels The surround back speakers will be set to the same setting as that of the surround speakers When the front speakers are set to Small the center surround...

Страница 101: ... Enjoying Sound Effects page 65 Note The setup items you can adjust on each settings vary depending on the sound field To adjust the effect level for HD D C S 1 Select HD D C S then press or b 2 Select the effect type you want then press HD D C S has three different types Dynamic Theater and Studio Each type has different reflection and reverberation sound mixture levels and is optimized to match ...

Страница 102: ...wing cases FM TUNER or AM TUNER input is selected Linear PCM signals with a sampling frequency of other than 44 1 kHz are being received Dolby Digital Plus Dolby Digital EX Dolby TrueHD DTS 96 24 DTS HD Master Audio or DTS HD High Resolution Audio signals are being received During network function signals with a sampling frequency of other than 44 1 kHz is being received x Advanced Auto Volume fun...

Страница 103: ...be output through the front right speaker simultaneously MAIN Sound of the main language will be output SUB Sound of the sub language will be output HDMI Settings You can adjust the required settings for equipment connected to the HDMI jack x Ctrl for HDMI Control for HDMI Lets you turn the Control for HDMI function on or off For details see Preparing for the BRAVIA Sync page 88 ON OFF Notes When ...

Страница 104: ... OutB x Priority Lets you set the priority when you select the same input for both main zone and zone 2 Main Zone2 You can enjoy the same input in the main zone and zone 2 However there may be some interference on the audio and video signals in the main zone Main Only You can enjoy good audio and video quality in the main zone There is no output in zone 2 Note This function is not available when Z...

Страница 105: ...ecting a new device to the home network add the device to the device list and set access permission page 105 Note Up to 20 devices can be added to the device list If 20 devices have already been registered Device Full appears and a new device cannot be added to the list In this case delete unnecessary devices from the list page 105 To add devices to the device list 1 Select Access Settings then pr...

Страница 106: ...gistered Media Remote Devices then press The registered media remote device lists appear on the TV screen 2 Select the device you want to delete then press 3 Select Delete then press 4 Select OK then press The selected device is deleted from the device list x Device Name Lets you assign a device name to the receiver up to 30 characters to be easily recognizable by other devices on the home network...

Страница 107: ...nd all history is deleted Note You cannot clear the history in the following cases No paired Bluetooth devices in history When you perform a pairing operation x Address Info Lets you check the Bluetooth device address information You can check the address information when a Bluetooth device is connected System Settings You can adjust the settings of the receiver x 12V Trigger Lets you select vario...

Страница 108: ...the Sleep Timer at the same time the Sleep Timer has priority Operating without connecting to a TV You can operate this receiver using the display panel even if the TV is not connected to the receiver Press GUI MODE repeatedly to select GUI OFF The receiver is switched to front panel display mode 1 Press AMP 2 Press MENU 3 Press V v repeatedly to select the menu you want then press or b 4 Press V ...

Страница 109: ... left speaker levelb SL LEVEL SL 10 0 dB to SL 10 0 dB 0 5 dB interval SL 0 dB Surround right speaker levelb SR LEVEL SR 10 0 dB to SR 10 0 dB 0 5 dB interval SR 0 dB Surround back speaker levelb SB LEVEL SB 10 0 dB to SB 10 0 dB 0 5 dB interval SB 0 dB Surround back left speaker levelb SBL LEVEL SBL 10 0 dB to SBL 10 0 dB 0 5 dB interval SBL 0 dB Surround back right speaker levelb SBR LEVEL SBR 1...

Страница 110: ...0 m to SB 10 00 m SB 3 3 to SB 32 9 0 1 m 1 inch interval e SB 3 00 m SB 9 10 Surround back left speaker distanceb SBL DIST SBL 1 00 m to SBL 10 00 m SBL 3 3 to SBL 32 9 0 1 m 1 inch interval e SBL 3 00 m SBL 9 10 Surround back right speaker distanceb SBR DIST SBR 1 00 m to SBR 10 00 m SBR 3 3 to SBR 32 9 0 1 m 1 inch interval e SBR 3 00 m SBR 9 10 Front left high speaker distanceb LH DIST LH 1 00...

Страница 111: ...tal Legato Linear D L L D L L AUTO2 D L L AUTO1 D L L OFF D L L AUTO1 Auto volume AUTO VOL ON OFF OFF Synchronizes audio with video output A V SYNC 0 ms to 300 ms 10 ms interval HDMI AUTO 0 ms Digital broadcast language selection DUAL MONO MAIN SUB MAIN SUB MAIN Digital audio input assignment A ASSIGN For details see Using other video audio input jacks Input Assign page 92 Video settings VIDEO Vid...

Страница 112: ... front high speakers page 42 e You can only adjust the distance in 0 01 meter interval when you have performed the Auto Calibration and saved the measurement result f You can only select this parameter if your speaker is set to SMALL g You can only select this parameter if you select HD D C S as sound field h You can only select this parameter when a Bluetooth device is paired System settings SYST...

Страница 113: ... input name Stream information may not be displayed Note Character or marks may not be displayed for some languages Tip You cannot switch the display while GUI MODE is shown on the display panel Press GUI MODE repeatedly to select GUI OFF Programming the remote control You can customize the remote control to match the equipment connected to your receiver You can even program the remote control to ...

Страница 114: ... step 1 the batteries are weak Replace both batteries If the RM SET UP button flashes 5 times in quick succession while entering the numeric code an error has occurred Start again from step 1 Use the numeric codes in the tables below to program non Sony equipment and also Sony equipment that the remote control is normally unable to control Since the signal from the remote control received by the e...

Страница 115: ... SONY 201 202 DENON 204 205 KENWOOD 206 207 208 209 NAKAMICHI 210 PANASONIC 216 PHILIPS 211 212 PIONEER 213 214 TECHNICS 215 216 YAMAHA 217 218 Maker Code s SONY 301 DENON 302 JVC 303 KENWOOD 304 Maker Code s SONY 307 308 309 Maker Code s SONY 310 311 312 PANASONIC 335 SAMSUNG 336 LG 337 Maker Code s SONY 313 314 315 Maker Code s SONY 401 402 403 BROKSONIC 424 DENON 405 HITACHI 416 JVC 415 423 MIT...

Страница 116: ...ANTZ 527 MITSUBISHI MGA 503 519 527 544 566 568 NEC 503 517 520 540 544 554 566 NORDMENDE 530 558 NOKIA 521 522 573 575 PANASONIC 509 524 553 559 572 PHILIPS 515 518 557 570 571 PHILCO 503 504 514 517 518 PIONEER 509 525 526 540 551 555 PORTLAND 503 QUASAR 509 535 RADIO SHACK 503 510 527 565 567 RCA PROSCAN 503 510 523 529 544 SAMSUNG 503 515 517 531 532 534 544 556 557 562 563 566 569 SAMPO 566 S...

Страница 117: ...37 738 739 740 PHILIPS 729 730 731 PIONEER 729 RCA PROSCAN 722 729 730 731 741 747 SAMSUNG 742 743 744 745 SANYO 717 720 746 SHARP 748 749 TOSHIBA 747 756 Maker Code s SONY 801 802 803 804 824 825 865 AMSTRAD 845 846 BskyB 862 GENERAL ELECTRIC GE 866 GRUNDIG 859 860 HUMAX 846 847 THOMSON 857 861 864 876 PACE 848 849 850 852 862 863 864 PANASONIC 818 855 PHILIPS 856 857 858 859 860 864 874 NOKIA 85...

Страница 118: ...ected from the AC power source mains as long as it is connected to the wall outlet even if the unit itself has been turned off If you are not going to use the receiver for a long time be sure to disconnect the receiver from the wall outlet To disconnect the AC power cord mains lead grasp the plug itself never pull the cord USA and Canada models only One blade of the plug is wider than the other fo...

Страница 119: ...ices and wireless LAN IEEE 802 11b g use the same frequency band 2 4 GHz When using your Bluetooth device near a device with wireless LAN capability electromagnetic interference may occur This could result in lower data transfer rates noise or inability to connect If this happens try the following remedies Use this receiver at least 10 meters 33 feet away from the wireless LAN device Turn off the ...

Страница 120: ... Sleep Timer function is working page 16 PROTECTOR is working page 132 The ON STANDBY indicator flashes in quick succession The software update has error Unplug the power cord and then plug in the power cord again The receiver will try to update the software If the indicator continues to flash in quick succession contact your nearest Sony dealer No picture and no sound are output or the picture an...

Страница 121: ...epending on the TV or the video equipment 4K images may not be displayed Check the video capability and setting of your TV and video equipment Also make sure you connect the video equipment to 4K available HDMI IN jack of this receiver When the receiver is in standby mode there is no image output from the TV When the receiver enters into standby mode image is from the last HDMI equipment selection...

Страница 122: ... Move your audio equipment away from the TV The plugs and jacks are dirty Wipe them with a cloth slightly moistened with alcohol There is no sound or only a very low level sound is heard from specific speakers Connect a pair of headphones to the PHONES jack to verify that sound is output from the headphones If only one channel is output from the headphones the equipment may not be connected to the...

Страница 123: ...tion of the playback equipment may need to be at certain settings before you can enjoy Multi Channel Linear PCM Refer to the operating instructions of the playback equipment Make sure the TV is compatible with the System Audio Control function If the TV does not have System Audio Control function set the Audio Out settings in HDMI Settings menu to TV AMP if you want to listen to the sound from the...

Страница 124: ...t signals via HDMI IN and DIGITAL IN jacks cannot be recorded Copyright protection to prevent recording is contained in the sources In this case you may not be able to record from the sources A test tone is not output from the speakers The speaker cords may not be connected securely Check to see if they are connected securely and cannot be disconnected by pulling on them slightly The speaker cords...

Страница 125: ...ote control repeatedly Set the EQ setting of the iPod iPhone to Off or Flat There is no sound from the iPod iPhone Disconnect the iPod iPhone and connect the iPod iPhone again The iPod iPhone cannot be charged Check that the receiver is turned on Make sure the iPod iPhone is connected firmly The iPod iPhone cannot be operated Check that you have removed the protect case of the iPod iPhone Dependin...

Страница 126: ...er characters may not be displayed correctly Reading is displayed for an extended time or it takes a long time before playback starts The reading process can take a long time in the following cases There are many folders or files on the USB device The file structure is extremely complex The memory capacity is excessive The internal memory is fragmented Thus we recommend following these guidelines ...

Страница 127: ...om these devices Make sure that the wireless LAN router access point is turned on Cannot control the receiver using the Media Remote device The receiver may take a long time to connect to the network after you turn on the receiver Wait for a few moments and then try using the Media Remote again Make sure Network Standby is set to On in the Network Settings menu so that you can use the Media Remote...

Страница 128: ...oint and check the multicast setting If the multicast setting is enabled on the wireless LAN router access point disable it You cannot play audio data normally Shuffle Play is selected Press SHIFT then press SHUFFLE repeatedly until SHUF disappears Play does not start or does not automatically change to the next track or file Make sure that the audio file you are trying to play is in a format supp...

Страница 129: ... to On page 106 Confirm that the network is correctly set up If it is not the connection cannot be made page 104 The device on the device list is set to Not Allow page 105 or the device is not added to the device list page 105 A maximum of 20 connectable devices has been set Delete unnecessary devices on the device list and then set Auto Access to Allow page 105 Server operation of the receiver is...

Страница 130: ...he iOS device Select the receiver as the network speaker You cannot connect the receiver to a service Make sure that the wireless LAN router access point is turned on Check the network status See To check the network information page 104 then select Connection in step 2 If Connection Fail appears set up the network connection again page 70 When the system is connected to the wireless network move ...

Страница 131: ...VOLUME on the receiver Severe hum or noise If there are obstacles between the receiver and your Bluetooth device remove or avoid the obstacles If there is equipment that generates electromagnetic radiation such as a wireless LAN other Bluetooth device or a microwave oven nearby move them away Turn down the volume of the connected Bluetooth device The Control for HDMI function does not work Check t...

Страница 132: ...t to the speakers or the receiver is covered and ventilation holes are blocked The receiver will automatically turn off after a few seconds Remove the object covering the upper panel of the receiver check the speaker connection and turn on the power again USB FAIL An over current from the USB port was detected The receiver will automatically turn off after a few seconds Check the iPod iPhone or US...

Страница 133: ...and the source there may be no sound output Frequency response Analog 10 Hz 100 kHz 0 5 2 dB with sound field and equalizer bypassed Input Analog Sensitivity 500 mV 50 kilohms S N3 105 dB A 500 mV4 Digital Coaxial Impedance 75 ohms S N 100 dB A 20 kHz LPF Digital Optical S N 100 dB A 20 kHz LPF Output Analog AUDIO OUT Voltage 500 mV 1 kilohm SUBWOOFER Voltage 2 V 1 kilohm Equalizer Gain levels 10 ...

Страница 134: ...96 2160p 23 98 24 Hz a 3840 2160p 29 97 30 Hz a 3840 2160p 25 Hz a 3840 2160p 23 98 24 Hz a 1920 1080p 59 94 60 Hz a a a 1920 1080p 50 Hz a a a 1920 1080p 29 97 30 Hz a a a a 1920 1080p 25 Hz a a a a 1920 1080p 23 98 24 Hz a a a a 1920 1080i 59 94 60 Hz a a a a 1920 1080i 50 Hz a a a a 1280 720p 59 94 60 Hz a a a a 1280 720p 50 Hz a a a a 1280 720p 29 97 30 Hz a a a a 1280 720p 23 98 24 Hz a a a a...

Страница 135: ...35 GHz Modulation method FHSS Freq Hopping Spread Spectrum Compatible Bluetooth profiles2 A2DP Advanced Audio Distribution Profile AVRCP 1 3 Audio Video Remote Control Profile Supported Codecs3 SBC4 Transmission range A2DP 20 Hz 20 000 Hz Sampling frequency 44 1 kHz 1 The actual range will vary depending on factors such as obstacles between devices magnetic fields around a microwave oven static el...

Страница 136: ...109 Camcoder 35 CD player 37 Clear memory 42 remote control 118 sound field 69 Connection antennas 38 audio equipment 37 iPod iPhone 35 Network 39 speakers 24 TV 26 USB device 38 video equipment 28 Wired 40 Wireless 40 Control for HDMI 103 111 Crossover frequency 100 110 D D L L Digital Legato Linear 102 DCAC DigitalCinemaAuto Calibration 44 Device Name 106 Direct Tuning 63 Display panel 11 Distan...

Страница 137: ...s 64 PROTECTOR 132 Proxy server 50 R Recording 61 Remote control 14 113 Resetting 42 S Satellite tuner 32 SB Assign 99 110 Scene Select 90 Server 70 Server list 73 Settings menu 98 Sleep Timer 16 Software Update 106 Sound field 65 Sound Optimizer 17 Speaker Pattern 99 109 Speaker Settings 99 109 SPEAKERS 43 Super Audio CD player 37 Surround Settings 101 111 System Audio Control 89 System Power Off...

Страница 138: ... SOFTWARE in whole or in part Separation of Components The SONY SOFTWARE is licensed as a single product Its component parts may not be separated Use on Single PRODUCT The SONY SOFTWARE may only be used with a single PRODUCT Rental You may not rent or lease the SONY SOFTWARE Software Transfer You may permanently transfer all of your rights under this EULA only when the SONY SOFTWARE is transferred...

Страница 139: ...SONY SOFTWARE LIMITATION OF LIABILITY SONY ITS SUPPLIERS AND SONY S LICENSOR S for purposes of this SECTION ONLY collectively SONY SHALL NOT BE LIABLE FOR ANY INCIDENTAL OR CONSEQUENTIAL DAMAGES RELATING TO THE SONY SOFTWARE ARISING FROM OR BASED ON BREACH OF ANY EXPRESS OR IMPLIED WARRANTY BREACH OF CONTRACT NEGLIGENCE STRICT LIABILITY OR ANY OTHER LEGAL THEORY SUCH DAMAGES INCLUDE BUT ARE NOT LI...

Страница 140: ...es du propriétaire Les numéros de modèle et de série se trouvent au dos de l appareil Inscrivez ces numéros dans l espace prévu ci dessous Vous devez les communiquer à votre revendeur Sony chaque fois que vous l appelez au sujet de ce produit N du modèle ___________ _____________________________ _________ N de série_______________ _____________________________ _________ Ce symbole vise à informer ...

Страница 141: ...l et des enceintes La déclaration FCC suivante s applique uniquement à la version de ce modèle destinée à la vente aux États Unis Il est possible que les autres versions ne soient pas conformes aux réglementations techniques de la FCC REMARQUE Cet équipement a été testé et déclaré conforme aux limitations prévues dans le cadre des appareils numériques de classe B selon la définition de la section ...

Страница 142: ...é mains poignets pieds et chevilles À propos de ce mode d emploi Les instructions de ce manuel couvrent le modèle STR DA1800ES Le numéro du modèle est situé dans l angle inférieur droit du panneau avant Les illustrations utilisées dans ce manuel correspondent au modèle pour les États Unis et peuvent être différentes pour votre modèle Dans ce manuel toutes les différences de fonctionnement sont sig...

Страница 143: ...orporation Wake on LAN est une marque commerciale d International Business Machines Corporation aux États Unis Microsoft Windows Windows Vista Windows 7 et Windows Media sont des marques commerciales ou des marques déposées de Microsoft Corporation aux États Unis et ou dans d autres pays Ce produit intègre une technologie protégée par certains droits de propriété intellectuelle de Microsoft L util...

Страница 144: ...er the name of the Xiph org Foundation nor the names of its contributors may be used to endorse or promote products derived from this software without specific prior written permission THIS SOFTWARE IS PROVIDED BY THE COPYRIGHT HOLDERSANDCONTRIBUTORS AS IS AND ANY EXPRESS OR IMPLIED WARRANTIES INCLUDING BUT NOT LIMITED TO THE IMPLIED WARRANTIES OF MERCHANTABILITY AND FITNESS FOR A PARTICULAR PURPO...

Страница 145: ...e l opération affichée à l écran 54 Opérations de base Lecture d un appareil source d entrée 56 Lecture d un iPod iPhone 59 Lecture d un périphérique USB 62 Enregistrement à l aide de l ampli tuner 65 Opérations du tuner Écoute d une radio FM AM 66 Préréglage des stations de radio FM AM Preset Tuning 68 Écouter les effets sonores Sélection du champ sonore 69 Utilisation de la fonction d optimiseur...

Страница 146: ...ter le son du téléviseur émis par les enceintes raccordées à l ampli tuner via la prise HDMI OUT A Audio Return Channel 97 Commutation des moniteurs qui émettent les signaux vidéo HDMI 97 Autres opérations Passage du son analogique au son numérique et vice versa INPUT MODE 98 Utilisation d autres prises d entrée vidéo audio Input Assign 98 Utilisation d un raccordement de bi amplification 100 Util...

Страница 147: ...roit très chaud ou très humide N utilisez pas une pile neuve avec des piles usagées Ne mélangez pas les piles au manganèse avec d autres types de piles N exposez pas le capteur de télécommande aux rayons directs du soleil ou à des appareils d éclairage Ceci pourrait provoquer un dysfonctionnement Si vous prévoyez de ne pas utiliser la télécommande pendant un certain temps retirez les piles pour év...

Страница 148: ...e à jour du logiciel est en cours d exécution page 86 Si l indicateur clignote rapidement la mise à jour du logiciel a généré une erreur page 128 C INPUT SELECTOR page 57 65 98 D INPUT MODE page 98 E Capteur de télécommande Capte les signaux de la télécommande F Panneau de l afficheur page 11 G DISPLAY page 121 H DIMMER Règle la luminosité du panneau de l afficheur sur 3 niveaux I MASTER VOLUME pa...

Страница 149: ...née et des signaux ARC Audio Return Channel sont détectés F PARTY S allume lorsque la fonction PARTY STREAMING est activée page 83 G Indicateur Dolby Digital Surround L indicateur approprié s allume lorsque l ampli tuner décode les signaux au format Dolby Digital correspondant D D EX D TrueHD Dolby Digital Dolby Digital Surround EX Dolby Digital Plus Dolby TrueHD H NEO 6 S allume lorsque le décode...

Страница 150: ... de la fonction Auto Calibration sont appliqués X UPDATE S allume quand un nouveau logiciel est disponible page 86 Y Indicateur Dolby Pro Logic L indicateur approprié s allume lorsque l ampli tuner exécute un traitement Dolby Pro Logic Cette technologie de décodage surround matricielle peut améliorer les signaux d entrée PL PL II PL IIx PL IIz Dolby Pro Logic Dolby Pro Logic II Dolby Pro Logic IIx...

Страница 151: ...age 30 B Prises de commande pour appareils Sony et autres appareils externes Prises IR REMOTE IN OUT page 102 Prise TRIGGER OUT page 115 Raccorde un dispositif de verrouillage à l alimentation d autres appareils compatibles 12V TRIGGER ou de l amplificateur C Section COMPONENT VIDEO INPUT OUTPUT Prises Y PB PR IN OUT page 26 30 32 Prises Y PB PR OUT page 102 D Section NETWORK Ports LAN page 40 Ant...

Страница 152: ...nt programmer la télécommande pour commander des appareils non Sony Pour plus d informations reportez vous à Programmation de la télécommande page 121 RM AAP080 F Section AUDIO INPUT OUTPUT Prises AUDIO IN page 26 32 34 37 Prises AUDIO OUT page 24 Prises AUDIO OUT page 102 G Section VIDEO AUDIO INPUT OUTPUT page 26 32 34 Prises VIDEO IN OUT Prises AUDIO IN OUT Prises VIDEO OUT page 102 H Port RS23...

Страница 153: ...ez sur 0 10 pour sélectionner le numéro de plage 10 sélectionner des numéros de canaux sélectionner les lettres ABC DEF etc symboles de ponctuation etc et autres etc lorsque vous saisissez des caractères pour les fonctions réseau Appuyez sur TV W puis appuyez sur les touches numériques pour sélectionner les canaux de télévision 1 Appuyez sur SHIFT V puis appuyez sur pour sélectionner le mode d ent...

Страница 154: ... Il s agit d une touche Aperçu pour HDMI Active un aperçu par incrustation d image en direct des entrées HDMI raccordées à cet ampli tuner Les fenêtres d aperçu affichent uniquement les entrées HDMI IN 1 IN 2 IN 3 et IN 4 Appuyez sur V v pour sélectionner l aperçu de chaque entrée HDMI puis appuyez sur pour entrer valider la sélection Cette fonction est optimisée par la technologie InstaPrevue de ...

Страница 155: ...appuyez sur TV VOL pour régler le niveau du volume du téléviseur MASTER VOL 1 Règle le niveau de volume de toutes les enceintes simultanément P DISC SKIP iPhone CTRL1 Appuyez sur cette touche pour ignorer le disque lors de l utilisation d un changeur multidisque basculer en mode de contrôle iPod iPhone lors de l utilisation d un iPod iPhone Q RETURN EXIT O1 Revient au menu précédent ou quitte le m...

Страница 156: ...DAT Lecteur CD platine MD B AV 1 z z z z z z z z z z z D Touches numériques z z z z z z z z z z z z 10 z z z z z z z z z z z ENT MEM z z z z z z zb z z z z z CLEAR za z z zc ze F Touches de couleur z za z z z H TOOLS OPTIONS z z z z z z z I MENU HOME z z z z z z z z J z z z z z z z z zd z z FOLDER z z z z z zc z ze REPEAT za z zc zd z z SHUFFLE za z zc z m TUNING M TUNING z z z z z z z z z z z N X...

Страница 157: ...appareils audio page 37 HDMI COMPONENT VIDEO Y PB CB PR CR VIDEO Analogique Image de haute qualité Numérique Préparation de l ampli tuner Raccordement du cordon d alimentation secteur page 41 et Exécution des opérations de configuration initiale effacement de tous les réglages mémorisés page 42 Réglage des enceintes Sélectionnez la configuration d enceintes page 42 puis exécutez la fonction Auto c...

Страница 158: ...sible que l image sur l écran du téléviseur soit déformée horizontalement ou qu aucune image ne soit visible Si vous utilisez un circuit d amélioration de l image avec votre magnétoscope il peut affecter la conversion du signal vidéo Il est recommandé de désactiver cette fonction sur votre magnétoscope L image HDMI convertie qui est émise ne prend pas en charge les modes x v Color x v Colour Deep ...

Страница 159: ...spond pas au format Pour plus d informations reportez vous au mode d emploi fourni avec l appareil de lecture b Les signaux dont la fréquence d échantillonnage est supérieure à 96 kHz sont lus à 96 kHz ou 88 2 kHz Formats audio numériques pris en charge par l ampli tuner Format audio Nombre de canaux maximum Raccordement entre l appareil de lecture et l ampli tuner COAXIAL OPTICAL HDMI Dolby Digit...

Страница 160: ...ntes avant hautes Remarque Vous pouvez raccorder deux caissons de graves à l ampli tuner Les mêmes signaux sont émis à partir de chacune des prises SUBWOOFER Système d enceintes 7 1 canaux utilisant des enceintes surround arrière Vous pouvez bénéficier d une restitution très fidèle du son enregistré avec un logiciel DVD ou un disque Blu ray au format 6 1 canaux ou 7 1 canaux Système d enceintes 7 ...

Страница 161: ...nière aussi symétrique que possible Système d enceintes 7 1 canaux utilisant des enceintes avant hautes Vous pouvez écouter les effets sonores verticaux en raccordant deux enceintes avant hautes supplémentaires Placez les enceintes avant hautes à un angle compris entre 25 et 35 à un angle de 20 5 en hauteur Système d enceintes 6 1 canaux Placez l enceinte surround arrière derrière la position d éc...

Страница 162: ...t des enceintes Débranchez le cordon d alimentation secteur avant de raccorder les cordons ACordon audio mono non fourni BCordon d enceinte non fourni 10 mm 13 32 1 2 3 4 Droite Gauche Droite Gauche Droite Enceinte centrale B Gauche B B Enceinte surround B A Enceinte surround arrière avant haute de bi amplification avant B Enceinte avant A Caisson de graves ...

Страница 163: ... SUBWOOFER Remarques sur le raccordement des bornes SPEAKERS SURROUND BACK FRONT HIGH BI AMP FRONT B Si vous raccordez une seule enceinte surround arrière raccordez la au L de cette borne Si vous disposez d un système d enceintes avant supplémentaire raccordez le à cette borne Réglez SB Assign sur Speaker B dans le menu Speaker Settings page 43 Vous pouvez sélectionner le système d enceintes avant...

Страница 164: ...ous pouvez voir l image de l entrée sélectionnée Vous pouvez utiliser cet ampli tuner à l aide d une interface utilisateur graphique GUI Graphical User Interface GUI s applique uniquement à la sortie HDMI de la zone principale Débranchez le cordon d alimentation secteur avant de raccorder les cordons ARC Téléviseur doté d une prise HDMI C Signaux audio vidéo Signaux audio Signaux vidéo E A ou Télé...

Страница 165: ...r Remarques Raccordez un écran de téléviseur ou un projecteur à la prise HDMI OUT ou MONITOR OUT de l ampli tuner Il est possible que vous ne puissiez pas effectuer d enregistrement même si vous raccordez des appareils d enregistrement Selon l état du raccordement entre le téléviseur et l antenne il est possible que l image diffusée sur l écran du téléviseur soit déformée Dans ce cas éloignez l an...

Страница 166: ...gie BRAVIA Sync de Sony au moyen de câbles HDMI les opérations peuvent être simplifiées Reportez vous à Fonctions BRAVIA Sync page 93 Si vous voulez raccorder plusieurs appareils numériques mais il n y a aucune entrée libre Reportez vous à Utilisation d autres prises d entrée vidéo audio Input Assign page 98 Conversion des signaux vidéo Cet ampli tuner est doté d une fonction qui permet la convers...

Страница 167: ... alimentation secteur avant de raccorder les cordons ACâble HDMI non fourni Sony vous recommande d utiliser un câble HDMI homologué ou Sony Remarque Ce raccordement HDMI est un exemple Vous pouvez raccorder un lecteur de disques Blu ray à n importe quelle entrée HDMI Raccordement d un lecteur de disques Blu ray Lecteur de disques Blu ray doté d une prise HDMI A Signaux audio vidéo ...

Страница 168: ...0ES CEL fm masterpage Left STR DA1800ES 4 428 194 12 2 Débranchez le cordon d alimentation secteur avant de raccorder les cordons Raccordement d un lecteur DVD C B D Signaux audio vidéo Lecteur DVD doté d une prise HDMI Signaux audio ou Signaux vidéo Lecteur DVD non doté d une prise HDMI A ...

Страница 169: ...coaxial non fourni DCordon vidéo composante non fourni Raccordement recommandé Autre raccordement Lorsque vous raccordez un appareil doté d une prise OPTICAL réglez Input Assign dans le menu Input Option page 98 Il n est pas nécessaire de raccorder tous les cordons Raccordez les cordons correspondant aux prises de vos appareils Remarque Ce raccordement HDMI est un exemple Lorsque vous n utilisez q...

Страница 170: ...ES 4 428 194 12 2 Débranchez le cordon d alimentation secteur avant de raccorder les cordons Raccordement d un tuner satellite tuner TV par câble B Signaux audio vidéo Signaux audio Tuner satellite tuner TV par câble doté d une prise HDMI ou A Tuner satellite tuner TV par câble non doté d une prise HDMI ou Signaux vidéo C D E ...

Страница 171: ...optique numérique non fourni CCordon audio non fourni DCordon vidéo non fourni ECordon vidéo composante non fourni Raccordement recommandé Autre raccordement Il n est pas nécessaire de raccorder tous les cordons Raccordez les cordons correspondant aux prises de vos appareils Remarque Ce raccordement HDMI est un exemple Lorsque vous n utilisez qu un raccordement à une entrée HDMI vous pouvez raccor...

Страница 172: ...icheur de l ampli tuner Pour plus d informations reportez vous à la section Attribution d un nom à l entrée Name Input page 57 Ce raccordement HDMI est un exemple Vous pouvez raccorder un jeu à n importe quelle entrée HDMI Débranchez le cordon d alimentation secteur avant de raccorder les cordons ACordon audio non fourni BCordon vidéo non fourni Si vous voulez effectuer un enregistrement vous deve...

Страница 173: ...STR DA1800ES CEL fm masterpage Right STR DA1800ES 4 428 194 12 2 Raccordements ACâble AV composite d Apple non fourni ACordon audio vidéo non fourni Raccordement d un iPod iPhone pour les contenus vidéo A iPod iPhone Raccordement d un autre appareil Caméscope console de jeu vidéo A ...

Страница 174: ... de disques Blu ray enregistreur de disques Blu ray etc compatibles 4K à l ampli tuner à l aide de câbles HDMI haute vitesse puis lisez le contenu compatible 4K HDMI IN 4 IN 6 prend en charge la transmission 4K HDMI IN 1 IN 2 IN 3 IN 4 peuvent s afficher dans une fenêtre d aperçu Remarques sur les raccordements HDMI Les signaux audio et vidéo transmis par l entrée HDMI ne sont pas émis à partir de...

Страница 175: ...à la prise HDMI ou SA CD CD Lorsque vous utilisez un lecteur CD doté de prises OPTICAL ou COAXIAL affectez l entrée à OPTICAL ou COAXIAL Aucun son n est émis lors de l utilisation d un lecteur Super Audio CD raccordé aux prises OPTICAL ou COAXIAL Conseil Toutes les prises audio numériques sont compatibles avec les fréquences d échantillonnage 32 kHz 44 1 kHz 48 kHz et 96 kHz Il n est pas nécessair...

Страница 176: ... d alimentation secteur avant de raccorder les antennes Remarques Pour empêcher les parasites placez l antenne cadre AM à l écart de l ampli tuner et des autres appareils Déployez complètement l antenne fil FM Après avoir raccordé l antenne fil FM maintenez la aussi horizontale que possible Raccordement d un iPod iPhone périphérique USB iPod iPhone périphérique USB A Antenne fil FM fournie Antenne...

Страница 177: ... d utiliser un routeur intégrant le serveur DHCP Dynamic Host Configuration Protocol Cette fonction affecte automatiquement les adresses IP du réseau LAN Utilisez un point d accès routeur LAN sans fil si vous voulez utiliser une connexion réseau LAN sans fil Câble réseau LAN CAT5 Uniquement pour une connexion réseau LAN filaire Nous vous recommandons d utiliser ce type de câble pour un réseau LAN ...

Страница 178: ... vous recommandons de raccorder le serveur au routeur via une connexion filaire AUniquement pour une connexion réseau LAN filaire BUniquement pour une connexion réseau LAN sans fil Veillez à utiliser un point d accès routeur LAN sans fil Remarque La lecture de contenus audio sur un serveur peut parfois s interrompre lorsque vous utilisez une connexion sans fil Exemple de configuration B A Internet...

Страница 179: ...ommande Lorsque vous mettez l ampli tuner hors tension appuyez à nouveau sur 1 STANDBY clignote dans la fenêtre d affichage Ne débranchez pas le cordon d alimentation secteur pendant que STANDBY clignote Ceci pourrait provoquer un dysfonctionnement Remarque Lorsque l ampli tuner est en mode de veille l indicateur ON STANDBY sur le panneau avant s allume en orange Pour économiser l énergie en mode ...

Страница 180: ...r cette procédure pour rétablir les réglages d usine par défaut Pour ce faire veillez à utiliser les touches de l ampli tuner 1 Appuyez sur 1 pour éteindre l ampli tuner 2 Maintenez 1 enfoncée pendant 5 secondes L indication CLEARING s affiche pendant quelques instants sur le panneau de l afficheur suivie de CLEARED Les modifications ou les ajustements apportés aux réglages sont désormais remplacé...

Страница 181: ...uement disponible si SP Pattern est défini sur un réglage ne comportant pas d enceintes surround arrière et avant hautes Veillez à régler SB Assign avant d exécuter la fonction Auto calibration 1 Appuyez sur MENU Le menu s affiche sur l écran du téléviseur 2 Appuyez plusieurs fois sur V v pour sélectionner Settings puis appuyez sur ou b La liste du menu Settings s affiche sur l écran du téléviseur...

Страница 182: ...Calibration qui vous permet d effectuer une calibration automatique comme suit Vérifiez le raccordement entre chaque enceinte et l ampli tuner Réglez le niveau des enceintes Mesurez la distance entre chaque enceinte et votre position d écoute 1 Mesurez la taille des enceintes 1 Mesurez les caractéristiques de fréquence Égaliseur 1 Mesurez les caractéristiques de fréquence Phase 1 2 1 Le résultat d...

Страница 183: ...arques Les enceintes émettent un son très fort pendant la calibration et le volume ne peut pas être réglé Veuillez respecter vos voisins et les enfants présents Si la fonction de coupure du son a été activée avant que vous exécutiez la fonction Auto calibration elle est désactivée automatiquement Il est possible que les mesures ne s effectuent pas correctement ou que la fonction Auto calibration n...

Страница 184: ...uvrement réglez la valeur au maximum Si vous raccordez un caisson de graves doté d une fonction de mise en veille automatique désactivez cette fonction désactivée Remarque Selon les caractéristiques du caisson de graves que vous utilisez la valeur de la distance d installation peut être différente de la position réelle 1 Appuyez sur MENU Le menu s affiche sur l écran du téléviseur 2 Appuyez plusie...

Страница 185: ...on Auto calibration Save Enregistre les résultats des mesures et quitte le processus de réglage Warning Affiche les avertissements relatifs aux résultats des mesures Reportez vous à Liste des messages après la mesure d auto calibration page 49 Exit Quitte le processus de réglage sans enregistrer les résultats des mesures 8 Enregistrez le résultat de la mesure Sélectionnez Save à l étape 7 Remarque...

Страница 186: ...ages dans le menu Speaker Settings Enregistrez les résultats des mesures avant d essayer de changer les réglages Pour annuler la fonction Auto calibration La fonction Auto calibration est désactivée lorsque vous effectuez les opérations suivantes pendant la mesure Appuyez sur 1 Appuyez sur les touches d entrée de la télécommande ou tournez INPUT SELECTOR sur l ampli tuner Appuyez sur MUTING Appuye...

Страница 187: ... LAN sans fil Afficheur et description Error Code 31 SPEAKERS est désactivé Sélectionnez d autres réglages d enceintes et exécutez de nouveau la fonction Auto calibration Error Code 32 Error Code 33 Les enceintes n ont pas été détectées ou ne sont pas raccordées correctement Aucune des enceintes avant n est raccordée ou une seule l est L enceinte surround gauche ou droite n est pas raccordée Les e...

Страница 188: ...ice Set Identifier est un nom qui identifie un point d accès particulier 2 Ces informations devraient figurer sur une étiquette sur votre point d accès routeur LAN sans fil ou dans le mode d emploi Vous devriez aussi pouvoir vous les procurer auprès de la personne qui a configuré votre réseau sans fil ou auprès de votre fournisseur de services Internet 1 Appuyez sur MENU Le menu s affiche sur l éc...

Страница 189: ... Not Use puis appuyez sur Un écran de confirmation apparaît sur l écran du téléviseur En cas d utilisation d un serveur proxy Sélectionnez Use puis appuyez sur L écran de saisie de l adresse du proxy apparaît sur l écran du téléviseur Appuyez sur SHIFT puis appuyez sur les touches numériques alphabétiques pour renseigner le champ Proxy Address puis appuyez sur Saisissez ensuite la valeur du champ ...

Страница 190: ...st une norme créée par Wi Fi Alliance qui vous permet de configurer un réseau sans fil facilement et en toute sécurité Configuration d un réseau sans fil à l aide de la méthode de configuration par touche poussoir WPS Vous pouvez facilement configurer une connexion sans fil WPS en appuyant une fois sur la touche désignée 1 Sélectionnez WPS Push à l étape 6 dans Recherche d un point d accès et conf...

Страница 191: ...ntenus audio enregistrés sur le serveur vous devez configurer ce dernier page 74 Conseils Lors de la vérification des réglages du réseau reportez vous à la section Pour vérifier les informations du réseau page 111 Pour plus d informations sur la saisie du code PIN dans le point d accès routeur LAN sans fil reportez vous au mode d emploi de l appareil 1 Sélectionnez Wired LAN Settings à l étape 5 d...

Страница 192: ...re quelque temps 5 Effectuez les réglages du serveur Pour écouter des contenus audio enregistrés sur le serveur vous devez configurer ce dernier page 74 Conseil Lors de la vérification des réglages du réseau reportez vous à la section Pour vérifier les informations du réseau page 111 Guide de l opération affichée à l écran Vous pouvez afficher le menu de l ampli tuner sur l écran du téléviseur et ...

Страница 193: ...r activer et désactiver GUI MODE Appuyez sur GUI MODE GUI ON ou GUI OFF apparaît sur le panneau de l afficheur selon le mode sélectionné Aperçu des principaux menus Lorsque vous appuyez sur TOOLS OPTIONS les menus des options du menu principal sélectionné s affichent Vous pouvez sélectionner une fonction associée sans sélectionner à nouveau le menu 1 Appuyez sur MENU Le menu s affiche sur l écran ...

Страница 194: ...u menu s affiche Le menu des options apparaît 4 Appuyez plusieurs fois sur V v pour sélectionner l option de votre choix dans le menu des options puis appuyez sur ou b 5 Appuyez plusieurs fois sur V v pour sélectionner le paramètre de votre choix puis appuyez sur Pour quitter le menu des options Appuyez sur RETURN EXIT O Lecture d un appareil source d entrée 1 Appuyez sur MENU Le menu s affiche su...

Страница 195: ...r INPUT SELECTOR sur l ampli tuner ou appuyer sur les touches d entrée de la télécommande pour sélectionner l appareil de votre choix Vous pouvez régler le volume différemment à l aide du bouton MASTER VOLUME de l ampli tuner ou du bouton MASTER VOL de la télécommande Pour augmenter ou réduire le volume rapidement Tournez le bouton rapidement Appuyez sur la touche et maintenez la enfoncée Pour eff...

Страница 196: ...fois sur V v pour sélectionner un caractère puis appuyez sur b Vous pouvez déplacer la position d entrée en avant et en arrière en appuyant sur B b 5 Répétez l étape 4 pour entrer les caractères un à un puis appuyez sur Le nom saisi est enregistré Remarque Certaines lettres affichées sur l écran du téléviseur ne peuvent pas apparaître sur le panneau de l afficheur ...

Страница 197: ...ser le logiciel de votre iPod iPhone mettez le à jour vers la version la plus récente Remarques Sony décline toute responsabilité en cas de perte ou d endommagement des données enregistrées sur un iPod iPhone raccordé à cet ampli tuner Ce produit a été spécialement conçu pour fonctionner avec l iPod iPhone et a été certifié conforme aux normes d Apple en termes de performances Modèles d iPod iPhon...

Страница 198: ... GUI ou iPod puis appuyez sur 1 Assurez vous que System GUI est sélectionné à l étape 4 de Sélection du mode de contrôle iPod iPhone page 60 2 Sélectionnez iPod iPhone puis appuyez sur 3 Sélectionnez le contenu désiré dans la liste des contenus puis appuyez sur Le contenu sélectionné est lu et les informations concernant les contenus musique vidéo s affichent sur l écran du téléviseur Remarque Les...

Страница 199: ... de l iPod iPhone reportez vous au mode d emploi fourni avec l iPod iPhone Pour utiliser l iPod iPhone à l aide de la télécommande Appuyez sur USB avant d utiliser les touches suivantes Utilisation de l iPod iPhone à l aide du mode iPod Appuyez sur Opération N Lance la lecture X x Met la lecture en pause m M Avance ou rembobine rapidement Accède au fichier précédent suivante B b Accède directement...

Страница 200: ... lus par l ampli tuner sont les suivants L ampli tuner ne lit pas les fichiers encodés avec DRM Les périphériques USB Sony suivants sont compatibles avec cet ampli tuner Aucun autre périphérique USB ne peut être utilisé avec cet ampli tuner Périphérique USB Sony validé V v Sélectionne l élément précédent suivant REPEAT Bascule en mode de répétition SHUFFLE Bascule en mode aléatoire iPhone CTRL Sél...

Страница 201: ...ié Lorsque vous raccordez un périphérique USB à l ampli tuner veillez à le faire après que le message Creating Library ou Creating Database a disparu de l afficheur du périphérique USB 1 Appuyez sur MENU Le menu s affiche sur l écran du téléviseur 2 Sélectionnez Music puis appuyez sur ou b Quand le périphérique USB est raccordé USB s affiche sur l écran du téléviseur 3 Sélectionnez USB puis appuye...

Страница 202: ... USB Quand le périphérique USB est raccordé Reading s affiche Reading peut mettre environ 10 secondes à s afficher selon le type de périphérique USB raccordé Lorsque le périphérique USB est raccordé l ampli tuner lit tous les fichiers sur le périphérique USB Si ce dernier contient de nombreux dossiers ou fichiers le système peut mettre longtemps à terminer la lecture du périphérique USB L ampli tu...

Страница 203: ...r la lecture Appuyez sur la touche d entrée pour sélectionner la source d entrée Par exemple appuyez sur SAT CATV Vous pouvez également utiliser INPUT SELECTOR sur l ampli tuner 2 Préparez l appareil d enregistrement Insérez une cassette vidéo vierge etc dans l appareil d enregistrement raccordé aux prises VIDEO 1 OUT 3 Commencez l enregistrement sur cet appareil puis lancez la lecture sur l appar...

Страница 204: ... Sélectionnez Auto Tuning puis appuyez sur ou b 2 Appuyez sur V v Appuyez sur V pour effectuer un balayage des stations aux fréquences inférieures vers les fréquences supérieures appuyez sur v pour effectuer un balayage des stations aux fréquences supérieures vers les fréquences inférieures L ampli tuner cesse le balayage dès qu une station est reçue Si la réception FM stéréo est mauvaise 1 Synton...

Страница 205: ...la fréquence actuelle Vérifiez si vous avez bien saisi la fréquence correcte Si la fréquence est incorrecte répétez l étape 2 Si vous ne parvenez toujours pas à régler une station c est que la fréquence n est pas utilisée dans votre région Vous pouvez remplacer l échelle de syntonisation AM par 9 kHz ou 10 kHz à l aide des touches de l ampli tuner 1 Appuyez sur 1 pour éteindre l ampli tuner 2 Pend...

Страница 206: ...tionnez FM ou AM dans le menu puis appuyez sur ou b 2 Sélectionnez la station préréglée que vous voulez puis appuyez sur Des numéros préréglés compris entre 1 et 30 sont disponibles 1 Sur l écran FM ou AM sélectionnez le numéro préréglé auquel vous souhaitez attribuer un nom 2 Appuyez sur TOOLS OPTIONS Le menu des options apparaît 3 Sélectionnez Name Input puis appuyez sur ou b 4 Appuyez plusieurs...

Страница 207: ...il de lecture raccordé ou les réglages de champs sonores de l ampli tuner Remarque Lorsque vous sélectionnez BD DVD GAME USB AirPlay HOME NETWORK et SEN comme entrée il n est pas possible de sélectionner A DIRECT Écouter les effets sonores Mode de son 2 canaux Mode 2CH Effet 2CH ST 2ch Stereo L ampli tuner émet le son à partir des enceintes avant gauche droite uniquement Aucun son n est émis par l...

Страница 208: ... technologie innovante de Home Theater de Sony utilisant les technologies de traitement des signaux numérique et acoustique de pointe Il repose sur des données de mesure des réponses précises d un studio de mastering Grâce à ce mode vous pourrez regarder des films Blu ray et DVD chez vous avec un son d excellente qualité mais aussi une ambiance sonore optimale exactement comme l ingénieur du son d...

Страница 209: ...al pour les MP3 et autres formats de musique compressée PLII MS PLII Music Exécute le décodage Dolby Pro Logic II Music Ce réglage est idéal pour les sources stéréo normales telles que les CD PLIIx MS PLIIx Music Exécute le décodage Dolby Pro Logic IIx Music Ce réglage est idéal pour les sources stéréo normales telles que les CD PLIIz PLIIz Height Exécute le décodage Dolby Pro Logic IIz Ce réglage...

Страница 210: ...ement lorsque la configuration d enceintes est réglée sur un paramètre comprenant des enceintes avant hautes Les champs sonores pour la musique et les films sont inopérants dans les cas suivants Des signaux DTS HD Master Audio DTS HD High Resolution Audio ou Dolby TrueHD avec une fréquence d échantillonnage supérieure à 48 kHz sont reçus A DIRECT est sélectionné PLII MV PLIIx MV PLII MS PLIIx MS P...

Страница 211: ...e fois que vous appuyez sur SOUND OPTIMIZER Remarque Cette fonction est inopérante si A DIRECT est en cours d utilisation Vous permet de verrouiller les réglages de l ampli tuner Vous ne pouvez activer ou désactiver cette fonction qu en suivant la procédure ci dessous 1 Appuyez sur 1 pour éteindre l ampli tuner 2 Pendant que vous maintenez MUSIC et SPEAKERS A B A B OFF enfoncé appuyez sur 1 pour m...

Страница 212: ...s et publie un logo autorisé qui doit être indiqué sur les périphériques qui prennent en charge les normes DLNA Configuration du serveur Pour écouter des contenus audio enregistrés sur votre serveur avec cet ampli tuner vous devez configurer le serveur au préalable Les périphériques serveurs suivants sont compatibles avec cet ampli tuner Sony VAIO Media plus 1 3 1 4 2 0 et 2 1 Sony HDD Network Aud...

Страница 213: ...s voulez n apparaît pas dans l affichage essayez de modifier le type d affichage du Panneau de configuration 3 Sélectionnez Public network sous View your active networks Si l affichage indique une option autre que Public Network allez à l étape 6 La fenêtre Set Network Location s affiche 4 Sélectionnez Home network ou Work network selon l environnement dans lequel est utilisé l ampli tuner 5 Suive...

Страница 214: ... Media Player 12 actualisez la liste des serveurs de l ampli tuner et sélectionnez y ce serveur Pour plus d informations sur la sélection d un serveur reportez vous à la section Pour actualiser la liste des serveurs page 78 Cette section explique comment configurer l installation de Windows Media Player 11 sur Windows Vista XP Pour plus d informations sur l utilisation de Windows Media Player 11 r...

Страница 215: ...on Share my media n est pas cochée dans la fenêtre Media Sharing qui s affiche à l étape 3 cochez la puis sélectionnez OK La liste des périphériques connectables s affiche 10Sélectionnez Settings qui apparaît à côté de Share my media to 11Cochez Allow new devices and computers automatically et sélectionnez OK Remarque Désélectionnez cette option après avoir vérifié que l ampli tuner peut être racc...

Страница 216: ... affiche sélectionnez le serveur à supprimer puis appuyez sur TOOLS OPTIONS Le menu des options apparaît 2 Sélectionnez Delete puis appuyez sur Un écran de confirmation apparaît sur l écran du téléviseur 3 Sélectionnez OK puis appuyez sur Complete apparaît et le serveur sélectionné est supprimé Remarque Même si vous supprimez le serveur de la liste des serveurs il réapparaîtra dans la liste si l a...

Страница 217: ...ez vous au mode d emploi ou à l aide de votre serveur 5 Sélectionnez l élément liste de lecture album dossier etc que vous voulez puis appuyez sur Si un autre élément apparaît répétez cette étape pour réduire les choix jusqu à ce que l élément que vous voulez apparaisse Les éléments qui s affichent dépendent du serveur raccordé 6 Sélectionnez la plage que vous voulez puis appuyez sur La lecture co...

Страница 218: ...net Pour plus d informations reportez vous à la section 6 Connexion au réseau page 39 Visitez le site Web ci dessous pour plus d informations sur la fonction SEN http www sonyentertainmentnetwork com Pour Procédez comme suit Mettre en pause la lecture Appuyez sur X pendant la lecture Appuyez sur N pour reprendre la lecture Arrêter la lecture Appuyez sur x Aller au début de la plage actuelle plage ...

Страница 219: ...le dossier ou la station que vous voulez puis appuyez sur Appuyez sur V v pour sélectionner l élément Appuyez sur pour accéder au répertoire suivant ou écouter la station Appuyez sur RETURN EXIT O pour retourner au répertoire précédent Remarque Si No Service apparaît et vous ne parvenez pas à obtenir la liste des fournisseurs de services appuyez sur TOOLS OPTIONS et sélectionnez Refresh Conseil L ...

Страница 220: ...e type de station Not Available apparaît sur l afficheur Conseil Utilisez les touches numériques pour sélectionner la station préréglée Appuyez sur SHIFT puis appuyez sur la touche numérique correspondant au numéro préréglé puis appuyez sur pour sélectionner directement la station préréglée Vous pouvez écouter le contenu de divers services musicaux disponibles sur Internet Visitez le site Web ci d...

Страница 221: ...e PARTY un périphérique appelé hôte PARTY démarre une session PARTY et diffuse de la musique tandis qu un périphérique appelé invité PARTY rejoint une session PARTY et reçoit la musique émise par l hôte PARTY Avant d utiliser la fonction PARTY STREAMING assurez vous que PARTY STREAMING est réglé sur On page 111 Vous pouvez utiliser la fonction PARTY STREAMING avec d autres périphériques portant le...

Страница 222: ...u à ce que CLOSE PARTY apparaisse Vous pouvez également utiliser PARTY sur l ampli tuner pour fermer une session Party L ampli tuner peut rejoindre une session PARTY démarrée par un autre périphérique afin que vous puissiez écouter les mêmes contenus audio lus dans une autre pièce Lorsque l hôte PARTY lance une session PARTY appuyez sur SHIFT puis appuyez sur PARTY JOIN PARTY apparaît et l ampli t...

Страница 223: ... 1 ou version ultérieure Remarques Reportez vous à Modèles d iPod iPhone iPad compatibles dans cette page pour plus d informations sur les versions prises en charge d iOS ou d iTunes Mettez à jour iOS ou iTunes vers la version la plus récente avant de l utiliser avec l ampli tuner Reportez vous au mode d emploi de votre périphérique pour plus d informations sur l utilisation de périphériques iOS i...

Страница 224: ...de cet ampli tuner lorsque vous réglez le volume à un niveau trop fort à l aide de périphériques iOS ou d iTunes Pour plus d informations sur l utilisation d iTunes reportez vous à l aide de ce dernier Il est possible que le niveau de volume des périphériques iOS ou d iTunes ne puisse pas être lié au niveau de volume de cet ampli tuner Mise à jour du logiciel En téléchargeant la dernière version d...

Страница 225: ... indication Complete s affiche Les modifications ou les ajustements apportés aux réglages sont désormais remplacés par les réglages par défaut Remarques Si l un des états ci dessous apparaît la mise à jour du logiciel a généré une erreur L indicateur ON STANDBY clignote rapidement ERROR apparaît sur le panneau de l afficheur Aucun indicateur ne s allume sur le panneau de l afficheur ou l indicateu...

Страница 226: ...sage et description Cannot Connect L ampli tuner ne peut pas se connecter au serveur Cannot Get Data L ampli tuner ne peut pas obtenir de contenu du serveur Cannot Play L ampli tuner ne peut pas lire un service ou une station car son format n est pas pris en charge ou la lecture est restreinte Data Error Vous avez essayé de lire un fichier illisible L ampli tuner ne reconnaît pas les données sur l...

Страница 227: ...viseur L écran de saisie de mots clés apparaît sur l écran du téléviseur 2 Appuyez sur SHIFT puis appuyez sur les touches numériques alphabétiques pour entrer un mot clé Un mot clé peut comporter jusqu à 15 caractères Remarque Entrez un mot clé correspondant aux lettres ou à un mot situé au début du nom ou du titre de l élément que vous recherchez Lorsque l ampli tuner recherche un élément l artic...

Страница 228: ...et versions Bluetooth suivants Système de communication Spécification Bluetooth version 2 1 EDR Profils compatibles Bluetooth A2DP Advanced Audio Distribution Profile Réception de contenus audio de qualité supérieure AVRCP 1 3 Audio Video Remote Control Profile Commande d appareils audio vidéo mise en pause arrêt démarrage de la lecture commande du volume etc Débit amélioré Remarques Pour pouvoir ...

Страница 229: ... suivent sinon l appairage sera annulé Dans ce cas répétez cette étape 4 Effectuez l appairage sur le périphérique Bluetooth pour détecter cet ampli tuner Pour plus d informations reportez vous au mode d emploi de votre périphérique Bluetooth La liste des périphériques détectés peut apparaître sur l affichage du périphérique Bluetooth selon le type de ce dernier Cet ampli tuner s affiche comme STR...

Страница 230: ...e Bluetooth connecté appuyez sur BLUETOOTH sur l ampli tuner Une fois la connexion établie passez à l étape 3 2 Établissez une connexion à partir du périphérique Bluetooth Pour plus d informations reportez vous au mode d emploi de votre périphérique Bluetooth 3 Démarrez la lecture à partir du périphérique Bluetooth Vous pouvez également appuyer sur la touche N de la télécommande 4 Réglez le volume...

Страница 231: ... qui prennent en charge la fonction Commande pour HDMI En raccordant des appareils Sony compatibles avec BRAVIA Sync au moyen d un câble HDMI non fourni les opérations sont simplifiées comme suit Lecture une touche page 94 Commande du son du système page 95 Mise hors tension du système page 95 Sélection d une scène page 96 Commande Home Cinéma page 96 Audio Return Channel ARC page 97 Commande pour...

Страница 232: ... dessus Quand le menu de réglage Zone2 OutB HDMI est Zone2 la fonction Commande pour HDMI sera désactivée et le menu de réglage Commande pour HDMI sera grisé Pour utiliser Ctrl for HDMI vous devez remplacer le réglage de Zone2 OutB par OutB Exécution des appareils avec la fonction Lecture une touche Lecture une touche Lorsque vous démarrez la lecture sur l appareil raccordé à l ampli tuner via un ...

Страница 233: ...iseur reportez vous au mode d emploi du téléviseur Si Ctrl for HDMI est réglé sur ON les réglages Audio Out du menu HDMI Settings seront automatiquement définis selon les réglages de la fonction Commande du son du système page 110 Mise hors tension de l ampli tuner en même temps que le téléviseur Mise hors tension du système Lorsque vous mettez le téléviseur hors tension en appuyant sur la touche ...

Страница 234: ...téléviseur Commande Home Cinéma Si un téléviseur compatible avec la fonction Commande Home Cinéma est raccordé à l ampli tuner une icône apparaît pour les applications basées sur Internet sur le téléviseur raccordé Vous pouvez changer une entrée de l ampli tuner ou changer de champs sonores à l aide de la télécommande de votre téléviseur Vous pouvez également régler le niveau de l enceinte central...

Страница 235: ...I est réglée sur ON Sinon effectuez le raccordement à la prise OPTICAL Commutation des moniteurs qui émettent les signaux vidéo HDMI Quand deux moniteurs sont raccordés aux prises HDMI OUT A et HDMI OUT B vous pouvez commuter la sortie de ces deux moniteurs à l aide de la touche HDMI OUT de la télécommande 1 Mettez l ampli tuner et les deux moniteurs sous tension 2 Appuyez sur HDMI OUT Chaque fois...

Страница 236: ...alogiques sont sélectionnés Lorsque l entrée TV est sélectionnée la priorité est donnée aux signaux ARC Audio Return Channel Si votre téléviseur n est pas compatible avec la fonction ARC les signaux audio optiques numériques sont sélectionnés Si les fonctions Commande pour HDMI de l ampli tuner et du téléviseur ne sont pas activées la fonction ARC est inopérante COAX Spécifie les signaux audio num...

Страница 237: ...uhaitez affecter 4 Appuyez sur TOOLS OPTIONS Le menu des options apparaît 5 Sélectionnez Input Assign puis appuyez sur ou b L écran Input Assign s affiche 6 Sélectionnez les signaux vidéo et ou audio que vous voulez affecter à l entrée sélectionnée à l étape 3 à l aide de V v B b 7 Appuyez sur Réglage par défaut La fonction TV ne peut pas affecter d autre entrée audio Remarques Lorsque vous affect...

Страница 238: ...menu s affiche sur l écran du téléviseur 2 Sélectionnez Settings puis appuyez sur ou b La liste du menu Settings s affiche sur l écran du téléviseur 3 Sélectionnez Speaker puis appuyez sur ou b 4 Sélectionnez SP Pattern puis appuyez sur ou b 5 Sélectionne la configuration d enceintes appropriée de sorte qu il n y ait aucune enceinte surround arrière et aucune enceinte avant haute puis appuyez sur ...

Страница 239: ... regarder un film BD dans la zone principale et un autre film BD en zone 2 Lors de l utilisation d un répéteur IR non fourni vous pouvez utiliser les deux appareils dans la zone principale et l ampli tuner Sony en zone 2 à partir de la zone 2 Pour utiliser l ampli tuner à partir de la zone 2 Si vous raccordez un répéteur IR non fourni à la prise IR REMOTE vous pouvez utiliser l ampli tuner sans po...

Страница 240: ... HDMI remplacez le réglage de Zone2 OutB par Zone2 Bien que vous puissiez raccorder la prise HDMI OUT B ZONE 2 directement à un téléviseur en zone 2 sans aucun amplificateur ampli tuner il est recommandé d effectuer le raccordement par le biais d un amplificateur ampli tuner dont les fonctionnalités audio doivent être supérieures à celles d un téléviseur ordinaire Étant donné que les fonctionnalit...

Страница 241: ...mmande SYSTEM STANDBY Lorsque l ampli tuner est en mode de veille l indicateur ON STANDBY sur le panneau avant s allume en orange si l ampli tuner en zone 2 est allumé Les signaux en provenance des appareils raccordés aux prises d entrée HDMI vidéo composante et analogiques sont émis par le biais des prises ZONE 2 OUT Aucun signal n est émis par les appareils raccordés aux prises d entrée numériqu...

Страница 242: ...s étapes décrites à la section Pour activer et désactiver GUI MODE page 55 1 Appuyez sur MENU Le menu s affiche sur l écran du téléviseur 2 Sélectionnez Settings dans le menu puis appuyez sur ou b pour entrer dans le mode menu La liste du menu Settings s affiche sur l écran du téléviseur 3 Sélectionnez l élément du menu que vous voulez puis appuyez sur Exemple lorsque vous sélectionnez Auto Cal 4 ...

Страница 243: ...intes Reportez vous aux sections Utilisation de la fonction AUTO CALIBRATION page 44 ou Manual Setup page 105 x Manual Setup Vous permet de régler chaque enceinte manuellement dans l écran Manual Setup Vous pouvez aussi régler les niveaux des enceintes une fois l auto calibration terminée Pour régler le niveau des enceintes Vous pouvez régler le niveau de chaque enceinte avant gauche droite avant ...

Страница 244: ...uces et 32 pieds 9 pouces par intervalles de 10 centimètres 1 pouce Remarques Selon le réglage de la configuration d enceintes il est possible que certains paramètres ne soient pas disponibles Cette fonction est inopérante si A DIRECT est en cours d utilisation Conseil Vous pouvez ajuster la distance par intervalle de 1 centimètres quand vous avez effectué l auto calibration et enregistré le résul...

Страница 245: ...t de définir la fréquence de recouvrement des graves pour les enceintes dont la taille a été réglée sur Small dans le menu Speaker Settings La fréquence de recouvrement des enceintes mesurée est réglée pour chaque enceinte après l auto calibration 1 Sélectionnez l enceinte à l écran dont vous souhaitez régler la fréquence de recouvrement puis appuyez sur 2 Réglez la valeur puis appuyez sur x Test ...

Страница 246: ...offre des niveaux de mélange de réflexion et réverbération différents et est optimisé pour s adapter à la spécificité au goût et à l ambiance de l espace de l utilisateur Dynamic Ce réglage convient à un environnement réverbérant mais ne donne pas de sensation d espace lorsque l absorption du son n est pas suffisante Il met l accent sur la réflexion du son et restitue le son d un cinéma classique ...

Страница 247: ...on d une publicité est plus fort que celui des programmes télévisés ON OFF Remarques Veillez à baisser le niveau du volume avant d activer de désactiver cette fonction Cette fonction n étant disponible que lorsque des signaux Dolby Digital DTS ou PCM linéaire sont reçus en entrée il est possible que le son augmente subitement lorsque vous changez de format Cette fonction est inopérante dans les ca...

Страница 248: ...I est réglé sur OFF x Audio Out Permet de régler les signaux audio HDMI émis par l appareil de lecture raccordé à l ampli tuner par le biais d un raccordement HDMI AMP Les signaux audio HDMI de l appareil de lecture sont uniquement émis vers les enceintes raccordées à l ampli tuner Le son multicanal peut être lu tel quel Remarque Les signaux audio ne sont pas émis par l enceinte du téléviseur lors...

Страница 249: ...ur Zone2 Network Settings Vous pouvez définir les réglages du réseau Le menu Network Settings n est disponible que si la fonction de réseau domestique ou SEN est sélectionnée x Settings Permet de définir les réglages du réseau Pour plus d informations reportez vous à la section Configuration des réglages du réseau de l ampli tuner page 49 Wireless LAN Settings Wired LAN Settings x Information Vous...

Страница 250: ... à 20 périphériques peuvent être ajoutés dans la liste des périphériques Si 20 périphériques ont déjà été enregistrés Device Full apparaît et il n est pas possible d ajouter un périphérique supplémentaire à la liste Dans ce cas supprimez les périphériques inutiles de la list page 113 Pour ajouter des périphériques à la liste des périphériques 1 Sélectionnez Access Settings puis appuyez sur 2 Sélec...

Страница 251: ...iques ont déjà été enregistrés Device Full apparaît et il n est pas possible d ajouter un périphérique supplémentaire à la liste Dans ce cas supprimez les périphériques inutiles de la list page 113 x Registered Media Remote Devices Vous permet de vérifier la liste des périphériques Media Remote enregistrés Seuls les périphériques enregistrés sont autorisés à commander l ampli tuner Pour supprimer ...

Страница 252: ...puis appuyez sur 2 Sélectionnez Version puis appuyez sur La version du logiciel apparaît sur l écran du téléviseur Bluetooth Settings Vous pouvez définir les réglages Bluetooth x Pairing Vous permet d appairer le périphérique Bluetooth et l ampli tuner x BT Standby Veille Bluetooth Lorsque le mode BT Standby est réglé sur ON l ampli tuner peut être contrôlé par le périphérique Bluetooth même s il ...

Страница 253: ...ctionnez Input l affichage des réglages permettant d activer de désactiver chaque déclencheur d entrée apparaît Appuyez sur V v pour sélectionner l entrée puis appuyez sur pour l activer ou la désactiver HDMI A pour Main uniquement Permet d activer ou de désactiver la sortie du déclencheur 12V selon le réglage de la sortie de la prise HDMI OUT A HDMI B pour Main uniquement Permet d activer ou de d...

Страница 254: ...NU 3 Appuyez plusieurs fois sur V v pour sélectionner le menu de votre choix puis appuyez sur ou b 4 Appuyez plusieurs fois sur V v pour sélectionner le paramètre que vous souhaitez régler puis appuyez sur ou b 5 Appuyez plusieurs fois sur V v pour sélectionner le réglage de votre choix puis appuyez sur Pour revenir à l affichage précédent Appuyez sur B ou RETURN EXIT O Pour quitter le menu Appuye...

Страница 255: ...B Niveau de l enceinte centraleb CNT LEVEL CNT 10 0 dB à CNT 10 0 dB Intervalle de 0 5 dB CNT 0 dB Niveau de l enceinte surround gaucheb SL LEVEL SL 10 0 dB à SL 10 0 dB Intervalle de 0 5 dB SL 0 dB Niveau de l enceinte surround droiteb SR LEVEL SR 10 0 dB à SR 10 0 dB Intervalle de 0 5 dB SR 0 dB Niveau de l enceinte surround arrièreb SB LEVEL SB 10 0 dB à SB 10 0 dB Intervalle de 0 5 dB SB 0 dB ...

Страница 256: ...ST SL 1 00 m à SL 10 00 m SL 3 3 à SL 32 9 Intervalle de 0 1 mètre 1 pouce e SL 3 00 m SL 9 10 Distance de l enceinte surround droiteb SR DIST SR 1 00 m à SR 10 00 m SR 3 3 à SR 32 9 Intervalle de 0 1 mètre 1 pouce e SR 3 00 m SR 9 10 Distance de l enceinte surround arrièreb SB DIST SB 1 00 m à SB 10 00 m SB 3 3 à SB 32 9 Intervalle de 0 1 mètre 1 pouce e SB 3 00 m SB 9 10 Distance de l enceinte s...

Страница 257: ... enceintes avant TREBLE TREBLE 10 dB à TREBLE 10 dB Intervalle de 1 dB TREBLE 0 dB Réglages Tuner TUNER Mode de réception de stations FM FM MODE STEREO MONO STEREO Attribution d un nom aux stations préréglées NAME IN Pour plus d informations reportez vous à la section Attribution d un nom aux stations préréglées Name Input page 68 Réglages Audio AUDIO Digital Legato Linear D L L D L L AUTO2 D L L ...

Страница 258: ...mètre que si votre enceinte est réglée sur SMALL g Vous ne pouvez sélectionner ce paramètre que si vous sélectionnez HD D C S comme champ sonore h Vous ne pouvez sélectionner ce paramètre que si un périphérique Bluetooth est appairé Réglages HDMI HDMI Commande pour HDMI CTRL HDMI CTRL ON CTRL OFF CTRL OFF Pass Through PASS THRU ON OFF OFF Sortie audio AUDIO OUT AMP TV AMP AMP HDMI Zone2 OutB ZONE2...

Страница 259: ...es ont été saisis ou s il est identique au nom d entrée Il est possible que certaines informations du flux ne s affichent pas Remarque Il est possible que certains caractères ou signes ne s affichent pas pour certaines langues Conseil Vous ne pouvez pas basculer l afficheur lorsque l indication GUI MODE est visible sur le panneau de l afficheur Appuyez plusieurs fois sur GUI MODE pour sélectionner...

Страница 260: ...on Appuyez sur la touche programmée pour activer l entrée qui vous intéresse En cas d échec de la programmation vérifiez les points suivants Si la touche RM SET UP ne s allume pas à l étape 1 les piles sont épuisées Remplacez les deux piles Si la touche RM SET UP clignote rapidement 5 fois successives pendant la saisie du code numérique une erreur s est produite Recommencez à partir de l étape 1 U...

Страница 261: ...ASONIC 115 PHILIPS 116 PIONEER 117 TECHNICS 115 118 119 YAMAHA 120 121 122 Marque Code s SONY 203 PIONEER 219 Marque Code s SONY 201 202 DENON 204 205 KENWOOD 206 207 208 209 NAKAMICHI 210 PANASONIC 216 PHILIPS 211 212 PIONEER 213 214 TECHNICS 215 216 YAMAHA 217 218 Marque Code s SONY 301 DENON 302 JVC 303 KENWOOD 304 Marque Code s SONY 307 308 309 Marque Code s Marque Code s SONY 310 311 312 PANA...

Страница 262: ...C 517 MAGNAVOX 503 515 517 518 544 566 MARANTZ 527 MITSUBISHI MGA 503 519 527 544 566 568 NEC 503 517 520 540 544 554 566 NORDMENDE 530 558 NOKIA 521 522 573 575 PANASONIC 509 524 553 559 572 PHILIPS 515 518 557 570 571 PHILCO 503 504 514 517 518 PIONEER 509 525 526 540 551 555 PORTLAND 503 QUASAR 509 535 RADIO SHACK 503 510 527 565 567 RCA PROSCAN 503 510 523 529 544 SAMSUNG 503 515 517 531 532 5...

Страница 263: ...735 NEC 736 PANASONIC 729 730 737 738 739 740 PHILIPS 729 730 731 PIONEER 729 RCA PROSCAN 722 729 730 731 741 747 SAMSUNG 742 743 744 745 SANYO 717 720 746 SHARP 748 749 TOSHIBA 747 756 Marque Code s SONY 801 802 803 804 824 825 865 AMSTRAD 845 846 BskyB 862 GENERAL ELECTRIC GE 866 GRUNDIG 859 860 HUMAX 846 847 THOMSON 857 861 864 876 PACE 848 849 850 852 862 863 864 PANASONIC 818 855 PHILIPS 856 ...

Страница 264: ...uner assurez vous que sa tension de fonctionnement correspond à celle du secteur La tension de fonctionnement est indiquée sur la plaque signalétique au dos de l ampli tuner L appareil n est pas isolé de l alimentation secteur tant qu il reste branché à la prise murale même s il est éteint Débranchez l ampli tuner de la prise murale si vous ne comptez pas l utiliser pendant longtemps Pour débranch...

Страница 265: ...ouce N utilisez pas de tampons abrasifs de poudres à récurer ou de solvants tels que de l alcool ou de l essence À propos de la communication Bluetooth Les périphériques Bluetooth doivent être utilisés à une distance approximative de 10 mètres 33 pieds distance sans obstacle les uns des autres La portée de communication effective peut être plus courte dans les conditions suivantes Quand une person...

Страница 266: ...i tuner Les périphériques Bluetooth connectés à cet ampli tuner doivent être conformes à la spécification Bluetooth définie par Bluetooth SIG Inc et ils doivent être certifiés conformes Toutefois même si un périphérique est conforme à la spécification Bluetooth il peut arriver que le périphérique Bluetooth du fait de ses caractéristiques ou spécifications ne puissent pas être connecté ou induise d...

Страница 267: ...n fonction des prises disponibles sur les appareils raccordés Aucune image n apparaît sur le téléviseur Sélectionnez l entrée appropriée à l aide des touches d entrée Sélectionnez la prise HDMI OUT appropriée à l aide de la touche HDMI OUT Réglez votre téléviseur sur le mode d entrée approprié Éloignez vos appareils audio du téléviseur Affectez correctement l entrée de composante vidéo Le signal d...

Страница 268: ...rtent une protection contre la copie pour empêcher l enregistrement Dans ce cas il est possible que vous ne puissiez pas enregistrer depuis les sources Le menu GUI n apparaît pas sur l écran du téléviseur Appuyez plusieurs fois sur GUI MODE pour sélectionner GUI ON Si le menu GUI ne s affiche toujours sur l écran du téléviseur appuyez sur MENU Le menu GUI n apparaîtra pas sur le téléviseur en zone...

Страница 269: ...areil Si vous entendez les deux canaux par le casque il se peut que l enceinte avant ne soit pas correctement raccordée à l ampli tuner Vérifiez le raccordement de l enceinte avant qui n émet pas de son Assurez vous que vous avez raccordé les deux prises L et R d un appareil analogique ces appareils exigent le raccordement de ces deux prises Utilisez un cordon audio non fourni Réglez le niveau des...

Страница 270: ...ème Si le téléviseur n est pas doté de la fonction Commande du son du système réglez les paramètres Audio Out du menu HDMI Settings sur TV AMP si vous souhaitez écouter le son à partir de l enceinte du téléviseur et de l ampli tuner AMP si vous souhaitez écouter le son à partir de l ampli tuner Lorsque vous raccordez l ampli tuner à un appareil vidéo projecteur etc il est possible que le son ne so...

Страница 271: ...reil source à l aide des touches d entrée page 56 Les signaux d entrée audio via les prises HDMI IN et DIGITAL IN ne peuvent pas être enregistrés Les sources comportent une protection contre la copie pour empêcher l enregistrement Dans ce cas il est possible que vous ne puissiez pas enregistrer depuis les sources Un signal de test n est pas émis par les enceintes Il est possible que les cordons de...

Страница 272: ...nisation lors de la syntonisation directe de stations AM page 67 Aucune station n a été préréglée ou les stations préréglées ont été effacées lors de la syntonisation de stations avec la fonction de balayage des stations préréglées Préréglez les stations page 68 Appuyez sur AMP puis appuyez plusieurs fois sur DISPLAY sur la télécommande pour afficher la fréquence sur le panneau de l afficheur Le s...

Страница 273: ... charge page 62 Le périphérique USB ne fonctionne pas correctement Reportez vous au mode d emploi du périphérique USB pour savoir comment résoudre ce problème La lecture ne démarre pas Éteignez l ampli tuner et raccordez à nouveau le périphérique USB puis rallumez l ampli tuner Raccordez le périphérique USB pris en charge page 62 Appuyez sur N pour démarrer la lecture Le périphérique USB ne peut p...

Страница 274: ... sur WEP Configurez votre réseau après la recherche du point d accès à l aide du balayage des points d accès Un message d erreur s affiche Identifiez la nature de l erreur Reportez vous à Liste des messages relatifs aux fonctions réseau page 87 L ampli tuner ne peut pas se connecter au réseau Vérifiez l état du réseau Reportez vous à la section Pour vérifier les informations du réseau page 111 pui...

Страница 275: ...ssaire de modifier les réglages du pare feu afin de permettre la connexion de l ampli tuner Pour plus d informations sur la modification des réglages du pare feu reportez vous au mode d emploi fourni avec votre ordinateur Si vous avez initialisé l ampli tuner ou effectué une récupération système sur votre serveur définissez à nouveau les réglages du réseau page 74 Le serveur par exemple un ordinat...

Страница 276: ...ion en continu de musique à partir du serveur Vérifiez si le fichier audio sur le serveur est endommagé ou effacé Reportez vous au mode d emploi fourni avec le serveur Vous ne pouvez pas lire les plages suivantes Plage qui ne respecte pas les restrictions de lecture Plage contenant des informations de protection contre la copie anormales Plage que vous avez achetée auprès d un magasin de musique e...

Страница 277: ...twork Standby est réglé sur Off Réglez Network Standby est réglé sur On afin que l ampli tuner puisse répondre aux opérations d autres périphériques via un réseau page 114 Les périphériques sur le réseau ne peuvent pas allumer l ampli tuner L ampli tuner ne peut pas être allumé par l exécution d une commande Wake on LAN par d autres périphériques sur un réseau L ampli tuner ne peut pas lire la pla...

Страница 278: ... Internet limite votre connexion Internet à un périphérique à la fois ce périphérique ne pourra pas accéder à Internet si un autre y est déjà connecté Consultez votre opérateur ou votre fournisseur de services Internet Le son est entrecoupé La bande passante de votre réseau LAN sans fil est peut être trop faible Rapprochez l ampli tuner et le point d accès routeur LAN sans fil l un de l autre et v...

Страница 279: ...ommande pour HDMI est inopérante Vérifiez le raccordement HDMI page 28 Assurez vous que Ctrl for HDMI est réglé sur ON dans le menu HDMI Settings Assurez vous que Zone2 OutB est réglé sur OutB dans le menu HDMI Settings Assurez vous que HDMI OUT est réglé sur HDMI A page 97 Vérifiez que l appareil raccordé est compatible avec la fonction Commande pour HDMI Vérifiez les réglages de la fonction Comm...

Страница 280: ...supérieur de l ampli tuner vérifiez le raccordement des enceintes puis remettez sous tension l ampli tuner USB FAIL Une surtension au niveau du port USB a été détectée L ampli tuner s éteindra automatiquement après quelques secondes Vérifiez l iPod iPhone ou le périphérique USB puis débranchez le et remettez le sous tension Pour consulter d autres messages reportez vous à la section Liste des mess...

Страница 281: ...a source il se peut qu aucun son ne soit émis Réponse en fréquence Analogique 10 Hz à 100 kHz 0 5 2 dB avec dérivation du champ sonore et de l égaliseur Entrée Analogique Sensibilité 500 mV 50 kohms S B3 105 dB A 500 mV4 Numérique Coaxial Impédance 75 ohms S B 100 dB A 20 kHz filtre passe bas Numérique Optique S B 100 dB A 20 kHz filtre passe bas Sortie Analogique AUDIO OUT Tension 500 mV 1 kohm S...

Страница 282: ...s 4096 2160p 23 98 24 Hz a 3840 2160p 29 97 30 Hz a 3840 2160p 25 Hz a 3840 2160p 23 98 24 Hz a 1920 1080p 59 94 60 Hz a a a 1920 1080p 50 Hz a a a 1920 1080p 29 97 30 Hz a a a a 1920 1080p 25 Hz a a a a 1920 1080p 23 98 24 Hz a a a a 1920 1080i 59 94 60 Hz a a a a 1920 1080i 50 Hz a a a a 1280 720p 59 94 60 Hz a a a a 1280 720p 50 Hz a a a a 1280 720p 29 97 30 Hz a a a a 1280 720p 23 98 24 Hz a a...

Страница 283: ...2 Portée de communication maximale Champ de réception environ 10 m1 Bande de fréquences Bande 2 4 GHz 2 4000 GHz à 2 4835 GHz Méthode de modulation FHSS Freq Hopping Spread Spectrum Profils compatibles Bluetooth2 A2DP Advanced Audio Distribution Profile AVRCP 1 3 Audio Video Remote Control Profile Codecs pris en charge3 SBC4 Plage de transmission A2DP 20 Hz à 20 000 Hz Fréquence d échantillonnage ...

Страница 284: ...fm masterpage Left STR DA1800ES 4 428 194 12 2 Dimensions largeur hauteur profondeur environ 430 mm 158 mm 322 6 mm 17 po 6 1 4 po 12 3 4 po parties saillantes et commandes comprises Poids environ 9 1 kg 20 livres 1 onces La conception et les spécifications sont sujettes à modifications sans préavis ...

Страница 285: ... accès 91 Commande du son du système 95 Commande Home Cinéma 96 Commande pour HDMI 110 120 Compression de gamme dynamique 107 117 Configuration d enceintes 105 118 Conversion ascendante 20 Coupure du son 57 D D L L Digital Legato Linear 109 DCAC DigitalCinema Auto Calibration 44 Device Name 113 Direct Tuning 67 Distance Unit 108 118 DLNA 74 Dolby Digital EX 21 DTS 11 Dual Mono 109 119 E Effacer mé...

Страница 286: ...0 Périphérique USB 62 PlayStation 3 34 Prérégler des stations 68 PROTECTOR 142 Puissance du signal LAN sans fil 11 R Raccordement antennes 38 appareils audio 37 appareils vidéo 28 enceintes 24 Filaire 40 iPod iPhone 35 Périphérique USB 38 Réseau 39 Sans fil 40 téléviseur 26 Raccordement de bi amplification 100 Recherche alphabétique 15 Réglages Auto Calibration 117 Réinitialisation 42 Réseau domes...

Страница 287: ...de composants Le LOGICIEL SONY est concédé sous licence en tant que produit unique Vous n êtes pas autorisé à dissocier ses composants Usage sur un PRODUIT unique Le LOGICIEL SONY ne peut être utilisé que sur un seul PRODUIT Location Vous n êtes pas autorisé à louer ou proposer en location bail le LOGICIEL SONY Cession du logiciel Vous pouvez céder définitivement tous vos droits en vertu du présen...

Страница 288: ...s ne seront pas endommagés par le LOGICIEL SONY LIMITATION DE RESPONSABILITÉ SONY SES FOURNISSEURS ET SES CONCÉDANTS DE LICENCES désignés collectivement dans la présente SECTION SEULEMENT par SONY NE SAURAIENT ÊTRE TENUS RESPONSABLES DES DOMMAGES ACCESSOIRS OU CONSÉCUTIFS RÉSULTANT D UNE UTILISATION DU LOGICIEL SONY CONTREVENANT AUX CONDITIONS DE TOUTE GARANTIE EXPLICITE OU IMPLICITE D UNE VIOLATI...

Отзывы: