


1-24
98
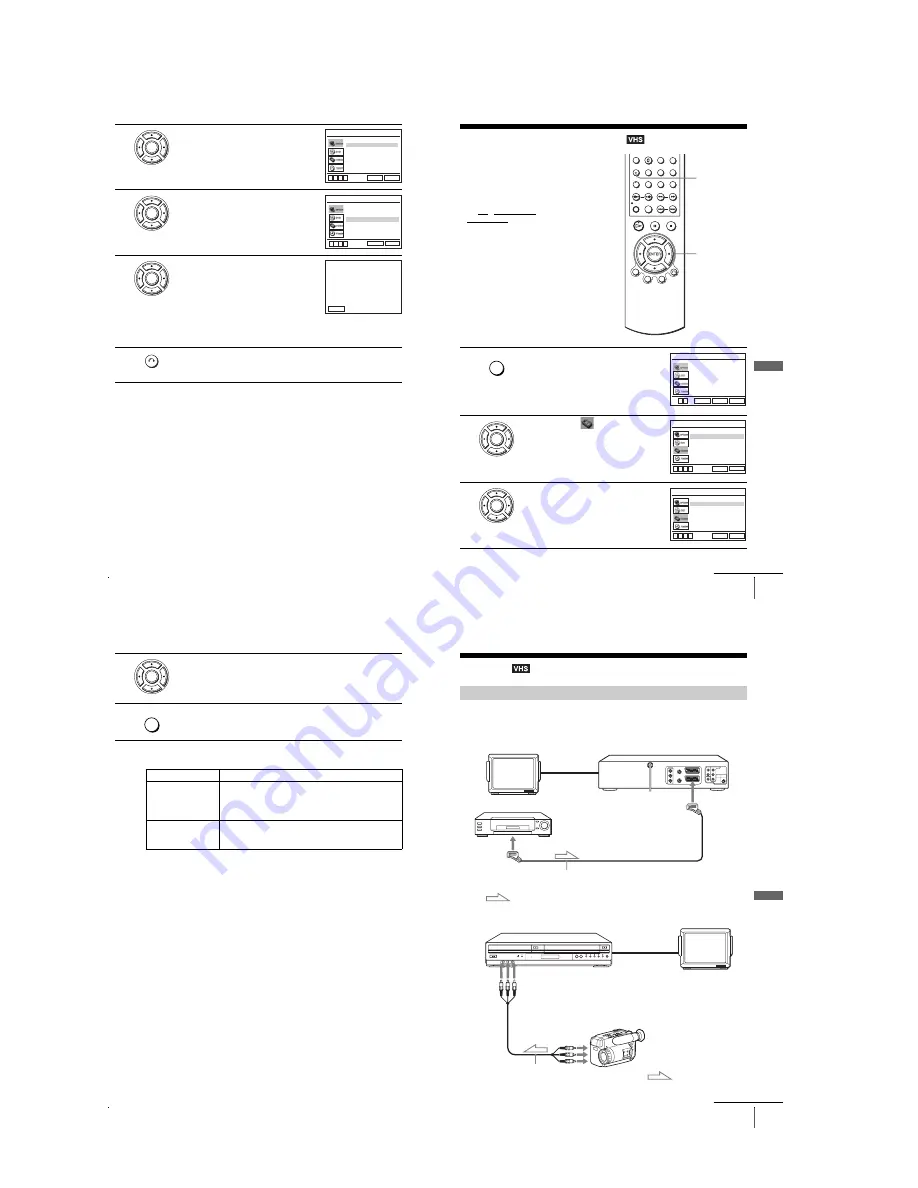
Adjusting the picture (tracking)
2
Press
V/v
to select “User Set,” then press
ENTER.
3
Press
V/v
to select “Smart Trilogic,” then
press
b
.
4
Press
V/v
to set “SMART TRILOGIC” to
“ON” or “OFF.”
• ON: Picture sharpness is automatically
adjusted.
• OFF: Adjust the picture sharpness
manually.
To soften the picture, press
B
.
To sharpen the picture, press
b
.
5
Press
O
RETURN to return to the original screen.
ENTER
NICAM
Colour System
VideoPlus Extend
Smart Trilogic
[ Off ]
RETURN
USER SET
SET UP
v
V
b
B
[ On ]
[ On ]
[ Auto ]
ENTER
NICAM
Colour System
VideoPlus Extend
Smart Trilogic
RETURN
USER SET
SET UP
v
V
b
B
[ Off ]
[ On ]
[ On ]
[ Auto ]
ENTER
SHARPEN
SOFTEN
– – – – – – – – – – –
*
– – – – – – – –
PICTURE
SMART TRILOGIC : ON
ON / OFF :
V
v
RETURN
RETURN
99
Changing menu options
VCR Ad
ditio
nal Ope
ration
s
Changing menu options
You can change the tape length, auto play
and auto repeat settings for the VCR.
Normally the default settings are used.
Change these settings if necessary.
Before you start...
• Set TV / DVD·VIDEO switch to
DVD·VIDEO on the remote (page 10).
1
Press SET UP when the DVD player is in stop
mode.
2
Press
V/v
to select
(VIDEO) and press
ENTER.
3
Press
V/v
to select the option to change.
V/v/B/b
ENTER
SET UP
SET UP
Language
Install
Auto Power Off
Screen Messages
Power Save
User Set
Clock
:English
[ Off ]
[ Off ]
[ On ]
RETURN
OPTION
SET UP
ENTER
v
V
ENTER
Tape Select
Repeat Play
RETURN
VIDEO SETUP
SET UP
v
V
b
B
[ E180 ]
[ Off ]
ENTER
Tape Select
Repeat Play
RETURN
VIDEO SETUP
SET UP
v
V
b
B
[ E180 ]
[ Off ]
continued
100
Changing menu options
Menu choices
The default settings are indicated in bold print.
4
Press
B/b
to change the setting.
5
Press SET UP to exit the menu.
Menu option
Set this option to
Tape Select
• “
E180
” to use an E-180 or shorter type tape.
• “E240” to use an E-240 type tape.
• “E260” to use an E-260 type tape.
• “E300” to use an E-300 type tape.
Repeat Play
• “On” to play back a tape repeatedly. The VCR rewinds a tape
to the beginning and restarts playback automatically.
• “
Off
” to turn off Auto repeat.
ENTER
SET UP
101
Editing
VCR Ad
ditio
nal Ope
ration
s
Editing
Connect the line outputs of the other VCR to the input connector of this VCR. Refer to the
examples A through C and choose the connection that best suits your VCR.
Example A
Example B
How to connect to record on this VCR
TV
LINE-1 (EURO AV)
Scart cable (not supplied)
Scart
(EURO-AV)
: Signal flow
Your VCR (Recorder)
Other VCR (Player)
TV
Audio/video cord
(not supplied)
LINE OUT
Your VCR (Recorder)
Other VCR (Player)
: Signal flow
LINE-2 IN
t
/
o
L/R
continued
Содержание RMT-V503C
Страница 40: ...1 30E MEMO ...
Страница 43: ...2 3 Fig 2 7 Circuit Board Locations 2 2 CIRCUIT BOARD LOCATIONS VHS MAIN PCB DVD MAIN PCB FUNCTION TIMER PCB ...
Страница 68: ...3 4E MEMO ...
Страница 69: ...4 2 4 1 4 PCB Diagrams 4 1 VCR Main 4 3 4 2 DVD Main 4 7 4 3 Function Timer 4 11 SLV D973P E D983P D D983P GI ...
Страница 70: ...4 4 4 3 4 1 VCR Main COMPONENT SIDE ...
Страница 71: ...4 6 4 5 CONDUCTOR SIDE ...
Страница 72: ...4 8 4 7 4 2 DVD Main COMPONENT SIDE ...
Страница 73: ...4 10 4 9 CONDUCTOR SIDE ...
Страница 74: ...4 12E 4 11 4 3 Function Timer COMPONENT SIDE CONDUCTOR SIDE ...
Страница 76: ...5 4 5 3 5 1 S M P S ...
Страница 77: ...5 6 5 5 5 2 Power Drive ...
Страница 78: ...5 8 5 7 5 3 VPS PDC ...
Страница 79: ...5 10 5 9 5 4 A2 NICAM ...
Страница 80: ...5 12 5 11 5 5 A V ...
Страница 81: ...5 14 5 13 5 6 Hi Fi ...
Страница 82: ...5 16 5 15 5 7 I O ...
Страница 83: ...5 18 5 17 5 8 TM ...
Страница 84: ...5 9 Syscon 5 20 5 19 ...
Страница 85: ...5 22 5 21 5 10 Function Timer ...
Страница 86: ...5 11 DVD Decoder Servo 5 24 5 23 ...
Страница 87: ...5 26 5 25 5 12 DVD A V ...
Страница 88: ...5 13 Function Timer 5 28E 5 27 ...
Страница 90: ...6 2 TEST TEST BUTTON ...
Страница 100: ...6 12E MEMO ...


