


1-18
77
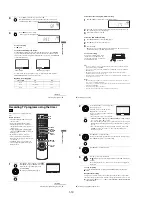
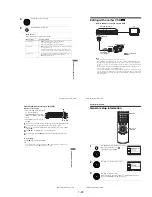
Using the DVD’s menu
DV
D Ad
diti
onal
O
p
eratio
ns
To turn off the DVD’s menu
Press
x
STOP
Note
• Depending on the DVD, you may not be able to use the TOP MENU button or search a point
by setting the time.
3
Press ENTER.
78
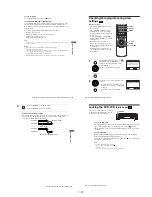
Zooming into a scene
Zooming into a scene
Notes
• You cannot use 4
×
magnification when you play VIDEO CDs.
• The zoom function may not work depending on the DVD.
You can zoom into a scene during playback
or still mode. To zoom into a JPEG image,
see “Playing JPEG image files” on page 93.
1
Press ZOOM.
“
” appears.
2
Press
V/v/B/b
to move “
” to the position where you want to zoom in.
3
Press ENTER repeatedly to change the magnification.
Each time you press the button, the magnification changes as shown below.
2
×
t
4
×
t
2
×
t
normal magnification
ZOOM
V/v/B/b
ENTER
79
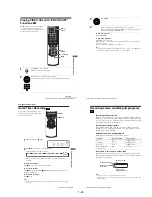
Changing the angles
DV
D Ad
diti
onal
O
p
eratio
ns
Changing the angles
Note
• Check the user’s manual of the purchased disc to determine whether it supports angle
operation. However, note that angle operation may not be possible for some discs.
If various angles (multi-angles) for a scene
are recorded on the DVD, “
” appears in
the display when you press ANGLE during
playback. This means that you can change
the viewing angle.
1
Press ANGLE during playback.
The angle number appears on the display.
The number after the slash indicates the total
number of angles.
2
Press
B/b
repeatedly to select the angle number.
The scene changes to the selected angle.
ANGLE
B/b
b
B
80
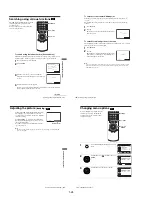
Displaying the subtitle
Displaying the subtitle
To turn off the subtitles
Select “Off” in step 3.
Note
• Depending on the DVD, you may not be able to change the subtitles even if multilingual
subtitles are recorded on it. You also may not be able to turn them off.
If subtitles are recorded on the disc, you can
change the subtitles or turn them on and off
whenever you want while playing a DVD.
1
Press SUBTITLE during playback.
2
Press
B/b
repeatedly to select the language.
Depending on the DVD, the choice of language varies.
Refer to “DVD Audio/Subtitle Language” on page 125 for the abbreviation
of the language.
3
Press
V/v
repeatedly to select “On.”
SUBTITLE
V/v/B/b
v
V
b
B
Содержание RMT-V501C
Страница 10: ... 10 MEMO ...
Страница 43: ...2 3 Fig 2 7 Circuit Board Locations 2 2 CIRCUIT BOARD LOCATIONS DVD MAIN PCB FUNCTION PCB VCR MAIN PCB ...
Страница 67: ...3 BLOCK DIAGRAM 3 2 3 1 SLV D350P D550P ...
Страница 68: ...3 4E MEMO ...
Страница 70: ...4 3 4 4 4 1 VCR MAIN FUNCTION TIMER COMPONENT SIDE ...
Страница 71: ...4 6 4 5 CONDUCTOR SIDE ...
Страница 72: ...4 7 4 8 COMPONENT SIDE CONDUCTOR SIDE 4 2 DVD MAIN ...
Страница 73: ...4 10 4 9 4 3 DIAL TIMER SLV D550P Only COMPONENT SIDE CONDUCTOR SIDE ...
Страница 74: ...4 12E MEMO ...
Страница 76: ... BLOCK IDENTIFICATION OF MAIN PCB 5 3 5 4 Component Side Conductor Side VCR MAIN PCB ...
Страница 77: ...5 1 S M P S 5 6 5 5 ...
Страница 78: ...5 2 POWER DRIVE 5 7 5 8 ...
Страница 79: ...5 3 LOGIC FUNCTION TIMER 5 10 5 9 ...
Страница 80: ...5 4 A V 5 11 5 12 ...
Страница 81: ...5 5 Hi Fi MTS 5 14 5 13 ...
Страница 82: ...5 6 INPUT OUTPUT 5 15 5 16 ...
Страница 83: ...5 7 DVD 5 18 5 17 ...
Страница 84: ...MEMO 5 20E ...
Страница 112: ...7 18E MEMO ...