background image

Additional Information

39

GB

STR-DE485    4-238-376-51(1) GB

There is no sound from a specific component.

• Check that the component is connected correctly

to the audio input jacks for that component.

• Check that the cord(s) used for the connection is

(are) fully inserted into the jacks on both the
receiver and the component.

• Check that you have selected the correct

component on the receiver.

There is no sound from one of the front
speakers.

Connect a pair of headphones to the PHONES jack
to verify that sound is output from the headphones
(page 21).

If only one channel is output from the headphones,
the component may not be connected to the
receiver correctly. Check that all the cords are fully
inserted into the jacks on both the receiver and the
component.

If both channels are output from the headphones,
the front speaker may not be connected to the
receiver correctly. Check the connection of the
front speaker which is not outputting any sound.

The left and right sounds are unbalanced or
reversed.

• Check that the speakers and components are

connected correctly and securely.

• Adjust balance parameters in the LEVEL menu.

There is severe hum or noise.

• Check that the speakers and components are

connected securely.

• Check that the connecting cords are away from a

transformer or motor, and at least 3 meters away
from a TV set or fluorescent light.

• Move your TV away from the audio components.

• The plugs and jacks are dirty. Wipe them with a

cloth slightly moistened with alcohol.

There is no sound or only a very low level sound
is heard from the center or/and surround
speaker.

• Make sure the sound field function is on (press

MODE).

• Select a sound field containing the word

“C.ST.EX” (pages 24).

• Adjust the speaker level (page 20).

• Make sure the center or/and surround speaker

size parameter is set to either “SMALL” or
“LARGE” (page 17).

There is no sound from the active sub woofer.

There is no sound output from the SUB WOOFER
terminal depending on the sound field (page 44).

The surround effect cannot be obtained.

Make sure the sound field function is on (press
MODE).

Dolby Digital or DTS multi channel sound is not
reproduced.

• Check that the playing DVD, etc. is recorded in

Dolby Digital or DTS format.

• When connecting the DVD player, etc. to the

digital input jacks of this receiver, check the
audio setting (settings for the audio output) of the
connected component.

Recording cannot be done.

• Check that the components are connected

correctly.

• Select the source component with function

buttons.

• Make sure that INPUT MODE is set to

“ANALOG” (page 21) before recording from a
digital component connected to the analog
MD/TAPE terminals.

To connect an LD player via an RF demodulator.

Connect the LD player to the RF demodulator,
then connect the RF demodulator’s optical or
coaxial digital output to the receiver’s jack. When
making this connection, be sure to set INPUT
MODE manually (page 21). The receiver may not
operate correctly if INPUT MODE is set to
“AUTO IN”.
For details on DOLBY DIGITAL RF hookups, see
the operating instructions supplied with your RF
demodulator.

continued

01GB11ADDCEL.p65

4/15/02, 5:09 PM

39

Содержание RM-U306

Страница 1: ...STR DE485 4 238 376 51 1 GB FM Stereo FM AM Receiver 4 238 376 51 1 STR DE485 2002 Sony Corporation Operating Instructions GB CS 01CS01COVCEL p65 4 15 02 5 11 PM 1 ...

Страница 2: ...f it correctly as chemical waste Do not install the appliance in a confined space such as a bookcase or built in cabinet ENERGY STAR is a U S registered mark As an ENERGY STAR partner Sony Corporation has determined that this product meets the ENERGY STAR guidelines for energy efficiency This receiver incorporates Dolby Digital and Pro Logic Surround and the DTS Digital Surround System Manufacture...

Страница 3: ...coding the input audio signal 23 Selecting a sound field 23 Using only the front speakers 2 Channel Stereo 25 Understanding the multi channel surround displays 26 Customizing sound fields 27 Receiving Broadcasts Direct tuning 29 Automatic tuning 29 Preset tuning 30 Other Operations Naming preset stations and program sources 31 Recording 31 Using the Sleep Timer 32 Adjustments using the SET UP butt...

Страница 4: ...RESS POWER KEY WHILE THIS MESSAGE APPEARS IN THE DISPLAY THANK YOU To cancel the demonstration Press 1 to turn the receiver off while the above message is being displayed The next time you turn the receiver on the demonstration will not appear To view the demonstration Hold down SET UP and press 1 to turn on the power Notes Running the demonstration will clear the receiver s memory For details on ...

Страница 5: ...ENU e 16 27 31 32 MENU ea 16 27 31 32 MODE wj 24 39 MULTI CHANNEL DECODING indicator 7 21 MULTI CH IN qf 21 MUTING wf 21 38 N S NAME 8 31 PHONES jack ek 21 PRESET TUNING 3 30 SET UP 6 4 16 32 43 SHIFT eg 30 SURR qd 27 43 T Z TREBLE qh 28 43 TUNER ws 21 29 31 TUNING 5 29 VIDEO 1 qk 21 VIDEO 2 w 21 BUTTON DESCRIPTIONS 1 power 1 4 15 20 28 ALPHABETICAL ORDER 0 9 2 CH wh 25 A D A DEC wk 23 25 AM es 29...

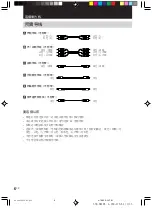
Страница 6: ... you get started Turn off the power to all components before making any connections Do not connect the AC power cord until all of the connections are completed Be sure to make connections firmly to avoid hum and noise When connecting an audio video cord be sure to match the color coded pins to the appropriate jacks on the components yellow video to yellow white left audio to white and red right au...

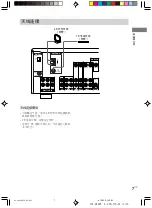
Страница 7: ...onents Be sure to fully extend the FM wire antenna After connecting the FM wire antenna keep it as horizontal as possible IN OUT IN CD MD TAPE R L SUB WOOFER MULTI CH IN FRONT SURROUND R L CENTER ANTENNA AM FM 75Ω COAXIAL DVD LD IN COAXIAL AUDIO IN AUDIO IN AUDIO OUT AUDIO OUT AUDIO IN VIDEO 1 VIDEO IN VIDEO IN VIDEO OUT VIDEO IN VIDEO OUT DVD LD MONITOR VIDEO 2 SUB WOOFER OPTICAL VIDEO 2 IN DIGIT...

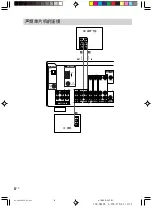
Страница 8: ...PTICAL VIDEO 2 IN DIGITAL LINE L R OUTPUT A IN OUT LINE L R LINE INPUT OUTPUT ç ç A A IN OUT IN CD MD TAPE R L AUDIO IN AUDIO IN AUDIO OUT AUDIO OUT AUDIO IN VIDEO 1 VIDEO IN VIDEO IN VIDEO OUT VIDEO IN VIDEO OUT DVD LD MONITOR VIDEO 2 SUB WOOFER Audio component hookups MD Tape deck CD player 01GB03HUPCEL p65 4 15 02 5 02 PM 8 ...

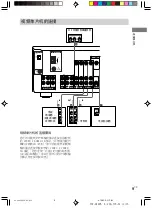
Страница 9: ...1 VIDEO IN VIDEO IN VIDEO OUT VIDEO IN VIDEO OUT DVD LD MONITOR VIDEO 2 SUB WOOFER Video component hookups TV monitor DVD or LD player Note on video component hookups You can connect your TV s audio output jacks to the VIDEO 2 AUDIO IN jacks on the receiver and apply sound effects to the audio from the TV In this case do not connect the TV s video output jack to the VIDEO 2 VIDEO IN jack on the re...

Страница 10: ...nd of a movie theater into your home To fully enjoy multi channel surround sound five speakers two front speakers two surround speakers and a center speaker and a sub woofer are required You can also connect an LD player with an RF OUT jack via an RF demodulator like the Sony MOD RF1 not supplied Notes You cannot connect an LD player s DOLBY DIGITAL RF OUT jack directly to this unit s digital inpu...

Страница 11: ...tal and DTS If your DVD player is equipped with multi channel output jacks you can connect them directly to the receiver to enjoy the sound of the DVD player s multi channel decoder Alternatively the multi channel input jacks can be used to connect an external multi channel decoder To fully enjoy multi channel surround sound five speakers two front speakers two surround speakers and a center speak...

Страница 12: ...a wall outlet connect the speaker system to the receiver page 13 Connect the AC power cord s of your audio video components to a wall outlet Other hookups b FRONT CENTER SURROUND R L R L R L R L SPEAKERS SPEAKERS IMPEDANCE USE 8 16Ω IMPEDANCE USE 8 16Ω AC power cord To a wall outlet 01GB04HUPCEL p65 4 15 02 5 02 PM 12 ...

Страница 13: ...T MONITOR E e E e A A INPUT AUDIO IN B E e E e E e A A A IMPEDANCE USE 8 16Ω Hooking Up and Setting Up the Speaker System Front speaker L Front speaker R Center speaker Surround speaker L Surround speaker R Active sub woofer continued Speaker system hookups Required cords A Speaker cords not supplied B Monaural audio cord not supplied Black Black 01GB05HUPCEL p65 4 15 02 5 04 PM 13 ...

Страница 14: ...iver Examples of poor conditions of the speaker cord Stripped speaker cord is touching another speaker terminal Stripped cords are touching each other due to excessive removal of insulation After connecting all the components speakers and AC power cord output a test tone to check that all the speakers are connected correctly For details on outputting a test tone see page 20 If no sound is heard fr...

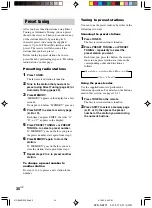
Страница 15: ...ctory settings All index names of preset stations and program sources are cleared All SET UP parameters are reset to their factory settings The sound field memorized for each program source and preset stations are cleared The master volume is set to VOL MIN Performing initial setup operations Before using your receiver for the first time adjust SET UP parameters so that the receiver correspond to ...

Страница 16: ...Tip The setting for Micro Satellite Speaker MICRO SP has been programmed to optimize the sound balance If you use Sony s Micro Satellite Speakers select MICRO SP Caution When you use Micro Satellite Speakers and the speaker size is set to LARGE you may not obtain the correct soundstage The speaker may also be damaged at high volume position Specifying the speaker parameters 1 Press SET UP 2 Press ...

Страница 17: ...t will effectively reproduce bass frequencies select LARGE Normally select LARGE However if the front speakers are set to SMALL you cannot set the surround speakers to LARGE If the sound is distorted or you feel a lack of surround effects when using multi channel surround sound select SMALL to activate the bass redirection circuitry and output the surround channel bass frequencies from the sub woo...

Страница 18: ...larger sound stage Adjusting these parameter while listening to the sound often results in much better surround sound Give it a try x Sub woofer selection SW S W XXX If you connect a sub woofer select YES If you do not connect a sub woofer select NO This activates the bass redirection circuitry and outputs the LFE signals from other speakers In order to take full advantage of the Dolby Digital bas...

Страница 19: ...not as critical as other modes All modes with virtual elements were designed under the premise that the surround speaker would be located behind the listening position but presentation remains fairly consistent even with the surround speakers positioned at a rather wide angle However if the speakers are pointing towards the listener from the immediate left and right of the listening position the s...

Страница 20: ...OLUME on the main unit or press MASTER VOL on the remote Notes The test tone cannot be output when the receiver is set to MULTI CH IN The adjusted value are shown in the display during adjustment Although these adjustments can also be made via the front panel using the LEVEL menu when the test tone is output the receiver switches to the LEVEL menu automatically we recommend you follow the procedur...

Страница 21: ...ignals analog is selected COAX IN Specify the digital audio signals input to the DIGITAL COAXIAL input jacks Select To OPT IN Specify the digital audio signals input to the DIGITAL OPTICAL input jacks ANALOG Specify the analog audio signals input to the AUDIO IN L R jacks Note If 96 kHz digital signal is input the tone sound field and surround parameters do not function MULTI CH IN Press MULTI CH ...

Страница 22: ...et station t Frequency t Sound field applied to the band or the preset station Index name appears only when you have assigned one to the component or preset station page 31 Index name does not appear when only blank spaces have been entered or it is the same as the function DIMMER Press DIMMER repeatedly to adjust the brightness of the display 3 steps However when you press any button the display ...

Страница 23: ...electing a sound field You can enjoy surround sound simply by selecting one of the pre programmed sound fields according to the program you want to listen to Sound field Display Normal Surround NORM SURR Cinema Studio EX A C ST EX A D C S Cinema Studio EX B C ST EX B D C S Cinema Studio EX C C ST EX C D C S Hall HALL Jazz Club JAZZ Live Concert CONCERT Game GAME About DCS Digital Cinema Sound The ...

Страница 24: ...om by shifting the sound of the front speakers into the screen Cinema Studio Reverberation Reproduces the reverberations peculiar to a movie theater Cinema Studio EX is the integrated mode which operates these elements simultaneously Tip You can select Cinema Studio EX by pressing MODE repeatedly Notes The effects provided by the virtual speakers may cause increased noise in the playback signal Wh...

Страница 25: ...urned off Using only the front speakers 2 Channel Stereo Press 2CH 2CH ST appears in the display This mode outputs the sound from the front left and right speakers only Standard 2 channel stereo sources completely bypass the sound field processing Multi channel surround formats are downmixed to 2 channel Notes No sound is output from the sub woofer when 2CH ST is selected To listen to 2 channel st...

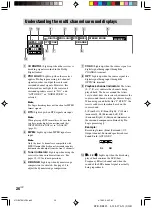
Страница 26: ... disc being played back contains the LFE Low Frequency Effect channel and when the sound of the LFE channel signal is actually being reproduced 1 DIGITAL Lights up when the receiver is decoding signals recorded in the Dolby Digital format 2 PRO LOGIC Lights up when the receiver applies Pro Logic processing to 2 channel signals in order to output the center and surround channel signals However this...

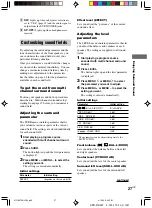
Страница 27: ...ound 2 Press SURR The button lights up and the first parameter is displayed 3 Press MENU or MENU to select the setting you want The setting is entered automatically Initial settings Parameter Initial setting EFFECT depends on the sound field Effect level EFFECT Lets you adjust the presence of the current surround effect Adjusting the level parameters The LEVEL menu contains parameters that let you...

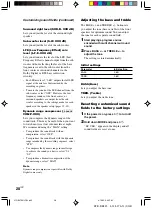
Страница 28: ...requency Effect channel output from the sub woofer without effecting the level of the bass frequencies sent to the sub woofer from the front center or surround channels via the Dolby Digital or DTS bass redirection circuitry For LFE mix level 0 dB outputs the full LFE signal at the mix level determined by the recording engineer To mute the sound of the LFE channel from the sub woofer select OFF Ho...

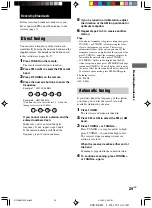
Страница 29: ...last received station is tuned in 2 Press FM or AM to select the FM or AM band 3 Press TUNING or TUNING Press TUNING to scan from low to high press TUNING to scan from high to low The receiver stops scanning whenever a station is received When the receiver reaches either end of the band Scanning is repeated in the same direction 4 To continue scanning press TUNING or TUNING again Before receiving ...

Страница 30: ... number If MEMORY goes out before you press the preset number start again from step 3 6 Press MEMORY again to store the station If MEMORY goes out before you can store the station start again from step 3 7 Repeat steps 2 to 6 to preset another station To change a preset number to another station Do steps 1 to 6 to preset a new station to the number nA1 A2 A0 B1 B2 B0N nC0 C2 C1N Tuning to preset s...

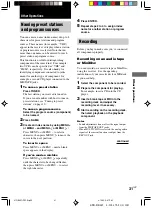
Страница 31: ...NU Press MENU or MENU to select a character then press MENU to move the cursor to the next position To insert a space Press MENU or MENU until a blank space appears in the display If you ve made a mistake Press MENU or MENU repeatedly until the character to be changed flashes then press MENU or MENU to select the right character 4 Press ENTER 5 Repeat steps 2 to 4 to assign index name for another ...

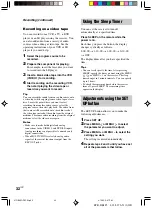
Страница 32: ... DVD player or an LD player using the receiver You can also add audio from a variety of audio sources when editing a video tape See the operating instructions of your VCR or LD player if you need help 1 Select the program source to be recorded 2 Prepare the component for playing For example insert the laser disc you want to record into the LD player 3 Insert a blank video tape into the VCR VIDEO 1...

Страница 33: ... settings Parameter Initial setting C MODE AVX AV2 x Selecting the command mode of the remote C MODE AVX Lets you select the command mode of the remote Change the command mode when you use 2 Sony receivers in the same room 01GB09OPECEL p65 4 15 02 5 07 PM 33 ...

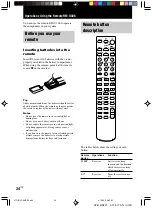
Страница 34: ...ect sunlight or lighting apparatuses Doing so may cause a malfunction If you don t use the remote for an extended period of time remove the batteries to avoid possible damage from battery leakage and corrosion Remote button description N X m M 1 2 3 4 5 6 7 8 0 9 MD TAPE CD TUNER TV VIDEO VIDEO 2 VIDEO 1 DVD LD SYSTEM STANDBY 10 SHIFT CH PRESET ANT TV VTR SOUND FIELD MASTER VOL TEST TONE MAIN MENU...

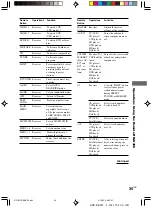
Страница 35: ...tellite tuner disc or track using the LD player numeric buttons press to MD deck enter the value DAT deck Tape deck Remote Operations Function Button VIDEO 1 Receiver To watch VCR VTR mode 3 VIDEO 2 Receiver To watch VCR VTR mode 1 DVD LD Receiver To watch DVD or laser disc MD TAPE Receiver To listen to Minidisc or audio tape CD Receiver To listen to compact disc TUNER Receiver To listen to radio ...

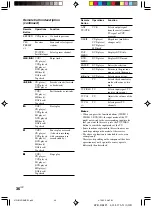
Страница 36: ...ome functions explained in this section may not work depending on the model of the receiver The above explanation is intended to serve as an example only Therefore depending on the component the above operation may not be possible or may operate differently than described Remote Operations Function Button RETURN VCD player Go back to previous menu CH Receiver Scans and selects preset PRESET statio...

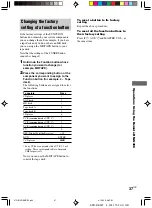
Страница 37: ... component you want to assign to the Function button for example 4 Tape deck The following buttons are assigned to select the functions To operate Press CD player 1 DAT deck 2 MD deck 3 Tape deck A 4 Tape deck B 5 LD player 6 VCR command mode VTR 1 7 VCR command mode VTR 2 8 VCR command mode VTR 3 9 TV 0 DSS Digital Satellite Receiver 10 DVD ENTER VCD player Sony VCRs are operated with a VTR 1 2 o...

Страница 38: ...outlet even if the receiver itself has been turned off If you are not going to use the receiver for a long time be sure to disconnect the receiver from the wall outlet To disconnect the AC power cord grasp the plug itself never pull the cord Models of area code U CA only One blade of the plug is wider than the other for the purpose of safety and will fit into the wall outlet only one way If you ar...

Страница 39: ... slightly moistened with alcohol There is no sound or only a very low level sound is heard from the center or and surround speaker Make sure the sound field function is on press MODE Select a sound field containing the word C ST EX pages 24 Adjust the speaker level page 20 Make sure the center or and surround speaker size parameter is set to either SMALL or LARGE page 17 There is no sound from the...

Страница 40: ...ed when tuning by scanning preset stations Preset the stations page 30 Press DISPLAY so that the frequency appears in the display There is no picture or an unclear picture appears on the TV screen or monitor Select the appropriate function on the receiver Set your TV to the appropriate input mode Move your TV away from the audio components The remote does not function Point the remote at the remot...

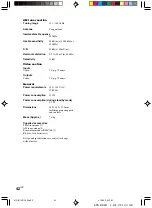
Страница 41: ...edance S N 100 dB A 20 kHz LPF Voltage 250 mV Impedance 10 kilohms Voltage 2 V Impedance 1 kilohms 10 Hz 50 kHz 0 5 2 dB with sound field and tone bypassed Sensitivity 250 mV Impedance 50 kilohms S N4 96 dB A 250 mV5 Specifications Amplifier section POWER OUTPUT Rated Power Output at Stereo Mode 8 ohms 1 kHz THD 0 7 80 W 80 W1 70 W 70 W2 Reference Power Output1 8 ohms 1 kHz THD 10 FRONT3 100 W ch ...

Страница 42: ...ion Inputs Video 1 Vp p 75 ohms Outputs Video 1 Vp p 75 ohms General Power requirements 220 230 V AC 50 60 Hz Power consumption 155 W Power consumption during standby mode 0 5 W Dimensions 430 145 298 mm including projecting parts and controls Mass Approx 7 0 kg Supplied accessories FM wire antenna 1 AM loop antenna 1 Remote commander RM U306 1 R6 size AA batteries 2 Design and specifications are ...

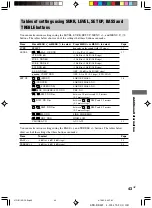
Страница 43: ...dB 10 dB to 10 dB 1 dB steps L F E XXX dB OFF 20 dB to 0 dB 1 dB steps D RANGE COMP XXX OFF 0 1 to 0 9 0 1 steps STD MAX SET UP L R FRONT LARGE SMALL 16 C CENTER LARGE SMALL NO SL SR SURROUND LARGE SMALL NO SW SUB WOOFER S W XXX YES NO L R DIST XX X m between 1 0 meters and 12 0 meters 0 1 meters steps C DIST XX X m between L R DIST and 1 5 meters 0 1 meters steps SL SR DIST XX X m between L R DIS...

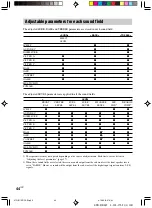
Страница 44: ...in Adjusting the level parameters page 27 2 When these sound fields are selected there is no sound output from the sub woofer if the front speaker size is set to LARGE However sound will be output from the sub woofer if the digital input signal contains L F E signals SURR BASS TREBLE EFFECT LEVEL 2CH ST z z AUTO DEC z z NORM SURR z z C ST EX A z z z C ST EX B z z z C ST EX C z z z HALL z z z JAZZ ...

Страница 45: ...Additional Information 45GB STR DE485 4 238 376 51 1 GB 01GB11ADDCEL p65 4 16 02 8 37 AM 45 ...

Страница 46: ...ó çêéçê íáçå bkbodv pq o VPM G EaçäÄóG aáÖáí äF Emêç içÖáÅ pìêêçìåÇF aqpGG EaqpGG aáÖáí ä pìêêçìåÇ póëíÉãF G EaçäÄó i Äçê íçêáÉëF açäÄó mêç içÖáÅ a GG aqp aqp aáÖáí ä pìêêçìåÇ EaáÖáí ä qÜÉ íÉê póëíÉãëI fåÅKF 02CS02TOCCEL p65 4 15 02 5 12 PM 2 ...

Страница 47: ...KKKKKKKKKKKKKKKKKKKK OO KKKKKK OP KKKKKKKKKKKKKKKKKKKKKK OP EO F K OR KKKKKKKK OS KKKKKKKKKKKKKKKKKKKKKK OT KKKKKKKKKKKKKKKKKKKKKK OV KKKKKKKKKKKKKKKKKKKKKK OV KKKKKKKKKKKKKKKKKKKKKK PM KKKK PN KKKKKKKKKKKKKKKKKKKKKK PN KKKKKKKKKKKKKKKK PO pbq rm KKKKKKKK PO ojJrPMS KKKKKKKKKK PQ KKKKKKKKKKKKKKKK PQ KKKKKKKK PT KKKKKKKKKKKKKKKK PU KKKKKKKKKKKKKKKKKKKKKK PU KKKKKKKKKKKKKKKKKKKKKKKKKK QN proo ibsbi ...

Страница 48: ...JRN ENF p 4CS pqoJabQUR 0 0 PQJPT klt abjlkpqo qflk jlab fc vlr cfkfpe abjlkpqo qflk mib pb mobpp mltbo hbv tefib qefp jbpp db mmb op fk qeb afpmi v qe kh vlr L1 0 pbq rm L1 NR L1 L1 L1 02CS02TOCCEL p65 4 15 02 5 15 PM 4 ...

Страница 49: ... jlab wj EOQ PVF jriqf e kkbi ab lafkd E FE F7EONF jriqf e fk qf EONF jrqfkd wfEON PUF N S k jb 8 EPNF melkbp E FE F ek EONF mobpbq qrkfkd 3EPMF pbq rm 6 EQ NS PO QPF pefcq eg EPMF proo qd EOT QPF T Z qob_ib qh EOU QPF qrkbo ws EON OVJPNF qrkfkd 5 EOVF sfabl N qk EONF sfabl O w EONF qa EOOF 1 E F 1 EQ NR OM OUF 0 9 O e wh EORF A D Kab wk EOPJORF j es EOVF _ pp wg EOU QPF a ql EONF fkbj pqrafl bu _...

Страница 50: ...6CS pqoJabQUR QJOPUJPTSJRN ENF p A B C D E F 012345 0123456 789 01234 02CS03HUPCEL p65 4 15 02 5 20 PM 6 ...

Страница 51: ...ER MULTI CH IN FRONT SURROUND R L CENTER ANTENNA AM FM 75Ω COAXIAL DVD LD IN COAXIAL AUDIO IN AUDIO IN AUDIO OUT AUDIO OUT AUDIO IN VIDEO 1 VIDEO IN VIDEO IN VIDEO OUT VIDEO IN VIDEO OUT DVD LD MONITOR VIDEO 2 SUB WOOFER OPTICAL VIDEO 2 IN DIGITAL 02CS03HUPCEL p65 4 15 02 5 20 PM 7 ...

Страница 52: ...COAXIAL DVD LD IN COAXIAL OPTICAL VIDEO 2 IN DIGITAL LINE L R OUTPUT A IN OUT LINE L R LINE INPUT OUTPUT ç ç A A IN OUT IN CD MD TAPE R L AUDIO IN AUDIO IN AUDIO OUT AUDIO OUT AUDIO IN VIDEO 1 VIDEO IN VIDEO IN VIDEO OUT VIDEO IN VIDEO OUT DVD LD MONITOR VIDEO 2 SUB WOOFER 02CS03HUPCEL p65 4 15 02 5 20 PM 8 ...

Страница 53: ... VIDEO OUT R AUDIO OUT OUTPUT L Ç B VIDEO OUT R AUDIO OUT VIDEO IN AUDIO IN OUTPUT INPUT L IN OUT Ç Ç B B AUDIO OUT VIDEO OUT L R OUTPUT B IN OUT IN CD MD TAPE R L AUDIO IN AUDIO IN AUDIO OUT AUDIO OUT AUDIO IN VIDEO 1 VIDEO IN VIDEO IN VIDEO OUT VIDEO IN VIDEO OUT DVD LD MONITOR VIDEO 2 SUB WOOFER asa sfabl O rafl fk sfabl O sfabl fk E F 02CS03HUPCEL p65 4 15 02 5 21 PM 9 ...

Страница 54: ...NT SURROUND R L CENTER ANTENNA AM FM 75Ω COAXIAL DVD LD IN COAXIAL OPTICAL VIDEO 2 IN DIGITAL IN OUT IN CD MD TAPE R L AUDIO IN AUDIO IN AUDIO OUT AUDIO OUT AUDIO IN VIDEO 1 VIDEO IN VIDEO IN VIDEO OUT VIDEO IN VIDEO OUT DVD LD MONITOR VIDEO 2 SUB WOOFER VIDEO OUT R AUDIO OUT OUTPUT L DIGITAL OPTICAL OUTPUT B D DIGITAL COAXIAL OUTPUT VIDEO OUT R AUDIO OUT OUTPUT L E B MULTI CH IN 02CS04HUPCEL p65 ...

Страница 55: ... CD MD TAPE R L AUDIO IN AUDIO IN AUDIO OUT AUDIO OUT AUDIO IN VIDEO 1 VIDEO IN VIDEO IN VIDEO OUT VIDEO IN VIDEO OUT DVD LD MONITOR VIDEO 2 SUB WOOFER A F A F L R FRONT SURROUND SUB WOOFER MULTI CH OUT CENTER MULTI CH IN 0 12345678 9 EaçäÄó aáÖáí äF aqp asa 012 asa 0123 01 R EO O N F N 012345 asa 012 asa 012 NP asa 02CS04HUPCEL p65 4 15 02 5 24 PM 11 ...

Страница 56: ...12CS pqoJabQUR QJOPUJPTSJRN ENF p E NP F b FRONT CENTER SURROUND R L R L R L R L SPEAKERS SPEAKERS IMPEDANCE USE 8 16Ω IMPEDANCE USE 8 16Ω 02CS04HUPCEL p65 4 15 02 5 24 PM 12 ...

Страница 57: ...FRONT CENTER SURROUND R L R L R L R L SPEAKERS SPEAKERS IMPEDANCE USE 8 16Ω AUDIO OUT SUB WOOFER VIDEO OUT MONITOR E e E e A A INPUT AUDIO IN B E e E e E e A A A IMPEDANCE USE 8 16Ω A EHF EHF EJF EJF B 02CS05HUPCEL p65 4 15 02 5 26 PM 13 ...

Страница 58: ...14CS pqoJabQUR QJOPUJPTSJRN ENF p NM ãã 01 H H J J 01 0 01 E F 01 01 OM 02CS05HUPCEL p65 4 15 02 5 27 PM 14 ...

Страница 59: ... 15CS pqoJabQUR QJOPUJPTSJRN ENF p E F E F E OM F 0 1 2 1 R E Q F E F pbq rm sli jfk 45 90 20 A A B C C pbq rm QP NSJOM POJPP A B NKR QKR C A NKM NOKM 02CS05HUPCEL p65 4 15 02 5 29 PM 15 ...

Страница 60: ...pj ii proolrka pj ii pr_ tllcbo vbp jf ol pmK Ejf ol pmKF pçåó jf ol pmK i odb 1 pbq rm 2 jbkr jbkr 3 jbkr H jbkr J 4 O P L R EcolkqF i odbG C E bkqboF i odbG SL SR EproolrkaF i odbG SW Epr_ tllcboF pKtK uuu vbpG L R afpqK uuKu ã RKM ã C afpqK uuKu ã RKM ã SL SR afpqK uuKu ã PKR ã SL SR miK uuu _beaK SL SR edqK uuu ilt G klojKpmK 02CS05HUPCEL p65 4 15 02 5 31 PM 16 ...

Страница 61: ...odb kl GP GN GP açäÄó mêç içÖáÅ GN kloj i GO me kqlj GP P pqbobl P i odb pj ii 01 i odb 0 0 1 01 i odb 0 pj ii 0 i odb _ pp HLJ OU x E L R F 0 i odb E F i odb pj ii E F pj ii pj ii E kl F x E C F 0 i odb E F i odb pj ii i odb pj ii E i odb F GN kl GO 02CS05HUPCEL p65 4 15 02 5 34 PM 17 ...

Страница 62: ...ENF p E F 01 NKR QKR 0 012 N O 012 E F 0 x E SW pKtK uuuF vbp kl icb açäÄó aáÖáí ä x E L R afpqK uuKu ãF NR A x E C afpqK uuKu ãF E NR AF NKR E NR BF x E SL SR afpqK uuKu ãF E NR AF QKR E NR CF 02CS05HUPCEL p65 4 15 02 5 36 PM 18 ...

Страница 63: ...30 A B A B 60 90 20 A B 30 B C C A 01 012 01 01 01 01 miK pfab 01 0 0 miK _beaK miK jfa 0 0 01 01 0 miK _beaK x E SL SR miK uuuFG 0 A pfab B jfa C _beaK x E SL SR edqK uuuFG 0 A ilt B efde G E SL SR F kl 02CS05HUPCEL p65 4 15 02 5 38 PM 19 ...

Страница 64: ...abQUR QJOPUJPTSJRN ENF p E F UMM eò 1 1 2 qbpq qlkb qK qlkb E F 3 ibsbi ibsbi ibsbi OT OU 4 qbpq qlkb 01 j pqbo slirjb j pqbo sli HLJ jriqf e fk ibsbi 01 ibsbi 1 1 2 a 3 4 PU 02CS05HUPCEL p65 4 15 02 5 39 PM 20 ...

Страница 65: ...saLia ja jaLq mb a a qrkbo asa fkmrq jlab rql fk l u fk afdfq i l uf i lmq fk afdfq i lmqf i k ild rafl fk EiLoF VS âeò jriqf e fk jriqf e fk jriqf e fk jriqf e kkbi ab lafkd E F jrqfkd E F jrqfkd j pqbo slirjb melkbp E F pmK lcc 02CS06BSCCEL p65 4 15 02 5 43 PM 21 ...

Страница 66: ...22CS pqoJabQUR QJOPUJPTSJRN ENF p afpmi v E F afpmi v G t t G t t G PN 01 afjjbo E F afjjbo EP F 02CS06BSCCEL p65 4 15 02 5 44 PM 22 ...

Страница 67: ...boq d jb a p E F D C S a p aáÖáí ä áåÉã pçìåÇ E F pçåó máÅíìêÉë båíÉêí áåãÉåí pçåó pçåó apm E F aáÖáí ä áåÉã pçìåÇ E F aáÖáí ä áåÉã pçìåÇ E F áåÉã píìÇáç E F bu áåÉã píìÇáç E F bu açäÄó aáÖáí ä asa E asaF pçåó máÅíìêÉë båíÉêí áåãÉåí fkbj pqrafl E F bu _ 0 0 NR Kab rql ab K EaçäÄó aáÖáí ä aqp O F 0 E F EaçäÄó aáÖáí ä icb F 0 02CS07ENJCEL p65 4 15 02 5 47 PM 23 ...

Страница 68: ...pqKbu _ E bu _F pçåó máÅíìêÉë båíÉêí áåãÉåí háã kçî â qÜÉ íÉê 0 x KpqKbu E bu F pçåó máÅíìêÉë båíÉêí áåãÉåí áåÉã píìÇáç E F bu áåÉã píìÇáç E F bu R áåÉã píìÇáç E F bu jlab áåÉã píìÇáç E F bu 01 jlab x klojKprooK E F O 0 x e ii x g ww x lk boq PMM x d jb Kab O e E F 02CS07ENJCEL p65 4 15 02 5 49 PM 24 ...

Страница 69: ... 25CS pqoJabQUR QJOPUJPTSJRN ENF p 01 g ww a a g ww 0 açäÄó aáÖáí ä açäÄó pìêêçìåÇ VS âeò 0 EO F O e O e pqK O O O e pqK O Kab rql ab K NS O rql ab K 01 02CS07ENJCEL p65 4 15 02 5 50 PM 25 ...

Страница 70: ...ab k ildE FE ON F 4 jmbdW jmbd O jmbd O 5 OVJPM 6 aKo kdb OU 7 l uW l uf i 8 lmqW lmqf i 9 i o KpqKbu i o pi po p PLO rql ab K 0 L F E icb icb SL SR L C R PRO LOGIC D RANGE MONO MPEG DTS STEREO OPT SP OFF SL S SR L SW C R MEMORY L F E DIGITAL a COAX 1 qa qs 2 3 4 6 7 5 8 9 0 02CS07ENJCEL p65 4 15 02 5 53 PM 26 ...

Страница 71: ... b qo uuu Ç_G M Ç_ proKiK uuu Ç_G M Ç_ proKoK uuu Ç_G M Ç_ pKtK uuu Ç_G M Ç_ iKcKbK uuu Ç_ M Ç_ D RANGE ljmK uuu lcc G jriqf e fk E L R _ iK iLo uuuF E qo uuu Ç_F EproKiK uuu Ç_F qa pt vbp NU pr_ tllcbo qx pmK lcc W NR proo 1 2 proo 3 jbkr H jbkr J bccb q E F Ebccb qF 02CS07ENJCEL p65 4 15 02 5 55 PM 27 ...

Страница 72: ...tK uuu Ç_F icb EiKcKbK uuu Ç_F icb açäÄó aáÖáí ä aqp icb M Ç_ icb icb lcc NRJNU E D RANGE ljmK uuuF 0 j u lcc 0 pqa MKN MKV 0 j u _ pp qob_ib 1 2 _ pp qob_ib _ pp M Ç_ qob_K M Ç_ _ pp E F qob_K E F 1 1 2 jlab 1 pcK ioK 02CS07ENJCEL p65 4 15 02 5 57 PM 28 ...

Страница 73: ... jlab EjlklF cj jlab cj RM âeò j V âeò 1 qrkbo 2 cj j cj j 3 qrkfkd H qrkfkd J qrkfkd H qrkfkd J 4 qrkfkd H qrkfkd J b b b b 1 0 2 5 0 b b b 1 3 5 0 cj j T 0 PQJPT 1 qrkbo 2 cj j cj j 3 aKqrkfkd 4 N cj NMOKRM jeò O j NPRM âeò E NM âeò M F P Q 5 j j 6 O R 02CS08RECCEL p65 4 15 02 6 02 PM 29 ...

Страница 74: ...V OV 3 jbjlov jbjlov jbjlov Q S 4 pefcq _ pefcq _ 5 mobpbq qrkfkd H mobpbq qrkfkd J jbjlov P 6 jbjlov jbjlov P 7 O S N S 0 1 qrkbo 2 mobpbq qrkfkd H mobpbq qrkfkd J 0 PQJPT 1 qrkbo 2 pefcq _ nA1 A2 A0 B1 B2 B0N nC0 C2 C1N 02CS08RECCEL p65 4 15 02 6 04 PM 30 ...

Страница 75: ...p 0 EjaF 0 EjaF 1 2 a a 3 4 jaLq mb lrq jriqf e fk ob lrq U sep 0 sep Ujj a jaLq mb 1 qrkbo PM 2 k jb 3 jbkr H jbkr J jbkr jbkr jbkr H jbkr J jbkr jbkr H jbkr J jbkr jbkr jbkr H jbkr J 4 bkqbo 5 O Q 02CS09OPECEL p65 4 15 02 6 07 PM 31 ...

Страница 76: ...a 1 2 3 Esfabl NF 4 012 010 012 sfabl O asaLia jriqf e fk ob lrq pibbm OJMMJMM t NJPMJMM t NJMMJMM t MJPMJMM t lcc pibbm jbkr jbkr HLJ N R pibbm pbq rm pbq rm 1 pbq rm 2 jbkr jbkr 3 jbkr H jbkr J 4 O P 02CS09OPECEL p65 4 15 02 6 09 PM 32 ...

Страница 77: ... 33CS pqoJabQUR QJOPUJPTSJRN ENF p KjlabK su sO x E KjlabK suF 0 O pçåó 02CS09OPECEL p65 4 15 02 6 10 PM 33 ...

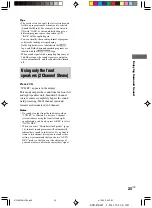
Страница 78: ...0 9 MD TAPE CD TUNER TV VIDEO VIDEO 2 VIDEO 1 DVD LD SYSTEM STANDBY 10 SHIFT CH PRESET ANT TV VTR SOUND FIELD MASTER VOL TEST TONE MAIN MENU MULTI CH ENTER D SKIP A DEC 2CH MODE D TUNING TOP MENU DVD MENU ENTER RETURN f F G g SLEEP AV 1 1 MENU TV VOL TV CH MUTING O x 02CS10REMCEL p65 4 15 02 6 12 PM 34 ...

Страница 79: ...lov pefcq a s a M NM ja a q NM a NM s a ja bkqbo ja a q sfabl N sqo P sfabl O sqo N asaLia asa jaLq mb ja a a qrkbo pefcq aKqrkfkd Kab rql ab lafkd jlab O e O e qbpq qlkb j fk jbkr proo ibsbi pbq rm k jb jriqf e jriqf e fk jbkr ILi jbkr HL jrqfkd j pqbo sli HL s 1 a s a asa ja a q 02CS10REMCEL p65 4 15 02 6 16 PM 35 ...

Страница 80: ...a asa asa jbkr bkqbo asa O asa VLvLBLb asa qsLsfabl qs sli HL qs e HL Esfabl N sfabl O asaL iaF 0 qsLsfabl 0 obqrok s a eL mobpbq HL L a s a L asa ja a q m M a L s a E asa ja a q N a L s a asa L ja a q L X a L E s a asa L ja a q L x a s a asa ja a q L E F 02CS10REMCEL p65 4 15 02 6 20 PM 36 ...

Страница 81: ...QUR QJOPUJPTSJRN ENF p ja jaLq mb qrkbo 1 jaLq mbF 2 Q a N a q O ja P Q _ R S sqo NG T sqo OG U sqo PG V M app NM asa bkqbo s a G pçåó sqo N O P _Éí Uãã sep jaLq mb L1 s L1 j pqbo sli J 02CS10REMCEL p65 4 15 02 6 22 PM 37 ...

Страница 82: ...38CS pqoJabQUR QJOPUJPTSJRN ENF p OM pçåó 0 j pqbo slirjb sli jfk jrqfkd E molqb q F 012 01 01 01 012 01 01 01 01 01 pçåó 02CS11ADDCEL p65 4 15 02 6 24 PM 38 ...

Страница 83: ... ENF p melkbp ON 0 0 ibsbi 0 P 0 jlab KpqKbu OQ OM pj ii i odb NT pr_ tllcbo jlabF açäÄó aáÖáí ä aqp asa aqp asa jaLq mb fkmrq jlab k ild ON F 0 fkmrq jlab ON fkmrq jlab rql fk ali_v afdfq i oc 02CS11ADDCEL p65 4 15 02 6 27 PM 39 ...

Страница 84: ...40CS pqoJabQUR QJOPUJPTSJRN ENF p cj TR cj 0 j PM afpmi v ANTENNA AM FM 75Ω COAXIAL cj g sO PP NR OT 02CS11ADDCEL p65 4 15 02 6 28 PM 40 ...

Страница 85: ... jaL q mb asaLia sfabl N O E F jriqf e fk a jaL q mb asaLia sfabl N O QFfkmrq peloq E F RF asaLia E F sfabl O E F jaLq mb ElrqF sfabl N E rafl lrqF pr_ tllcbo S Ç_ N Ç_ cj UTKR J NMUKM jeò TR NMKT jeò jçåç NUKP Ç_Ñ OKO µsLTR píÉêÉç PUKP Ç_Ñ OOKR µsLTR NNKO Ç_Ñ N µsLTR pLk jçåç TS Ç_ píÉêÉç TM Ç_ N âeò jçåç MKP píÉêÉç MKR N âeò QR Ç_ PM eò J NR âeò HMKRLJO Ç_ QMM âeò SM Ç_ NM eò RM âeò HMKRLJO Ç_ E...

Страница 86: ... NSMO âeò QRM âeò RM Ç_Lã ENIMMM âeò VVV âeò F pLk RQ Ç_ ERM ãsLã F MKR ERM ãsLã QMM eòF PR Ç_ N séJé TR N séJé TR OOM J OPM s RMLSM eò NRR t MKR t QPM NQR OVU ãã TKM âÖ W cj ENF j ENF ojJrPMS ENF oS E F EOF 02CS11ADDCEL p65 4 15 02 6 33 PM 42 ...

Страница 87: ... EN Ç_ F iKcKbK uuu Ç_ lcc JOM Ç_ M Ç_ EN Ç_ F D RANGE ljmK uuu lcc MKN MKV EMKN F pqa j u pbq rm L R EcolkqF i odb pj ii NS C E bkqboF i odb pj ii kl SL SR EproolrkaF i odb pj ii kl SW Epr_ tllcboF pKtK uuu vbp kl L R afpqK uuKu ã NKM NOKM EMKN F C afpqK uuKu ã L R afpqK NKR EMKN F SL SR afpqK uuKu ã L R afpqK QKR EMKN F SL SR miK uuu pfab jfa _beaK SL SR edqK uuu efde ilt KjlabK su sN sO PP _ pp...

Страница 88: ...proKoK pKtllcbo icb aKo kdb _ i ibsbi ibsbi ibsbi ibsbi jfuNF ljmNF O e pqK z z z rql ab K z z z z z z z klojKprooK z z z z z z z KpqKbu z z z z z z z KpqKbu _ z z z z z z z KpqKbu z z z z z z z e ii z z z z zOF z z g ww z z z z zOF z z lk boq z z z z zOF z z d jb z z z z z z z jriqf e fk z z z z z m j VSh z NF 012 345 67 89 OT OF 012i odb iKcKbK ibsbi Sony Corporation Printed in China 02CS11ADDCE...

Отзывы: