49
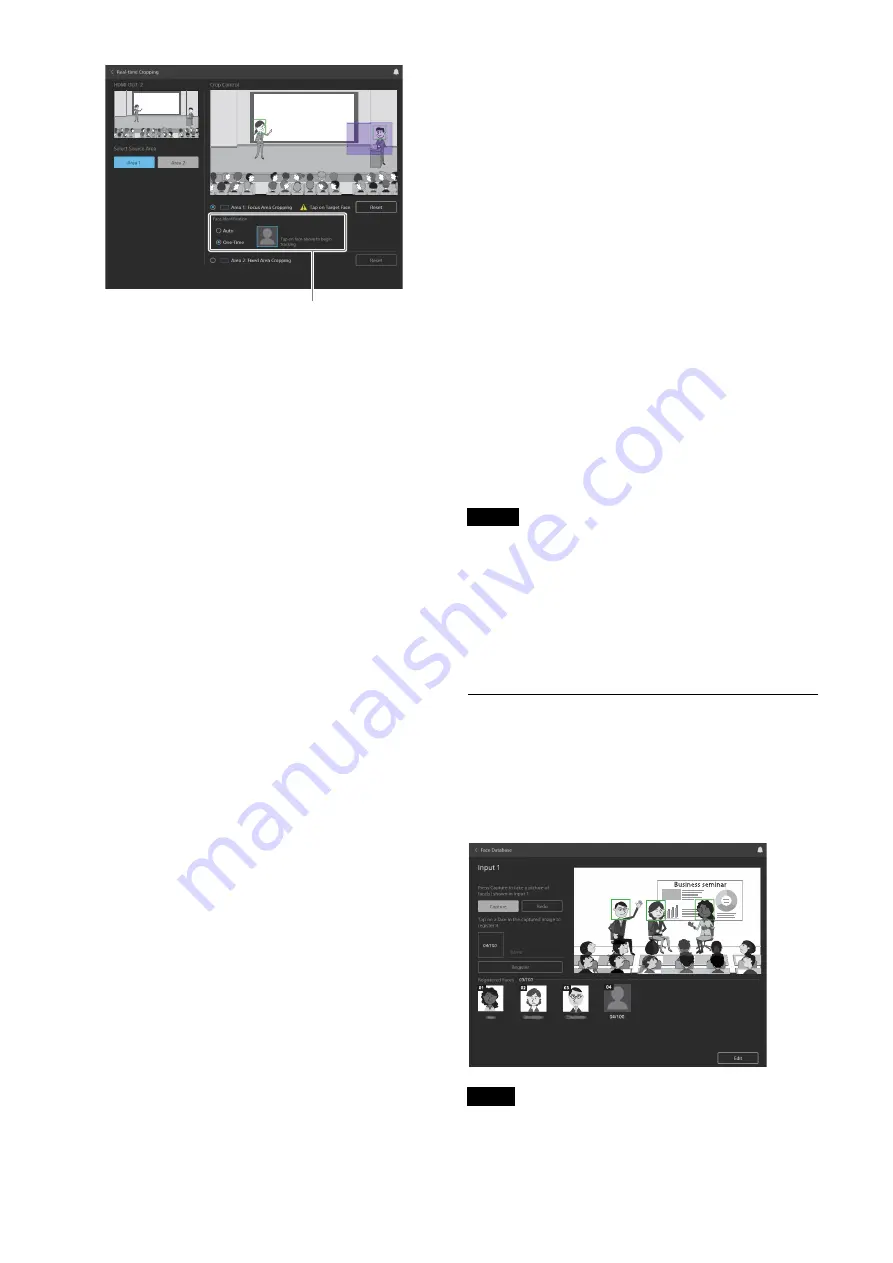
[Select Source Area]
Select the area to display on HDMI OUT 2. [Area 1]
is selected by default when the application is
launched.
[Crop Control]
Use to control cropping.
[Area 1: Focus Area Cropping], [Area 2: Fixed
Area Cropping]:
Select the target area to
control.
[Reset] button:
Click the [Reset] button to restore
the extraction area to the initial position. When
[Focus Area Cropping] is selected, tracking is
interrupted and detection of a person to track
starts again. Also, if [One-Time] is selected for
the face identification tracking function, the
identification of the face that is selected or being
tracked is cleared.
Face Identification
Select the method for identifying faces. Displayed
when a check mark is placed in [Follow Faces] on
the setup screen.
[Auto]:
Search for tracking target from faces
registered in the face database.
[One-Time]:
Search for faces within the current
camera image, and display a frame around
detected faces. Click a frame to start tracking
that face. The face data registered in the face
database is not used.
When the target control area is set to [Fixed
Area Cropping]
Drag the blue frame or purple frame to move the crop
area position.
When the target control area is set to [Focus
Area Cropping]
Enable [Start Tracking Automatically] to track a person
captured by the camera, according to the setup, and to
output the tracking image. You can check the operating
status of the application in the bottom right of the screen
while the application is running.
[Detecting]:
Person is detected at the home position. A
face frame is attached to the person.
[Tap on Target Face]:
In this state, you can select the
face frame of a person to be tracked manually. Select
a face frame.
[Tracking]:
Person was detected and is being tracked.
[Target Lost]:
Person being tracked is no longer visible
and tracking has been lost.
To start tracking manually
If using the face identification tracking function:
Select [One-Time] and click the frame of a detected
face while the application is in [Tap on Target Face]
state to select that face as the tracking target and start
tracking.
If [Start Tracking Automatically] is disabled and the
face identification tracking function is not being
used:
Select [One-Time] and click the frame of a
detected face while the application is in [Tap on
Target Face] state to select that face as the tracking
target and start tracking.
If [Start Tracking Automatically] is enabled and the
face identification tracking function is not being
used:
Click the frame of a detected face while the
application is in [Detecting] state to select that face
as the tracking target and start tracking.
• If the source area is changed while the application is
running, the changes are not saved in the settings.
• You can change the crop area position while the
application is running, but the changes are not saved
in the settings.
• The resolution of the close-up output image may be
reduced depending on the resolution of the input
image from the camera.
Registering a face in the face
database
Register the faces of people to use with the face
identification function. Click [Face Database] (page 47)
on the setup screen to display the face registration
screen. Up to 100 faces can be registered.
All face data registered in the face database are deleted
when the unit is reset to factory defaults.
Display when face identification function is enabled
Notes
Note


