1-8
RDR-GX220/GX330
33
E
igh
t Bas
ic
Op
erat
ions
—
Ge
tt
in
g to Kno
w You
r
D
V
D
Re
cor
der
1
Insert a disc.
See “1. Inserting a Disc” on page 23.
2
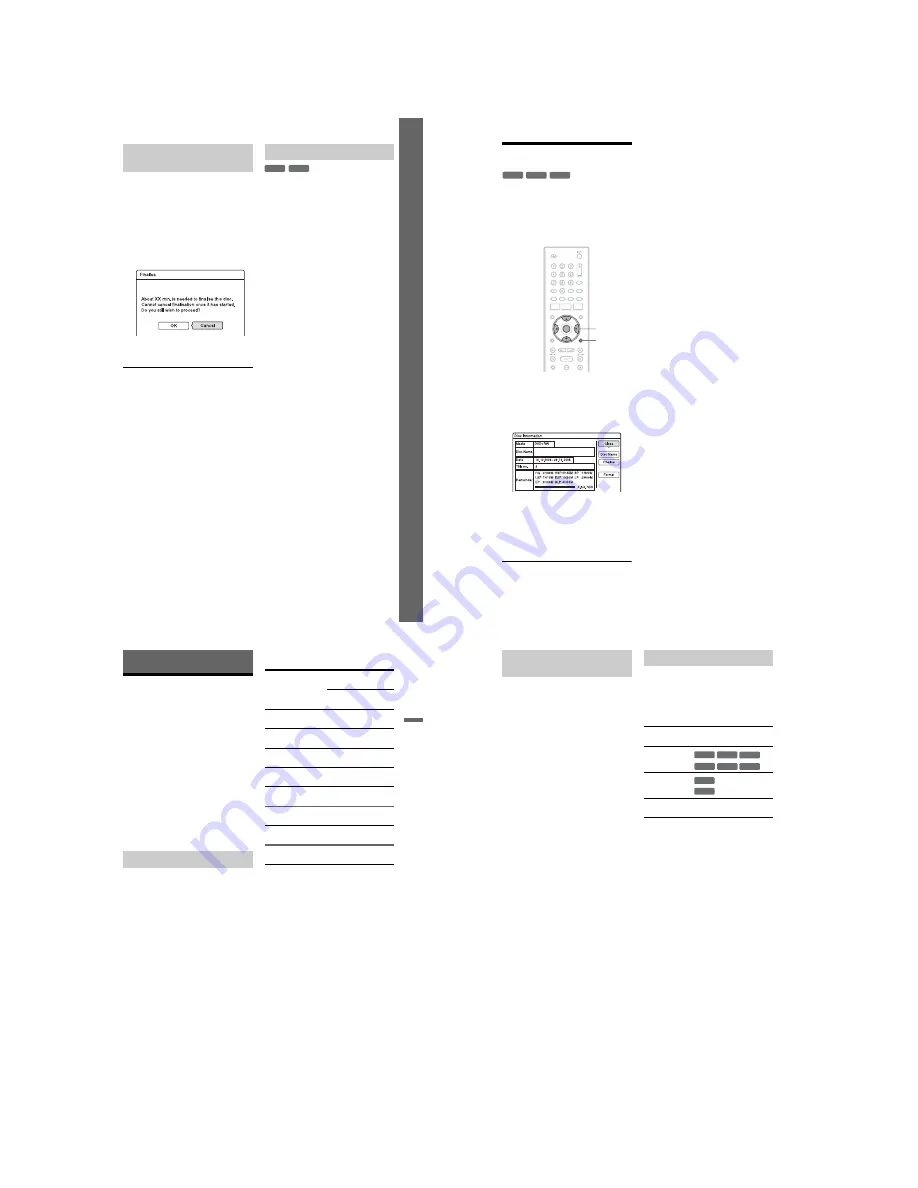
Press OPTIONS to select “Disc
Information,” and press ENTER.
The “Disc Information” display appears.
3
Select “Finalise,” and press ENTER.
The display shows the approximate time
required for finalising and asks for
confirmation.
4
Select “OK,” and press ENTER.
The recorder starts finalising the disc.
z
Hint
You can check whether the disc has been finalised
or not. If you cannot select “Finalise” in step 3
above, the disc has already been finalised.
b
Notes
• Depending on the condition of the disc,
recording, or the DVD equipment, discs may not
play even if the discs are finalised.
• The recorder may not be able to finalise the disc
if it was recorded on another recorder.
For DVD-RWs (Video mode)
DVD-RWs (Video mode) that have been
finalised to prohibit additional recording or
editing can be unfinalised to allow further
recording or editing.
For DVD-RWs (VR mode)
If you cannot record or edit on a DVD-RW
(VR mode) that has been finalised with other
DVD equipment, unfinalise the disc.
b
Note
The recorder is not able to unfinalise DVD-RWs
(Video mode) that have been finalised on another
recorder.
1
Insert a disc.
See “1. Inserting a Disc” on page 23.
2
Press OPTIONS to select “Disc
Information,” and press ENTER.
The “Disc Information” display appears.
3
Select “Unfinalise,” and press
ENTER.
The recorder starts unfinalising the disc.
Unfinalising may take several minutes.
Finalising the disc using “Disc
Information” display
Unfinalising a disc
-RW
VR
-RW
Video
34
8. Reformatting a disc
New discs are automatically formatted when
inserted. If necessary, you can manually re-
format a DVD+RW or DVD-RW disc to
make a blank disc. For DVD-RWs, you can
select a recording format (VR mode or Video
mode) according to your needs (page 56).
1
Insert a disc.
See “1. Inserting a Disc” on page 23.
2
Press OPTIONS to select “Disc
Information,” and press ENTER.
Example: When a DVD+RW is inserted.
3
Select “Format,” and press ENTER.
4
Select “OK,” and press ENTER.
For DVD-RWs and unrecorded DVD-Rs
(Video mode), select “VR” or “Video,”
and press ENTER.
All contents on the disc are erased.
z
Hint
By reformatting, you can change the recording
format on DVD-RWs, or record again on DVD-
RWs that have been finalised.
b
Note
On this model, 1 GB (read “gigabyte”) is equivalent
to 1 billion bytes. The larger the number, the larger
the disc space.
+
RW
-RW
VR
-RW
Video
OPTIONS
<
/
M
/
m
/
,
,
ENTER
35
T
im
e
r R
e
co
rd
in
g
Timer Recording
Before Recording
Before you start recording…
• Check that the disc has enough available
space for the recording (page 29). For
DVD+RWs and DVD-RWs, you can free
up disc space by erasing titles (page 56).
• Adjust the recording picture quality and
picture size if necessary (page 40).
z
Hint
Timer recordings will be made regardless whether
or not the recorder is turned on. You can turn off the
recorder without affecting the recording even after
recording starts.
b
Note
To play a recorded disc on other DVD equipment,
finalise the disc (page 32).
Like the standard ×3 recording modes of
video tapes, you can select the desired
recording mode using the REC MODE
button.
Recording modes with higher quality provide
a more beautiful recording, but the large data
volume also results in a shorter recording
time.
Conversely, a longer duration provides a
longer recording time, but the lower data
volume results in a coarser picture quality.
Press REC MODE repeatedly to switch the
recording modes.
b
Notes
• The maximum continuous recording time for a
single title is eight hours.
• Situations below may cause slight inaccuracies
with the recording time.
– Recording a programme with poor reception, or
a programme or video source of low picture
quality
– Recording on a disc that has already been edited
– Recording only a still picture or just sound
Recording mode
Recording mode
Approx. recording
time (hours)
DVD
DVD+R
DL
HQ (High quality)
1
1 hr.
48 min.
HSP
R
1 hr.
30 min.
2 hr.
42 min.
SP (Standard mode)
2
3 hr.
37 min.
LSP
r
2 hr.
30 min.
4 hr.
31 min.
ESP
r
3
5 hr.
25 min.
LP
r
4
7 hr.
14 min.
EP
r
6
10 hr.
51 min.
SLP (Long duration) 8
14 hr.
28 min.
,
continued
36
The recorder automatically receives and
records stereo and bilingual programmes
based on the ZWEITON system or the
NICAM system.
A DVD-RW (VR mode) or DVD-R (VR
mode) can record both main and sub sounds.
You can switch between main and sub when
playing the disc.
A DVD+RW, DVD-RW (Video mode),
DVD+R, or DVD-R (Video mode) can
record only one sound track (main or sub) at
a time. Select the sound track using the Setup
Display before recording starts. Set
“Bilingual Recording” of the “DVD Rec.
Settings” to “Main” (default) or “Sub” in the
“Recording” setup (page 77).
ZWEITON (German stereo) system
When a stereo based programme is received,
“Stereo” appears.
When a bilingual ZWEITON based
programme is received, “Main,” “Sub,” or
“Main/Sub” appears.
NICAM system
When a stereo or bilingual NICAM based
programme is received, “NICAM” appears in
the front panel display.
To record a NICAM programme, be sure to
set “Audio” of “Channel Setting” in the
“Basic” setup to “NICAM” (default). If the
sound is not clear when listening to NICAM
broadcasts, set “Audio” to “Standard” (see
“Channel Setting” on page 68).
z
Hint
You can select the audio (main or sub) while
recording bilingual programmes using the AUDIO
button. This does not affect the recorded sound.
Pictures with copy protection cannot be
recorded on this recorder.
When the recorder receives a copy guard
signal, the recorder continues to record but
only a blank, grey coloured screen will be
recorded.
* The recorded disc can be played only on CPRM
compatible equipment (page 7).
Recording stereo and bilingual
programmes
Unrecordable pictures
Copy control
signals
Recordable discs
Copy-Free
Copy-Once
(CPRM*)
(CPRM*)
Copy-Never
None (a blank screen is
recorded)
+
RW
-RW
VR
+
R
-RW
Video
-R
VR
-R
Video
-RW
VR
-R
VR


