background image

Additional Information

34

EN

Notes on CDs

• Before playing, clean the CD with a

cleaning cloth. Wipe the CD from the
center out.

• Do not use solvents such as benzine,

thinner, commercially available
cleaners or anti-static spray intended
for vinyl LPs.

• Do not expose the CD to direct

sunlight or heat sources such as hot
air ducts, nor leave it in a car parked
in direct sunlight as there can be a
considerable rise in temperature
inside the car.

• Do not stick paper or sticker on the

CD, nor scratch the surface of the CD.

• After playing, store the CD in its case.

If there is a scratch, dirt or fingerprints
on the CD, it may cause tracking error.

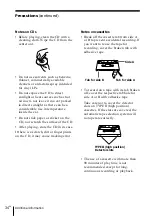
Notes on cassettes

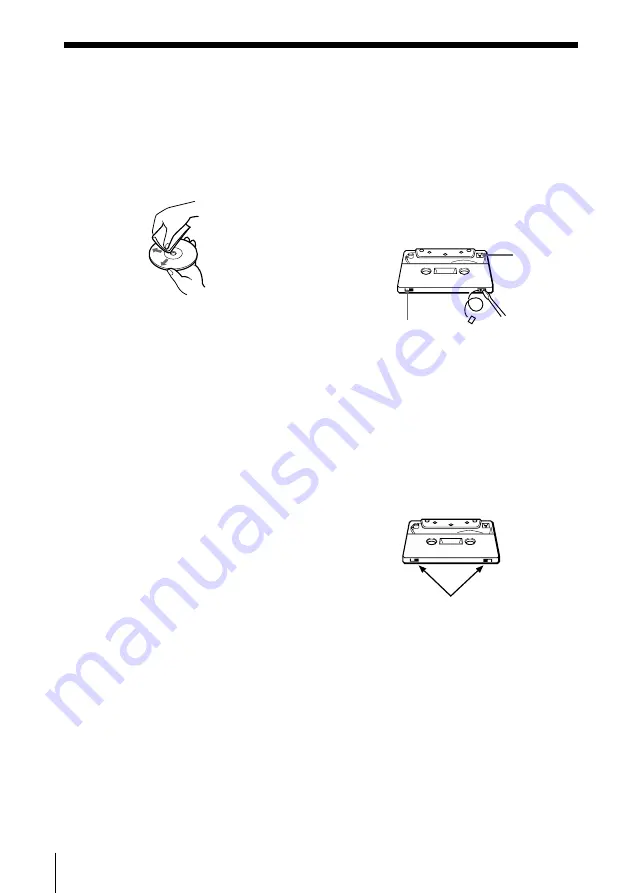
• Break off the cassette tab from side A

or B to prevent accidental recording. If
you want to reuse the tape for
recording, cover the broken tab with
adhesive tape.

• To record on a tape with its tab broken

off, cover the respective tab hole for
side A or B with adhesive tape.

Take care not to cover the detector
slots on TYPE II (high position)
cassettes. If the slots are covered, the
automatic tape selection system will
not operate correctly.

• The use of a cassette with more than

90 minutes of play time is not
recommended except for long,
continuous recording or playback.

Precautions 

(continued)

Side A

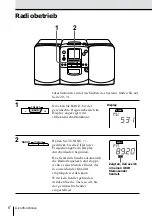
Tab for side B

Tab for side A

TYPE II (high position)
Detector slots

Содержание PMC-303L

Страница 1: ...3 856 988 13 1 1996 by Sony Corporation EN Operating Instructions page 2EN Bedienungsanleitung Seite 2D D PMC 303L Personal Component System ...

Страница 2: ...er after you change the fuse Never use the plug without the fuse cover If you should lose the fuse cover please contact your nearest Sony service station This Compact Disc player is classified as a CLASS 1 LASER product The CLASS 1 LASER PRODUCT label is located on the side Warning Do not install the appliance in a confined space such as a bookcase or built in cabinet CAUTION You can use this play...

Страница 3: ...order Shuffle Play 16 Creating your own program Program Play The Radio 18 Presetting radio stations 19 Playing preset radio stations The Tape Player 20 Finding the beginning of a track The Timer 21 Setting the clock 22 Waking up to music 26 Falling asleep to music 27 Timer recording radio programs Setting Up 29 Hooking up the system 32 Selecting the audio emphasis Sound Mode MEGA BASS Additional I...

Страница 4: ...es 29 31 1 Press 6 OPEN CLOSE down to open the disc compartment and place the CD on the CD compartment 2 Close the lid of the CD compartment 3 Press direct power on The player plays all the tracks once Display 1 2 3 4 5 6 7 8 9 10 CD 3 With the label side up OPEN CLOSE OPEN CLOSE 1 2 ...

Страница 5: ...to a CD just press The player turns on automatically and starts playing the CD POWER To Press Adjust the volume VOLUME Stop playback p Pause playback Press again to resume play after pause Go to the next track Go back to the previous track Remove the CD 6 OPEN CLOSE Turn on off the player POWER p 6 OPEN CLOSE VOLUME ...

Страница 6: ...display direct power on 2 Hold down TUNING until the frequency digits begin to change in the display The player automatically scans the radio frequencies and stops when it finds a clear station If you can t tune in a station press the button once at a time Display RADIO Indicates an FM stereo broadcast 2 1 RADIO TUNING RADIO PRESET BAND ...

Страница 7: ... time you want to listen to the radio just press the BAND button The player turns on automatically and starts playing the previous station To Press Adjust the volume VOLUME Turn on off the radio POWER To improve broadcast reception FM Connect the FM outdoor aerial not supplied see page 31 MW LW Reorient the MW LW loop aerial supplied If the MW LW broadcast is still noisy connect an insulated wire ...

Страница 8: ... to open the tape compartment and insert a recorded tape Use TYPE I normal TYPE II high position and TYPE IV metal tapes Close the compartment 2 Press The player turns on direct power on and starts playing With the side you want to play facing forward Display TAPE Tape counter 2 1 TAPE ...

Страница 9: ... remote only To play Display shows One side of the tape Both sides of the tape from the front side to reverse side only Both sides of the tape repeatedly Tips Press COUNTER RESET on the remote to reset the counter to 000 on the remote only When you listen to a tape recorded with the Dolby B NR system press DOLBY NR on the remote until DOLBY B NR appears in the display on the remote only Next time ...

Страница 10: ...ormal and TYPE II high position tapes only 2 Select the program source you want to record To record from the CD player insert a CD see page 4 and press p on the CD section To record from the radio press BAND and tune in the station you want see page 6 With the side you want to record on facing forward 3 1 3 Display 1 2 3 4 5 6 7 8 9 10 CD RADIO PRESET BAND ...

Страница 11: ...en is displayed recording will be made on both sides of the tape To record on one side press DIR MODE on the remote to display on the remote only If the MW LW radio makes a whistling sound after you ve pressed r P in step 3 press STEREO MONO ISS on the remote to select the position that most decreases the noise on the remote only Use these buttons for additional operations To Press Stop recording ...

Страница 12: ... Even if you turn off the power the current time remains in the display as long as the player is connected to the wall outlet When you change the function e g from CD to RADIO the display of the function e g band and frequency for the RADIO function appears for about 4 seconds and returns to the current time If you want to check the display of certain function press DISPLAY repeatedly until the di...

Страница 13: ...d or the sound backward while playing and hold down until you find the point a point while observing forward or the display backward in pause and hold down until you find the point Note You cannot locate a specific track if SHUF or PGM is lit in the display Turn off the indication by pressing p on the CD section Tip When you locate a track numbered over 10 press 10 first then the corresponding num...

Страница 14: ...1 Press p CD appears in the display 2 Proceed as follows To repeat Press a single track 1 Press REPEAT until REP 1 appears 2 Press the number button corresponding to the track number you want to repeat all the tracks 1 Press REPEAT until REP ALL appears 2 Press tracks in random order 1 Press PGM SHUF until SHUF appears and press Shuffle play starts 2 Press REPEAT programmed tracks 1 Start program ...

Страница 15: ... order Shuffle Play You can play tracks in random order 1 Press p CD appears in the display 2 Press PGM SHUF until SHUF appears in the display 3 Press to start shuffle play To cancel shuffle play Press PGM SHUF until SHUF disappears in the display p PGM SHUF ...

Страница 16: ...umber buttons for the tracks you want to program in the order you want Programmed tracks appear in the music calendar 4 Press to start program play To cancel Program Play Press PGM SHUF until PGM disappears in the display To check the order of tracks before play Press ENTER Every time you press the button the track number appears in the programmed order Tip If you made a mistake press CANCEL and r...

Страница 17: ...ton the last track in the program is cleared 2 Re enter the track numbers Change the whole Press p on the CD section Then program completely create a new program following the programming procedure Tips You can play the same program again since the program is saved until you open the CD compartment You can record program play using DUBBING on the player ...

Страница 18: ...re stored in memory from the lower frequencies unless a station has a weak signal If a station cannot be preset automatically You need to preset a station with a weak signal manually Also when you want to replace a preset station with a new one do the following 1 Press BAND until the band you want appears in the display 2 Tune in a station you want 3 Hold down the number buttons that you want to p...

Страница 19: ...et the stations use the number buttons to tune in your favorite stations BAND Number buttons Tip You can tune in a preset station with the player Use PRESET instead of the number buttons 1 Press BAND to select the band 2 Press the number buttons to tune in a stored station ...

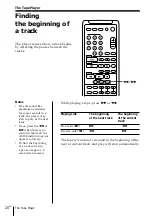
Страница 20: ...ent track Front side 0 Reverse side 9 0 The tape is wound or rewound to the beginning of the next or current track and play will start automatically Notes If a soft sound like pianissimo continues for some seconds in a track the player may start to play as the next track If you press the 0 or when there is no sound in the track the AMS function does not operate correctly To find the beginning of a...

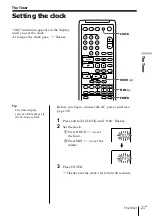
Страница 21: ...flashes The Timer Tip The time display system of this player is the 24 hour system Before you begin connect the AC power cord see page 30 1 Press and hold CLOCK until 0 00 flashes 2 Set the clock 1 Press HOUR to set the hour 2 Press MIN to set the minite 3 Press ENTER flashes and the clock starts from 00 seconds HOUR MIN CLOCK ENTER ...

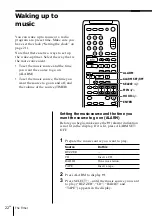
Страница 22: ...the time you want the source to go on and off and the volume of the source TIMER Setting the music source and the time you want the source to go on ALARM Before you begin make sure the alarm indication is not lit in the display If it is lit press ALARM SET OFF 1 Prepare the music source you want to play Source Do this BUZZER CD Insert a CD RADIO Tune in a station TAPE Insert a tape 2 Press ALARM t...

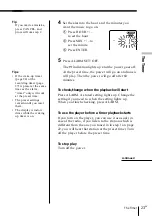
Страница 23: ...e the setting if you need to when the setting lights up When you finish checking press ALARM To use the player before a timer playback starts If you turn on the player you can use it as usual in case of the radio if you listen to the station which is different from the one you tuned in in step 1 on page 22 you will hear that station at the preset time Turn off the player before the preset time To ...

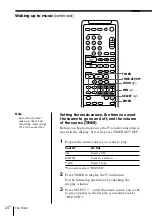
Страница 24: ...epare the music source you want to play Source Do this CD Insert a CD RADIO Tune in a station TAPE Insert a tape You cannot select BUZZER 2 Press TIMER to display the t indication Do the following operations by checking the display window 3 Press SELECT until the music source you want to play appears in the display you cannot select BUZZER TIMER SET OFF TIMER HOUR MIN SELECT ENTER Note You cannot ...

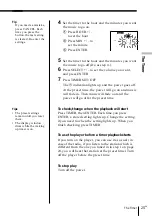
Страница 25: ...will fade in Then music will fade out and the power will go off at the preset time To check change when the playback will start Press TIMER then ENTER Each time you press ENTER a stored setting lights up Change the setting if you need to when the setting lights up When you finish checking press TIMER To use the player before a timer playback starts If you turn on the player you can use it as usual...

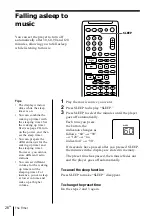
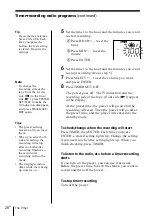
Страница 26: ...ory The preset time has passed then music fades out and the player goes off automatically To cancel the sleep function Press SLEEP to make SLEEP disappear To change the preset time Do the steps 2 and 3 again Tips The display window dims while the sleep timer is on You can combine the waking up timer with the sleeping timer Set the waking up timer first see page 24 turn on the power and then set th...

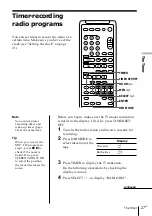
Страница 27: ...or recording 2 Press DIR MODE to select direction of the tape 3 Press TIMER to display the t indication Do the following operations by checking the display window 4 Press SELECT to display RADIO REC Note You cannot preset recording timer and wake up timer page 24 at the same time Tip When you receive the MW LW program in step 1 press r P to check if the noise is heard If so press STEREO MONO ISS t...

Страница 28: ...setting if you need to when the setting lights up When you finish checking press TIMER To listen to the radio etc before a timer recording starts If you turn on the player you can use it as usual Before the preset time tune in the station you want to record and turn off the power To stop timer recording Turn off the power Tip If you made a mistake press CANCEL Each time you press the button the la...

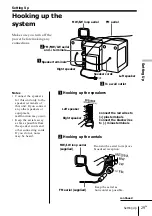
Страница 29: ...as far as possible from the speaker cords and other connecting cords If you do not noise may be heard Speaker cords Left speaker Hooking up the system Make sure you turn off the power before making any connections Speaker terminals 1 FM MW LW aerial and y terminals 2 continued Left speaker Right speaker Connect the red wires to plus terminals Connect the black wires to minus terminals FM aerial su...

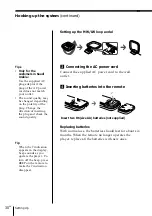
Страница 30: ...rates the player replace all the batteries with new ones Hooking up the system continued Tips Only for the customers in Saudi Arabia Use the supplied AC plug adaptor if the plug of the AC power cord does not match your outlet The sound quality may be changed depending on the polarity of the plug Change the direction of inserting the plug and check the sound quality Tip When the indication appears ...

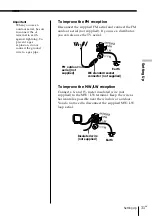
Страница 31: ...d wire not supplied to the MW LW terminal Keep the wire as horizontal as possible near the window or outdoor You do not need to disconnect the supplied MW LW loop aerial Important When you use an outdoor aerial be sure to connect the y terminal to earth against lightning To prevent a gas explosion do not connect the ground wire to a gas pipe Earth Insulated wire not supplied Earth IEC standard soc...

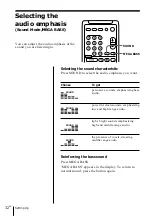
Страница 32: ...hasis you want Choose To get percussive sounds emphasizing bass audio powerful clean sounds emphasizing low and high range audio light bright sounds emphasizing high and middle range audio the presence of vocals stressing middle range audio Reinforcing the bass sound Press MEGA BASS MEGA BASS appears in the display To return to normal sound press the button again SOUND SOUND SOUND SOUND SOUND MEGA...

Страница 33: ... player will not operate properly In this case remove the CD and wait about an hour for the moisture to evaporate If the player has not been used for a long time set it in the playback mode to warm it up for a few minutes before inserting a cassette If you have any questions or problems concerning your player please consult your nearest Sony dealer On safety As the laser beam used in the CD player...

Страница 34: ...here is a scratch dirt or fingerprints on the CD it may cause tracking error Notes on cassettes Break off the cassette tab from side A or B to prevent accidental recording If you want to reuse the tape for recording cover the broken tab with adhesive tape To record on a tape with its tab broken off cover the respective tab hole for side A or B with adhesive tape Take care not to cover the detector...

Страница 35: ...ce the CD with the label surface up Clean the CD Take out the CD and leave the CD compartment open for about an hour to dry moisture condensation Press p on the CD section to switch the function of the player to CD Reduce the volume Clean the CD or replace it if the CD is badly damaged Place the player in a location free from vibration Move the player away from the TV If you are using the remote w...

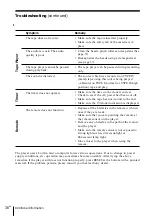
Страница 36: ... sure that you are pointing the remote at the remote sensor on the player Remove any obstacles in the path of the remote and the player Make sure the remote sensor is not exposed to strong light such as direct sunlight or fluorescent lamp light Move closer to the player when using the remote Tape Player Troubleshooting continued Timer Symptom The tape does not record The audio is weak The audio qu...

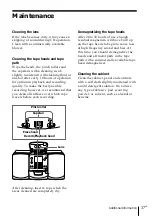
Страница 37: ...ape travels before each recording Maintenance Demagnetizing the tape heads After 20 to 30 hours of use enough residual magnetism will have built up on the tape heads to begin to cause loss of high frequency sound and hiss At this time you should demagnetize the heads and all metal parts in the tape path with a commercially available tape head demagnetizer Cleaning the cabinet Clean the cabinet pan...

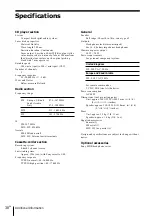
Страница 38: ...on Recording system 4 track 2 channel stereo Fast winding time Approx 120s sec with Sony cassette C 60 Frequency response TYPE I normal 40 16 000 Hz TYPE II high position 40 17 000 Hz General Speaker Full range 10 cm 4 in dia cone type x 2 Outputs Headphones jack stereo minijack For 16 68 ohms impedance headphones Maximum power output 20 W 20 W Power requirements For personal component system Unit...

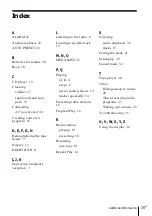
Страница 39: ...eption 7 L Listening to the radio 6 Locating a specific track 13 M N O MEGA BASS 32 P Q Playing a CD 4 a tape 8 preset radio stations 19 tracks repeatedly 14 Presetting radio stations 18 Program Play 16 R Radio stations playing 19 presetting 18 Recording on a tape 10 Repeat Play 14 S Selecting audio emphasis 32 tracks 13 Setting the clock 21 Setting up 29 Sound mode 32 T Tape player 20 Timer Falli...

Страница 40: ... der Seite des Geräts Achtung Stellen Sie das Gerät nicht an einem Ort auf an dem ausreichende Luftzufuhr nicht gegeben ist zum Beispiel in einem engen Regalfach oder in einem Einbauschrank VORSICHT Sie können dieses Gerät nur mit Netzstrom betreiben Sie können es nicht mit Batterien betreiben Wenn Sie das Netzkabel lösen werden die Speicherdaten für Uhrzeit Timer Radiosender nach etwa 30 Minuten ...

Страница 41: ...fle Play 16 Zusammenstellen eines eigenen Programms Program Play Das Radio 18 Speichern von Radiosendern 19 Wiedergeben gespeicherter Radiosender Der Kassettenrecorder 20 Ansteuern des Anfangs eines Titels Der Timer 21 Einstellen der Uhr 22 Aufwachen mit Musik 26 Einschlafen mit Musik 27 Aufnehmen von Radiosendungen mit dem Timer Vorbereitungen 29 Anschließen des Systems 32 Auswählen der Klangbeto...

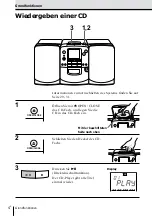
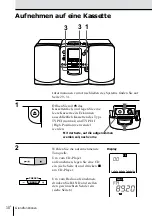
Страница 42: ... Seite 29 31 1 Öffnen Sie mit 6 OPEN CLOSE das CD Fach und legen Sie die CD in das CD Fach ein 2 Schließen Sie den Deckel des CD Fachs 3 Drücken Sie Direkteinschaltfunktion Der CD Player gibt alle Titel einmal wieder 1 2 3 OPEN CLOSE OPEN CLOSE Mit der beschrifteten Seite nach oben Display 1 2 3 4 5 6 7 8 9 10 CD ...

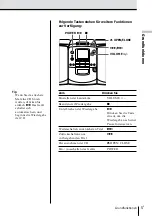
Страница 43: ...omatisch ein und beginnt die Wiedergabe der CD Zum Drücken Sie Einstellen der Lautstärke VOLUME Beenden der Wiedergabe p Unterbrechen der Wiedergabe Drücken Sie die Taste erneut um die Wiedergabe nach einer Pause fortzusetzen Weiterschalten zum nächsten Titel Zurückschalten zum vorhergehenden Titel Herausnehmen der CD 6 OPEN CLOSE Ein Ausschalten des Geräts POWER 6 OPEN CLOSE VOLUME POWER p ...

Страница 44: ...UNING gedrückt bis die Ziffern der Frequenzangabe im Display durchzulaufen beginnen Das Gerät durchsucht automatisch die Radiofrequenzen und stoppt wenn es einen Sender findet der in ausreichender Qualität empfangen werden kann Wird kein Sender gefunden drücken Sie die Taste so oft bis der gewünschte Sender eingestellt ist TUNING RADIO Display RADIO RADIO Zeigt an daß es sich um einen UKW Stereose...

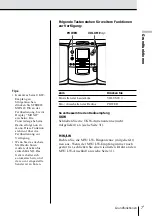
Страница 45: ...Sie das nächste Mal Radio hören wollen drücken Sie einfach BAND Das Gerät schaltet sich automatisch ein und der zuvor eingestellte Sender ist zu hören Zum Drücken Sie Einstellen der Lautstärke VOLUME Ein Ausschalten des Radios POWER So verbessern Sie den Radioempfang UKW Schließen Sie die UKW Außenantenne nicht mitgeliefert an siehe Seite 31 MW LW Richten Sie die MW LW Ringantenne mitgeliefert neu...

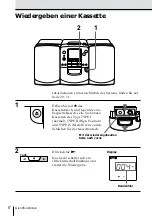
Страница 46: ...ttenfach und legen Sie eine bespielte Kassette ein Sie können Kassetten des Typs TYPE I normal TYPE II High Position und TYPE IV Metall verwenden Schließen Sie das Kassettenfach 2 Drücken Sie Das Gerät schaltet sich ein Direkteinschaltfunktion und startet die Wiedergabe 2 1 Mit der wiederzugebenden Seite nach vorne Display TAPE Bandzähler TAPE ...

Страница 47: ...Erscheint im Display Einer Bandseite Beider Bandseiten und zwar nur zuerst die Vorder dann die Rückseite Beider Bandseiten mehrmals Tips Drücken Sie COUNTER RESET auf der Fernbedienung um den Zähler auf 000 zu setzen Diese Funktion steht nur über die Fernbedienung zur Verfügung Wenn Sie ein mit dem Dolby B NR System aufgenommenes Band wiedergeben drücken Sie DOLBY NR auf der Fernbedienung bis DOLB...

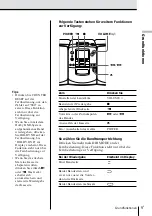
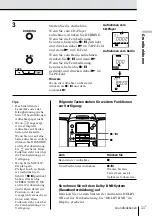
Страница 48: ... Kassetten des Typs TYPE I normal und TYPE II High Position verwendet werden 2 Wählen Sie die aufzunehmende Tonquelle Um vom CD Player aufzunehmen legen Sie eine CD ein siehe Seite 4 und drücken p am CD Player Um vom Radio aufzunehmen drücken Sie BAND und stellen den gewünschten Sender ein siehe Seite 6 3 1 3 Mit der Seite auf die aufgenommen werden soll nach vorne 1 2 3 4 5 6 7 8 9 10 CD Display ...

Страница 49: ...influßt den Aufnahmepegel nicht Wenn angezeigt wird erfolgt die Aufnahme auf beiden Seiten der Kassette Wenn Sie nur auf eine Seite aufnehmen wollen drücken Sie DIR MODE auf der Fernbedienung bis erscheint Diese Funktion steht nur über die Fernbedienung zur Verfügung Wenn beim MW LW Empfang ein Pfeifgeräusch zu hören ist nachdem Sie in Schritt 3 r P gedrückt haben drücken Sie STEREO MONO ISS auf d...

Страница 50: ...enn Sie das Gerät ausschalten wird die aktuelle Uhrzeit im Display angezeigt solange das Gerät mit der Netzsteckdose verbunden ist Wenn Sie die Funktion wechseln z B von CD zu RADIO erscheint etwa 4 Sekunden lang die Anzeige der entsprechenden Funktion z B Frequenzbereich und Frequenz bei der RADIO Funktion Dann wird wieder die aktuelle Uhrzeit angezeigt Wenn Sie die Anzeige einer bestimmten Funkt...

Страница 51: ...be vorwärts oder rückwärts und halten Sie die Taste gedrückt bis Sie die Passage gefunden haben einer Passage mit Hilfe im Pausemodus des Displays vorwärts oder rückwärts und halten Sie die Taste gedrückt bis Sie die Passage gefunden haben Hinweis Sie können einen bestimmten Titel nicht ansteuern wenn SHUF oder PGM im Display leuchtet Schalten Sie die Anzeige aus indem Sie p im CD Feld drücken Tip...

Страница 52: ...euchtet schalten Sie sie mit p im CD Feld aus 1 Drücken Sie p CD erscheint im Display 2 Gehen Sie folgendermaßen vor Zum Wiederholen Drücken Sie eines einzelnen Titels 1 Drücken Sie REPEAT bis REP 1 erscheint 2 Drücken Sie die Zahlentaste die der Nummer des zu wiederholenden Titels entspricht aller Titel 1 Drücken Sie REPEAT bis REP ALL erscheint 2 Drücken Sie der Titel in 1 Drücken Sie PGM SHUF w...

Страница 53: ...l in willkürlicher Reihenfolge wiedergeben lassen 1 Drücken Sie p CD erscheint im Display 2 Drücken Sie PGM SHUF bis SHUF im Display erscheint 3 Starten Sie mit die Wiedergabe in willkürlicher Reihenfolge So brechen Sie Shuffle Play ab Drücken Sie PGM SHUF bis SHUF nicht mehr im Display angezeigt wird PGM SHUF p ...

Страница 54: ...eihenfolge Programmierte Titel werden im Musikkalender angezeigt 4 Starten Sie mit die Wiedergabe in programmierter Reihenfolge So brechen Sie Program Play ab Drücken Sie PGM SHUF bis PGM nicht mehr im Display angezeigt wird So lassen Sie die Reihenfolge der Titel vor der Wiedergabe anzeigen Drücken Sie ENTER Mit jedem Tastendruck werden die Titelnummern in der programmierten Reihenfolge angezeigt...

Страница 55: ...weils letzte Titel im Programm gelöscht 2 Geben Sie die Titelnummern erneut ein Ändern des gesamten Drücken Sie p im CD Feld Programms Stellen Sie dann wie oben angegeben ein neues Programm zusammen Tips Sie können dasselbe Programm nochmals abspielen da das Programm gespeichert bleibt bis Sie das CD Fach öffnen Sie können ein eigenes Programm auch aufnehmen indem Sie DUBBING am Gerät drücken ...

Страница 56: ...quenz gespeichert sofern sie in ausreichender Signalstärke empfangen werden Wenn ein Sender nicht automatisch gespeichert werden kann Einen Sender mit schwachem Signal müssen Sie von Hand einstellen und speichern Gehen Sie dazu und zum Ersetzen eines gespeicherten Senders durch einen neuen folgendermaßen vor 1 Drücken Sie BAND bis der gewünschte Frequenzbereich im Display erscheint 2 Stellen Sie d...

Страница 57: ...n Sie sie mit Hilfe der Zahlentasten mühelos abrufen BAND Tip Sie können einen gespeicherten Sender auch mit den Tasten am Gerät einstellen Verwenden Sie dazu PRESET anstelle der Zahlentasten 1 Wählen Sie mit BAND den Frequenzbereich 2 Stellen Sie mit den Zahlentasten einen gespeicherten Sender ein Zahlentasten ...

Страница 58: ...Titels Vorderseite 0 Rückseite 9 0 Das Band wird an den Anfang des nächsten bzw aktuellen Titels gespult und die Wiedergabe beginnt automatisch Hinweise Wenn ein Titel eine sehr leise Passage von einigen Sekunden Länge enthält startet das Gerät möglicherweise die Wiedergabe an dieser Stelle Wenn Sie 0 oder drücken und der Titel Stellen ohne Ton enthält funktioniert die AMS Funktion nicht korrekt D...

Страница 59: ...e Uhrzeit wird bei diesem Gerät im 24 Stunden Format angezeigt Schließen Sie zunächst das Netzkabel an siehe Seite 30 1 Halten Sie CLOCK gedrückt bis 0 00 blinkt 2 Stellen Sie die Uhrzeit ein 1 Stellen Sie mit HOUR die Stunden ein 2 Stellen Sie mit MIN die Minuten ein 3 Drücken Sie ENTER blinkt und die Uhr beginnt bei 00 Sekunden zu laufen HOUR MIN ENTER CLOCK ...

Страница 60: ...halten soll und der Lautstärke der Musikquelle TIMER Einstellen der Musikquelle und der Uhrzeit zu der sich die Musikquelle einschalten soll ALARM Sorgen Sie zunächst dafür daß die Anzeige Alarm nicht im Display leuchtet Andernfalls drücken Sie ALARM SET OFF 1 Bereiten Sie die wiederzugebende Musikquelle vor Musikquelle Gehen Sie folgendermaßen vor BUZZER CD Legen Sie eine CD ein RADIO Stellen Sie...

Страница 61: ...benenfalls die Einstellung wenn sie aufleuchtet Drücken Sie danach wieder ALARM So benutzen Sie das Gerät vor der mit dem Timer programmierten Zeit Wenn Sie das Gerät einschalten können Sie es wie gewohnt benutzen Wenn Sie beim Radio einen anderen als den in Schritt 1 auf Seite 22 eingestellten Sender einstellen hören Sie zur voreingestellten Zeit den zuletzt eingestellten Sender Schalten Sie das ...

Страница 62: ...sikquelle vor Musikquelle Gehen Sie folgendermaßen vor CD Legen Sie eine CD ein RADIO Stellen Sie einen Sender ein TAPE Legen Sie eine Kassette ein Sie können nicht BUZZER wählen 2 Drücken Sie TIMER so daß die Anzeige t erscheint Beachten Sie im folgenden die Anzeigen im Display 3 Drücken Sie SELECT bis die gewünschte Musikquelle im Display angezeigt wird Sie können nicht BUZZER wählen Hinweis Sie...

Страница 63: ...ird eingeblendet Danach wird die Musik zur voreingestellten Zeit ausgeblendet und das Gerät schaltet sich aus So können Sie die Startzeit überprüfen ändern Drücken Sie TIMER und dann ENTER Mit jedem Tastendruck auf ENTER leuchtet eine gespeicherte Einstellung auf Ändern Sie gegebenenfalls eine Einstellung wenn sie aufleuchtet Drücken Sie danach wieder TIMER So benutzen Sie das Gerät vor der mit de...

Страница 64: ...k ausgeblendet und das Gerät schaltet sich automatisch aus So deaktivieren Sie die Sleep Funktion Blenden Sie mit der Taste SLEEP die Anzeige SLEEP aus So ändern Sie die voreingestellte Zeit Gehen Sie wie in Schritt 2 und 3 erläutert vor Tips Die Anzeige im Display ist abgeschwächt während der Sleep Timer aktiviert ist Sie können den Weck Timer mit dem Sleep Timer kombinieren Stellen Sie dazu zuer...

Страница 65: ...hme ein 2 Wählen Sie mit DIR MODE die Bandrichtung 3 Drücken Sie TIMER so daß die Anzeige t erscheint Beachten Sie im folgenden die Anzeigen im Display 4 Drücken Sie SELECT bis RADIO REC erscheint Hinweis Sie können für den Aufnahme Timer und den Weck Timer Seite 24 nicht dieselbe Zeit voreinstellen Tip Wenn Sie in Schritt 1 einen MW LW Sender einstellen drücken Sie r P und überprüfen Sie ob Störg...

Страница 66: ...stellung wenn sie aufleuchtet Drücken Sie danach wieder TIMER So hören Sie Radio usw vor dem Start einer Timer Aufnahme Wenn Sie das Gerät einschalten können Sie es wie gewohnt benutzen Stellen Sie vor der voreingestellten Zeit den aufzunehmenden Sender ein und schalten Sie das Gerät aus So beenden Sie die Timer Aufnahme Schalten Sie das Gerät aus Tip Wenn Sie einen Fehler machen drücken Sie CANCE...

Страница 67: ...Störgeräusche zu hören sein Linker Lautsprecher Anschließen des Systems Achten Sie darauf daß das Gerät ausgeschaltet ist bevor Sie irgendwelche Anschlüsse vornehmen Rechter Lautsprecher Lautsprecherkabel Richten Sie die Antenne neu aus wenn Sie den Empfang verbessern wollen UKW Antenne mitgeliefert UKW MW LW Antennenanschluß und Anschluß y 2 Lautsprecheranschlüsse 1 An eine Netzsteckdose 3 Linker...

Страница 68: ...teuern läßt tauschen Sie alle Batterien gegen neue aus Anschließen des Systems Fortsetzung Tips Nur für Kunden in Saudi Arabien Verwenden Sie den mitgelieferten Zwischenstecker wenn der Netzstecker des Netzkabels nicht in die Netzsteckdose paßt Je nach Polarität des Steckers kann die Klangqualität unterschiedlich sein Ändern Sie die Richtung in der Sie den Stecker einstecken und überprüfen Sie die...

Страница 69: ...den MW LW Anschluß an Der Draht sollte so horizontal wie möglich in der Nähe eines Fensters oder einer Außentüre ausgerichtet sein Sie brauchen die mitgelieferte MW LW Ringantenne nicht vom Gerät zu lösen Wichtig Wenn Sie eine Außenantenne verwenden müssen Sie den Anschluß y erden Andernfalls besteht die Gefahr eines Blitzschlags Verbinden Sie den Massedraht auf keinen Fall mit einer Gasleitung An...

Страница 70: ...ive Klänge mit Betonung der Bässe kraftvolle klare Klänge mit Betonung des unteren und oberen Klangspektrums leichte helle Klänge mit Betonung des oberen und mittleren Klangspektrums hervorgehobene Gesangsstimmen mit Betonung des mittleren Klangspektrums Verstärken der Bässe Drücken Sie MEGA BASS MEGA BASS erscheint im Display Wenn Sie wieder zum normalen Klang schalten wollen drücken Sie die Tast...

Страница 71: ...nd warten Sie ein paar Minuten lang ab Aufwärmzeit bevor Sie eine Kassette einlegen Sollten an Ihrem Gerät Probleme auftreten oder sollten Sie Fragen haben wenden Sie sich bitte an Ihren Sony Händler Sicherheit Der Laser Strahl den dieser CD Player generiert schädigt die Augen Versuchen Sie daher nicht das Gerät zu zerlegen Überlassen Sie Wartungsarbeiten stets nur qualifiziertem Fachpersonal Soll...

Страница 72: ...er Wiedergeben verwenden Hinweise zu CDs Reinigen Sie die CD vor dem Abspielen mit einem Reinigungstuch Wischen Sie dabei immer von der Mitte nach außen Verwenden Sie keine Lösungsmittel wie Benzin oder Verdünner und keine handelsüblichen Reinigungsmittel oder Antistatik Sprays für Schallplatten Setzen Sie die CD weder direktem Sonnenlicht noch Wärmequellen wie zum Beispiel Warmluftauslässen aus L...

Страница 73: ...n Sie das Gerät weiter entfernt vom Fernsehgerät auf Wenn Sie die Fernbedienung benutzen und dabei einen MW LW Sender empfangen können Störgeräusche zu hören sein Dies läßt sich nicht vermeiden Drücken Sie STEREO MONO ISS auf der Fernbedienung bis ST erscheint Wenn Sie einen UKW Sender empfangen und das Gerät neben einem Fernsehgerät mit Zimmerantenne steht stellen Sie das Gerät weiter vom Fernseh...

Страница 74: ...E I normal oder TYPE II High Position Die Uhrzeit muß korrekt eingestellt sein Überprüfen Sie ob die Stromversorgung unterbrochen war Sehen Sie nach ob das Bandende erreicht ist Die Anzeige t Uhrzeit muß angezeigt werden Tauschen Sie alle Batterien in der Fernbedienung gegen neue aus wenn sie schwach sind Achten Sie darauf die Fernbedienung auf den Fernbedienungssensor am Gerät zu richten Entferne...

Страница 75: ...nahme zu reinigen Wartung Legen Sie nach dem Reinigen eine Kassette erst ein wenn alle Bereiche vollständig trocken sind Entmagnetisieren der Tonköpfe Nach etwa 20 bis 30 Betriebsstunden haben sich auf den Köpfen so viele magnetische Ablagerungen gebildet daß hohe Frequenzen nicht mehr zu hören sind oder es zu Störgeräuschen kommt In diesem Fall müssen die Köpfe und alle anderen Metallkomponenten ...

Страница 76: ...uren 2 Kanäle stereo Spuldauer ca 120 Sek mit Kassette C 60 von Sony Frequenzgang TYPE I normal 40 16 000 Hz TYPE II High Position 40 17 000 Hz Allgemeines Lautsprecher Voller Bereich Durchmesser 10 cm Konus x 2 Ausgänge Kopfhörerbuchse Stereominibuchse Für Kopfhörer mit 16 68 Ohm Impedanz Maximale Leistungsabgabe 20 W 20 W Betriebsspannung Personal Component System Großbritannien 230 240 V Wechse...

Страница 77: ...Klangbetonung 32 Klangmodus 32 M MEGA BASS 32 P Program Play 16 R Radioempfang 6 Radiosender einstellen 19 speichern 18 Reinigen Gehäuse 37 Tonköpfe und Bandtransportweg 37 Repeat Play 14 S Signalton 30 Speichern von Radiosendern 18 Störungsbehebung 35 T Timer Aufnehmen von Radiosendungen mit dem Timer 27 Aufwachen mit Musik 22 Einschlafen mit Musik 26 V Verbessern des Radioempfangs 7 Vorbereitung...

Страница 78: ...Weitere Informationen 40D ...

Страница 79: ...Weitere Informationen 41D ...

Страница 80: ...Sony Corporation Printed in Korea ...

Отзывы: