background image

16

Recording Camcorder Video on This Unit

  Rec

o

rdi
ng Camc

ord

e

r Vide

o on T

h

is

 U
n

it

Play back video

By pressing the PLAY button on the 
camcorder, you can play back recorded 
video clips.

For information on playback, refer to the operating 
instructions of the camcorder.

Recording and Playback 
Precautions

Recording operation in high-
vibration environments

• If the unit is exposed to a constant 

vibration during operation, recording or 
playback may be stopped to protect the 
HDD. In such cases, integrity of the data 
during vibration is not guaranteed.

• If recording is stopped due to vibration, 

you may need to restore the HDD to start 
recording again after removing the 
source of vibration. However, the data 
recorded immediately before the forced 
stop may be lost even after HDD 
restoration. The duration of data that 
cannot be restored differs depending on 
the camcorder model and recording 
mode.

For more information on restoring the HDD, 
refer to the section on memory card restoration in 
the operating instructions of your camcorder.

Recording operation and data 
integrity when battery power 
is low or power is cut off

• When the remaining battery capacity is 

low, the BATTERY indicator flashes. If 
you continue to use the unit, the unit 
automatically stops recording for safety 
and eventually powers itself off. 

For more information on the BATTERY indicator 
flashing, see “Status Indications” (page 20)
.

• If the battery pack or battery charger is 

disconnected during recording, integrity 
of the data recorded is not guaranteed. All 
of the data stored on the HDD may be 
damaged.

• If the PHU connection cable is 

disconnected during recording, recording 
will stop. The data recorded up to that 
point is stored, but integrity of such data 
is not guaranteed.

• If the power is accidentally turned off 

during recording, recording will stop. 
However, the data recorded up to that 
point is stored normally.

• The unit may stop operating if it detects 

that the ambient temperature is lower or 
higher than the HDD guaranteed 
operation temperature range. This is done 
to protect the unit. If this occurs, wait 
until the ambient temperature returns to 
the guaranteed operation temperature 
range before trying to use the unit. See 
“Specifications” (page 21) for the 
guaranteed operation temperature range.

• If the unit stops responding during power 

off (including automatic power off 
because of low battery power), power the 
unit off by pressing the power switch and 
holding it for at least three seconds. 
However, recorded data is not guaranteed 
in this case. 
Forcibly cutting power by disconnecting 
the battery pack or battery charger may 
damage the unit.

About the drop detection 
function

This unit is equipped with a 3G sensor to 
protect the internal HDD when the unit is 
dropped or overturned. The sensor detects 
differences in acceleration and may activate 
the drive protection function if you jump 
down from a high place, run down a flight 
of stairs, or otherwise cause the unit to 
detect acceleration similar to that of the unit 

Содержание PHU-60K Series

Страница 1: ...Operating InstructionsGB Professional Harddisk Unit 3 875 207 12 1 PHU 60K 2008 Sony Corporation ...

Страница 2: ... splashing No objects filled with liquids such as vases shall be placed on the apparatus ATTENTION Eviter d exposer l appareil à un égouttement ou à des éclaboussures Ne placer aucun objet rempli de liquide comme un vase sur l appareil ACHTUNG Das Gerät ist nicht tropf und spritzwassergeschützt Es dürfen keine mit Flüssigkeiten gefüllten Gegenstände z B Vasen darauf abgestellt werden CAUTION The u...

Страница 3: ...ns not expressly approved in this manual could void your authority to operate this equipment NOTE This equipment has been tested and found to comply with the limits for a Class B digital device pursuant to Part 15 of the FCC Rules These limits are designed to provide reasonable protection against harmful interference in a residential installation This equipment generates uses and can radiate radio...

Страница 4: ...tilisé dans les environnements électromagnétiques suivants E1 résidentiel E2 commercial et industrie légère E3 urbain extérieur et E4 environnement EMC contrôlé ex studio de télévision Für Kunden in Europa Dieses Produkt besitzt die CE Kennzeichnung und erfüllt die EMV Richtlinie 2004 108 EC der EG Kommission Angewandte Normen EN55103 1 Elektromagnetische Verträglichkeit Störaussendung EN55103 2 E...

Страница 5: ... is Sony Corporation 1 7 1 Konan Minato ku Tokyo 108 0075 Japan De gemachtigde vertegenwoordiger voor EMC en productveiligheid is Sony GmbH Hedelfinger Strasse 61 70327 Stuttgart Duitsland Voor diensten of waarborg aangelegenheden gelieve de gegeven adressen in de aparte diensten en waarborgdocumenten te gebruiken O produtor deste produto é a Sony Corporation 1 7 1 Konan Minato ku Tokyo 108 0075 J...

Страница 6: ...blémákkal a garanciajegyben illetve valamely független szerviz által megadott címet keresse fel Produkt ten został wyprodukowany przez Sony Corporation 1 7 1 Konan Minato ku Tokyo 108 0075 Japonia Autoryzowanym przedstawicielem w zakresie EMC oraz bezpieczeństwa użytkowania tego produktu jest Sony Deutschland GmbH Hedelfinger Strasse 61 70327 Stuttgart Niemcy W sprawie serwisu i gwarancji proszę o...

Страница 7: ...0075 Japan Autorisert representant for EMC og produktsikkerhet er Sony Deutschland GmbH Hedelfinger Strasse 61 70327 Stuttgart Germany For eventuelle garanti og servicehenvendelser henviser vi til kontaktopplysningene i de separate garanti og servicedokumenter Pentru clientii din Europa Producatorul este Sony Corporation 1 7 1 Konan Minato ku Tokyo 108 0075 Japan Reprezentantul autorizat pentru El...

Страница 8: ...lling on the Camcorder 13 Camcorder Installation Position 13 Installation on the Camcorder 14 Recording Camcorder Video on This Unit 15 Recording and Playback Precautions 16 Playing Back Video Clips on a Recorder 17 Copying Video Clips to Editing Equipment 18 Connecting to a Computer 18 Copying Video Clips 19 Disconnecting the Unit from the Computer 19 Status Indications 20 Specifications 21 ...

Страница 9: ... danger of tipping over or falling off Data in the HDD may be damaged if the unit tips over or falls off the desk If you think the unit may have been subjected to excessive shock check to be sure that it is operating properly before using it Do not place the unit near equipment that generates vibrations Do not use in areas of low atmospheric pressure Do not use the HDD in areas of low atmospheric ...

Страница 10: ...ing the entire HDD with data shot in a quiet place with the lens cover on Note that data in the HDD may not be completely erased when the HDD is formatted If you plan to dispose of the unit physical destruction is recommended You can make it very difficult to recover previously recorded data by physically destroying the internal HDD Outline This unit is a Professional Harddisk Unit for Sony XDCAM ...

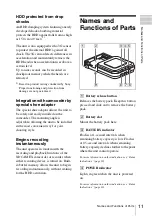
Страница 11: ...is adjustable allowing the unit to be installed in the most convenient way for your shooting style Begins recording instantaneously The unit operates in tandem with the recording and playback functions of the XDCAM EX camcorder or recorder when either recording device is turned on Built in buffer memory allows the unit to begin recording instantaneously without waiting for the HDD activation Names...

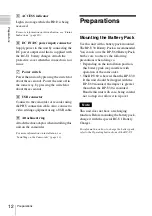
Страница 12: ... adaptor when installing this unit on the camcorder For more information on installation see Installing on the Camcorder page 13 Preparations Mounting the Battery Pack Use this unit with a battery pack mounted The BP U30 Battery Pack is recommended You can also use the BP U60 Battery Pack but be sure to observe the following precautions when doing so Depending on the installation position this bat...

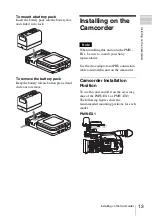
Страница 13: ... and slide out to remove Installing on the Camcorder Note When installing this unit onto the PMW EX1 be sure to consult your Sony representative Use the shoe adaptor and PHU connection cable to install this unit on the camcorder Camcorder Installation Position To use this unit install it on the accessory shoe of the PMW EX1 or PMW EX3 The following figures show the recommended mounting positions f...

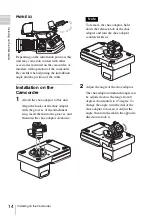
Страница 14: ... to this unit Align the hooks of the shoe adaptor with the grooves of the attachment ring insert them into the grooves and then turn the shoe adaptor clockwise Note To remove the shoe adaptor hold down the release knob of the shoe adaptor and turn the shoe adaptor counterclockwise 2 Adjust the angle of the shoe adaptor The shoe adaptor attachment angle can be adjusted across the range from 0 degre...

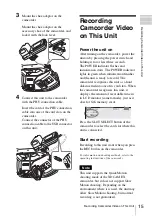
Страница 15: ...ER indicator lights in green when initialization finishes and the unit is ready to record The camcorder recognizes this unit as a hard disk inserted into one of its card slots When the camcorder recognizes this unit it displays the amount of recordable time in its LCD monitor camera mode just as it does for SxS memory cards Press the SLOT SELECT button of the camcorder to select the card slot wher...

Страница 16: ...f the battery pack or battery charger is disconnected during recording integrity of the data recorded is not guaranteed All of the data stored on the HDD may be damaged If the PHU connection cable is disconnected during recording recording will stop The data recorded up to that point is stored but integrity of such data is not guaranteed If the power is accidentally turned off during recording rec...

Страница 17: ...isplayed as thumbnail reduced size images and played back on the LCD panel of the recorder 1 Connect this unit and the BC U1 Connect the DC power output cord supplied with the BC U1 to the DC IN connector on this unit Connect the AC power cord of the BC U1 and set the mode select switch on the BC U1 to the DC OUT For details refer to the Operating Instructions of the BC U1 2 Connect this unit to t...

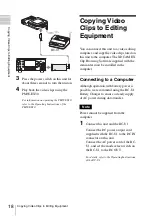
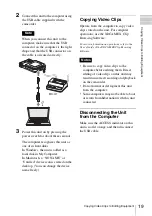
Страница 18: ...he XDCAM EX Clip Browsing Software supplied with the camcorder must be installed in the computer Connecting to a Computer Although operation with battery power is possible we recommend using the BC U1 Battery Charger to ensure a steady supply of AC power during data transfer Note Power cannot be supplied from the computer 1 Connect this unit and the BC U1 Connect the DC power output cord supplied ...

Страница 19: ...ktop You can change the device name freely Copying Video Clips Operate from the computer to copy video clips stored on the unit For computer operations use the XDCAM EX Clip Browsing Software For more information on operations refer to the User s Guide of the XDCAM EX Clip Browsing Software Notes Be sure to copy video clips to the computer before editing them Direct editing of video clips on this ...

Страница 20: ...cally Turn the power off and exchange the battery pack for a fully charged one or connect the battery charger to the DC IN connector Off Lit Flash 0 25 second interval An abnormality has been detected in the battery pack Turn the power off immediately Contact your Sony representative Off Flash 0 5 second interval Flash 0 5 second interval A hardware error has occurred Turn the power off and then o...

Страница 21: ...ding on ambient temperature and operating conditions Operating temperature 5 C to 40 C 41 F to 104 F Operating humidity 8 to 90 no condensation Storage temperature 20 C to 60 C 4 F to 140 F Storage humidity 8 to 90 no condensation Operating altitude 300 m to 3 000 m 984 feet to 9 843 feet 0 7 atm Storage altitude 300 m to 12 000 m 984 feet to 39 370 feet Dimensions w d h Approx 89 135 32 59 mm 3 5...

Страница 22: ...ted by or marks Notes Always make a test recording and verify that it was recorded successfully SONY WILL NOT BE LIABLE FOR DAMAGES OF ANY KIND INCLUDING BUT NOT LIMITED TO COMPENSATION OR REIMBURSEMENT ON ACCOUNT OF FAILURE OF THIS UNIT OR ITS RECORDING MEDIA EXTERNAL STORAGE SYSTEMS OR ANY OTHER MEDIA OR STORAGE SYSTEMS TO RECORD CONTENT OF ANY TYPE Always verify that the unit is operating prope...

Страница 23: ...Sony Corporation ...

Отзывы: