background image

PCM-D100

4

SECTION  1

SERVICING  NOTES

ABOUT  THE  BOARDS  REPLACING

When boards installed by this unit are defective, replace the com-
plete mounted board. Individual electrical parts that the mount is 
done cannot be exchanged. When electric parts installed by this 
unit are defective, replace the complete mounted board.

ABOUT  THE  DESTINATION  SETTING  WHEN  REPLAC-
ING  THE  SYSTEM  BOARD

When the SYSTEM board of this unit is replaced, perform pro-
cessing according to the following procedure.

Precaution

The contents which are not opened to customers are included 
in the following procedure. After you are cautious of handling of 
information, execute work under the suffi cient administration.

1.  About the preparing of tools

Confi rm the method of obtaining the fi le used by this operation to 
the service headquarters.

2. Setting 

method

Note:

 The destination setting is impossible when battery voltage is not 

enough. Do work using the battery with suffi cient battery level.

Procedure:

1.  Connect this unit to the PC.

PC

to a USB port

USB connecting
cable (supplied)

to the 

connector

2.  On PC, unzip the model setting fi le  (change_destination_

PCM-D100.zip) to get folder on PC.

3.  On PC, open the unzipped folder, and select the folder corre-

sponding to the destination of this unit.

PCM-D100_CED_CEK
PCM-D100_CNA
PCM-D100_E
PCM-D100_J
PCM-D100_UC

4.  On PC, copy the “LOCAL.UPG” fi le included in the folder 

selected at step 3 to root folder of this unit.

5.  Remove this unit from the PC.

PC

from a 
USB port

USB connecting
cable (supplied)

from the 

connector

6.  This unit is rebooted automatically.
7.  The destination setting is completed.

3. Confi rmation and initialize method
Procedure:

1.  Equip this unit with battery.
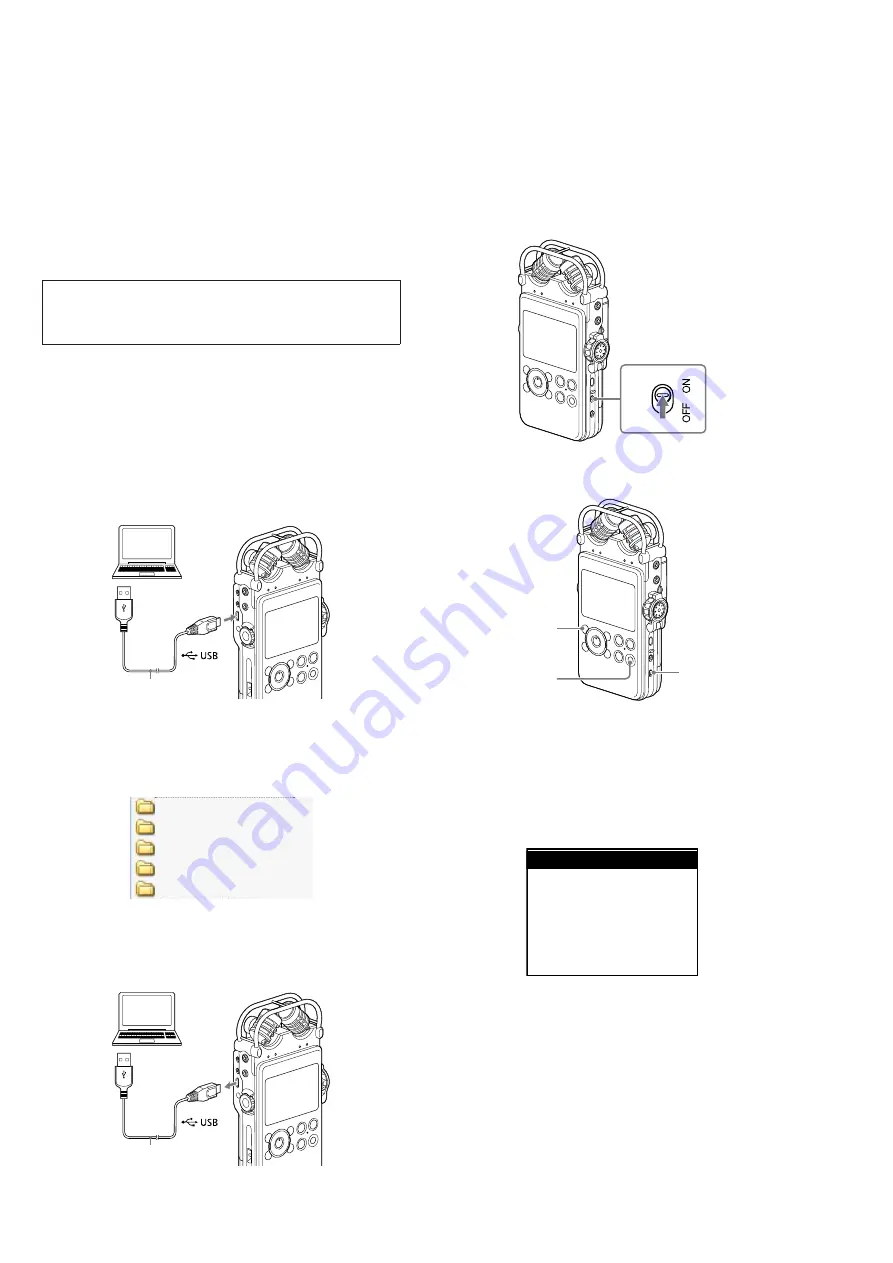
2.  Slide the [POWER] switch in the direction of “ON” until the 

window display appears.

POWER

3.  While pressing the [F1] and [T-MARK] keys, slide the 

[HOLD] switch in the direction of “ON” or “OFF” (Either 
“ON” or “OFF” is OK).

F1

T-MARK

HOLD

4.  While pressing the [F1] and [T-MARK] keys, slide the [HOLD] 

switch in the direction opposite to that specifi ed in step 3. 

5.  While pressing the [F1] and [T-MARK] keys, slide the [HOLD] 

switch in the direction opposite to that specifi ed in step 4. 

6.  The test mode menu is displayed, and enter the test mode. Re-

lease the [F1] and [T-MARK] keys.


(Displayed characters/values in the following fi gure are ex-
ample)

<Version>

<Sleep>
<Deep Sleep>
<Off Deep Sleep>
<Power Down>

LCD Display

R

 / 

r

 / [ENT]

B

7.  Press the [

v

] or [

V

] keys to select the “Version”, and press the 

[

N

] key.

– Continued on next page –

Содержание PCM-D100

Страница 1: ... LPCM 192kHz 176 4kHz 96kHz 88 2 kHz 48kHz 44 1 kHz 24bit 96 dB or above for S N 100dB OFF 100 dB or above for S N 100dB ON Total harmonic distortion Input from the LINE IN OPT jack output from LINE OUT OPT jack when recording playing back DSD 2 8MHz 1bit 0 008 or below 1 kHz 22 kHz LPF LPCM 192kHz 176 4kHz 24bit 96kHz 88 2kHz 48kHz 44 1kHz 16bit 24bit 0 006 or below 1 kHz 22 kHz LPF Speaker Appro...

Страница 2: ...x 16 hrs LPCM 44 1kHz 16bit STEREO Approx 13 hrs Approx 22 hrs Approx 18 hrs Approx 18 hrs MP3 320kbps STEREO Approx 13 hrs Approx 22 hrs Approx 18 hrs Approx 18 hrs 4 Measured value by the standar d of JEITA Japan Electronics and Information Technology Industries As sociation The battery life may shorten depending on how you oper ate the linear PCM recorder 5 When playing back music thr ough the ...

Страница 3: ... MIC Section 27 4 2 Panel Front Section 28 4 3 LCD Section 29 4 4 POWER Board Section 30 4 5 AUDIO AD AUDIO DA Board Section 31 4 6 Microphone Section 32 4 7 Battery Case Lid Section 33 4 8 Case Section 34 5 ACCESSORIES 35 TABLE OF CONTENTS SAFETY RELATED COMPONENT WARNING COMPONENTS IDENTIFIED BY MARK 0 OR DOTTED LINE WITH MARK 0 ON THE SCHEMATIC DIAGRAMS AND IN THE PARTS LIST ARE CRITICAL TO SAF...

Страница 4: ...D100 zip to get folder on PC 3 On PC open the unzipped folder and select the folder corre sponding to the destination of this unit PCM D100_CED_CEK PCM D100_CNA PCM D100_E PCM D100_J PCM D100_UC 4 On PC copy the LOCAL UPG file included in the folder selected at step 3 to root folder of this unit 5 Remove this unit from the PC PC from a USB port USB connecting cable supplied from the connector 6 Th...

Страница 5: ...ex ample Version PCM D100 CN ARM 1 00 01 OMF 4 11 63 SYS 20130906RB T t Stop Ret Destination LCD Display 9 Press the x STOP key return to test mode menu 10 Press the v or V keys to select the Factory Ship and press the N key 11 Press the N key again and the initialization is performed Factory Ship Execute LCD Display 12 This unit is reboots ...

Страница 6: ...C SW ASSY Page 17 2 18 AUDIO AD BOARD Page 16 2 17 CHASSIS LOWER Page 16 2 16 BUTTON LIGHT ASSY Page 15 2 15 CHASSIS POWER Page 15 2 13 AUDIO DA BOARD Page 14 2 12 CHASSIS UPPER Page 13 2 11 DA C BOARD Page 13 2 9 SP BOX ASSY SP1 Page 12 2 8 POWER BOARD 2 Page 11 2 7 POWER BOARD 1 Page 10 2 6 LED ASSY Page 10 2 5 KNOB REC VOL L BLOCK SPACER REC VOL B Page 9 2 4 LCD ASSY LCD1 Page 9 2 3 PANEL FRONT...

Страница 7: ...C 2 two screws M1 4 Screw holes are not aligned 2 two screws M1 4 Note When installing the guard MIC insert firmly it and check that align the screw hole and case hole Note When installing the guard MIC insert firmly it and check that align the screw hole and panel front hole OK NG NRWH IRU LQVWDOOLQJ WKH JXDUG 0 Screw holes are aligned Screw holes are not aligned ...

Страница 8: ...PCM D100 8 2 3 PANEL FRONT BLOCK L O C K R E L E A S E 3 two stoppers 1 7 1 Slide the knob to RELEASE side 2 Open the battery case lid Rear bottom view Front bottom view 4 panel front block ...

Страница 9: ...6 spring knob REC L 7 spacer REC VOL B spacer REC VOL B rib shaft hole 1 open the guard REC ornament REC VOL five holes 0 1 2 3 4 5 6 7 8 9 1 0 Front top view shaft Note 1 When installing the ornament REC VOL align this claw with the position of 0 mark of the knob REC VOL block Note 4 When installing the spacer REC VOL B arrange the rib outside Note 3 When installing the knob REC VOL block align t...

Страница 10: ...oard three bosses three bosses URQW ERWWRP YLHZ 5 screw 3 tape sub material tape sub material 4 stopper M1 7 u 3 0 1 Remove the solder speaker wire orange yellow 2 blind sheet circus jack blind sheet circus jack 1 Remove the solder speaker wire green blue green blue orange yellow POWER board POWER board POWER board Front bottom view ire VettinJ ire VettinJ center line center line OinG VKeet FirFXV...

Страница 11: ...ard chassis POWER POWER board 5 Remove two solders AUDIO DA board wire 5 Remove five solders AUDIO AD board wire 5 Remove three solders SYSTEM board wire SW board wire black SW board wire red AUDIO AD board wire red AUDIO AD board wire blue AUDIO AD board wire green AUDIO AD board wire gray SYSTEM board wire white SYSTEM board wire red SYSTEM board wire black AUDIO AD board wire yellow AUDIO DA bo...

Страница 12: ...hen installing the knob play VOL align the shape of hole and the shape of shaft Note 1 When installing the HP VOLUME assy push the DA C board wire under the chassis upper HP VOLUME assy Knob play VOL setting 3 two stoppers M1 7 u 3 0 6 HP VOLUME assy DA C board chassis upper 4 Remove the HP VOLUME assy in the direction of an arrow 5 Remove five solders AUDIO DA board blue white yellow red black LU...

Страница 13: ...claw 1 Remove the solder gray 1 Remove the solder red gray red 3 Remove the DA C board in the direction of an arrow 6 DA C board LUH VHWWLQJ URQW WRS YLHZ AUDIO DA board DA C board 2 12 CHASSIS UPPER 2 screw M2 u 14 1 screw 3 chassis upper 2 screw M2 u 14 Front top view ...

Страница 14: ...view 1 screw M1 4 2 connector CN3301 3 Remove the AUDIO DA board in the direction of an arrow 5 AUDIO DA board 4 Draw out two jacks 2 14 REC VOLUME ASSY 1 flexible board CN3002 2 screw 4 REC VOLUME assy 3 two stoppers M1 7 u 3 0 Front top view ...

Страница 15: ...1 7 u 3 0 4 chassis power button light assy Sectional view chassis power button light assy Note When installing the chassis power insert the rib of chassis power under the button light assy 2 16 BUTTON LIGHT ASSY Front bottom view 1 boss 1 boss 2 Draw out two buttons 4 button light assy 3 stopper guard REC ...

Страница 16: ...r MIC SW board wire white 1 Remove three solders MIC L assy L ch wire 1 Remove three solders MIC R assy R ch wire 2 screw M1 4 3 connector CN1751 Front bottom view 4 Remove the AUDIO AD board in the direction of an arrow 6 AUDIO AD board 5 Draw out two jacks MIC SW board wire white MIC L assy L ch wire red MIC SW board wire black MIC L assy L ch wire black MIC L assy L ch wire yellow MIC R assy R ...

Страница 17: ... an arrow 3 MIC SW assy Note 1 When installing the MIC SW assy insert two switch levers to the slot of MIC assy switch lever switch lever slot slot MIC wire L ch screw hole screw hole MIC wire R ch 0 ZLUH VHWWLQJ Note 2 When installing the MIC SW assy check that the MIC wire is arranged as shown in the following figure URQW ERWWRP YLHZ ...

Страница 18: ... R assy rear view Note 2 Check the L mark not to mistake right and left Note 2 Check the R mark not to mistake right and left Note 3 Align the screw hole ditch ditch ditch Note 3 Align the screw hole MetKoG oI instaOOinJ tKe MIC assy MIC Note 1 When replacing the MIC assy MIC1 replace left and right at the same time Do not replace only one side ...

Страница 19: ... D100 19 2 21 KNOB ASSY 1 two stoppers M1 7 u 3 0 2 Remove the knob assy in the direction of an arrow 3 knob assy Front bottom view 2 22 PANEL REAR BLOCK 1 four foots rear Rear bottom view 2 four shafts lid lock 3 panel rear block ...

Страница 20: ... 6 two screws M1 4 7 battery case lid block Note When installing the spring lid lock install two hooks to numerical order 0etKoG oI iQVtaOOiQJ tKe VSriQJ OiG OoFN 2 24 SLOT LID BLOCK 1 two stoppers M1 7 u 3 0 hole hole hole boss boss boss 2 slot lid block Note When installing the slot lid block align four holes and four bosses Rear bottom view ...

Страница 21: ...ttery terminals 3 two stoppers M1 7 u 3 0 2 screw M1 4 4 Remove the SYSTEM board in the direction of an arrow 6 SYSTEM board 5 Draw out the flexible flat cabel and wires Rear bottom view Note When replacing the SYSTEM board refer to ABOUT THE DESTINATION SETTING WHEN REPLACING THE SYSTEM BOARD on page 4 ...

Страница 22: ...posite to that specified in step 4 6 The test mode menu is displayed and enter the test mode Re lease the F1 and T MARK keys Displayed characters values in the following figure are ex ample Version Sleep Deep Sleep Off Deep Sleep Power Down LCD Display R r ENT B 2 RELEASING THE TEST MODE Remove battery 3 CONFIGURATION OF THE TEST MODE v key V key J j k K START After turn on the power stop or sleep...

Страница 23: ...Press the x STOP key return to test mode menu 4 2 Sleep It can change into the sleep state for standby current value mea surement Procedure 1 Enter the test mode Refer to SETTING THE TEST MODE on page 22 2 Press the v or V keys to select the Sleep and press the N key 3 The sleep state selection screen is displayed This unit shifts to the sleep state by pressing the T MARK key Sleep Sleeping STOP R...

Страница 24: ...default setting saved at eMMC Key input settings under this mode of operation Contrast value decrease Minimum 20 Contrast value increase Maximum 20 N The current contrast value is written to eMMC Releasing method Press the x STOP key return to test mode menu 4 7 LCD Led Light The lighting check of LCD can be performed Procedure 1 Enter the test mode Refer to SETTING THE TEST MODE on page 22 2 Pres...

Страница 25: ... key return to test mode menu 4 9 Menu Init The menu settings of this unit can be return to the shipment set tings Procedure 1 Enter the test mode Refer to SETTING THE TEST MODE on page 22 2 Press the v or V keys to select the Menu Init and press the N key 3 Press the N key again and the initialization is performed Menu Init LCD Display Success Releasing method Press the x STOP key return to test ...

Страница 26: ...on the remote com mander The change of Channel 1 to Channel 3 of main unit is performed automatically 5 All of Channel 1 to Channel 3 check that the message OK appears Releasing method Press the x STOP key return to test mode menu 4 12 Keychk Factory Ship Operation of keys and switches can be checked and this unit can return to the factory shipment settings LCD contrast is not initial ized Note It...

Страница 27: ...rk Note XX and X mean standardized parts so they may have some difference from the original one Items marked are not stocked since they are seldom required for routine ser vice Some delay should be anticipated when ordering these items The mechanical parts with no reference number in the exploded views are not sup plied Color Indication of Appearance Parts Ex ample KNOB BALANCE WHITE RED Parts Col...

Страница 28: ...71 361 01 SPRING GUARD REC 55 4 470 827 01 CAM REC GUARD 56 A 1971 523 A GUARD REC ASSY 57 3 252 825 01 SCREW 1 7 58 A 1971 524 A PANEL FRONT ASSY 59 4 470 803 02 BUTTON FRONT v V N X z x 60 4 477 465 11 HI RES LABEL Ref No Part No Description Remark Ref No Part No Description Remark not supplied 60 51 57 58 59 57 52 53 54 55 56 LCD section ...

Страница 29: ...59 01 SPRING KNOB REC L 106 4 470 809 01 KNOB REC VOL L 107 4 487 087 01 SPACER REC VOL R 108 4 471 217 01 BELT KNOB REC 109 4 470 810 01 KNOB REC VOL R 110 3 729 013 41 SCREW M1 4X3 5 WASHERHEAD P 111 4 470 811 01 ORNAMENT REC VOL LCD1 A 1969 111 A LCD ASSY Ref No Part No Description Remark Ref No Part No Description Remark LCD1 101 101 102 102 103 104 105 106 107 108 109 110 111 POWER board sect...

Страница 30: ... M2X12 157 4 470 799 01 CHASSIS UPPER 158 4 470 812 01 KNOB PLAY VOL 159 3 880 474 01 CUSHION 15X5X0 3 160 4 486 618 01 GASKET FRONT 161 4 470 841 01 SHEET SP BOX ADHESIVE 162 4 470 846 01 SHEET SP BOX BLIND SP1 A 1970 332 A SP BOX ASSY Including Loudspeaker 1 6 cm Ref No Part No Description Remark Ref No Part No Description Remark AUDIO AD AUDIO DA board section SP1 A C D B 162 151 152 152 152 15...

Страница 31: ...485 515 01 STOPPER M1 7X3 0 206 3 254 082 01 SCREW 207 4 470 801 01 CHASSIS POWER 208 4 470 800 01 CHASSIS LOWER 209 A 1969 107 A AUDIO AD BOARD COMPLETE 210 3 268 205 02 RING MIC INSULATING 211 4 151 570 01 SHEET LCD 212 4 470 830 01 STOPPER GUARD REC 213 A 1971 521 A BUTTON LIGHT ASSY Including SW board Ref No Part No Description Remark Ref No Part No Description Remark 202 210 211 203 microphon...

Страница 32: ... 254 A 1971 519 A KNOB ASSY 255 4 488 635 01 SHEET PANEL _ REAR 256 4 470 788 11 PANEL REAR Chinese 256 4 470 788 21 PANEL REAR E 256 4 470 788 31 PANEL REAR US Canadian 256 4 470 788 41 PANEL REAR AEP 257 4 470 835 01 SHAFT LID LOCK MIC1 9 885 191 13 SV MIC ASSY See Note Ref No Part No Description Remark Ref No Part No Description Remark Note When replacing the MIC assy Ref No MIC1 replace left a...

Страница 33: ... BATTERY CASE 305 3 234 449 27 SCREW M1 4 306 X 2179 643 1 PLATE ASSY CASE LID SWITCHING 307 3 254 082 01 SCREW 308 4 476 516 02 CUSHION LID BATT 309 4 485 515 01 STOPPER M1 7X3 0 310 4 470 819 01 HOLDER LID SLOT 311 4 470 817 01 LID SLOT Ref No Part No Description Remark Ref No Part No Description Remark 301 302 303 304 305 305 306 311 309 310 309 307 307 308 302 case section not supplied I I ...

Страница 34: ...SCREW M2 SPECIAL HEAD EG GRIP 356 4 488 500 01 SHEET TRIPOD 357 4 470 847 01 TRIPOD 358 4 488 502 01 SHEET BATTERY CASE LID 359 3 270 466 01 SHAFT STRAP 360 4 470 784 01 CASE 361 A 1971 517 A HOLDER TERMINAL ASSY BT1351 1 756 813 11 LITHIUM RECHARGEABLE BATTERY FFC1 1 969 873 11 CABLE FLEXIBLE FLAT 30 P Ref No Part No Description Remark Ref No Part No Description Remark 4 8 CASE SECTION Rear view ...

Страница 35: ...S Canadian AEP 4 475 417 71 GUIDE SFAS10 QUICK START Application Software Using Sound ForgeAudio Studio LE ITALIAN AEP 4 475 417 81 GUIDE SFAS10 QUICK START Application Software Using Sound ForgeAudio Studio LE GERMAN AEP 4 475 417 91 GUIDE SFAS10 QUICK START Application Software Using Sound ForgeAudio Studio LE ENGLISH US Canadian AEP 4 479 574 01 SOFT SFAS10 APPLICATION DVD ROM Sound ForgeAudio ...

Страница 36: ...sion allows you to jump to the revised page Also clicking the version at the top of the revised page allows you to jump to the next revised page Ver Date Description of Revision 1 0 2013 10 New 1 1 2014 01 Addition of US Canadian and AEP models ...

Отзывы: