background image

F:\Joutou\#4090332_Sony_LF-X\4103221121up\4103221121\4103221121LF-
X1\00GB05C01-WW.fm

masterpage: Right

LocationFreeTV

4-103-221-

12

(1)

25

Turning On the Power

Setu

p an

d Co

nn
ecti

o

n

s

2

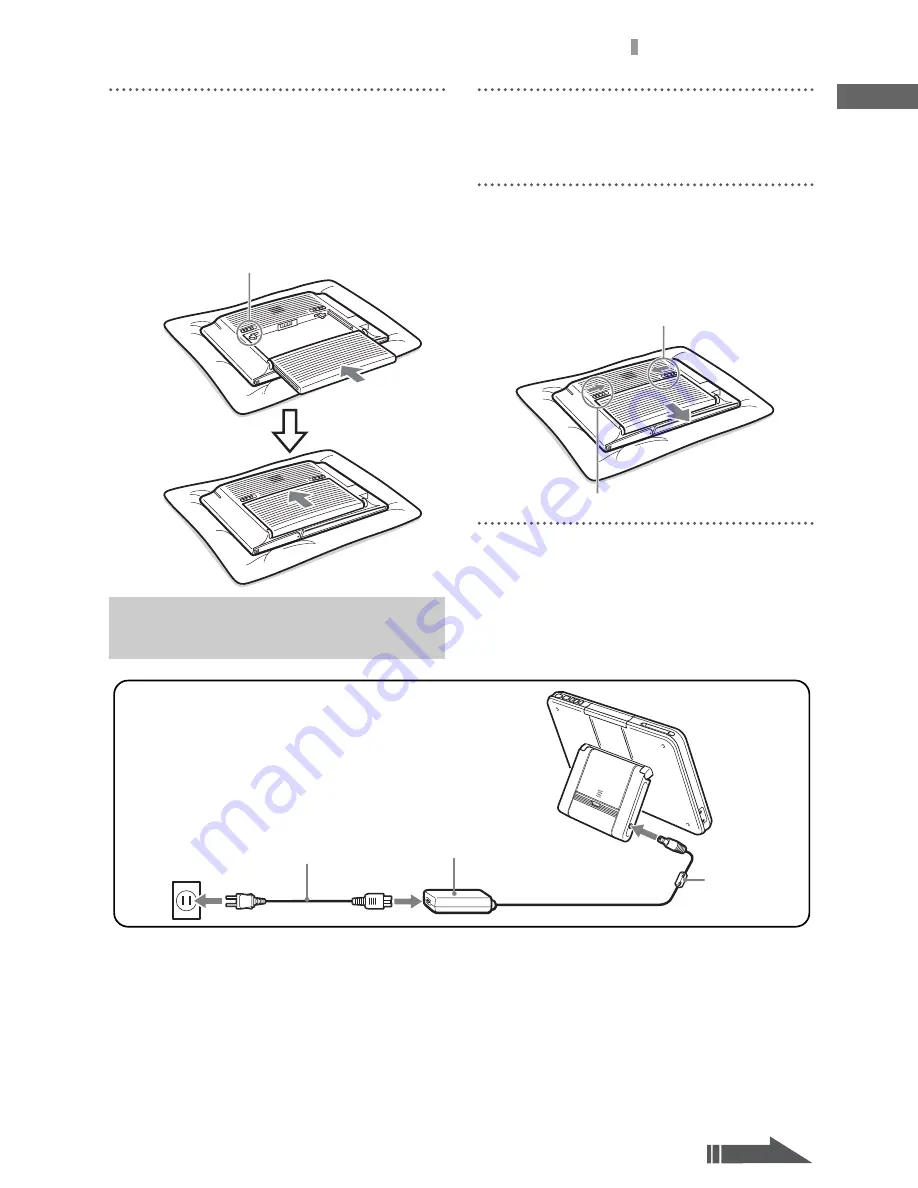
Slide the LOCK/UNLOCK latch on the back 
of the monitor to the UNLOCK position.
From the bottom of the compartment, slide 
the battery into the monitor until it clicks 
into place.
Slide the LOCK/UNLOCK latch into the 
LOCK position.

Removing the battery

Slide the LOCK/UNLOCK latch on the back of 
the monitor to the UNLOCK position.
Push and hold the RELEASE latch.
While holding the RELEASE latch, slide the 
battery away from the monitor.

LOCK/UNLOCK latch

RELEASE latch

LOCK/UNLOCK latch

Connecting the Power Cord to 
the Monitor

Power cord (supplied)

AC-LX1M AC power 
adapter (supplied)

to a wall outlet

to DC IN

For the LF-X1

Do not remove the 
ferrite core.

Ferrite core

Continued

Содержание LF-X1, LF-X5

Страница 1: ...Operating Instructions 4 103 221 12 1 LocationFreeTV LF X1 LF X5 2004 Sony Corporation LocationFreeTV LF X1 LF X5 ...

Страница 2: ... the manufacturer 12 Use only with the cart stand tripod bracket or table specified by the manufacturer or sold with the apparatus When a cart is used use caution when moving the cart apparatus combination to avoid injury from tip over 13 Unplug this apparatus during lightning storms or when unused for long periods of time 14 Refer all servicing to qualified service personnel Servicing is required...

Страница 3: ...e suggested that some biological effects might occur but such findings have not been confirmed by additional research The LocationFreeTV has been tested and found to comply with the Federal Communications Commission FCC guidelines on RF energy exposures The maximum SAR levels tested for the LF X1 has been show to be 0 87 W kg at Body LF X5 has been show to be 1 25 W kg at Body This transmitter mus...

Страница 4: ...nto an outlet on a circuit different from that to which the receiver is connected Consult the dealer or an experienced radio TV technician for help FCC WARNING You are cautioned that any changes or modifications not expressly approved in this manual could void your authority to operate this equipment For customers in the United States This product contains mercury Disposal of this product may be r...

Страница 5: ...er 23 Carrying and Positioning the Monitor 28 Setting Up TV Channels 30 Using the On screen Remote Control 33 Connecting to the Internet 37 Configuring Network Settings 40 Setting Up Mail 43 Guide to On screen Icons 45 Wireless Connection at Home 47 Wired LAN Connection at Home 48 Wired LAN Connection On the Go 48 Wireless Connection On the Go 49 About Wireless Security 51 Enable Wired LAN 53 Sett...

Страница 6: ... 69 Capturing Images 70 Using the Wide Screen Mode LF X5 only 71 Adjusting the Picture Position LF X5 only 71 Web 73 Viewing Web Pages Basics 74 Using the Web Window 75 Viewing Web Pages Useful Functions 76 Viewing PDF Files on the Web 82 Configuring Other Settings 82 Mail 85 Using Mail Basics 86 Using the Mail Window 86 Composing Mail 89 Reading Replying to and Forwarding Mail 93 Using Mail Usefu...

Страница 7: ...rd LF X1 only 119 Memory Stick LF X1 CompactFlash LF X5 121 Using a Memory Stick LF X1 Only 122 Using a CompactFlash Card LF X5 Only 124 Initializing a Memory Stick CompactFlash Card 126 Functions and Settings 127 Basic Settings 128 Setting Up TV Channels Manually 129 Changing the Wireless Channel Manually 131 Using the Base Station as a Wireless Access Point 132 Resetting Factory Defaults 135 Che...

Страница 8: ...8 Others 139 Status Indicators 140 Troubleshooting 141 Specifications 151 Index 157 Trademarks 159 Note The screen shots used in this manual are only example images ...

Страница 9: ...or and a base station that communicate with each other over a wireless connection The monitor must be within about 100 feet 30 meters of the base station in order to send and receive transmissions clearly Signal strength will differ based on operating environment When the monitor is in communication with the base station the upper of the screen displays the indicator Only when using in Home Wirele...

Страница 10: ...annel Blue or green flashing 3 sec intervals Attempting to connect with wireless network The wireless function is active but out of range Blue and green flashing alternately 3 sec intervals Scanning for an access point when 2 4 GHz 5 GHz is selected as the band for Public Wireless Access Off Not connected 4 Memory Stick indicator 1 page 122 Orange lit A Memory Stick is being accessed 5 Memory Stic...

Страница 11: ...era or other AV device Left side 9 0 qa qs qd qfStylus stylus compartment 1 page 30 qgPOWER switch 1 page 26 Turns the monitor power on and off qhVOLUME buttons 1 page 65 Adjusts the speaker volume qjCAPTURE button 1 page 70 Saves the currently displayed image in the album qkINDEX button 1 page 65 Displays the Index window qlMonitor handle 1 page 28 Pull out the handle when carrying the monitor w ...

Страница 12: ...the 5 GHz channel Green lit Connected with the wireless network on the 2 4 GHz channel Blue or green blinking 3 sec intervals Attempting to connect with wireless network The wireless function is active but out of range Blue and green flashing alternately 3 sec intervals Scanning for an access point when 2 4 GHz 5 GHz is selected as the band for Public Wireless Access 6Battery charge indicator 1 pa...

Страница 13: ...ttaching a carrying strap Do not pass a string or other cord through them by which to hang the monitor Don t cover the rear vent for a prolonged time while using the monitor Doing so may cause the surface of the product to increase in temperature Avoid touching hot areas of the surface of the product for long periods especially if you have sensitive skin Doing so may cause swellings or blisters as...

Страница 14: ...AV Off Not connected Red lit The base station is being initialized Also turns red when Dynamic DNS client settings fail 4POWER indicator 1 page 26 Green lit The power is on Red flashing A malfunction has occurred 5POWER switch 1 page 26 Turns the base station power on and off 6LAN port 1 page 37 Connect a LAN cable 7USB port 8VHF UHF jack 1 page 20 Connect an antenna cable 9VIDEO OUTPUT AUDIO VIDE...

Страница 15: ...t Guide 1 Base station stand 1 Important software notice 1 Ferrite core for External Keyboard For LF X5 Base station 1 Monitor 1 Stylus 1 BP LX5A battery 1 BP LX5B battery 1 AC LX1B AC power adapter for the base station 1 AC LX5M AC power adapter for the monitor 1 IR Blaster 1 Power cord 2 Carrying case 1 Operating instructions 1 Quick Start Guide 1 Base station stand 1 Important software notice 1...

Страница 16: ......

Страница 17: ...TB page 20 Connecting Other Devices page 21 Turning On the Power page 23 Carrying and Positioning the Monitor page 28 BASIC Basic Setting Setting Up TV Channels page 30 Using the On screen Remote Control page 33 Connecting to the Internet page 37 Configuring Network Settings page 40 Setting Up Mail page 43 BASIC Guide to On screen Icons Guide to On screen Icons page 45 ...

Страница 18: ...ection at Home page 48 Wired LAN Connection On the Go page 48 Wireless Connection On the Go page 49 About Wireless Security page 51 ADVANCE Watching A V via Home Wired LAN Enable Wired LAN page 53 Setting Up the Monitor page 54 ADVANCE Making Use of NetAV What s NetAV page 55 Connecting with NetAV page 60 ...

Страница 19: ... Connections BASIC Installing and Connecting To keep the base station stable attach the base station stand Install the 4 rubber feet and 2 stoppers so they fit in the proper holes on the stand Attaching the Base Station Stand Stand Stopper Stopper ...

Страница 20: ...the set top box connects to the antenna cable or to the video input terminal on the base station Connecting to the antenna cable Connecting to the video input terminal Refer to Connecting Other Devices 1 page 21 Connecting to a TV Antenna Rear of base station Antenna cable not supplied to antenna Keep the antenna cable as far as possible from other power cords and cables Connecting to an External ...

Страница 21: ...ct Video 1 Video 2 or Monitor Video In LF X1 only according to the input terminal to which the device is connected Note If you have connected a DVD player to the base station via a VCR the VCR s copy guard function may distort or dim the DVD picture Connect the DVD player directly to the video input terminal on the base station Connecting Other Devices to VHF UHF output jack Rear of base station S...

Страница 22: ...erminal on the TV as shown below Rear of base station The VIDEO OUT terminal outputs the audio video signal coming from the device connected to the IN2 terminal A V cable not supplied to A V output terminal to A V input terminal TV Antenna cable not supplied to VHF UHF output jack Antenna cable not supplied Audio video signal flow to VHF UHF input jack from antenna Antenna splitter not supplied An...

Страница 23: ...IN Connect the power cord to the base station AC power adapter AC LX1B and the AC power adapter to the DC IN jack on the base station then plug the power cord into a wall outlet Notes Be sure to use the base station AC power adapter AC LX1B The monitor AC power adapter AC LX1M for the LF X1 AC LX5M for the LF X5 cannot be used as a substitute Do not bundle the base station AC power adapter cord an...

Страница 24: ...nitor stand closed when inserting the battery Notes Insert the battery so that the side with the symbol faces upward Insert the battery until you hear it click Removing the battery Push and hold the tab in the direction of the arrow 1 then slide the battery upward 2 For the LF X5 1 Place the monitor on a soft cloth with the LCD screen down Inserting the Battery Symbol ...

Страница 25: ...he LOCK position Removing the battery Slide the LOCK UNLOCK latch on the back of the monitor to the UNLOCK position Push and hold the RELEASE latch While holding the RELEASE latch slide the battery away from the monitor LOCK UNLOCK latch RELEASE latch LOCK UNLOCK latch Connecting the Power Cord to the Monitor Power cord supplied AC LX1M AC power adapter supplied to a wall outlet to DC IN For the L...

Страница 26: ... monitor to turn it on For the LF X5 Slide POWER on top of the monitor to turn it on The POWER indicator on the top of the monitor lights green and the TV picture appears Turning off the monitor power For the LF X1 press POWER again For the LF X5 slide POWER again Power cord supplied AC LX5M AC power adapter supplied to a wall outlet to DC IN For the LF X5 Do not remove the ferrite core Ferrite co...

Страница 27: ...y charge indicator on the left side of the monitor lights red The indicator goes off when charging is finished For the LF X1 For the LF X5 Battery charging time Times are approximate Approximate life of a fully charged battery For the LF X1 4 hours at minimum Backlight 3 hours at medium Backlight 1 hour 40 minutes at maximum Backlight For the LF X5 BP LX5A 80 minutes BP LX5B 2 5 hours Times are ap...

Страница 28: ...antly it is time to buy a new battery The battery can be charged about 300 times before it needs replacement Depending on the type of battery the battery charge may run out and cause the power to shut off before the indicator appears Pull out and use the handle on top when carrying the monitor For the LF X1 Use the monitor stand to adjust the screen angle as shown The stand has a range of 120 degr...

Страница 29: ...on Be careful not to swallow the stand For the LF X1 The monitor is best viewed within 60 degrees above or below and 70 degrees to the left or right of the center of the screen as shown For the LF X5 The monitor is best viewed within 60 degrees above 40 degrees below and 70 degrees to the left or right of the center of the screen as shown Adjusting the Viewing Angle ...

Страница 30: ...e stylus from its compartment then touch anywhere on the screen with it You can extend the stylus if you want For the LF X1 For the LF X5 2 Select Settings at the bottom right of the screen The Settings window appears 3 Select TV Video The TV Video window appears 4 Select Channel Settings The Channel Settings window appears Setting Up TV Channels Auto Program for the Built in Tuner Settings TV Vid...

Страница 31: ...o window reappears 8 Select Remote Settings The Remote Settings window appears 9 Select TV On the Remote Settings window you can configure the on screen remote control The TV window appears 10 Select an Internal TV tuner and then select Back The Remote Settings window reappears 11 Select Back Settings then select Exit The TV Video window reappears 12 Select TV in the Index window then touch anywhe...

Страница 32: ...he STB and not the internal tuner Then proceed with the remote control settings Note If programs from the STB do not appear at this point touch the screen and use the on screen remote to select channel 3 or 4 whichever displays the STB programs 8 Open the Settings window and select TV Video The TV Video window appears 9 Select Remote The Remote window appears 10 Select TV On the Remote Settings wi...

Страница 33: ...remote control for external devices connected to the base station using the IR Blaster supplied For more on connecting other devices see Connecting Other Devices 1 page 21 1 Connect the IR Blaster to the IR BLASTER port on the base station 2 Position the IR Blaster above the infrared receiver on the external device To locate the infrared receiver see the operating instructions for the connected de...

Страница 34: ...s connected The Video 1 or Video 2 window appears 6 From the list in the upper part of the window select the make and type of the connected device then select Power When you select a make various types for that make are displayed When the device is configured correctly you can turn it on and off by selecting Power Use the sub screen to confirm that the power turns on and off If selecting Power sev...

Страница 35: ...is replaced with DVD Player 11 Select the type of the on screen remote control The remote control appears at the right side of the screen so that you can control the connected equipment z Tip You can change channels by sliding the stylus across the screen from left to right or right to left if the connected equipment contains a tuner such as cable TV set top box For more information see Watching T...

Страница 36: ...tch button changes simultaneously changes the on screen remote control and picture However if the new picture does not match the displayed remote control press to change pictures If you press the DVR Rec button the message Start recording When recording is in progress pressing OK may terminate current recording appears This message appears when you press the Rec button to stop recording Even if th...

Страница 37: ...d to contract with an Internet service provider ISP DSL modems that connect via a USB interface are not supported Note You cannot connect the LocationFreeTV to the Internet if your ISP prevents devices other than computers from connecting to the Internet requires you to install special software on devices connecting to the Internet requires you to configure settings that are not available on the L...

Страница 38: ...ould use depends on what kind of cable modem or DSL modem you have For more information see the operating instructions for your modem For more information on setting up the connection to your cable or DSL modem see the operating instructions for your modem If you are still unsure of how to connect your modem contact your cable TV company DSL network administrator or ISP Connection Examples z Tip L...

Страница 39: ...ter direct you to use a web browser Internet Explorer or Netscape Navigator to access the router s settings screen you can do so by inputting the router s IP address in the address field on the Web window 1 page 74 You must also configure network settings for the LocationFreeTV 1 page 40 For more information on configuring router settings refer to the operating instructions for your router The set...

Страница 40: ...ablished when the LocationFreeTV web page appears This web page is set as the default homepage If an error message Cannot connect to the web server appears Go on to step 3 and verify the DHCP connection settings 3 Select Settings at the bottom right of the screen The Settings window appears 4 Select Base station The Base station window appears 5 Select Internet Connection The Internet Connection w...

Страница 41: ...his sets the configuration for LAN DHCP Manual IP address Settings 5 Select Back Settings then select Exit When you are finished Connect to the Internet and check that you can open web pages For details on how to open a web page see Viewing Web Pages Basics 1 page 74 1 Select Settings at the bottom right of the screen If Settings is not shown touch anywhere on the screen to make it appear The Sett...

Страница 42: ...automatically z Tip To input the DNS address manually clear the check box next to Automatic DNS configuration input values for DNS1 and DNS2 and then select Set 5 Set button 6 Back button The following terms may differ depending on your ISP For more information see the documents supplied by your ISP 1 Connection ID is also known as user ID PPP login name network ID connection login name account na...

Страница 43: ... Tip The LocationFreeTV can only be programmed to access one mail account 1 Select Settings at the bottom right of the screen If Settings is not shown touch anywhere on the screen to make it appear The Settings window appears 2 Select E mail The E mail window appears 3 Select Send Receive The Send Receive window appears 4 Input the proper values for each item then select OK 1 Name Enter the name y...

Страница 44: ...ail This setting is not available for the LF X5 9 Font Size Select the size at which mail text appears on the screen 0 OK button z Tips For details on character entry see Entering Characters 1 page 116 You may capture and save the configured setup screen for future reference 1 page 70 The following terms may differ depending on your ISP For more information see the documents supplied by your ISP O...

Страница 45: ...nitor is unable to connect to the network or IP address acquisition from the DHCP server is in progress Wired LAN is selected for the monitor setting Not yet connected to the network such as when the monitor is unable to connect to the network or IP address acquisition from the DHCP server is in progress Displayed when connected to the base station by Wireless Home mode or Wired LAN in Home mode W...

Страница 46: ...46 Example 1 When Wireless is selected in On the go mode Example 2 When Wired LAN is selected in Home mode ...

Страница 47: ...tation while away from home and to communicate wirelessly or via wired LAN Home mode describes the monitor when connected with the base station while inside your home Using the monitor away from home is called On the go mode In each of these modes the monitor can communicate wirelessly or via wired LAN z Tip The on screen icons change as follows depending on the current settings and connection sta...

Страница 48: ...or The Monitor window appears 2 Select Wired LAN under On the go 3 Select Back The connection mode is changed Note For more on setting the IP address in Wired LAN under On the go refer to Setting Up the Monitor on page 54 In that case however step 2 should read Select Settings to the right of On the go Wired LAN Also for more on settings necessary for watching TV refer to Setting Up NetAV on page ...

Страница 49: ...nvenience you can save the configuration of public wireless access you visit frequently The following is an example of how to establish a connection The actual connection method differs depending on the public wireless access provider For details refer to the instruction manual provided by your public wireless access provider 1 Open the Settings window and select Monitor The Monitor window appears...

Страница 50: ...s access you want to connect to An SSID is used to identify a wireless network 2 Alias If necessary set an Alias Enter a nickname for the public wireless access The alias can be up to 8 characters 3 Authentication scheme Configure the authentication scheme needed to connect to the public wireless access Refer to documents about the public wireless access to configure this setting 4 Encryption Conf...

Страница 51: ...th your intended purpose and network environment Wireless LAN security function of the LocationFreeTV No encryption Because raw data is transmitted there is a danger of interception This setting is not available for wireless LAN communication between the base station and the monitor WEP WEP is the wireless LAN security technology specified by IEEE802 11 It applies encryption to communications Ther...

Страница 52: ...eless LAN environment other than that for communication with the base station the monitor should be configured in accordance with the security setting of the wireless LAN environment For settings information contact the network administrator ...

Страница 53: ... cannot use the wired LAN function when you have connected the base station to the Internet using a PPPoE LAN line or analog phone line The following settings are not necessary to use web or mail applications via a Home Wired LAN But these settings are necessary to use TV or video over the wired LAN Before the settings you need to select Home Wireless mode on the Monitor window to prepare for the ...

Страница 54: ...correctly to watch TV and video in Home Wired LAN mode If you connect to the base station once in Home Wireless mode the IP address for the base station can be automatically acquired You can confirm the acquired IP address by selecting Settings for Home Wired LAN on the Base station Address screen Note If does not appear switch the connection mode to Home Wireless and then back to Home Wired LAN C...

Страница 55: ... home NetAV settings must be configured when connecting by either Wireless or Wired LAN In addition when connecting wirelessly you must configure Wireless Monitor Settings and when connecting by Wired LAN you must configure Wired Monitor Settings Notes When using NetAV the base station power must be turned on You must set up NetAV in advance while you are at home and the monitor has a wireless con...

Страница 56: ... to Wireless Home mode If you cannot select NetAV Settings check your monitor settings 3 Select Enable Disable NetAV The Enable Disable NetAV window appears 4 Configure the necessary settings for each item and select OK 1 Select Enable 2 If necessary change the port number of the NetAV server 3 Select OK z Tip For Port number for the NetAV enter a number between 5021 and 5999 Note Configure the fo...

Страница 57: ... Exit For more on domain name refer to the LocationFreeTV FAQ http www sony com locationfree faq Setting the Dynamic DNS client on the base station For more on how to configure settings refer to the LocationFreeTV FAQ http www sony com locationfree faq You can register other monitors to a single base station When registered either monitor B or C can connect to the base station A in On the go Wirel...

Страница 58: ... registered to the base station and so monitors can access the base station with NetAV Perform these settings on the base station and home monitor together Setting up for additional monitors In this section you can also set whether to allow AV interception on a bound monitor 1 Open the Settings window and select Base station The Base station window appears 2 Select NetAV Settings The NetAV Setting...

Страница 59: ...ng other monitors to the base station Register the monitors that will connect to the base station via the Internet Note Switch the connection type for the monitor to On the go Wireless or On the go Wired LAN depending on the connection used for On the go to start NetAV 1 Display the Settings window and select Monitor The Monitor window appears 2 Select NetAV Settings The NetAV Settings window appe...

Страница 60: ... When your monitor A cannot receive video because monitor B or C is in a NetAV session with the base station A you can see the indicator at the top of the screen If you press GetAV button in such a case the NetAV session between monitor B or C and the base station A will be disconnected and your monitor A can receive video from the base station A This chapter describes how to start NetAV and some ...

Страница 61: ...etAV Select End or turn off the monitor Changing TV channels Using the on screen remote you can operate the TV screen the same way you do at home See Watching TV and Video 1 page 65 z Tips You may not be able to watch some copyright protected programs When selecting a new channel on a NetAV connection there may be a delay before the picture appears due to buffering Changing the TV picture size In ...

Страница 62: ... 1 and 5 as the connection speed You can change the connection speed while connected to NetAV Be aware however that the NetAV connection will be cut for a moment when you change from the lowest connection speed to another speed or vise versa Select a speed OK ...

Страница 63: ...ge 65 Using the TV Video Screen page 67 Selecting a Secondary Audio Program SAP page 68 Optimizing Picture Quality page 68 Using the Sub Screen LF X1 only page 69 Capturing Images page 70 Using the Wide Screen Mode LF X5 only page 71 Adjusting the Picture Position LF X5 only page 71 ...

Страница 64: ...creen select Settings at the bottom right of the screen If Settings is not shown touch anywhere on the screen to make it appear 2 Select a function The LF X5 has no Monitor Video In option z Tips To return to the Index window press INDEX again To hide the Index window press INDEX again When the Index window is displayed all buttons other than INDEX are disabled and you cannot select the sub screen...

Страница 65: ...rol then select a channel You can also hide the on screen remote control by selecting X at the top right corner Changing channels with a Sony remote control not supplied LF X1 only Point the remote control at the infrared receiver on the monitor and press a channel number button If the TV screen is not displayed however switch to the TV screen using the TV button on the remote control and then sel...

Страница 66: ...n TV mode skimming the screen with the stylus changes TV channels In video mode skimming the screen with the stylus changes channels on the tuner of the connected video equipment This option is only available when the external video equipment has a tuner and remote control settings have been configured 1 page 33 Changing channels using the stylus is possible only when a TV program is displayed on ...

Страница 67: ...ou to select a channel Different remote controls appear depending on the settings F SAP button 1 page 68 Switches between STEREO and SAP when an SAP program is tuned in G Wide button LF X5 only 1 page 71 Switches to Wide Screen mode Select repeatedly to cycle through the Wide Screen mode settings Wide Zoom Normal Full Zoom H Rate button Optimizes picture quality according to the ambient radio wave...

Страница 68: ...o select an SAP option for external equipment use the remote supplied with the connected equipment To optimize the picture quality according to the current radio wave conditions select Rate at the bottom of the screen The message Changing rate Please wait appears at the top of the screen Each time you select Rate the optimum frequency which depends on the current radio wave conditions is obtained ...

Страница 69: ...x as well To watch the image in full screen select Full If you select Sound the speakers output sound for the sub screen but pictures on the sub screen disappear To restore the picture display select PIP To quit the sub screen display select z Tip You can move the sub screen to a different position Touch the sub screen and then drag it to the desired position You cannot move the sub screen however...

Страница 70: ...u turn off the monitor or the battery runs out while the capture list is displayed z Tips When you capture a web page you can specify a specific image on the page to save in the Album 1 page 80 You cannot capture the screen if The Index window is displayed You have just captured an image A slide show is in progress The TV channel has just been changed A message is displayed The Stylus Calibration ...

Страница 71: ...cture up and down for each Wide Screen Mode in the following cases To move the position of the picture only in Wide Zoom and Zoom modes When subtitles may not fit in the screen 1 Open the Settings window and select TV Video The TV Video window appears 2 Select Wide Mode The Wide Mode window appears 3 Make settings in Vertical Center Using the Wide ScreenMode LF X5 only Wide Zoom enlarges the 4 3 p...

Страница 72: ......

Страница 73: ...page 78 Capturing a Web Page Album page 80 Searching for Text on a Web Page page 80 Copying and Pasting Text page 81 Viewing PDF Files on the Web page 82 Configuring Other Settings page 82 Note To access the Internet you also need to contract with an Internet service provider ISP See Connecting to the Internet 1 page 37 and Configuring Network Settings 1 page 40 ...

Страница 74: ...board enter http www sony com then select Close The keyboard disappears and the unit starts downloading the Sony web site While downloading the Internet icon at the top left of the screen moves When downloading is finished the Sony web site opens and the Internet icon stops moving With the LF X5 select Exit after inputting the web page address Note Your contract with an Internet Service Provider I...

Страница 75: ...our favorite web page addresses F History Displays a list of the web pages you have opened recently G Save 1 page 78 Displays the Page List Save window where you can save the current web page You can open saved web pages later without being connected to the Internet H Tab Closes the web page displayed on the current tab and leaves the tab blank I Tab If you select a link designed to open in a new ...

Страница 76: ...her web page Failure to do so may allow other people to view your personal information By adding your favorite web pages to the Favorites list you can quickly access them again later without having to input their addresses or search for them with a search engine The LocationFreeTV can store up to 100 web page addresses in the Fav list Adding a web page to the Fav list 1 Open your favorite web page...

Страница 77: ...the screen The Fav list appears From the list select the web page that you want to view The selected web page begins downloading z Tips You can display the next page of the Fav list by selecting B and the previous page by selecting b To open a web page saved on a Memory Stick select Switch at the bottom of the Fav list Or select Edit then select Switch in the Edit Fav window Renaming a web page in...

Страница 78: ...our convenience without accessing the Internet The LocationFreeTV can store up to 100 web pages in the Save list 1 When a web page is displayed select Save The Page List Save window appears at the right of the screen 2 Select Add z Tip To save a web page on the Memory Stick LF X1 or CompactFlash card LF X5 select Switch to switch to the Memory Stick LF X1 or CompactFlash card LF X5 then select Add...

Страница 79: ...it The Edit Save window appears 2 Select the check box beside the web page you want to rename then select Rename Web pages can only be renamed one at a time 3 Enter a new title in the Title field then select OK z Tip For details on character entry see Entering Characters 1 page 116 Copying saved web pages to or from an external memory card You can save web page addresses to a Memory Stick for the ...

Страница 80: ... you select Select picture and capture the message Select a picture to capture appears at the top left of the screen Go to step 3 If you select Capture the whole page the entire screen is captured 3 Select an image for capture The selected image is captured The captured image is saved automatically in the album You can search for any text string on the current web page z Tip This function only all...

Страница 81: ...earch for a previous match select Prev For details on character entry see Entering Characters 1 page 116 3 To stop searching select Exit You can copy any text string on the current web page and paste it into an e mail or onto another screen 1 Using the stylus highlight the text you want to copy then select Copy When any text is highlighted Copy replaces Search at the bottom of the screen After Cop...

Страница 82: ...DF files supported by the device may not display for some Web pages Proxy settings and other web browsing settings can be configured as necessary In most cases it is not necessary to set a proxy 1 Select Settings at the bottom right of the screen The Settings window appears 2 Select Web The Web window appears 3 To configure web browsing settings select Web Basics The Web Basics window appears 4 Co...

Страница 83: ...ows you to clear the cache memory manually 8 Erase Cookie Select to erase cookies Cookies are files generated by some web pages you access They contain information about the selections you made on certain web pages 9 Erase Saved Passwords Select to erase any passwords saved when you select Save this password in the dialog box that appears after you enter an ID and password to view a web page 0 OK ...

Страница 84: ......

Страница 85: ...to Mail page 95 Forwarding Mail page 95 Using Mail Useful Functions page 96 Using the Address Book page 96 Moving Mail to Memory Stick or CompactFlash Card page 98 Auto checking for New Mail LF X1 Only page 99 Configuring Other Mail Settings page 99 Searching for Mail page 99 Setting an E mail Protection Password page 100 Note To send and receive mail you need to sign in to an Internet service pro...

Страница 86: ...ntly selected mail is shown in the bottom half of the window C Outbox tab Shows the list of sent mail and mail temporarily saved for future editing The content of the currently selected mail is shown in the bottom half of the window D Folder tab Appears when a Memory Stick for the LF X1 or a CompactFlash card for the LF X5 is inserted This allows you to move the mail you have sent and received to ...

Страница 87: ... added or removed from this box each time you select it K Receive 1 page 93 Checks for new mail L New 1 page 89 Allows you to compose a new mail M Reply Resend or Edit Reply Resend or Edit appears depending on the content of the currently selected mail Reply Displays the window for replying to mail 1 page 95 Resend Displays the window for editing and sending mail that you have already sent Edit Di...

Страница 88: ...ter the mail addresses of recipients F Send 1 page 89 Sends a composed mail G Address Book 1 page 96 Displays the Address Book H Save 1 page 89 Saves the current mail in the Outbox for you to finish later I Delete 1 page 89 Deletes the currently selected mail J Back Quits mail composition and returns to the Outbox or Inbox Mail that has not finished being composed is saved in the Outbox K Select T...

Страница 89: ...select Send This device does not support data encryption when sending e mail Take particular note of this when dealing with sensitive information z Tip To check that the LocationFreeTV can send and receive mail properly try sending a mail to your own mail address For more on receiving mail see Reading Mail 1 page 93 Sending the same mail to multiple recipients To specify multiple recipients in the...

Страница 90: ...elect Attach The picture selection window appears 3 Select the check box for a picture or movie then select Attach To attach multiple pictures or movies select the check box next to each To attach images saved on a Memory Stick for the LF X1 or a CompactFlash card for the LF X5 select the desired Folder tab z Tip If you select a picture the picture is enlarged To restore the previous display touch...

Страница 91: ...appears 2 Select the picture you want to verify The picture is enlarged When sending multiple pictures you can select Next or Prev to sequentially enlarge other pictures and movies 3 Select Back The list of attached pictures reappears 4 Select Back The Compose E mail window reappears Attaching multiple pictures You can send multiple pictures and movies at the same time 1 Open the list of attached ...

Страница 92: ... Select Send to send the mail z Tip You can verify and remove attached drawings in the same way as for attached pictures and movies 1 page 90 Attaching multiple drawings You can create and attach multiple drawings to send with your mail A drawing can also be attached along with picture or movie attachments 1 Create a drawing or attach a picture 2 Open the list of attached pictures 3 Select Draw Th...

Страница 93: ... the monitor is disabled while the Inbox is open The LocationFreeTV can periodically check for new mail 1 page 43 With this function activated the mail indicator on the left side of the monitor lights red only when you have new mail This indicator is disabled when you receive new mail manually and when mail is automatically detected with the Mail window open Automatic mail detection is only availa...

Страница 94: ...t the mail you want to display then select View Deleting mail Select the mail to be deleted then select Delete Or select the check box beside the mail to be deleted then select Delete selected Following links in mail If you select a link in a mail the corresponding web page opens in the Web window Enlarging an attached picture To enlarge a picture sent with a mail select the picture To restore the...

Страница 95: ...r selecting Reply all highlight the entire mail address of that person in the To or Cc field then select Backspace on the on screen keyboard You can also add other mail addresses to the To Cc or Bcc field 3 Compose the text of your reply z Tip For details on character entry see Entering Characters 1 page 116 4 Check the text of your mail and the mail address of the recipient 5 Select Send 1 Open t...

Страница 96: ...only add addresses from mail you have finished sending 3 Select Register Address The address registration window appears with the address field automatically filled in z Tip With a received mail displayed the mail address of the sender is added to the Address Book With a previously sent mail displayed all mail addresses displayed in the To Cc and Bcc fields are added to the list this allows you to...

Страница 97: ... mail address in the address field and select OK To register multiple mail addresses under the same nickname separate each address with a comma z Tip For details on character entry see Entering Characters 1 page 116 Editing the address book 1 Open the Address Book window select the check box beside the mail address you want to edit and select Edit The address edit window appears 2 Edit the individ...

Страница 98: ...y Stick LF X1 or a CompactFlash card LF X5 The Folder tab appears in the Mail window z Tip You cannot increase the number of Folders 2 Open the Inbox or Outbox 3 Select the check box beside the mail you want to move then select Move selected A message appears 4 Select a destination folder The selected mail is moved to the folder on the Memory Stick LF X1 or the CompactFlash card LF X5 Note Do not ...

Страница 99: ...e watching TV and browsing web pages You can specify the font size of a mail on the screen or save a signature information such as your name and mail address By saving a signature you can automatically add your contact information at the end of a mail which saves you the task of entering your name address etc each time you compose a mail Perform font size and signature settings in Settings under E...

Страница 100: ...r password using the same procedure Note Be careful not to forget your password If you forget the password you must reinitialize your mail settings 1 page 136 which deletes all mail data 1 Select Settings at the bottom right of the screen The Settings window appears 2 Select E mail The E mail window appears 3 Select Protection The Protection window appears 4 Enter a password then select OK The fac...

Страница 101: ...Protection The Enable Disable Protection window appears 8 Select Enable Protection then select OK The security password setting window reappears 9 Select Back The E mail window reappears 10 Select Settings then select Exit After a password has been set you must enter it each time you turn on the monitor and open the E mail window Once you enter the password you do not need to reenter it until you ...

Страница 102: ......

Страница 103: ...tures page 106 Viewing a Slide Show page 107 Drawing on the Screen page 108 Using the Drawing Palette page 109 Watching Movies page 110 Using the Album Useful Functions page 111 Sending a Picture by Mail page 111 Copying Pictures to a Memory Stick LF X1 or a CompactFlash Card LF X5 page 112 Displaying Picture Information page 113 ...

Страница 104: ...ng order G Check box A check mark is added or removed from this box each time you select it H Slide Show 1 page 107 Sequentially displays all pictures in the tab or all pictures with check marks I Draw 1 page 108 Allows you to draw pictures and or text J Send 1 page 111 Attaches a picture with a check mark to e mail K Info 1 page 113 Allows you to change the name of a picture with a check mark enl...

Страница 105: ...actFlash card LF X5 Example of a folder tree on a computer If the Memory Stick LF X1 or CompactFlash card LF X5 does not contain the above folder create it with the computer To create the folder automatically simply insert the Memory Stick LF X1 or CompactFlash card LF X5 into the monitor and open the Picture List window If you copy pictures from the album to a Memory Stick LF X1 or a CompactFlash...

Страница 106: ...n viewed on the LF X5 2 Touch the picture again to close the enlarged display The Picture List window reappears z Tip You can also press INDEX on the monitor to return to the Picture List window Stretching a small picture to full screen LF X1 only When the size of a picture is smaller than the screen size the LocationFreeTV displays the picture at its original pixel size By following the steps bel...

Страница 107: ...o appear and select Slide Show The images you selected are displayed in the order you selected them Note If you select only a single picture the slide show keeps showing the same picture Changing the slide show screen change interval You can change the amount of time that each picture appears using the Settings window 1 Select Settings at the right bottom of the screen The Settings window appears ...

Страница 108: ... the LF X5 2 Draw pictures or text using the drawing palette at the right of the screen For more on using the drawing palette see Using the Drawing Palette 1 page 109 3 When you finish drawing select Save The Picture List window reappears The modified image is saved in the JPEG format as a different image and added to the beginning of the album Saving a drawing in progress Select Hold at the botto...

Страница 109: ...e 11 times restores the original image To undo an operation Select Undo The last operation you performed on the image is undone To blur an image Select Blur then use the stylus to select the area you want to blur To erase pictures or text 1 Select Eraser 2 For Width select the width of the eraser 3 Use the stylus to select the area you want to erase To pick a color from an image 1 Select Pick 2 On...

Страница 110: ...vie size is reduced during play however if it exceeds 640 480 for the LF X1 or 480 360 for the LF X5 1 Open the Picture List window and select the movie you want to play Do not select the check box by the movie The icon appears to the right of movie titles The Play Movie window appears and the movie automatically starts playing z Tips A slider bar shows the current playback position You can change...

Страница 111: ...lecting multiple check boxes The Compose E mail window appears Note The icon appears to the right of pictures that exceed 4 MB to indicate that you cannot attach and send them For movies the icon appears An error message appears if you select Attach when the total size of the attached pictures and movies exceeds 4 MB You can check image file sizes in the Information window 1 page 113 When you have...

Страница 112: ...Folder 3 on the Memory Stick LF X1 or CompactFlash card LF X5 select Folder 3 To check that the pictures have been copied open the Picture List window for the destination folder Renaming folders on a Memory Stick LF X1 or CompactFlash card LF X5 1 Select Settings at the bottom right of the screen The Settings window appears 2 Select Album The Album window appears 3 Select Folders The Folders windo...

Страница 113: ...ange the file name Shooting Date Time appears only for pictures taken with digital still cameras Web page URL appears only when Capture the whole page is selected under Web It does not appear when other images are captured Use the Comment field to enter information up to 560 characters about the picture Entered information can only be viewed from the LocationFreeTV 2 Select OK The Picture List win...

Страница 114: ......

Страница 115: ...115 Entering Characters Entering Characters page 116 Using the On screen Keyboard page 117 Using an External Keyboard LF X1 only page 119 ...

Страница 116: ...other windows 1 Open the Compose E mail window 1 page 89 and select an entry field The on screen keyboard appears For the LF X5 the keyboard input screen appears 2 Using the stylus select the character you want to type The selected character appears in the entry field 3 After typing the desired text select Close The on screen keyboard disappears and the previous window reappears For the LF X5 sele...

Страница 117: ...kspace Deletes the character to the left of the cursor or highlighted characters F Select All Selects all characters in an entry field G Enter Begins a new line H Caps Displays the capital letter keyboard I Shift Displays the capital letter keyboard temporarily After one letter is typed the alphabetic keyboard reappears J Space Inserts a space K R r t T Moves the cursor L Close Closes the on scree...

Страница 118: ...u ca C Copy Copies selected characters D Paste Pastes copied characters E Backspace Deletes the character to the left of the cursor or highlighted characters F Select All Selects all characters in an entry field G Enter Begins a new line H R r t T Moves the cursor I Close Closes the on screen keyboard For the LF X5 the on screen keyboard returns to the original screen by selecting Exit ...

Страница 119: ... sure to attach the ferrite core as shown below Note You cannot connect and use a keyboard that only has a PS 2 connector You cannot connect and use a keyboard equipped with a USB hub Do not connect a keyboard to the USB port on the base station 2 Select an entry field with the stylus and enter characters with the connected keyboard To move to another entry field use the stylus to select the new f...

Страница 120: ......

Страница 121: ...X1 CompactFlash LF X5 Using a Memory Stick LF X1 Only page 122 Supported Media Types page 122 Memory Stick Media page 123 Using a CompactFlash Card LF X5 Only page 124 Initializing a Memory Stick CompactFlash Card page 126 ...

Страница 122: ...eeTV turn off the power to the monitor remove the AC power adapter or the battery runs out The Memory Stick indicator lights orange during data transfer You use the Memory Stick in a location affected by static charge and or electric noise The following media types can be used with the LocationFreeTV 1 MagicGate cards can be used but the MagicGate function is not supported 2 A Memory Stick Duo ada...

Страница 123: ...ortant data recorded on the Memory Stick Do not affix anything other than the supplied label to the Memory Stick label area Affix the label so that it does not stick out beyond the label area When storing or carrying a Memory Stick keep it in its original case Do not touch the terminal of the Memory Stick with anything including your fingers or metallic objects Do not strike bend or drop the Memor...

Страница 124: ...the LocationFreeTV make sure that the memory you want to use is already selected A Memory Stick with the Memory Select function allows the user to select the internal memory of the Memory Stick with the selector switch Care must be taken in the following cases as the supported devices only detect the selected memory Formatting is only processed for the selected memory The remaining memory is only ...

Страница 125: ...it turn off the power to the monitor remove the AC power adapter or the battery runs out The CompactFlash card indicator lights orange during data transfer You use the CompactFlash card in a place affected by static charge and or electric noise Using a Memory Stick Duo Note A standard sized Memory Stick cannot be used When Memory Stick Duo is inserted into a Memory Stick Duo Adaptor the size becom...

Страница 126: ... Never remove the Memory Stick or CompactFlash card during initialization The Init Memory Stick or Init CompactFlash window appears 4 Select Initialize then select OK Note Be sure to read the precautions shown on the screen A confirmation message appears 5 Select OK 6 When the message Initialization finished appears select OK Note If you initialize a Memory Stick CompactFlash card with other equip...

Страница 127: ... page 131 Using the Base Station as a Wireless Access Point page 132 What Is Wireless LAN page 132 Setting Up a Wireless LAN page 133 Resetting Factory Defaults page 135 Initializing the Base Station page 135 Resetting All Settings page 135 Initializing Internet Connection Wireless Connection page 135 Initializing Mail Settings page 136 Checking Available Memory page 137 Adjusting the Screen Backl...

Страница 128: ...imer Sets the Power Save Timer to activate and conserve battery power when you have not used the monitor for a while When the timer activates the monitor backlight shuts off and the screen goes dark The Power Save Timer does not function while in use with the AC adapter C Stylus Calibration Calibrates the touch screen and stylus If the touch screen registers a different selection than where you in...

Страница 129: ...The Channel Settings window appears 3 Select Channel Skip Add The Channel Skip Add window appears 4 Place a check mark beside the channel you want to delete and select Skip You can select multiple channels at once The selected channels are deleted 5 Select Back twice The TV Video window reappears 6 Select Settings then select Exit You can manually restore a deleted channel without performing autom...

Страница 130: ...ify the actual channel number of the station you selected When the channel is added successfully the message Channel Added appears at the top of the screen If you try to add a channel which has already been registered the message This channel is already registered appears at the top of the screen 5 Select Back The Channel Skip Add window reappears with the revised channel information 6 Select Back...

Страница 131: ...ss signal quality select the optimum wireless channel z Tip Wireless LAN cards that conform to IEEE 802 11a b or g standards can be used on the following channels When connecting a computer to the base station via a wireless connection select a channel supported by the computer s wireless LAN card For more on which channels your wireless LAN card supports see the operating instructions for your wi...

Страница 132: ...te wireless transmission device Stopping radio wave emission from the monitor When using the monitor in a place where radio wave emissions are prohibited switch the monitor settings to wired LAN Note The base station always emits radio waves when its power is on A wireless LAN is a network LAN over which data is sent and received via wireless transmission A wireless access point forms the center o...

Страница 133: ...e the necessary items and select Set 1 SSID A factory default character string should already appear You can change it by entering up to 32 letters and or numbers An SSID is used to identify a wireless network 2 Stealth Hide SSID check box Select if you do not want to disclose the SSID 3 Allow PC connection check box Select to allow computers to connect 4 Security Select either WEP or WPA PSK with...

Страница 134: ...el follow step 3 of Changing the Wireless Channel Manually 1 page 131 5 Select Back The Wireless Access Point window reappears 6 Select Back The Base station window reappears 7 Select Settings then select Exit Setting up your computer Make sure your computer is equipped with a wireless LAN card that conforms to 2 4 GHz 5 GHz IEEE 802 11a b or g standards Next you must configure the Windows environ...

Страница 135: ...stored in the album as well as web pages and favorites you have saved Be sure to follow the instructions for Initializing the Base Station before performing the following procedure 1 Open the Settings window and select Basic The Basic window appears 2 Select Initialize The Initialize window appears 3 Select Clear All The Clear All window appears 4 Carefully read the precautions shown on the screen...

Страница 136: ...n verify that appears at the top of the screen Follow the steps below to reset the mail settings and delete all sent and received mail data You can also initialize the mail settings if you forget the mail protection password you set for the E mail window Note Initializing the mail settings also deletes any images received by mail Images copied to the album however are not deleted 1 Open the Settin...

Страница 137: ...elete unnecessary data and free up more memory Clear the cache memory See Configuring Other Settings 1 page 82 Delete mail See Deleting a mail in progress or a saved mail 1 page 89 Delete pictures in the Album See Using the Album Window 1 page 104 You can adjust the backlight of the screen This operation changes the backlight for all screens 1 Open the Settings window and select Backlight The Back...

Страница 138: ......

Страница 139: ...139 Others Status Indicators page 140 Troubleshooting page 141 Specifications page 151 Index page 157 Trademarks page 159 ...

Страница 140: ...Sony dealer Status indicators Status Indicators POWER indicator on the base station Problem Solution Blinks red The hardware may have malfunctioned 1 Turn the base station off and then on again 2 If the problem persists contact your Sony dealer POWER indicator on the monitor Problem Solution Blinks red The hardware may have malfunctioned 1 Turn the monitor off and then on again 2 If the problem pe...

Страница 141: ...s channel as the signal from the base station change the setting on the wireless access point 1 page 132 Wireless communications might be interfered by radio waves Change the wireless channel or move to a location free from radio interference 1 page 132 When using the 2 4 GHz channel Make sure a microwave oven is not in use nearby Interference from a microwave to the wireless signal will stop when...

Страница 142: ...arge indicator flashes There may be a problem with the battery Disconnect the AC power adapter Remove the battery and reinstall it If the problem persists contact your Sony dealer The battery will not charge if the temperature is not between 32 F to 95 F 0 C to 35 C Clock is incorrect The built in battery used to keep the clock accurate may be dead When this happens the clock will stop once the mo...

Страница 143: ...e screen you can press Get AV at the bottom of the TV Video1 or Video2 screen to intercept the image Picture freezes frequently There is a possibility that a nearby device is operating on the same wireless channel as the unit Change the wireless channel setting of the unit or use it somewhere out of range of the other device When using wired LAN mode use a 10 100 Base T router or hub and not a 10 ...

Страница 144: ...tings and after temporarily selecting the internal TV tuner change to channel 3 or 4 with the on screen remote With the LF X1 You can also change the channel using a Sony brand TV remote control not supplied The on screen remote does not work Connect the IR Blaster to the IR BLASTER port on the base station 1 page 14 Press some of the buttons on the device itself to make sure that it is functionin...

Страница 145: ...have been disconnected Check the on screen icon When the disconnected icon appears check the monitor settings 1 page 45 Your Internet service contract may not allow for devices like the LocationFreeTV or your provider may be experiencing trouble with its servers Contact your ISP Select Set to the right of LAN DHCP Manual IP address settings at Internet Connection on the Base station screen place a...

Страница 146: ... large sized images The LocationFreeTV cannot display image files other than JPEG GIF and PNG MPEG1 movie files on the Internet cannot be displayed When the connection is busy it takes time to load the image You can continue to wait or select Reload after a while and try reloading the page Although connected to the Internet web pages do not display The access point or the server may be busy Wait a...

Страница 147: ...ot recall the mail protection password Once the mail protection password has been set you must input that password in order to change or delete it If you have lost your mail protection password initialize the mail settings 1 page 136 While attaching an image to an e mail the Picture List window does not show the expected image Make sure you have selected the location where the image is saved Switc...

Страница 148: ...o work You may have only placed a check by one image Clear the check or place a check mark by two or more images The message Cancelled by memory storage appears If you have opened multiple tabs on the web screen close some tabs Turn the monitor off and then on again Picture being drawn can no longer be seen If you select Brighter or Darker repeatedly the original picture may disappear Select Resta...

Страница 149: ...to obtain one automatically DHCP Also settings do not become effective unless you select Set If the NetAV LED on the base station is lit red the Dynamic DNS setting on the NetAV Settings window authentication has failed Check that the setting is configured properly When the NetAV indicator on the base station is lit red the settings for Dynamic DNS are not correct For more information refer to the...

Страница 150: ...he base station may not be able to connect to the Internet B On the registered monitor Another registered monitor may be using NetAV already Press the Get AV button on the bar at the bottom of the screen to begin viewing content The settings for NetAV have not been configured correctly Refer to the Causes and remedies for Connection will not be established even though NetAV is pressed Settings hav...

Страница 151: ...er LE V1 0 Mail Transmit protocol SMTP Receive protocol POP3 Album Album file types GIF JPEG PNG BMP MPG MPEG1 movie Input output Base station VHF UHF 75 ohm external terminal S VIDEO 4 pin mini DIN VIDEO INPUT1 Y 1 Vp p 75 ohms unbalanced sync negative C 0 286 Vp p burst 75 ohms Video 1 Vp p 75 ohms unbalanced sync negative Audio 500 mVrms Impedance 47 kilohms VIDEO INPUT2 Video 1 Vp p 75 ohms un...

Страница 152: ...310 g Operating temperature 32 F to 95 F 0 C to 35 C Storage temperature 14 F to 95 F 10 C to 35 C General Power consumption Base Station Approx 12 W watching TV Approx 0 6 W power off using AC power adapter Monitor Approx 55 W watching TV charging battery Approx 24 W watching TV using battery Approx 43 W power off charging battery Operating temperature 32 F to 95 F 0 C to 35 C Storage temperature...

Страница 153: ...immediately available and that production of them may be stopped at any time Design and specifications are subject to change without notice Battery duration Approx 4 hours at minimum Backlight Approx 3 hours at medium Backlight Approx 100 minutes at maximum Backlight Battery charging time Approx 2 5 hours monitor power on Approx 2 hours monitor power off Supplied accessories BP LX1A battery 1 Styl...

Страница 154: ... LE V1 0 Mail Transmit protocol SMTP Receive protocol POP3 Album Album file types GIF JPEG PNG BMP MPG MPEG1 movie Input output Base station VHF UHF 75 ohm external terminal S VIDEO 4 pin mini DIN VIDEO INPUT1 Y 1 Vp p 75 ohms unbalanced sync negative C 0 286 Vp p burst 75 ohms Video 1 Vp p 75 ohms unbalanced sync negative Audio 500 mVrms Impedance 47 kilohms VIDEO INPUT2 Video 1 Vp p 75 ohms unba...

Страница 155: ... 69 8 10 1 mm w h d Mass 6 oz 160 g Operating temperature 32 F to 95 F 0 C to 35 C Storage temperature 14 F to 95 F 10 C to 35 C BP LX5B Battery Rated voltage 7 4 V DC Capacity 4 800 mAh Type Lithium ion battery Dimensions Approx 57 8 23 4 13 16 inches 146 2 69 8 20 0 mm w h d Mass 8 oz 220 g Operating temperature 32 F to 95 F 0 C to 35 C Storage temperature 14 F to 95 F 10 C to 35 C General Power...

Страница 156: ... BP LX5B Communication range Indoors approx 30 m 100 feet depending on the environment Standards IEEE802 11 a b g Frequency range 2 4 GHz 5 GHz Modulation DS SS Modem and OFDM Modem Power requirements AC power adapter 100 V AC 50 60 Hz Battery 2 200 mAh BP LX5A 4 800 mAh BP LX5B Battery duration BP LX5A Approx 80 minutes at minimum Backlight BP LX5B Approx 2 hours 50 minutes at minimum Backlight B...

Страница 157: ...button 104 113 Initialize 126 128 135 136 Inserting the Battery 24 INTERNET indicator 14 IR Blaster 33 151 J Java Applet 83 JavaScript 83 M Mail Window 86 Memory Stick 122 123 124 126 Memory Stick slot 10 Memory Stick Duo 124 125 Memory Stick indicator 10 N NetAV 55 NetAV indicator 14 Network Settings 40 New mail indicator 11 No encryption 51 O On the go mode 47 On screen Icons 45 On screen Keyboa...

Страница 158: ...eb window 75 WEP 50 51 133 134 Wide button 71 Wide Screen mode 71 wired LAN 53 Wireless Access Point 132 133 wireless channel 131 132 134 WIRELESS indicator 10 12 14 Wireless Security 51 WPA PSK 50 WPA PSK with TKIP encryption 51 133 ...

Страница 159: ...s and product names mentioned here may be the trademarks or registered trademarks of their respective companies The symbols for and are omitted in these instructions Copyright 2003 Dr Brian Gladman Worcester UK All rights reserved LICENSE TERMS The free distribution and use of this software in both source and binary form is allowed with or without changes provided that 1 Distributions of this sour...

Страница 160: ...Printed in Japan Printed on 100 recycled paper using VOC Volatile Organic Compound free vegetable oil based ink ...

Отзывы: