—
5
—
KV
-32XBR200/KV
-36XBR200
TV/VIDEO
(page 16)
ANT (page 16)
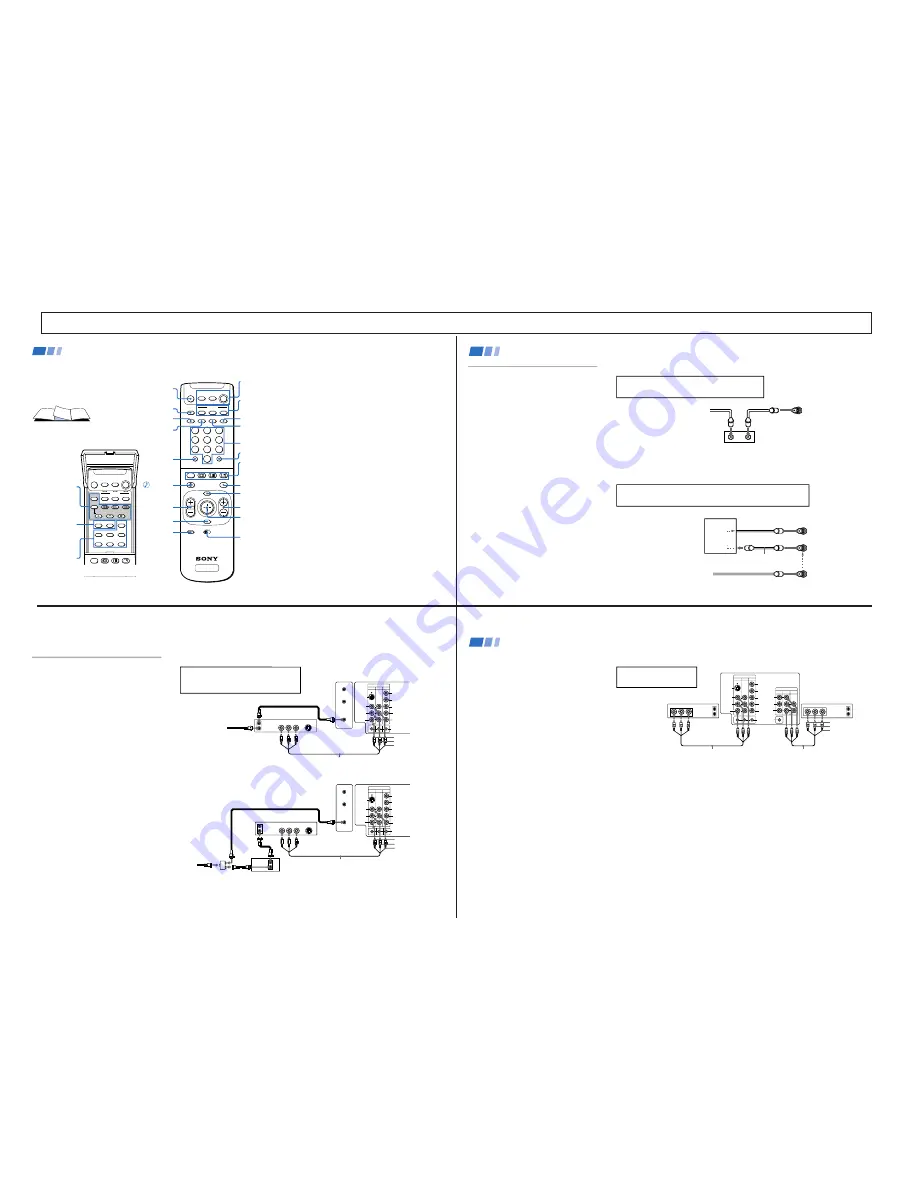
In the instructions that follow, we will
refer to the buttons on your remote control.
Keep this flap unfolded and use this page
for reference.
Getting to know the buttons on the
remote control
Names of the buttons on the remote
control are presented in different colors to
represent the available functions.
Button color
Black ................ Press to select the component
you want to control; e.g. VTR
(VCR)/MDP/DVD Player, DBS
(Direct Broadcast Satellite)/
CABLE, or TV
Green ............... Buttons relevant to power
operations, like turning the TV,
DBS (Direct Broadcast Satellite)/
CABLE, or VTR (VCR)/MDP/
DVD Player on or off
Label color
White ............... TV/VTR (VCR)/MDP/DVD
Player/DBS (Direct Broadcast
Satellite)/CABLE operation
buttons
Yellow .............. PIP, P&P, and CHANNEL
INDEX operation buttons
Blue .................. DBS (Direct Broadcast Satellite)
operation buttons
Green ............... S-Link operation buttons
Pink .................. DVD Player operation buttons
For a detailed explanation of most buttons, see
"Watching the TV" on page 15.
Remote Control
MUTING
(page 15)
POWER
(page 15)
FUNCTION
(page 15)
ENTER
0 – 9 Buttons
MTS/GUIDE
PIP/P&P/
CHANNEL INDEX
(pages 17-20)
VTR1/2/3/DVD/
MDP (page 31)
Joystick
(page 13)
CH +/–
MENU
RESET
VOL +/–
TV/DBS
JUMP
(page 15)
DISPLAY (page 16)
SLEEP (page 15)
SYSTEM OFF (page 16)
MTS
TV
MUTING
VTR/DVD DBS/CABLE
POWER
VTR/DVD DBS/CABLE
FUNCTION
TV
TITLE
DVD MENU
FREEZE
AUDIO
SWAP
CH +
POSITION
TV/VIDEO
CH -
TV/VTR
REC
GUIDE
TV/DBS
OFF
TV
2
1
3
5
4
6
8
7
9
0
TV
MTS
MUTING
VTR/DVD DBS/CABLE
POWER
VTR/DVD DBS/CABLE
FUNCTION
TV
OFF
SYSTEM
SLEEP
DISPLAY
TV/VIDEO
ANT
MENU
GUIDE
VOL
TV/DBS
RESET
CH
VTR 1 2 3 DVD/MDP
CODE SET
JUMP
ENTER
OFF
RM -Y144
PIP/P&P
(pages 17, 18)
DVD
Operation
Buttons
(page 32)
VCR/DVD/MDP
Operation
Buttons
(page 32)
CODE SET
(pages 31, 33)
If you are connecting a cable box through the AUX input and would like
to switch between the AUX and normal (CATV) input you should consider
using the CHANNEL FIX feature. (see “CHANNEL SET UP” on page 26)
If you will be controlling all channel selection through
your cable box, you should consider using the CHANNEL
FIX feature. (see “CHANNEL SET UP” on page 26)
Cable Box Connections
Some pay cable TV systems use scrambled or
encoded signals that require a cable box to
view all channels.
Cable box
1
Connect the coaxial connector from your
cable to the IN on your cable box.
2
Using a coaxial cable, connect OUT on
your cable box to VHF/UHF on your TV.
Cable box and cable
For this set up, you can switch between
scrambled channels (through your cable box),
and normal (CATV) channels by pressing
ANT on your remote control.
Notes
• Your Sony remote control can be
programmed to operate your cable box.
(see “Operating a Cable Box or DBS
Receiver” on page 33)
• When using PIP, you cannot view the
AUX input in the window picture.
Tip
z
Pressing ANT switches between these inputs.
Cable box
Cable
OUT
IN
(Rear of TV)
VHF/UHF
TO CONVERTER
Cable box
VHF/UHF
(Rear of TV)
AUX
75-ohm coaxial
cable (not supplied)
CATV cable
(unscrambled channels)
(signal)
scrambled
channels
Connecting and Installing the TV (continued)
4
SECTION 1 GENERAL
VIDEO IN
1
3
4
L
R
(MONO)
VIDEO
S VIDEO
OUT
AUDIO
L
R
Y
P
B
P
R
AUDIO
S-LINK
CONTROL S
AUX
TO
CONVERTER
VHF/UHF
AUDIO R AUDIO L VIDEO
S VIDEO
LINE
OUT
OUT
IN
Disconnect all power sources before making any connections.
VCR Connections
Connecting an antenna/cable TV
system with a VCR
1
Attach the coaxial connector from your
cable or antenna to IN on your VCR.
2
Using A/V connectors, connect AUDIO
and VIDEO OUT on your VCR to AUDIO
and VIDEO IN on your TV*.
3
Using a coaxial connector, connect OUT on
your VCR to VHF/UHF on your TV.
* If you are connecting a monaural VCR, connect only the
single white audio output to the left input on your TV.
Connecting a VCR and TV with a
cable box
1
Connect the single (input) jack of the
splitter to your incoming cable connection,
and connect the other two (output) jacks
(using coaxial cable) to IN on your cable
box and VHF/UHF on your TV.
2
Using a coaxial connector, connect OUT on
your cable box to IN on your VCR.
3
Using A/V connectors, connect AUDIO and
VIDEO OUT on your VCR to AUDIO and
VIDEO IN on your TV.
Coaxial cable
(Rear of TV)
VMC-810S/820S (not supplied)
Cable
VCR
3
1
2
AUDIO-R (red)
AUDIO-L (white)
VIDEO (yellow)
For optimum picture quality, use S VIDEO
instead of the yellow A/V cable. S VIDEO does
not provide sound, your audio connectors
must still be connected.
VIDEO IN
1
3
4
L
R
(MONO)
VIDEO
S VIDEO
OUT
AUDIO
L
R
Y
P
B
P
R
AUDIO
S-LINK
CONTROL S
AUX
TO
CONVERTER
VHF/UHF
AUDIO R AUDIO L VIDEO
S VIDEO
LINE
OUT
OUT
IN
OUT
IN
(Rear of TV)
VMC-810S/820S (not supplied)
Cable box
Splitter
(not supplied)
3
AUDIO-R (red)
AUDIO-L (white)
VIDEO (yellow)
VCR
Cable
Coaxial cable
2
1
5
OUT
MONITOR AUDIO
(VAR/FIX)
TV
VIDEO IN
1
3
4
IN
L
R
(MONO)
VIDEO
VIDEO
S VIDEO
OUT
AUDIO
L
R
(MONO)
AUDIO
L
R
Y
P
B
P
R
AUDIO
S-LINK
CONTROL S
LINE
OUT
OUT
IN
LINE
IN
OUT
IN
AUDIO R AUDIO L VIDEO
AUDIO R AUDIO L VIDEO
Disconnect all power sources before making any connections.
Connecting two VCRs
MONITOR OUT gives you the ability to use a
second VCR to record a program being played
by the primary VCR or to perform tape
editing and dubbing.
1
Connect the VCR intended for playback
using the connection instructions on page
4 of this manual.
2
Using A/V connectors, connect AUDIO
and VIDEO IN on your VCR intended for
recording to MONITOR AUDIO and
VIDEO OUT on your TV.
VCR (for playback)
VCR (for recording)
VMC-810S/820S (not supplied)
VMC-810S/820S (not supplied)
(Rear of TV)
1
2
Do not change the input
signal while editing through
MONITOR OUT.
Connecting and Installing the TV (continued)
AUDIO-R (red)
AUDIO-L (white)
VIDEO (yellow)
6
The instructions mentioned here are partial abstracts from the Operating Instruction Manual. The page numbers showm reflect those of the Operating Instruction Manual.
Содержание KV-32XBR200 - 32" Fd Trinitron Wega Xbr
Страница 45: ...4 3 1 0 Vp p H 2 1 1 Vp p H BX BOARD WAVEFORMS 1 7 Vp p H 1 1 8 Vp p H 2 1 Vp p H 6 1 4 Vp p H 1 8 Vp p H 5 ...
Страница 47: ...1 2 C BOARD WAVEFORMS 154 7 Vp p H 118 8 Vp p H 142 2 Vp p H 3 ...
Страница 55: ...6 3 1 6 Vp p H 2 0 Vp p H 2 5 2 3 Vp p H UX BOARD WAVEFORMS 1 9 Vp p H 1 1 0 Vp p H 1 0 Vp p H 4 ...


